-
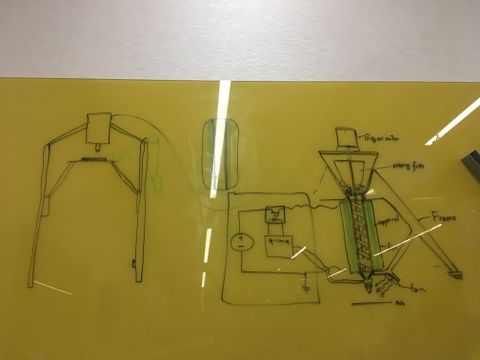
Fig 1: Stonehenge Conceptual Drawing

Introduction
The "Stonehenge Regolith Printer" is a RepRap based on the AthenaII 3D printer. Stonehenge is designed to print a mixture of Regolith and PET-G. Development is on-going by Jacob Loss and Marcello Guadagno. Final intent is to prove that small scale printing of such a print is possible with expansion of these concepts into application on the moon or similar planetary body.
Printer capabilities/statistics
- Print media: PET-G and Regolith Mixture
- Nozzle diameter: 0.4 mm (TBR)
- Print volume: 220mm diameter, 210mm high semi-cylindrical shape
- A variety of print controllers can be used
Design Overview
This section will go through the basic design of adaptations to the AthenaII and why these design choices were made. Were applicable, prototype/test results will be supplied.
Extruder Design
The extruder is one of the most complicated components of the overall design. This is due to the material it is moving. Taking similarities to concrete, the mixture is rough, heavy, and viscous. The added requirement of heating and adequate mixing creates a system which must be robust but accurate. Our initial design concept is to use an auger fed extruder nozzle with two heating sections. The mixture is fed into the system using a hopper with a ship auger running down the middle. The ship auger pushes the mixture down to the first heating section. The first heating section will heat the mixture up to a point where the materials can be more thoroughly mixed together. This temperature currently lies in the range of 100 C to 120 C. The mixture then goes through the extruder section which heats the mixture up to extrusion temps and pushes it through the nozzle. An image of this system can be seen below:

Files and Bill of Materials
Uses all files and materials from the AthenaII. TODO: Fill with materials and files for the mods.
3D Printer BOM
This is the BOM to produce a Stonehenge printer:
| Item Name | Purpose | QTY | Cost | Link |
|---|---|---|---|---|
| text | text | text | text | text |
Integration & Testing BOM
This is a BOM of all things used determine final printer design and material composition.
| Item Name | Purpose | QTY | Cost | Link |
|---|---|---|---|---|
| text | text | text | text | text |
Tools
Consumables
Printing Materials:
- Lunar Highland Simulant from Exolith Labs
- PETG Pellets from [company name]
Required Software
Franklin Firmware package for the AthenaII printers.
Assembly Procedure
Stonehenge Testing and Integration
This section is meant to give updates on what our most recent work related to Stonehenge
Regolith-Polymer Mixture
This section describes the progress towards determining the optimal regolith, PETG, and temperature combination for the 3D printer. This will be accomplished by baking several mixtures at varying temperatures. Compiled Data will be shown directly below which will be followed by testing logs.
Material Properties
Regolith
- Lunar Highland Simulant from Exolith Labs
- Largely Basalt Glass and Basalt
- Coarse Sand-like Material
PET-G
- Polyethylene terephthalate glycol
- Affordable corrosion resistant plastic
- Used in a large number of commercial products
- Extrusion Temp. 230 C - 250 C
Future Test Ideas
Given the Bakeout test results below, these are more things to try for obtaining a good, easy to use mixture:
- Better Thermal Bake setting (ie. NOT a toaster oven)
- Different Material
- PET-G May no be suitable due to higher temperature needed and UV sensitivity
- Smaller PET-G Grain size
- Better Mixing Methods
- Mix while heated
Bakeout Results
| Date | Regolith:PET-G Mix | Temp | Heating Time | Notes | Picture of Results |
|---|---|---|---|---|---|
| mm/dd/2019 | N/A | 230 C | 20 min. Bake | Varying mixture of each result to check consistency. Each mixed before heating by shaking of tupper-ware container. Mixtures were as follows: [70% Regolith; 30% PET-G], [60% Regolith; 40% PET-G], [50% Regolith; 50% PET-G], [40% Regolith; 60% PET-G], [30% Regolith; 70% PET-G], [0% Regolith; 100% PET-G]. Mixing with shaking seems to drive the Regolith to the bottom of the tupper-ware container. Likely need a better mixing method. In all results, the large grain size of the PET-G creates clumps of plastic in a relatively loose aggregate. | |
| 12/11/2019 | 20g:20g | 230 C | 20 min. Bake | Using one sample, mixed regolith and PET-G after heating in toaster oven for about 20 min. Had to do multiple times to get a consistent mixture. The PET-G stuck to almost everything. Baked for 20 min. after mixing. Result was quite consistent but was a hassle to get to. Did not test strength with hands. | |
| 12/11/2019 | 10g:10g | 230 C | 20 min. Bake | Layered Regolith and PET-G to see if a passive method of mixing could work. No mixing done to samples. Layered Regolith on top of PET-G, Layered PET-G on top of Regolith, Sandwiched a layer of Regolith between layers of PET-G. All samples were brittle and easy to break. None had good flow of PET-G into the Regolith. Most of the Regolith fell off when extracted from tray. Mixing seems to be needed. | |
| 12/11/2019 | 10g:10g | 90 C / 230 C | Preheat w/ 20 min. Bake | Preheated components and mixture before mixing with compliment component to see if the heat would allow more impact. Preheated pure PET-G, pure Regolith, and a layered PET-G/Regolith Mixture. Preheated at about 90 C and put samples into tupper-ware container to mix before bake. Upped temperature to 100 C after noticing PET-G not melting. For all samples with Regolith, the PET-G did not seem to melt. The Regolith either did not get to temp, or dissipated heat very quickly. The PET-G only sample went into the tupper-ware in clumps but broke apart during mixing. Did not seem to impact integration of Regolith into PET-G. All results were about the same. This seems to indicate that it does not matter if one or the other component is heated before mixing. May not be true if PET-G is completely liquid. |


Heated Auger
This section is meant to describe the process used to determine what would be the best heated auger for the regolith printer and how it was designed/fabricated.