Sophivorus (talk | contribs) m (Text replacement - "estimated-cost-currency=USD $" to "estimated-cost-currency=USD") |
|||
| (41 intermediate revisions by 5 users not shown) | |||
| Line 1: | Line 1: | ||
= | {{Infobox device | ||
|title=Stethoscope | |||
|image=Stethoscope_assembly.jpg | |||
|description=This Stethoscope only requires some surgical tubing or similar airtight tubing and 3D printed parts. | |||
|keywords=3D printing, stethoscope, medical equipment, cardiology | |||
|intended-use=medical, development | |||
|development-stage=Prototype | |||
|made=Yes | |||
|made-independently=No | |||
|countries-of-design=United States | |||
|main-materials=Plastic | |||
|estimated-cost-amount=1.13 | |||
|estimated-cost-currency=USD | |||
|sustainable-development-goal=Sustainable Development Goal 3, Sustainable Development Goal 8 | |||
|contact-affiliation=MOST | |||
|authors=User:Bwbarker | |||
|manufacturing-files=https://www.thingiverse.com/thing:577507%7C | |||
|documentation-language=English | |||
|manifest-language=English | |||
|manifest-date-updated=2020-06-04 | |||
|manifest-author-name=Kathy Nativi | |||
|manifest-author-affiliation=Appropedia | |||
|manifest-author-email=info@appropedia.org | |||
}} | |||
{{777}} | |||
==Stethoscope == | |||
Project developed by [[http://www.appropedia.org/User:Bwbarker| Bwbarker]] | |||
<center>[[Image:Stethoscope_assembly.jpg|500px]]</center> | |||
{{Status|prototype}} | |||
==Abstract== | ==Abstract== | ||
* The Stethoscope is one of the most basic medical tools. It allows a trained medical professional to diagnose issues with the heart and lungs. Stethoscopes come in a range of prices and quality, but all are breakable. This Stethoscope only requires some surgical tubing or similar airtight tubing and 3D printed parts. | |||
== Bill of Materials== | == Bill of Materials== | ||
* BOM | |||
** 3D printer | |||
*** Filament | |||
*** STL and/or OpenScad files | |||
****[http://www.thingiverse.com/thing:577507| Thingiverse] | |||
****[[Media:Stethoscope_ears.scad]] | |||
****[[Media:Stethoscope.scad]] | |||
** Surgical tubing | |||
== Tools needed for fabrication of the OSAT== | == Tools needed for fabrication of the OSAT== | ||
| Line 29: | Line 49: | ||
== Skills and Knowledge Necessary to Make the OSAT == | == Skills and Knowledge Necessary to Make the OSAT == | ||
* | * No special skills needed to build, To use this device propertly takes some training. | ||
** [https://m.youtube.com/watch?v=J8E6SrRhBSs| Stethoscope Overview] | |||
== Technical Specifications and Assembly Instructions== | == Technical Specifications and Assembly Instructions== | ||
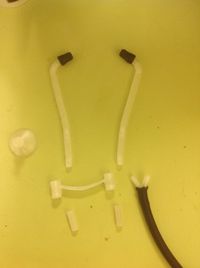
# There are 7 seperate prints for this device | # There are 7 seperate prints for this device listed below with there print times (depending on your printer and settings) | ||
## Bell | ## Bell | ||
### Approximately 2 hours | ### Approximately 2 hours | ||
## Y tubing joing | |||
### Approximately 1/2 hour | |||
## 2 small tubes | ## 2 small tubes | ||
### Approximately 1 hour each | ### Approximately 1 hour each | ||
| Line 41: | Line 64: | ||
## 2 earpieces | ## 2 earpieces | ||
### Approximately 4 hours each | ### Approximately 4 hours each | ||
# Assembly time depends on how much post printing | # Assembly time depends on how much post-printing corrections you need to do. Some filing or sanding may be necessary for a great fit. | ||
# | ##<center>[[image:Stethoscope_parts.jpg| Printed Parts|200px]]</center> | ||
## Cut the tubing to desired length, | |||
### About a 1.5 feet from the bell to the Y joint | |||
### 2 at about 4 inches from the Y joint to the small straws | |||
### 2 small tapered pieces to act as ear buds on the end of the long earpieces | |||
## Simply fit the pieces together, I did not use any glue but that is an option. | |||
=== Common Problems and Solutions=== | === Common Problems and Solutions=== | ||
| Line 48: | Line 76: | ||
== Cost savings== | == Cost savings== | ||
* | * Costs | ||
** Plastic at $25 per kilogram, 45 grams, $1.13 | |||
** Rubber tubing $2.30 per foot, 2 feet, $4.60 | |||
* Commercial Equivelent | |||
** Low cost - $7.99 - [http://www.pedometersusa.com/omron-412.html?productid=omron-412&channelid=FROOG&utm_source=CSEs&utm_medium=GoogleShopping&utm_campaign=PedometersUSA&gclid=CP3l2_a2rMICFdRzMgodt0IAYA| pedometerusa] | |||
** High cost - $75 - [http://www.allheart.com/product.aspx?p=2200-16&cmpid=SEGOO&utm_source=google&utm_medium=cpc&utm_campaign=plagoogle&CAWELAID=120013910001332029&CAGPSPN=pla&catargetid=120013910001480392&cadevice=t&gclid=CNG4yKS3rMICFeRAMgodfw8ANA| Littmann] | |||
* Savings between $2.26 and $69.27 | |||
==References== | ==References== | ||
[[Category:How tos]] | [[Category:How tos]] | ||
[[Category: | [[Category:Medical_Devices]] | ||
[[Category: | [[Category:3D_printing]] | ||
[[Category:OSAT_3D-Printable_Designs]] | |||
Revision as of 12:09, 21 October 2020
Stethoscope
Project developed by [Bwbarker]

Abstract
- The Stethoscope is one of the most basic medical tools. It allows a trained medical professional to diagnose issues with the heart and lungs. Stethoscopes come in a range of prices and quality, but all are breakable. This Stethoscope only requires some surgical tubing or similar airtight tubing and 3D printed parts.
Bill of Materials
- BOM
- 3D printer
- Filament
- STL and/or OpenScad files
- Surgical tubing
- 3D printer
Tools needed for fabrication of the OSAT
- MOST Delta RepRap or similar RepRap 3-D printer
- Knife or scissors
Skills and Knowledge Necessary to Make the OSAT
- No special skills needed to build, To use this device propertly takes some training.
Technical Specifications and Assembly Instructions
- There are 7 seperate prints for this device listed below with there print times (depending on your printer and settings)
- Bell
- Approximately 2 hours
- Y tubing joing
- Approximately 1/2 hour
- 2 small tubes
- Approximately 1 hour each
- Cross piece
- Approximately 3 hours
- 2 earpieces
- Approximately 4 hours each
- Bell
- Assembly time depends on how much post-printing corrections you need to do. Some filing or sanding may be necessary for a great fit.
- Cut the tubing to desired length,
- About a 1.5 feet from the bell to the Y joint
- 2 at about 4 inches from the Y joint to the small straws
- 2 small tapered pieces to act as ear buds on the end of the long earpieces
- Simply fit the pieces together, I did not use any glue but that is an option.

Common Problems and Solutions
- For a really tight plastic on plastic fit, some sanding or filing will need to be done.
Cost savings
- Costs
- Plastic at $25 per kilogram, 45 grams, $1.13
- Rubber tubing $2.30 per foot, 2 feet, $4.60
- Commercial Equivelent
- Low cost - $7.99 - pedometerusa
- High cost - $75 - Littmann
- Savings between $2.26 and $69.27