J.M.Pearce (talk | contribs) m (→Footnotes) |
m (Standardize wikitext) |
||
| (60 intermediate revisions by 16 users not shown) | |||
| Line 1: | Line 1: | ||
[[ | [[File:Solar Air Heater.jpg|thumb]] | ||
= | {{Project data | ||
| authors = User:HowardMech425 | |||
| completed = 2011 | |||
| made = Yes | |||
| replicated = No | |||
| cost = USD 95 | |||
}} | |||
Solar air heaters are systems that collect solar energy and transfers the heat to passing air, which is either stored or used for space heating. The collectors are often black to absorb more of the sun's energy and a conductive material, often metal, acts as a [[Heat Exchangers|heat exchanger]]. There are many different designs and systems may include fans to increase the flow rate of air. Alternatively, a passive collector can be built such that when the hot air rises it draws fresh air through the bottom. Fans can often increase the performance of the system, but require additional parts and adds complexity. Solar air heaters can compliment traditional indoor heating systems by providing a free and clean source of heat (after initial costs). While clouds effect the energy output of the system, the metal will store energy on a hot day and will reduce the impact of momentary cloud cover. To achieve best results, the system should be unshaded and facing the general direction of the sun (south for the northern hemisphere, north for the southern hemisphere)<ref>http://www.daviddarling.info/encyclopedia/S/AE_solar_air_heater.html</ref> | '''Solar air heaters''' are systems that collect solar energy and transfers the heat to passing air, which is either stored or used for space heating. The collectors are often black to absorb more of the sun's energy and a conductive material, often metal, acts as a [[Heat Exchangers|heat exchanger]]. There are many different designs and systems may include fans to increase the flow rate of air. Alternatively, a passive collector can be built such that when the hot air rises it draws fresh air through the bottom. Fans can often increase the performance of the system, but require additional parts and adds complexity. Solar air heaters can compliment traditional indoor heating systems by providing a free and clean source of heat (after initial costs). While clouds effect the energy output of the system, the metal will store energy on a hot day and will reduce the impact of momentary cloud cover. To achieve best results, the system should be unshaded and facing the general direction of the sun (south for the northern hemisphere, north for the southern hemisphere).<ref>http://www.daviddarling.info/encyclopedia/S/AE_solar_air_heater.html</ref> | ||
< | In the UK, 40% of all energy consumption was dedicated to space heating.<ref>http://webarchive.nationalarchives.gov.uk/+/http://www.berr.gov.uk/files/file11250.pdf</ref> This percentage is the largest component of energy use and can be reduced by simply using solar air heaters as a means of enabling the sun to passively heat our in door areas without consuming the Earth's finite resources. | ||
[[File:UK Energy Breakdown.jpg|none|450x280px|Breakdown of energy use in the UK]] | |||
The financial and environmental benefits of implementing solar air heaters can be estimated through the use of this [http://www.retscreen.net/ang/g_solara.php RETScreen tool] that was created by the government of [http://canada.gc.ca/home.html Canada] and made freely available to the world.< | |||
== Materials == | |||
There are two common methods used to create a solar air heater. The first is a pop can design and the other directs the air through a channel in a "snake" pattern. Both methods use similar materials and tools with only a few exceptions. | |||
< | Both designs require the following materials:<ref>http://www.coloradowindpower.com/page.php?26</ref><ref>http://web.archive.org/web/20140407005834/http://transitionvictoria.ning.com:80/group/greenenergy/forum/topics/solar-air-heater-materials-and</ref> | ||
* Plywood | |||
* Wood - 2"x4" | |||
* Glass or plexiglass | |||
* Sealant | |||
* Insulation | |||
* Black paint | |||
* Aluminum "L" trim | |||
* Screws | |||
* Drill | |||
To build a "snake" design, a piece of sheet metal for the base would help increase thermal mass and improve heat transfer to the passing air. Also, sand paper may be required. | |||
Alternatively, building the pop can design requires a large number of pop cans and either a mortar or glue to connect the cans. | |||
== Three basic forms of solar air heaters == | |||
< | === Pop Can Design<ref>http://greenterrafirma.com/solar-air-heating.html</ref> === | ||
# Determine the dimensions of the unit and build a box for the number of rows of cans and to include insulation along the walls. | |||
# Build the box to act as a base structure for the air heater. It can be built using 2" x 4" beams and plywood can act as the bottom | |||
# Drill a hole at the top of the unit and at the bottom, make an equal number of holes as rows of cans (In the 2" by 4") to act as the inlet and outlet streams for the air. The holes should be the same size as the opening of the cans | |||
# The box should be sealed along all edges to prevent air leaking out of the system | |||
# Insulation can be added to reduce the amount of heat leaving the unit. The insulation is placed along the inner walls and a second application of sealant can be applied along the edges | |||
# Wash the aluminum cans and then drill holes into the bottom of the aluminum cans or the tops and bottoms can be cut off | |||
# Paint the box and cans black with a matt coating. | |||
# Connect the cans in a row using glue (Tops connected to bottoms usually fits best) | |||
# Attach the rows of cans to their respective positions in the box and add sealant around the air intake holes | |||
# Place the sheet of glass or plexiglass on the top of the unit to complete the box and enclose the system. Fasten the material using the aluminum "L" trim. | |||
< | === Snake Design<ref>http://web.archive.org/web/20200216100355/http://www.solarsponge.com:80/article.htm</ref> === | ||
# Determine the dimensions of the unit and build a box to include insulation along the walls. | |||
# Build the box to act as a base structure for the air heater. It can be built using 2" x 4" beams and plywood can act as the bottom. Alternatively, using a sheet of metal as the bottom would significantly help the unit's heat transfer properties. | |||
# Drill a hole at the top and bottom of the unit (In the 2" by 4" or plywood) to act as the inlet and outlet streams for the air | |||
# The box should be sealed along all edges to prevent air leaking out of the system | |||
# Insulation can be added to reduce the amount of heat leaving the unit. The insulation is placed along the inner walls and a second application of sealant can be applied along the edges | |||
# Add baffles by positioning additional pieces of 2" x 4" perpendicular to the air flow which do not span the entire width of the unit but alternate between touching the "left" and the "right" walls | |||
# Paint the box and the baffles black using a matt paint | |||
# Position the glass or plexiglass to enclose the unit and adjust the height of the baffles to create a snug fit against the glass. This can be done using sand paper or adding sealant as necessary | |||
# Place the sheet of glass or plexiglass on the top of the unit to complete the box and enclose the system. Fasten the material using the aluminum "L" trim. | |||
< | <div></div><div>Here is a sample schematic to build the [http://web.archive.org/web/20160327032731/http://solarsponge.com/images/SolarSpongeMechanicalDrawing.gif "snake" design]</div> | ||
=== Down Spout Design<ref>http://web.archive.org/web/20200216100355/http://www.solarsponge.com:80/article.htm</ref> === | |||
# Similar to the pop can design. | |||
# Determine the dimensions of the unit and build a box for the number of rows of downspouts and to include insulation along the walls (Adding insulation to the wooden box adds very little heat and increases cost.) | |||
# Drill a hole at the top and bottom of the unit (In the 2" by 4" or plywood) to act as the inlet and outlet streams for the air | |||
# The box should be sealed along all edges to prevent air leaking out of the system | |||
# Insulation can be added to reduce the amount of heat leaving the unit. The insulation is placed along the inner walls and a second application of sealant can be applied along the edges | |||
# Add baffles by positioning additional pieces of 2" x 4" perpendicular to the air flow which do not span the entire width of the unit but alternate between touching the "left" and the "right" walls | |||
# Paint the box and the baffles black using a matt paint | |||
# Position the glass or plexiglass to enclose the unit and adjust the height of the baffles to create a snug fit against the glass. This can be done using sand paper or adding sealant as necessary | |||
# Place the sheet of glass or plexiglass on the top of the unit to complete the box and enclose the system. Fasten the material using the aluminum "L" trim. | |||
= | == Optimal Locations and Angles == | ||
* [http://web.archive.org/web/20110410192118/http://www.meteonorm.com/media/maps_online/world_global_8100.png Meteonorm] - Provides a visual reference to understand how much energy your geographic location receives from the sun | |||
* [http://www.solarpathfinder.com/industry Solar Path Finder] - Helps determine which angle the collector should be positioned, based on your location | |||
* [http://weatherbase.com/ Weatherbase] - Has a large database of temperature and weather data that could be helpful in learning more about your heating and cooling demands | |||
* [http://web.archive.org/web/20111125024517/http://practicallyoffthegrid.com:80/SAH%20Analysis%20of%20high%20efficiency%20solar%20air%20heater.pdf Report on Efficiency] - An investigation into the efficiency of solar air heaters in cold climates | |||
== Estimated costs == | |||
The cost for to build a solar air heater varies significantly depending on whether the materials are purchased "new" or if they were salvaged. In addition, the decision between glass and plexiglass has a very large impact on total cost of the system. Finally, there are other factors such as the use of a fan, [[Solar panel|solar panels]], back-up battery, wires and sheet metal that could be incorporated in the design and would certainly increase the budget. | |||
{| class="wikitable" | |||
! Item | |||
! Cost | |||
{| | |||
|- | |- | ||
| Plywood | | Plywood | ||
| $20 | | $20 | ||
|- | |- | ||
| Wood Beams | | Wood Beams | ||
| $15 | | $15 | ||
|- | |- | ||
| Glass or Plexiglass | | Glass or Plexiglass | ||
| $40 | | $40 | ||
|- | |- | ||
| Sealant | | Sealant | ||
| $5 | | $5 | ||
|- | |- | ||
| Insulation | | Insulation | ||
| $5 | | $5 | ||
|- | |- | ||
| Black Paint | | Black Paint | ||
| $5 | | $5 | ||
|- | |- | ||
| Aluminum "L" Trim | | Aluminum "L" Trim | ||
| $3 | | $3 | ||
|- | |- | ||
| Screws | | Screws | ||
| $2 | | $2 | ||
|} | |} | ||
Overall, a basic system can be constructed for approximately $95, which could easily be reduced by being resourceful when gathering the components. For example, see this a solar heater built using reclaimed materials: [http://web.archive.org/web/20110821150009/http://loveandtrash.com:80/2011/02/how-and-how-not-to-make-a-diy-solar-heater/ DIY solar heater on Love and Trash]. | |||
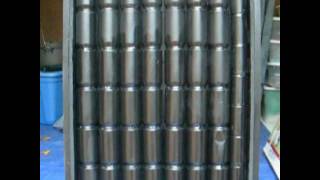
[[File:Solar Air Heater.jpg|right|300x380px|Homemade solar air heater using a "snake" design]] | |||
== Design Problems == | |||
Natural convection during a sunny day will allow the heater to pull cool air from your room, heat it and expel it back into the room as warm air. At night and on dark cloudy days the opposite is true. The heater will pull air from your room into the "heater" it will cool it and it will fall back into your room. A solar heater needs to include the ability to completely seal off airflow. To make this heater truly useable for people that are not at home 100% of the time, the heater needs to have the ability to open the sealed vent when the temperatures reach a higher temperature than the room, with no human interaction. The same should be done with heaters equipped with a fan. The fan needs to come on and shut off automatically. Until these issues are solved in an economic way solar heaters will not find wide spread use. | |||
The above assertion is not true because if it were true that a reverse air current were generated when the room was hotter than the air inside the heater, the heat extracted from the air of the room during the reverse air flow would be maintained inside the heater only for a short time as it would eventually be emitted into the same environment outside the air heater. Such environment around the heater is, of course, inside the room where the heater is located. | |||
To address the possibility of reverse air flow, first consider that the hot air would need to rise through the cooler air of the heater, yet if the air were cooled on its way up to be colder than that of the room, the air would not flow up. | |||
To consider downward air flow, yes it is true that cold air settles when displaced by warmer air. The heater will not have cooler air because we assume the heater is completely inside the room and so there can be no "loss" of heat by the heater in relation to the room because if it gives up heat it will be giving it up to the room. If the heater were to share its plastic surface with an outside window, then there could be a current at night as the heat inside the heater is exchanged to the outside via the window acting as heat exchanger. | |||
== Alternative designs == | |||
To improve the durability of your unit, a [http://web.archive.org/web/20160808144437/http://solutions.3m.com:80/wps/portal/3M/en_US/Window_Film/Solutions/Markets-Products/Residential/Safety-Security_Window_Films/ protective coating] can be added to the glass to improve its expected life due to the elements. | |||
You can also try to increase turbulence to the air flow by adding [http://web.archive.org/web/20180723020101/http://myweb.tiscali.co.uk/burywsd/beercanheater/ deflectors] to the pop cans. This should help increase the [[heat transfer]] from the metal to the air. | |||
Also, feel free to consult or contribute to any of the following online forums about solar air heaters: | |||
* [http://web.archive.org/web/20110410154117/http://www.ata.org.au/forums/topic/solar-heating-cooling-systems Alternative Technology Assn Forums] | |||
* [http://web.archive.org/web/20111113050320/http://www.solarpowerforum.net:80/forumVB/solar-heating/2498-soda-can-furnace-most-efficient-cutting-pattern-cans.html SolarPowerForum.net] | |||
* [http://www.instructables.com/id/Almost-Free-Solar-Hot-Air-Collector/# Instructables] | |||
* [http://web.archive.org/web/20140407005834/http://transitionvictoria.ning.com:80/group/greenenergy/forum/topics/solar-air-heater-materials-and Transition Victoria: A Regional Initiative] | |||
== Videos == | |||
Here are a couple instructional videos to help you build a solar air heater and maybe even get inspired to improve the designs. | |||
{{ | {{Video|QLNViUsRCVU}} | ||
{{Video|pXYaO596cgY}} | |||
== References == | |||
<references /> | |||
{{Page data | |||
| keywords = Glass, Insulation, Paint, Wood, solar, air heater | |||
| sdg = SDG07 Affordable and clean energy, SDG11 Sustainable cities and communities, SDG12 Responsible consumption and production | |||
| published = 2011 | |||
| license = CC-BY-SA-3.0 | |||
| language = en | |||
}} | |||
[[Category: | [[Category:Appropriate technology]] | ||
[[Category:Built environment]] | |||
[[Category:Green living]] | |||
[[Category:Design]] | |||
[[Category:CMAS801]] | |||
[[Category:Solar]] | |||
[[Category:Paint]] | |||
[[Category:Wood]] | |||
Latest revision as of 14:42, 23 October 2023

Solar air heaters are systems that collect solar energy and transfers the heat to passing air, which is either stored or used for space heating. The collectors are often black to absorb more of the sun's energy and a conductive material, often metal, acts as a heat exchanger. There are many different designs and systems may include fans to increase the flow rate of air. Alternatively, a passive collector can be built such that when the hot air rises it draws fresh air through the bottom. Fans can often increase the performance of the system, but require additional parts and adds complexity. Solar air heaters can compliment traditional indoor heating systems by providing a free and clean source of heat (after initial costs). While clouds effect the energy output of the system, the metal will store energy on a hot day and will reduce the impact of momentary cloud cover. To achieve best results, the system should be unshaded and facing the general direction of the sun (south for the northern hemisphere, north for the southern hemisphere).[1]
In the UK, 40% of all energy consumption was dedicated to space heating.[2] This percentage is the largest component of energy use and can be reduced by simply using solar air heaters as a means of enabling the sun to passively heat our in door areas without consuming the Earth's finite resources.

The financial and environmental benefits of implementing solar air heaters can be estimated through the use of this RETScreen tool that was created by the government of Canada and made freely available to the world.<
Materials[edit | edit source]
There are two common methods used to create a solar air heater. The first is a pop can design and the other directs the air through a channel in a "snake" pattern. Both methods use similar materials and tools with only a few exceptions.
Both designs require the following materials:[3][4]
- Plywood
- Wood - 2"x4"
- Glass or plexiglass
- Sealant
- Insulation
- Black paint
- Aluminum "L" trim
- Screws
- Drill
To build a "snake" design, a piece of sheet metal for the base would help increase thermal mass and improve heat transfer to the passing air. Also, sand paper may be required.
Alternatively, building the pop can design requires a large number of pop cans and either a mortar or glue to connect the cans.
Three basic forms of solar air heaters[edit | edit source]
Pop Can Design[5][edit | edit source]
- Determine the dimensions of the unit and build a box for the number of rows of cans and to include insulation along the walls.
- Build the box to act as a base structure for the air heater. It can be built using 2" x 4" beams and plywood can act as the bottom
- Drill a hole at the top of the unit and at the bottom, make an equal number of holes as rows of cans (In the 2" by 4") to act as the inlet and outlet streams for the air. The holes should be the same size as the opening of the cans
- The box should be sealed along all edges to prevent air leaking out of the system
- Insulation can be added to reduce the amount of heat leaving the unit. The insulation is placed along the inner walls and a second application of sealant can be applied along the edges
- Wash the aluminum cans and then drill holes into the bottom of the aluminum cans or the tops and bottoms can be cut off
- Paint the box and cans black with a matt coating.
- Connect the cans in a row using glue (Tops connected to bottoms usually fits best)
- Attach the rows of cans to their respective positions in the box and add sealant around the air intake holes
- Place the sheet of glass or plexiglass on the top of the unit to complete the box and enclose the system. Fasten the material using the aluminum "L" trim.
Snake Design[6][edit | edit source]
- Determine the dimensions of the unit and build a box to include insulation along the walls.
- Build the box to act as a base structure for the air heater. It can be built using 2" x 4" beams and plywood can act as the bottom. Alternatively, using a sheet of metal as the bottom would significantly help the unit's heat transfer properties.
- Drill a hole at the top and bottom of the unit (In the 2" by 4" or plywood) to act as the inlet and outlet streams for the air
- The box should be sealed along all edges to prevent air leaking out of the system
- Insulation can be added to reduce the amount of heat leaving the unit. The insulation is placed along the inner walls and a second application of sealant can be applied along the edges
- Add baffles by positioning additional pieces of 2" x 4" perpendicular to the air flow which do not span the entire width of the unit but alternate between touching the "left" and the "right" walls
- Paint the box and the baffles black using a matt paint
- Position the glass or plexiglass to enclose the unit and adjust the height of the baffles to create a snug fit against the glass. This can be done using sand paper or adding sealant as necessary
- Place the sheet of glass or plexiglass on the top of the unit to complete the box and enclose the system. Fasten the material using the aluminum "L" trim.
Down Spout Design[7][edit | edit source]
- Similar to the pop can design.
- Determine the dimensions of the unit and build a box for the number of rows of downspouts and to include insulation along the walls (Adding insulation to the wooden box adds very little heat and increases cost.)
- Drill a hole at the top and bottom of the unit (In the 2" by 4" or plywood) to act as the inlet and outlet streams for the air
- The box should be sealed along all edges to prevent air leaking out of the system
- Insulation can be added to reduce the amount of heat leaving the unit. The insulation is placed along the inner walls and a second application of sealant can be applied along the edges
- Add baffles by positioning additional pieces of 2" x 4" perpendicular to the air flow which do not span the entire width of the unit but alternate between touching the "left" and the "right" walls
- Paint the box and the baffles black using a matt paint
- Position the glass or plexiglass to enclose the unit and adjust the height of the baffles to create a snug fit against the glass. This can be done using sand paper or adding sealant as necessary
- Place the sheet of glass or plexiglass on the top of the unit to complete the box and enclose the system. Fasten the material using the aluminum "L" trim.
Optimal Locations and Angles[edit | edit source]
- Meteonorm - Provides a visual reference to understand how much energy your geographic location receives from the sun
- Solar Path Finder - Helps determine which angle the collector should be positioned, based on your location
- Weatherbase - Has a large database of temperature and weather data that could be helpful in learning more about your heating and cooling demands
- Report on Efficiency - An investigation into the efficiency of solar air heaters in cold climates
Estimated costs[edit | edit source]
The cost for to build a solar air heater varies significantly depending on whether the materials are purchased "new" or if they were salvaged. In addition, the decision between glass and plexiglass has a very large impact on total cost of the system. Finally, there are other factors such as the use of a fan, solar panels, back-up battery, wires and sheet metal that could be incorporated in the design and would certainly increase the budget.
| Item | Cost |
|---|---|
| Plywood | $20 |
| Wood Beams | $15 |
| Glass or Plexiglass | $40 |
| Sealant | $5 |
| Insulation | $5 |
| Black Paint | $5 |
| Aluminum "L" Trim | $3 |
| Screws | $2 |
Overall, a basic system can be constructed for approximately $95, which could easily be reduced by being resourceful when gathering the components. For example, see this a solar heater built using reclaimed materials: DIY solar heater on Love and Trash.
Design Problems[edit | edit source]
Natural convection during a sunny day will allow the heater to pull cool air from your room, heat it and expel it back into the room as warm air. At night and on dark cloudy days the opposite is true. The heater will pull air from your room into the "heater" it will cool it and it will fall back into your room. A solar heater needs to include the ability to completely seal off airflow. To make this heater truly useable for people that are not at home 100% of the time, the heater needs to have the ability to open the sealed vent when the temperatures reach a higher temperature than the room, with no human interaction. The same should be done with heaters equipped with a fan. The fan needs to come on and shut off automatically. Until these issues are solved in an economic way solar heaters will not find wide spread use.
The above assertion is not true because if it were true that a reverse air current were generated when the room was hotter than the air inside the heater, the heat extracted from the air of the room during the reverse air flow would be maintained inside the heater only for a short time as it would eventually be emitted into the same environment outside the air heater. Such environment around the heater is, of course, inside the room where the heater is located.
To address the possibility of reverse air flow, first consider that the hot air would need to rise through the cooler air of the heater, yet if the air were cooled on its way up to be colder than that of the room, the air would not flow up.
To consider downward air flow, yes it is true that cold air settles when displaced by warmer air. The heater will not have cooler air because we assume the heater is completely inside the room and so there can be no "loss" of heat by the heater in relation to the room because if it gives up heat it will be giving it up to the room. If the heater were to share its plastic surface with an outside window, then there could be a current at night as the heat inside the heater is exchanged to the outside via the window acting as heat exchanger.
Alternative designs[edit | edit source]
To improve the durability of your unit, a protective coating can be added to the glass to improve its expected life due to the elements.
You can also try to increase turbulence to the air flow by adding deflectors to the pop cans. This should help increase the heat transfer from the metal to the air.
Also, feel free to consult or contribute to any of the following online forums about solar air heaters:
- Alternative Technology Assn Forums
- SolarPowerForum.net
- Instructables
- Transition Victoria: A Regional Initiative
Videos[edit | edit source]
Here are a couple instructional videos to help you build a solar air heater and maybe even get inspired to improve the designs.
References[edit | edit source]
- ↑ http://www.daviddarling.info/encyclopedia/S/AE_solar_air_heater.html
- ↑ http://webarchive.nationalarchives.gov.uk/+/http://www.berr.gov.uk/files/file11250.pdf
- ↑ http://www.coloradowindpower.com/page.php?26
- ↑ http://web.archive.org/web/20140407005834/http://transitionvictoria.ning.com:80/group/greenenergy/forum/topics/solar-air-heater-materials-and
- ↑ http://greenterrafirma.com/solar-air-heating.html
- ↑ http://web.archive.org/web/20200216100355/http://www.solarsponge.com:80/article.htm
- ↑ http://web.archive.org/web/20200216100355/http://www.solarsponge.com:80/article.htm