
Using the sun as energy
&
Using water as energy (heat) storage
Understanding the market
Both existing and future homes can incorporate simple hydro-thermal systems. We know that these systems work, but I feel the need to have hands on experimenting to explore it for myself and inspire others around me to explore this vast source of clean heat (the sun). My design is setup to do that. If I were to raise it a little it could operate as an outdoor shower, or if I were to lengthen the piping I could use it for indoor water/space heating.
My interest in this project also extends to thermal mass technology. [[1]] Water has such a high heat capacity I am interested in large tanks inside of a house with collectors outside.
This project can be expanded into:
- An outdoor shower with heated water.
- Residential.
- A school campus (Athletics Department).
- Beach or recreation facility.
- To heat a water thermal mass inside of a greenhouse.
- A demonstration display at a school campus, museum, or other.
- Space heating.
- Accessory preheat for your existing hydronic heating.
- I dream of this being incorporated into being the primary heating system of a home.
- Accessory preheat for your existing water heater.
Project Goals
- Determine how much heat can be obtained from the sun on site. (orientation, materials)
- Setup as a community solar shower or demonstration unit.
- Expand on concept to try to design a full in house space thermal mass storage and space heating system.
Design
Overall
This unit consists of a panel containing tubing full of water that is heated by the sun and a water storage tank. The tank and panel are connected by tubing. As long as the water tank is above the panel the system may not need a pump. Hot water that is heated in the panel will naturally rise into the tank and the colder tank water will replace the water in the panel.
CPVC pipe was chosen for its higher temperature/pressure rating. Caution should be taken if the water is ever to stop flowing because the CPVC pipe could potentially melt.
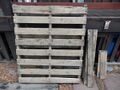
Shipping pallets made for an easy construction of the solar collector and free construction material although they are assembled with twist-shank nails that are extremely difficult to pull apart. A flat bar, crow bar, and good hammer and patience are recommended so as to not break the boards when pulling them apart.
Climate
This system is not intended for areas that the temperatures can drop below freezing unless the system is drained during subzero conditions (possibly into an additional indoor tank) or is used as for heating and non-potable water.
Sustainability
I tried to use as many reclaimed materials as possible. Shipping pallets/crates are usually used many times over until they are finally damaged out of the shipping stream. The tank was a used pool chlorine container which also gets recycled and reused. I am not however, sure of how much embodied energy is in them or how many times they are reused but it is far more sustainable that buying new. The CPVC pipe is one of the main components that had to be purchased new and hopefully can have a very long lifetime if properly maintained. I tried to find glass scrap for the collector but was offered a cheap option at my local glass company. Cardboard works for a temporary insulation, however reclaimed carpet or other insulating material can be used. If CPVC came in black, it would save on spray paint. I also had a couple sheets of thin aluminum that were salvaged out of a dumpers. They were NFL promotional signs displayed temporarily at a casino.
- Gallery
-
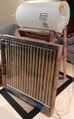
The unit
-

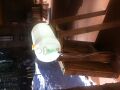
Installing tank connection
-
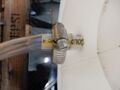
Tank Connection
-
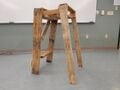
Tank Stand
-
what I made the stand out of.
-
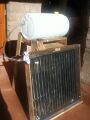
Unit during first test
-
Unit during first test
-
-

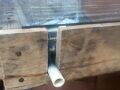
Glass mount
-

Glass mount


Tools Used
- Hammer
- Flat bar
- Crow bar
- cordless drill (drill bit)
- Dremel
- Hacksaw
- Chopsaw
- Jigsaw
Costs and Parts List
| Item | Quantity | Total Cost (USD) |
|---|---|---|
| Shipping Pallets | 2 | Free - Sourced from local business |
| 1/8" glass | 1 | 5 |
| 10' 1/2"OD CPVC Tubing | 5@3.83 | 19.15 |
| CPVC T's | 4x10 pack @ 1.71 | 6.84 |
| CPVC elbow | 2@.39 | .78 |
| Flowgaurd Gold Glue 8oz | 1 | 6.76 |
| 17 Gallon Drum | 1 | Free - Sourced from local business with a chlorinated pool |
| Hose clamps | 4 | * |
| 5/8" ID vinyl tubing | 9' | 4.41 |
| Screws | * | |
| cardboard or insulation | * | |
| Pipe hangers/holders | 3 | * |
| Total | 42.94 |
_* I already had the part laying around.
Build Instructions
Constructing the Collector and Pipe Array
- I turned 1 shipping pallet into a box by pulling planks off of one side and nailing them back onto the other side. I reused the nails. This turned the shipping pallet into a lidless box.
- I cut the 10' lengths of CPVC pipe into 18 36" long pieces. This worked out so there were 4 pieces per 10' original pipe and then some left over for the rest.
- With the remaining I cut short pieces to go between the T's
- I used the Flowgaurd Gold to glue the T's onto one end of all 30" pieces except one which got an elbow.
- I then used the short pieces of CPVC pipe to glue all the T's and 1 elbow together together (caution: the glue dries very fast)
- I glued short pieces of CPVC into one side of each of the remaining T's
- I carefully took the T along with the short piece sticking out and assembled the rest of the array.
- I cut off two more short pieces to add into the inlet and outlet part of the array.
- I marked and cut notches on the shipping pallet box so that the array sat inside the pallet.
- I stapled the cardboard to the rear of the box and I also had two sheets of aluminum to stick in there. (will play with this later)
- Painted the inside of the box black using heat resistant paint.
- The local glass company was able to cut some glass to size for me at a very cheap price. I mounted this glass by using some extra pallet scraps and screws.
Constructing the Tank Stand
- I cut a corner out of the other shipping pallet which was already notched out for the drum to sit inside.
- Deconstructing the rest of the pallet I was able to use the boards for legs and braces.
Setting up the Tank
- I drilled a hole into each end of the tank. A higher hole for the hot water exiting from the array and a lower hole for the colder water leaving the tank and entering the bottom of the array.
- I used my dremel to enlarge the hole slightly larger than the outside of the CPVC pipe but smaller than the outside of the vinyl tubing.
- Pinching and bending the vinyl tubing I put it into the hole and unpinched it so that it opened back up inside the hole.
- Pushed the CPVC pipe inside the vinyl tubing making a tight fit. If it leaks I plan on using some silicone.
- Cut lengths of vinyl tubing to go from the collector array to the tank making sure to leave enough slack so that the array can be tilted into the angle of the sun.
- Using hose clamps I clamped the vinyl tubing to the tank and array.
Discussion
Please see my power point file for an overview and solar related calculations. At perfect efficiency I was able to determine that I could get a 20F temperature rise in 15 gallons of water over 1 hour period of time at high noon. I know that there can be improvement in my physics calculations. Please contact me to collaborate on organizing and correcting them.
File:AVpresentation.ppt
After going through my physics calculations I realized that one implementation I have never seen done is to put dividers inside of the collector panel. I believe that dividers would stop the convection of air inside of the box. By reducing the air movement you are reducing the heat that is obtained by radiation on the pipe from conducting to the glass. In essence you are increasing your air insulation inside of the box. In other words, the less air flows around inside of your collector box, the less it can transfer heat to the glass to be lost from the system.
Speaking of insulation of the collector box, I am curious about the percent thermal mass material and insulation material. The box should be insulated with non-conductive material to prevent the heat obtained by radiation from the sun from being lost, but a conductive material should be placed behind and near the pipe to absorb the radiant heat so that it can pass it over to the pipe.
Another idea I would like to pursue if allowed the time is mountain it on the roof of where I currently live. I live in a cold climate where freezing is a concern. My idea is to mount this system on my room and have a drain valve that comes through the attack down into my room to another tank. It can be automated using an arduino. After the water has heated though the day without pumps (electricity), the system can drain into the second tank in my room/house where it will radiate that heat back into my living space over night. The next day the water can be pumped up to the roof to be heated all over again.
Where I currently live is also designed where I could run a shower head through the attack ceiling into the shower. In this scenario the system would be drained into my shower instead of another tank. Just some ideas.
Next steps
Test the panel and compare to calculations.
Conclusions
This was a really simple and cheap build. It is definitely worth it whether you want to just play around with solar hydro-thermal collection or implement it. Having a final location and purpose would make this build even easier because you will know exactly where it is going to be placed making measurements easier. Hopefully after some testing I can obtain a payback period.
Results
I had one sunny day to test at the school before 2 weeks of cloudy and snowy weather. You can see the sun was very low and moving through some trees. In about 1.5 hours as the sun passed behind a couple trees lending several minutes of shade each time the entire system of 15 gallons rose by ~6 degrees F.


References
My project was inspired by this: Super Simple, CPVC Solar Hot Water Collector
Contact details
This page was built the week of December 6th - 12th 2015
assspam at gmail dot com