No edit summary |
|||
| (12 intermediate revisions by the same user not shown) | |||
| Line 2: | Line 2: | ||
{{777}} | {{777}} | ||
== Snap Together Shovel == | == Snap Together Shovel == | ||
Project developed by [[User:Cleyton|Cleyton]] | Project developed by [[User:Cleyton|Cleyton Cavallaro]] | ||
[[Image:ShovelAssembly.JPG|200px|right]] | |||
{{Statusboxtop}} | {{Statusboxtop}} | ||
{{status-design}} | {{status-design}} | ||
| Line 10: | Line 11: | ||
==Abstract== | ==Abstract== | ||
This shovel was designed to be a tool that can be fully modulated for the users current needs and environment. Shovels are used everywhere and are almost a necessity if moving large amounts of something dirt like. This shovel can be fully 3D printed if necessary. If the user has access to sticks or branches, the user can print off the wooden shaft attachments instead of the 3D printed shaft, saving time and money. If the user find a piece of scrap sheet metal, they can print off the sheet metal attachment instead of printing the blade, again saving time and money. The handle can either be a straight shaft, or an actual handle to help lift the material easier. Because it is designed with M16 screw/nuts, common parts can easily be substituted from a hardware store. It also does not need any additional hardware other than simple glue to help hold the parts that are printed in pieces. | This shovel was designed to be a tool that can be fully modulated for the users current needs and environment. Shovels are used everywhere and are almost a necessity if moving large amounts of something dirt like. This shovel can be fully 3D printed if necessary. If the user has access to sticks or branches, the user can print off the wooden shaft attachments instead of the 3D printed shaft, saving time and money. If the user find a piece of scrap sheet metal, they can print off the sheet metal attachment instead of printing the blade, again saving time and money. The handle can either be a straight shaft, or an actual handle to help lift the material easier. Because it is designed with M16 screw/nuts, common parts can easily be substituted from a hardware store. It also does not need any additional hardware other than simple glue to help hold the parts that are printed in pieces. This shovel can have multiple blade types designed to fit it. This can include, dirt blades, snow blades, and other things like rakes or hoes. | ||
== Bill of Materials== | == Bill of Materials== | ||
| Line 27: | Line 28: | ||
== | == Components Designed for Shovel == | ||
{{Gallery | |||
|width=180 | |||
|height=135 | |||
|title= Shovel Components | |||
|lines=4 | |||
|Image:ShovelBlade.JPG | [http://www.thingiverse.com/thing:1182075 Shovel Blade] | |||
|Image:ShovelShaft.JPG | [http://www.thingiverse.com/thing:1182154 Shaft Segment] | |||
|Image:ShovelHandle.JPG | [http://www.thingiverse.com/thing:1182112 Handle Attachments] | |||
}} | |||
== Technical Specifications and Assembly Instructions== | == Technical Specifications and Assembly Instructions== | ||
* Print all parts: | |||
**Blade ~ 12 hours | |||
**Shaft ~ 2 hours each segment | |||
**Handle ~ 2 hours | |||
**If using part substitutions, time will be much shorter. | |||
*Blade assembly | |||
**Remove supports | |||
**Slide piece one into piece two. Final product should look like blade pictured above. | |||
**Add glue if desired. | |||
* Shaft Assembly | |||
**None. If using part substitution, slide both ends of wooden shaft holder onto shaft. | |||
*Handle assembly | |||
**Snap both side arms onto the square screw holder. Arms should face away from screw. | |||
**Attach round handle by sliding onto ends of arms. | |||
**Add glue if desired. | |||
**If using part substitution, no assembly required. | |||
*Final Assembly | |||
**all pieces screw into each other. | |||
=== Common Problems and Solutions=== | === Common Problems and Solutions=== | ||
| Line 40: | Line 65: | ||
== Cost savings== | == Cost savings== | ||
# ~ $11 when fully printed | |||
# | ## If wooden shaft and/or sheet metal blade are found (for free), cost is ~ $5 | ||
# Current shovels at Home Depot are ~$20. You would need two to be able to compare to the full modular abilities of the 3D printed shovel. | |||
# | # Savings between $30 and $35 dollars. This is a 75% to 88% savings. | ||
[[category:OSAT 3D-Printable Designs]] | [[category:OSAT 3D-Printable Designs]] | ||
Revision as of 22:29, 7 December 2015
Snap Together Shovel
Project developed by Cleyton Cavallaro
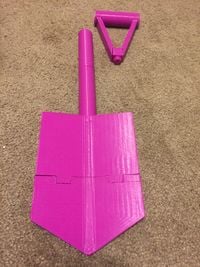
Template:Statusboxtop Template:Status-design Template:Status-prototype You can help Appropedia by contributing to the next step in this OSAT's status. Template:Boxbottom
Abstract
This shovel was designed to be a tool that can be fully modulated for the users current needs and environment. Shovels are used everywhere and are almost a necessity if moving large amounts of something dirt like. This shovel can be fully 3D printed if necessary. If the user has access to sticks or branches, the user can print off the wooden shaft attachments instead of the 3D printed shaft, saving time and money. If the user find a piece of scrap sheet metal, they can print off the sheet metal attachment instead of printing the blade, again saving time and money. The handle can either be a straight shaft, or an actual handle to help lift the material easier. Because it is designed with M16 screw/nuts, common parts can easily be substituted from a hardware store. It also does not need any additional hardware other than simple glue to help hold the parts that are printed in pieces. This shovel can have multiple blade types designed to fit it. This can include, dirt blades, snow blades, and other things like rakes or hoes.
Bill of Materials
- 3D Printer
- Upload and link to all source files from open source CAD
- Upload and link to all STLs
- Additional substitutions:
- Sheet metal blade
- wood shaft
Tools needed for fabrication of the OSAT
- MOST Delta RepRap or similar RepRap 3-D printer
- Glue or epoxy
- knife
Components Designed for Shovel
Technical Specifications and Assembly Instructions
- Print all parts:
- Blade ~ 12 hours
- Shaft ~ 2 hours each segment
- Handle ~ 2 hours
- If using part substitutions, time will be much shorter.
- Blade assembly
- Remove supports
- Slide piece one into piece two. Final product should look like blade pictured above.
- Add glue if desired.
- Shaft Assembly
- None. If using part substitution, slide both ends of wooden shaft holder onto shaft.
- Handle assembly
- Snap both side arms onto the square screw holder. Arms should face away from screw.
- Attach round handle by sliding onto ends of arms.
- Add glue if desired.
- If using part substitution, no assembly required.
- Final Assembly
- all pieces screw into each other.
Common Problems and Solutions
- When assembling blade and handle, ensure adequate drying time to provide optimal strength
Cost savings
- ~ $11 when fully printed
- If wooden shaft and/or sheet metal blade are found (for free), cost is ~ $5
- Current shovels at Home Depot are ~$20. You would need two to be able to compare to the full modular abilities of the 3D printed shovel.
- Savings between $30 and $35 dollars. This is a 75% to 88% savings.


