Lesson 3
Presentation
Materials
Applying materials
Now the building has been largely drawn, we can apply materials to obtain a more realistic appearance. We use a new tool; the PAINT BUCKET-tool. When you select this tool, SketchUp opens up its materials library (also accessible via Window -> Materials). At the top right is a menu where you can select a materials-category. In the library itself, you select the material that you want to use.
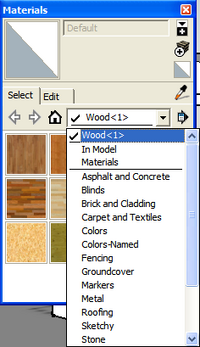
When you select a material, the cursor changes to a paint bucket, and you can start "painting" the surfaces (or selections, groups, ...) by clicking on it.
Tip: If you click on a group (or component), all surfaces within this group are colored !
We apply the material: fencing_weathered (fencing-collection) to all of our groups. Only 2 roof halves get a different material: dark grey, color_007 (colors-collection).
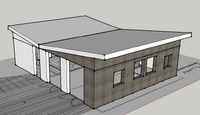
Because we applied the same material to all surfaces within the group, as we clicked on this group, a small problem occured: even the ceiling and all interior walls are now foreseen of a wood texture. This can be easily fixed by opening up the groups (double-click) and by then applying a white color to the interior walls (PAINT BUCKET-tool).

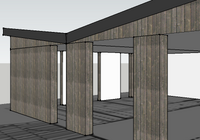
Note: SketchUp has a sort of hierarchy in the allocation of the materials: the most specific description always comes up higher in the list. The coloring of a surface is more specific than the coloring of a whole group, and thus gets priority.
Example:

Give 1 side of a cube a green color. Then select the entire cube and make it into a group.
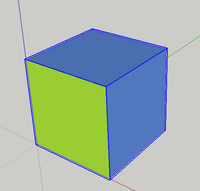
If you then apply a blue color to this group, you will see that the whole group becomes blue, except the green colored surface. This just remains green.
Creating new materials
To create a new material, we click on the icon pictured on the right. (Note: if you don't do this, we adjust an existing material !) The existing material will be kept this way, but a copy is then created which you can customize.
Customizing materials

The probability that SketchUp's standard materials always meet everyone's requirements is quite small. Google thus made it possible to adapt materials. Once you used a material in your model, you can modify several settings under the "Edit"-tab.
- COLOR
allows you to change the color of the material. The menu allows you to work with different color models. The two icons at the top right allow you to base yourself on a color in your model, or somewhere else on your screen.
- TEXTURE
Here you can configure whether or not you want to work with a texture, indicate it which image you want to use as a texture, enter the scale of the texture, ... (note: if you check off the "use texture image" checkbox, the simple reactivating of the box will not be sufficient; you will need to look it back up)
- OPACITY
Here you indicate how transparent your material should be. 100% is completely opaque, 0% is completely non-transparent.
Changing the alignment of a material
Sometimes a tile pattern needs to start exactly in the corner of a room, a wall needs to be composed of exactly 10 bricks, ... In SketchUp, materials can be adjusted upto this level of detail. We'll see how we do this using an exercise: the aligning of a picture in a picture frame.

1. Open "fotokader.skp". The photo of the puppy must fit perfectly into the photo frame.

2. When we right-click on the picture, we select Texture -> Position in the context menu. A number of pins now appear on the picture that will allow us to edit the picture. Through the red pin, we can move the picture, through the green one we can rotate and scale it, ...
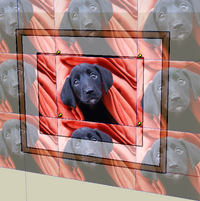
3. Alternatively, you may also right-click and uncheck "fixed pin". Then, all pins gain the same function, namely the determining of a vertex position.
Shadow (and misses )
Through the View menu you can switch shadow and/or fog on/off at your model to make your models appearance more realistical.
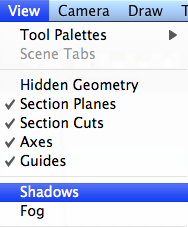
You can also open the shadow and/or fog settings-window through Window -> Shadows, or Window -> Fog
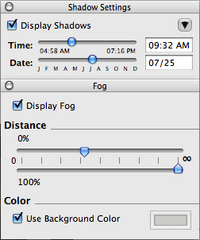
The settings are fairly straightforward:
- Shadow: on/off, set time, set date
- Mist: on/off, mist settings, fog color
Tip: If you want to conduct more realistic shadow studies, you also need to set the location and orientation of your model.
You can do this as follows:
- Choose Window -> Model info.
- Check on "Use georeferencing"
- Under "location", you select the country and the city in which the model is or will be located
- Then click on the "select" button under "solar orientation"
- you then indicate the direction of the north arrow in your model.

If you have Google Earth installed, you can also search up the location of a model and pass it on to SketchUp through the menu: Tools -> Google Earth -> Get Current View. SketchUp then imports an image from Google Earth as a placemat, and it sets the location of your model, automatically.

Visual styles (rendering)


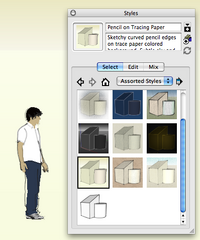
Trying is the way to go here ! Through the Menu -> View -> Edge style, the appearance of lines can be adjusted. Just below "Edge style", using the same menu, you can also adapt the "Face style".
Finally you can also open following window via Window -> Styles:
Exporting views
Meanwhile we have discussed almost all of the camera tools and graphics settings. But what if we want to save a view ? We do this via the menu: File -> Export -> 2D graphic. Then you provide a filename and a location, and choose an image size (of which you btw can also set some options), and after this we click "Export". A few seconds later, the image appears on the chosen location.
Scenes & animation
Introduction
We just exported a view. Suppose we now decide to expand our model some more, and decide to export the exact same view again afterwards. This requires a lot of work: the camera needs to be reset, the shadow and fog settings need to be reset, ... Fortunately we can avoid this extra work by making SCENES. Scenes are comparable to cameras, but smarter. They remember the way on how we look to a 3D model: from what position, with what shadow settings, ...
In summary:
- SCENES save time with the creation of views (settings are kept)
- They can be used for presentations (different positions, various design options, ...)
- They form the basis for animation (shadow studies, walkthroughs, ...)
Creating SCENES
Note: scenes have no influence on the size of a model. They can also be easily removed. You can thus never create too much of them. As mentioned before, a SCENE is best created if you wish to reurn to a view later-on. We do this as follows:
- You open up the Scenes-window via Window -> Scenes
- You create a view you want to preserve
- You click on the "Add page"-button
- SCENE 1 is now created, and appears on 2 places:
- in a tab on top of the SketchUp modeling window
- in the list in the Scenes-window


Note: there is still no JPEG-file being exported ! You still need to do this via File -> Export
Reactivating already created SCENES
To reactivate the view that we kept as a SCENE, there are 2 methods:
- Click once on the SCENE-tab
- Double-click on the name of the SCENE in the list in the Scene-window
Reorganizing, renaming, deleting already created SCENES
This is possible by right-clicking on the desired tab and choosing move left/move right, rename, delete.
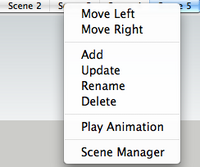
Adapting already created SCENEs
To adapt a SCENE:
- activate the scene (click on the tab)
- Change the camera settings, shadow settings, ...
- Right-click on the Scene-tab and choose "Update".
Animation
We just said that it is possible to create SCENEs using Window -> Scenes, hereby preserving visual settings (camera position, shadow settings, appearance of surfaces, ...). The transition between 2 scenes is always animated. You notice this as you switch between SCENEs (by clicking on the SCENE-tabs). You can play a complete animation (all scenes) by right-clicking on one of the tabs, and selecting "PLAY ANIMATION".
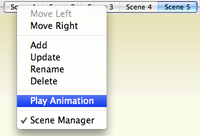
Tip: PAGE UP and PAGE DOWN are shortcuts to scroll through all the different scenes. The idea behind animation is that for each stage of the animation you create a different scene. The animation settings (length of the transition between 2 scenes, duration of the break per scene, ...) are set via View -> Animation -> Settings.
Finally, you can export an animation using File -> Export -> Animation.
Organizing SketchUp drawings (continued)
We talked earlier about working with groups (lesson 1). SketchUp however contains a more possibilities to organise your drawing. These are:
- Components
- Layers
- The OUTLINER
- Hide objects
- Lock objects
Components
Components are like groups, but they are much more powerful. Once a group appears several times in the same drawing, it is best to make a component off of it. Examples are: a window frame that appears several times, a step that is copied 20 times, ... The reason for this is that once a component is modified, all its copies too are automatically adjusted.
For example, if you are drawing a stairs of 90cm width, which is composed of different steps, and you build it in groups, you will need to adjust all individual groups when you decide to widen it. If you built the same stairs from components, you only need to change 1 step, after which they all change automatically. In addition, components can direct themselves automatically towards the camera, automatically create openings in surfaces, fix themselves automatically unto a certain surface, ...
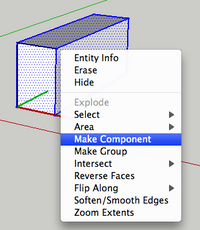
To create a component, you first select a number of surfaces. You then:
- Choose Edit -> Make component in the menu
- OR you right-click on your selection and you select "Make component"
- OR you use the shortcut G
Then, the following window appears:
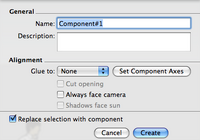
The most important thing here to enter is a name. This is a significant difference with groups: components must have a name. With groups, this was optional. You can also enter a description. Under alignment, you can set some advanced options: the component keeps focusing itself towards the camera, ...
Tip: SketchUp makes a library of all the components that you create. You can use this library via Window -> Components. This library contains not only the components that you created yourself, but also a wide range of standard components. Via the internet, there are more components (but also groups and models) available for download: http://sketchup.google.com/3dwarehouse/
Layers
Those of you who previously worked with AutoCAD, Photoshop, Illustrator, ... will surely recognize this concept. The intention is that you combine similar things into 1 layer. That way, it is possible to thick off some layers. That way, you can switch off certain details in complex models, ... The power of layers lies in the thinkering with their visibility. You open the Layers-window via Window -> Layers.
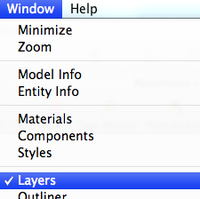
This window appears:
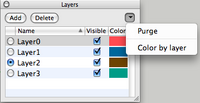
Standard, you will only find Layer0. This is a special layer. It can never be removed. In this window, you can check all the properties of the layers. You can also
- change their visibility (on/off)
- change their name (double-click on their name)
- determine their color, ...
You also control which layer is active (indicated by a black dot placed before the layer name). What you draw is always placed inside the active layer ! Things that have already been drawn can be fortunatly changed afterwards by right-clicking on an object, and choosing "Entity info". In the window that opens up, you can select the layer in which the selected object will need to appear.
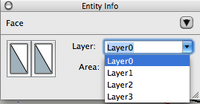
Lastly, one final tip: "Color by layer" colors each object based on the color of the layer in which it is placed. This is very useful to quickly see which object is in which layer.
The OUTLINER
Through Window -> Outliner, we open up this window:
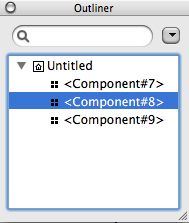
The Outliner a more abstract way for looking at models. All groups and components appear in the Outliner, and may be selected, opened, hidden or made visible, ... You will find that right-clicking on an object, or on the name of an object provides the same possibilities in the Outliner.
Tip: The Outliner is only useful if you give a name to all your groups: right-click -> Entity info.
Hide objects
By right-clicking on an object and selecting hide, this item becomes temporarily hidden. You do this for example, to temporary hide a roof, modify some things under the roof, and then make the roof again visible.
In the Outliner, a hidden object remains in the list, but the symbol before the object becomes gray. This is very useful. That way you see at a glance what objects are hidden, and which are not in the Outliner.
To make an item again visible, choose Edit -> Unhide from the menu. You can then choose to make the lastly hidden object again visible (last), or make all objects again visible (all).
Tip: In the Outliner, you can right-click on a hidden object, and choose "Unhide" to make it visible again.
Lock objects
Locking objects is similar to hiding them. You use this function to protect objects from accidental changes. Use: right-click on an object, and choose "Lock".
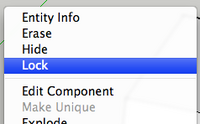
Once an object has been locked, it can no longer be adapted, moved, deleted, ... When you select a locked object, a red border appears. Trying to execute an adjustment will have no effect.
Tip: The Outliner displays a key icon before a locked object.
Unlocking locked objects is done just as the unhiding of hidden objects.
Modeling terrain with the Sandbox-tools
The Sandbox-tools are available in the free version of SketchUp, but are not loaded by default. To load them for here on onwards, you check on the Sandbox-toolsunder Window -> Preferences -> Extensions.

This gives you access to a range of new tools. These are available through the Tools-menu (at the bottom of this menu, a number of sandbox options have appeared), and are also available via the "Sandbox toolbar" (which needs to be made visible first via View -> Tool -> Palettes -> Sandbox)

Now that the tools are available, you can work on 2 methods:
- Based on contour lines = predetermined
- Based on a grid = interactive
Predetermined, based on contour lines
In order to create a terrain based on contour lines, we proceed as follows:
- Draw the contour lines (LINE-tool, FREEHAND-tool, ...). These lines are drawn on the ground plane.
- Contour lines are give the correct altitude (= move in the blue direction, over or below the ground plane).
- By selecting all contour lines, and pushing the FROM CONTOURS-button, terrain is created. This terrain is separate from the drawn contour lines. The contour lines may even be removed later.

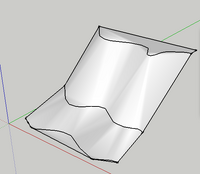
Note: The terrain is a group containing a grid of triangles.
Interactive, based on a grid
To give a terrain a shape on an interactive method, you start off from a grid:
- Click on the FROM SCRATCH-tool. At the bottom right, the grid size is displayed. This determines how detailed the terrain is, and you can modify it if you so wish (type in a number).
- Then, you draw out the grid on the ground plane.
- Then you can start to adjust the starting grid using the SMOOVE-tool. Do double-click first to work within the group (grid) ! With the SMOOVE-tool you can create hills and pits. You may enter the exact height/depth, you can also enter the radius if you click on the SMOOVE-tool.


Note: This is the easiest way of working, a different way of working is by changing the grid without using the SMOOVE-tool: by double-clicking on the grid, you open up the group, and you can then manually introduce changes.
Note: You can add any extra detail with the ADD DETAIL-tool, or change the direction of the diagonals with the FLIP EDGE-tool.
Stamping objects into the terrain

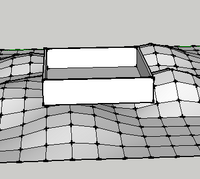
The terrains that are created with the Sandbox-tools are often very irregular in shape. If you try to place a house on this, it is often partially buried, or it partially floats over the terrain. To prevent this, you can use the STAMP-tool. This tool creates a flat base, unto which we can place the building on.
- 1. Select the STAMP-tool
- 2. Select the object that you want to place on the terrain (a red border will appear around it, indicating the edge that will be stamped into the terrain)

- 3. Click on the terrain area unto which you want to place the object
- 4. Indicate the height of the flat terrain using the mouse pointer

- 5. Move the object (following the Z-axis) to move the object unto the flattened terrain.

Laying objects over the terrain
Items that do not require a flat surface (eg a road which follows the contours of the landscape, ...) can be lain "over" the terrain, rather than stamped into it. For this, we use the DRAPE-tool, and we follow these steps:

- 1. Draw out the road (ARC-tool, LINE-tool, ...)
- 2. Position the road
- 3. Select the DRAPE-tool
- 4. Click on the road that you want to lay over the terrain once
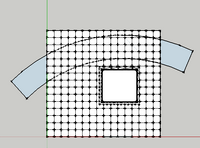
- 5. Click once on the terrain itself
The road is now projected unto the terrain. This is important for when you begin to apply your textures. By opening up (by double-clicking), the terrain (= a group) each surface of the terrain can given a different color.

Tip: Making the grid lines invisible
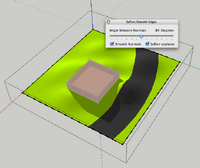
When you create a terrain based on a grid, the grid always remains visible. To make this grid invisible, follow these steps:
- Open up the terrain (Group) by double-clicking on it
- Select all elements within this group
- Right-click on this selection and choose SOFTEN/SMOOTH EDGES
- Check on "SMOOTH NORMALS", and "SOFTEN COPLANARS"
- The slider is set high enough so that all the lines disappear.


PhotoMatch: modeling based on a photo
PhotoMatch is used to make an object from a photo (also called a SketchOver). PhotoMatch is (amongst others) used to draw buildings/building blocks in 3D for use in Google Earth.
Importing a photo to SketchUp
The photo we will use will need to fulfill in the following requirements:
- The selected object should be photographed on an angle
- At least 2 sides of the object should be visible.
Frontal images are not usable, only pictures with perspective are.
Method: From the menu, we choose Window -> Match photo. A new window (Sketch Over) opens up.

The icon in the top left corner allows us to select a photo (New Matched Photo). What you get to see after selecting a picture looks similar to this:

Aligning points/axises and true origin
It is intended that we clearify to SketchUp on how the perspective runs in the picture. To do so, we place the green and red axises on the countours of the building. (for example: the ridge of a roof, a gutter, the bottom of the windows, ...). The placement is done by dragging the end points of the red and the green axises. It is also the intention that the origin of the axises (yellow rectangle) is positioned on a logical place: usually on a corner of the building.
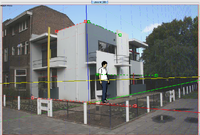
As a check-up: the yellow line represents the horizon, and must thus be positioned more or less horizontally.
Setting the scale and confirming that everything is set
By clicking on the blue axis and dragging it, we scale the picture (note the figurine to set the scale properly). By clicking the "Done"-button in the MATCH PHOTO-window, you can confirm that you have set all the parameters, and that you wish to begin the modeling.
Tip: you can also choose a grid style: "outside" is standard; if you work with photos incorporating a bird-perspective you take "above", and if you work with interior photos, we go for "inside".

Modeling
We have now tailored the perspective of the picture to the perspective in SketchUp. We can now use the drawing tools (LINE-tool, ...) to draw over the picture. Attention: PhotoMatch only works for one particular view (the set view). If you rotate, the picture disappears. PAN and ZOOM can be used to manipulate the view without losing the set perspective.
Tip: Obviously, you will never lose any of your settings. To reset the original view, click the Scene-tab, on top of the 3D-environment (which took over the name of the picture).
Projecttextures from photo
By clicking on this, parts of the photo are projected unto the volume (as a texture). Once the photo sticks on the volume, you can use the ORBIT-tool.