
The objective of this design project is to provide Six Rivers Charter School with a photovoltaic system capable of charging electronic devices while also serving as an educational device. The photovoltaic station will be used by students to charge their phones and provide education on solar power, energy efficiency and consumption. It will also be the focal point of a space for students to come together as a community.
Background
Towards the beginning of the Fall 2018 semester, our team was tasked by Six Rivers Charter High School to create an educational photovoltaic system for their campus. Six Rivers Charter School is in Arcata, CA at 1720 M St. They are a small charter high school, who’s mission statement is: “Through communication, collaboration, and critical thinking, Six Rivers is a community that strengthens dependent learners into independent and interdependent learners. In valuing the whole student, Six Rivers provides opportunities for success within and beyond school” (Perry, 2016). They share the campus with Arcata High School, with whom they work with to provide their students with the full scope of classes needed to achieve a High School diploma (AHS, 2015). Ron Perry, the principle of Six Rivers Charter School, presented the criteria for our project on Friday, September 21. His main objective for the solar installation is to create a space for his students to come together as a community during school breaks, where they can charge their electronics and learn about solar power in a safe, relaxed environment (Ron Perry, Interview, September 21, 2018).


Problem statement and criteria
The problem our team was tasked to solve was to invite use to a relatively unused part of Six Rivers' campus by creating and installing an educational photovoltaic system. To best determine how to solve this problem, IO Co. came up with a list of criteria and constraints. Criteria are specific elements of the project that can be judged subjectively to find the best solution to the problem at hand. Constrains are the parameters that the criteria must follow to ensure the client’s needs are addressed. After creating these two lists, our team then assigned weighted values (1-10, 10 being the most valued) to each criterion relative to their importance in the projects final design.
| Criteria | Constraints | Weight |
|---|---|---|
| Safety | Doesn't shock students or damage phones | 10 |
| Durability | 2 year minimum lifespan | 9 |
| Education | Provides basic knowledge of PV charging | 9 |
| Aesthetics | Looks nice and invites use | 7.5 |
| Maintainability | Serviceable by existing maintenance crew | 6 |
| Cost | $400 maximum cost | 2 |
With this information our team was able to decide upon a final project design.
Description of final project
This section describes the decided upon design from the criteria section and its application at Six Rivers Charter School. Subjects of interest include a description of the final product, cost analyses, as well as implementation and performance results.
Solution Description
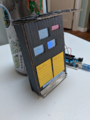
The final design our team decided upon is the 'Watts' Up Bulletin Board. The overall design can be described in four sections: 1) the solar array and its mounting system, 2) the structure of the retaining box, 3) the internal electronics and its connection to the external USBs, and 4) the educational and bulletin board display.
The Solar Array
The solar array utilized for this application is a three PV solar module system wired in parallel. Each panel is rated at 35 watts to produce a maximum combined power of 105 watts and a maximum voltage output of 18 volts. Mounting the solar array required the use of a frame constructed out of wood 2×4s and an assortment of nuts, bolts, and washers as shown below.
-
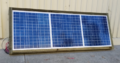
Completed array before mounting.
-
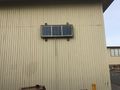
Mounted array.

Retaining Box
The base of the retaining box is constructed out of 2x5's with a (bathroom wood name) backplate. Inside the base is a vinyl liner stapled to the 2x5's to keep internal electrical components out of the elements. Around the rim of the base is weather stripping to create a watertight seal when the door is closed. Connected to the base with two hinges is a red balau framed acrylic door.
-
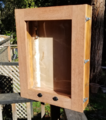
Bulletin box mid-construction.
-
Completed bulletin box.

Internal Electronics
The internal electronics of the Solar Bulletin Charger begins with the positive and negative leads being fed into the retaining box from the PV solar array. The reason this type of setup was chosen over one with a charge controller and battery is threefold: 1) it requires the least amount of maintenance with nothing needing to be turned on or off before or at the end of the day, 2) removing the charge controller, battery, and inverter reduces the chance and cost of future maintenance, and 3) it provides more efficiency of power by removing intermediate components while still being accessible to charge students’ phones at times of the day when they will be present.

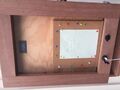
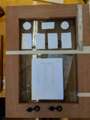
Educational and Bulletin Display
On the faceplate beneath the LCD Meter Reader, an engraved placard will be mounted. On this placard, information regarding voltage, current, power and energy will be accompanied by visuals to help the user gain a better understanding of how their phone is being charged.
Prototyping
Solar Array Prototyping Process
The initial design was to have the 3 panel array mounted at an angle to maximize the systems efficiency. While visiting the Schatz Energy Research Center (SERC) we took an image of their ground-level solar array's mounting system to replicate on the wall at Six Rivers. However, due to weight issues, we decided on mounting the array flat against the wall.

Educational Faceplate Prototyping Process
The initial design was to use an Arduino system to measure Voltage and turn LED lights on based on this reading. These would then backlight an educational blurb related to the given voltage. However, this was nixed for financial reasons and replaced by the LCD Meter Reader. Educational Prototyping Process
-
Initial educational faceplate prototype.
-
Finalized educational faceplate prototype.


Costs
| Quantity | Material | Source | Cost ($) | Total ($) |
|---|---|---|---|---|
| 3 | 35W solar panel | Donated (SERC) | 0.00 | 0.00 |
| 45 | 12 gauge wire (50') | Ace Hardware (Arcata) | 0.69 | 31.05 |
| 1 | 1/4" heat shrink | Ace Hardware (Sunnybrae) | 2.99 | 2.99 |
| 1 | 3/8" heat shrink | Ace Hardware (Sunnybrae) | 2.99 | 2.99 |
| 1 | 3/32" heat shrink | Ace Hardware (Arcata) | 3.39 | 3.99 |
| 1 | dielectric grease | Ace Hardware (Sunnybrae) | 4.99 | 4.99 |
| 2 | ring terminal | Ace Hardware (Arcata) | 3.99 | 7.98 |
| 1 | female disconnect | Ace Hardware (Arcata) | 3.99 | 3.99 |
| 1 | waterproof wire nut 5-pack | Ace Hardware (Arcata) | 4.59 | 4.59 |
| 2 | marine grade dual USB socket | Amazon | 19.44 | 38.88 |
| 1 | LCD Meter Reader | Amazon | 18.99 | 18.99 |
| 1 | 12V DC ON/OFF switch | Pierson Building Center | 7.49 | 7.49 |
| 1 | 24x30x0.100" acrylic sheet | Ace Hardware (Arcata) | 17.99 | 17.99 |
| 2 | lockable draw catch 2-pack | Ace Hardware (Arcata) | 6.99 | 13.98 |
| 1 | hinge 2-pack | Ace Hardware (Arcata) | 5.99 | 5.99 |
| 1 | 2x5" scrap wood (10') | Donated (team member) | 0.00 | 0.00 |
| 1 | vinyl sheet (3x3') | Ace Hardware Arcata | 5.99 | 5.99 |
| 1 | outdoor furniture varnish | Donated (team member) | 0.00 | 0.00 |
| 1 | wood caulking | Donated (team member) | 0.00 | 0.00 |
| 1 | conduit (LENGTH) | Donated (SRCHS staff) | 0.00 | 0.00 |
| 3 | 2x4" pressure treated wood (8') | Donated (SRCHS staff) | 0.00 | 0.00 |
| 2 | 3/4x4" red balau decking (6') | Almquist Lumber | 12.00 | 24.00 |
| Total Cost | 195.28 | |||
Testing Results
After acquiring and assembling all of the internal components and connectors, we tested the systems functionality. All 3 panels had full sun exposure and were able to charge 4 phones simultaneously. The LED meter reader also successfully displayed voltage, current, power, and energy.

How to build
Ensure the space provided is large enough to house a bulletin board and the solar array. Examining this space first ensures that the necessary amount of wire, conduit, and wood is collected to make the product work.

Decide on how big the display needs to be and build the retaining box accordingly. Some things that need to be considered when making the box is that it needs to be able to endure weather and daily abuse from students. This means the overall design needs to be waterproof and structurally sound.

Waterproof the box to avoid water penetration that might cause corrosion to wiring. The waterproofing process was done by varnishing the outside wood with a marine grade waterproof varnish, lining the inside with a plastic liner, applying weather stripping to make a seal between the door and the inside, and applying a roof to move water away from the top of the box.

Test the solar array to make sure the panels are functional before mounting them together. Once it is known that all the panels are functional, mount them together using pressure treated 2x4s. At this point, the solar array is ready to be mounted.
Install the door which was fabricated using an acrylic sheet, red balau 2x4s, and the two dual USB ports. The door is attached using three draw catches located on the left of the door, which is secured by a lock, and two hinges located on the right.

Install the phone cubby located on the bottom of the box. Make sure it can fit four phones at a time and soften the edges to prevent any injuries that might occur from placing a hand inside.
Fabricate the theorized circuit and test all the internal components to ensure the product will charge phones and the meter will display the desired information before installing the product. This will save time and energy should there be any circuit problems down the line.

Install the faceplate within the box. The components of the faceplate include the DC multifunction meter, the internal on/off switch, the educational placard and logos, and the bulletin portion. At this point, the product is ready to be installed.
) Install the entire product, including the array and the bulletin box, at the location of interest. A boom lift was used to assist in the installing of the solar array, and the bulletin box was mounted roughly three feet below that. The final version of the Watts Up Bulletin Board can be seen here.
Maintenance
In order for the 'Watts' Up Bulletin Board to stay functional for the longest amount of time, proper maintenance must be carried out. The material in this section describes what type of maintenance tasks need to be done, how often these tasks should be carried out, and how to go about completing these tasks.
Schedule
Breakdown of maintenance tasks and how often to carry them out.
- Daily
- Turn the system on/off
- Ensure the bulletin box is locked and sealed
- Monthly
- Check solar array and bulletin box for wear and tear
- Yearly
- Clean the solar array.
- Re-varnish the wood to prevent water damage.
- Check the internal wire splices for corrosion.
Instructions

Remove lock and open door by unlatching the draw catches along the side of the box.

Flip switch to the ON or OFF position as labeled on the switch.
Check that all 3 draw catches are latched to seal the box. If they are not, do so.

Tug on lock to check that it's engaged. If it comes free, check the educational faceplate for damage, then proceed to fully lock the box.

Visually inspect the bulletin box for damage that may result in loss of waterproofing (such as cracks in the wood or acrylic) or for any signs that water might have entered the box (loss of functionality, rotted wood, etc.).

Visually inspect the solar array from the ground to check for any obvious breakage such as cracks.
How to Clean the Array
Step 1: Rinse the panels with clean fresh water, avoid exposing the panels to chemicals.
Step 2: Scrub the panels with a non-abrasive cloth if needed.
How to Re-Varnish the Wood
Step 1: Select a weather resistant wood varnish of your choosing.
Step 2: Apply to seams of the box with a brush. When applying to faces of wood, be sure to tape off areas where varnish shouldn't be (acrylic panel, hinges, etc.)
Step 3: Re-apply as per your chosen varnishes instructions.
How to Check Wire Splices
Step 1: Visually check where there is shrink-wrapping and look for corrosion, fraying of wires or tubing, or frayed electrical tape.
Step 2: Should a problem with a slice exist, turn the system of and repair the splice by cutting a new section of wire out and connect the wires by solder or twisting.
Step 3: Cover the new splice in shrink-wrapping and dielectric grease on the inside to prevent water damage.
Troubleshooting
Phone Not Charging?
- ) Check that there is daylight.
- ) Make sure the charging cable being used isn't damaged.
- ) Check that the switch is in the ON position.
LCD Meter Reader Not Working?
Refer to the instruction manual in the box or contact customer service (service@bayite.com).
Product Model: PZEM-051
Suggestions for future changes
The main alteration to our final design would be to make a smaller bulletin box. The original design was meant to house a battery, charge controller, etc. After construction of the box we decided to remove the battery from the system leaving the box with a large amount of empty space. Another thing to change would to be replacing the free scrap wood with more aesthetic weatherproof decking.