(Not a lot here (Timeline) - commented out) |
Sophivorus (talk | contribs) m (Text replacement - "| affiliations = " to "| organizations = ") |
||
| (38 intermediate revisions by 12 users not shown) | |||
| Line 1: | Line 1: | ||
[[File:Finally done.JPG|thumb|The final product.]] | |||
{{Project data | |||
[[File:Finally done.JPG|thumb | | authors = User:Dtp13 | ||
| cost = USD 14.33 | |||
| instance-of = Drop box, Natural paints | |||
| location = Arcata, California | |||
}} | |||
For this project I made a box out papercrete for an on-campus office supply recycling service called R.O.S.E.. The goal of the project is to create a drop box out of recycled materials to be used as a receptacle on campus to increase the amount of supplies that R.O.S.E. receives and promote awareness of the organization. To build the box I spent around 10 hours creating the necessary materials and design, and another 20 hours in its construction and overall aesthetics. The finished product fulfills most of the criteria I originally laid out, but lacks slightly in the looks department. While the aesthetics are not dead-on, the result is still a strong sturdy drop box made almost exclusively of recycled materials and painted with natural paint. | |||
== Background == | == Background == | ||
==Price== | R.O.S.E. is an on campus organization at Cal Poly Humboldt dedicated to recycling office supplies to help students and reduce waste. R.O.S.E. is just starting out and needs drop boxes in populated areas on campus to increase the effectiveness of their organization and promote awareness of it. The box will be a receptacle where students can drop off their school supplies that they no longer need binders, pencils, pens ect. This project will be completed before June of 2011 and the drop box will be located in either the [[Cal Poly Humboldt|HSU]] Library or the Social and Behavioral Sciences building. | ||
== Objective == | |||
The purpose of this project is incorporate recycled office materials into a drop box that will be used to raise interest in the R.O.S.E. Center. The drop boxes will be sturdy enough to hold a range of office supplies from manila folders to adding machines. We will incorporate recycled materials and office supplies in the structure, design, and decoration of the boxes. The boxes will have an artistic eye catching element, as well as a functional use for collecting materials. A way of gathering materials from the drop box to take back to R.O.S.E. must be part of the design as well. Appropriate information about R.O.S.E. and the drop box will also be incorporated into the design. | |||
== Price == | |||
=== Cost for Project === | |||
<center> | |||
{| class="wikitable" | |||
{| class="wikitable | ! Quantity | ||
! Quantity | ! Material | ||
! Source | |||
! Cost ($) | |||
! Total ($) | |||
|- | |||
| 90 lb | |||
| Concrete | |||
| Lowes | |||
| align="right"| Donated | |||
| align="right"|- | |||
|- | |||
| 50 lb | |||
| Sand | |||
| Lowes | |||
| align="right"| Donated | |||
| align="right"| - | |||
|- | |||
| 1 | |||
| Natural dye | |||
| Phoenix Ceramic | |||
| align="right"| 1.50 | |||
| align="right"| 1.50 | |||
|- | |||
| 1 | |||
| Clay | |||
| Phoenix Ceramic | |||
| align="right"| 1.00 | |||
| align="right"| 2.50 | |||
|- | |- | ||
| | | 1 | ||
| Flour | |||
| Safeway | |||
| | | align="right"| 2.99 | ||
| | | align="right"| 5.49 | ||
|align="right"| | |||
|align="right"| | |||
|- | |- | ||
| 1 | | | 1 | ||
| | | Floppy Discs | ||
| R.O.S.E. | |||
| align="right"| Donated | |||
| align="right"| - | |||
|align="right"| | |||
|align="right"| | |||
|- | |- | ||
| | | 30 lb | ||
| Paper | |||
| Anywhere | |||
| | | align="right"| Recycled | ||
| | | align="right"| - | ||
|align="right"| | |||
|align="right"| - | |||
|- | |- | ||
|- class="sortbottom" | |||
| colspan="4" align="right" | '''-''' | |||
| align="right"| ''5.49'' | |||
|-class="sortbottom" | |||
|colspan="4" align="right" | '''-''' | |||
|align="right"| ''5.49'' | |||
|} | |} | ||
===Price if all materials | </center> | ||
=== Price if all materials are purchased === | |||
<center> | |||
{| class="wikitable | {| class="wikitable" | ||
! Quantity | ! Quantity | ||
! Material | |||
! Source | |||
! Cost ($) | |||
! Total ($) | |||
|- | |||
| 90 lb | |||
| Concrete | |||
| Lowes | |||
| align="right"| 5.26 | |||
| align="right"|5.26 | |||
|- | |- | ||
| | | 50 lb | ||
| | | Sand | ||
| Lowes | |||
| align="right"| 3.58 | |||
| align="right"| 8.84 | |||
|align="right"| 3.58 | |||
|align="right"| 8.84 | |||
|- | |- | ||
| 1 lb | | 1 lb | ||
|align="right"| 1.50 | | Natural dye | ||
|align="right"| 10 | | Phoenix Ceramic | ||
| align="right"| 1.50 | |||
| align="right"| 10.34 | |||
|- | |- | ||
| | | 1 lb | ||
|align="right"| | | Clay | ||
|align="right"| | | Phoenix Ceramic | ||
| align="right"| 1.00 | |||
| align="right"| 11.34 | |||
|- | |- | ||
| | | 3 lb | ||
|align="right"| | | Flour | ||
|align="right"| 14.33 | | Safeway | ||
|- | | align="right"| 2.99 | ||
|-class="sortbottom" | | align="right"| 14.33 | ||
|colspan="4" align="right" | '''-''' | |- | ||
|align="right"| ''14.33'' | | 30 lb | ||
| Caper | |||
| Anywhere | |||
| align="right"| Recycled | |||
| align="right"| 14.33 | |||
|- | |||
|- class="sortbottom" | |||
| colspan="4" align="right" | '''-''' | |||
| align="right"| ''14.33'' | |||
|} | |} | ||
</center> | |||
== Criteria == | |||
<center> | |||
{| class="wikitable | {| class="wikitable" | ||
! Criteria | ! Criteria | ||
! Constraints | ! Constraints | ||
| Line 108: | Line 160: | ||
|} | |} | ||
</center> | |||
<!-- ==Time Line== | <!-- ==Time Line== | ||
3/13-15 Molds constructed and slabs poured | 3/13-15 Molds constructed and slabs poured | ||
4/9-11 | 4/9-11 Box constructed | ||
5/4 Box painted and finished --> | 5/4 Box painted and finished --> | ||
== Literature Review == | <!-- == Literature Review == | ||
This is a review of literature on building and creating artwork using recycled materials for creative constructing of a Drop Box for ROSE. | This is a review of literature on building and creating artwork using recycled materials for creative constructing of a Drop Box for ROSE. | ||
===Building with Alternative Material Basics=== | === Building with Alternative Material Basics === | ||
The purpose of building with recycled materials is to help reduce the amount of raw material that goes into manufacturing.<ref>Balogh, Christie. 1997. An Overview of Recycled-Content Building Materials: Their Uses and Applications. Self publication.</ref> Plastics, papers, glass, and various metals that were used in one medium are cheaply re-manufacturing them into another. In the same respect people have been making not only building materials from recycled products but art as well. These projects can range from 3D sculptures to creative and interpretive canvases, for this research I will not be focusing on sculptures. Many alternative building material options not only offer less of an environmental impact but increased efficiency.<ref>Kaulfuss, Oliver. Mahal, Armit. and Cable, Chris. 2010. An Investigation into Sustainable alternatives for Buildings Components. APSC 262</ref> | |||
=== Types of materials and Art made from recycled waste === | |||
=== | ==== Papercrete ==== | ||
Papercrete is a hard building material made from mostly paper then small amounts of cement and lime. This material is extremely durable and in many aspects better than conventional construction materials. Papercrete is a better thermal insulator than conventional concrete and has a higher fire resistance than Masonry brick.<ref>Mohammed, Bashar. 2009. Papercrete as Infill Materials for Composite Wall System. EuroJournals Publishing.</ref> | |||
Papercrete is a hard building material made from mostly paper then small amounts of cement and lime. | |||
====Floppy disc art==== | ==== Floppy disc art ==== | ||
Artist Nick Gentry makes paintings over a canvas made of floppy discs and cassette tapes and integrating their look and texture into the artwork. | Artist Nick Gentry makes paintings over a canvas made of floppy discs and cassette tapes and integrating their look and texture into the artwork. While this subtracts from the actual recycle of the available material it does create a new creative medium.<ref>Gentry-Nick. 2010. "Paintings." http://www.nickgentry.co.uk/</ref> His art focuses on decorating outdated media storage devices. | ||
====Recycled Glass surfaces==== | ==== Recycled Glass surfaces ==== | ||
Recycles Glass surfaces are waterproof and artistic. Usually they are constructed from 85% glass fragments and 15% bonding materials such as resins or cement.< | Recycles Glass surfaces are waterproof and artistic. Usually they are constructed from 85% glass fragments and 15% bonding materials such as resins or cement.<ref>Whaley, Tim. 2010. "Let it Live Again..." EnviroGLAS. http://www.enviroglasproducts.com/</ref> | ||
====Recycled Plastic structures==== | ==== Recycled Plastic structures ==== | ||
Recycled plastic remolded into walls create good translucent wall material. | Recycled plastic remolded into walls create good translucent wall material. The Taipei amphitheater is made completely from recycled bottles from Taiwan.<ref>Studstill, Kyle. 2010. "Taipei Amphitheater Built From Recycled Bottles, Cooled By Falling Water." PSFK Salon. (April), http://www.psfk.com/2010/04/taipei-amphitheater-built-from-recycled-bottles-cooled-by-falling-water.html</ref> | ||
==== Paper-Mache ==== | ==== Paper-Mache ==== | ||
====Natural Paint==== | ==== Natural Paint ==== | ||
=== Concerns === | |||
--> | |||
== How to Build Your Own == | |||
For this you will need the materials listed in the budget, a cement mixer (small), and a large bucket or drum. | For this you will need the materials listed in the budget, a cement mixer (small), and a large bucket or drum. | ||
# Make sure you have around 20 pounds of paper, the thinner the better. I found news paper and pages from phone books work very well. | # Make sure you have around 20 pounds of paper, the thinner the better. I found news paper and pages from phone books work very well. Next make sure you have a large container, if you have the choice, try to find something bigger than a 20 gallon drum, but multiple small containers work well too. Take the paper and rip it up into small pieces and put those scraps into the buckets. The smaller you get the pieces the better the papercrete will turn out. | ||
# | # Once all the paper is torn up fill the buckets with water and stir the mixture well. The paper must soak for at least 24 hours but the longer it soaks the more it will break down the paper. The mixture should be thick and look somewhat like mashed potatoes. | ||
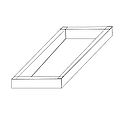
# While the paper is soaking it is time to make the mold for what you are building. | # While the paper is soaking it is time to make the mold for what you are building. For my project I made two 4' by 1.5' frames out of 2x4's and lined them with plastic so the mix would not stick to the inside of the mold. I built a screed (a tool to level freshly poured concrete) from the scrap wood. (Refer to image below) This is not necessary but recommended if you want your thickness to constant for all slabs. NOTICE: Make more than one mold, once the mix is poured in the mold it will need 24 hours to dry before you can take it out and use the mold again. | ||
# You will need a concrete mixer for this step. | # You will need a concrete mixer for this step. Once your paper has been soaking long enough to be the texture of a mud-like soup it is time to mix. For the purposes of stability I used 10 pounds paper (with the water squeezed out) and 10 pounds of Portland cement mix with a 32oz cup of sand thrown in. Enough water should be added so that the mixture is a thick flowing singular mass, there should be no balling of small amounts of mix rolling around in the mixer. Allow the mixer to run for at least 20 minutes(the longer it runs, the better). | ||
# Pour the mix into the mold which should be on flat ground. | # Pour the mix into the mold which should be on flat ground. Slide your screed back and forth across the top of your mold to make sure all of the mixture is an even height. If your screed is too far above the mix add more. If there is too much mix in the mold, take some out. Once the slab is the desired thickness and smoothness let the slab cure for 24 hours before attempting to remove it from the mold. Depending on the number of molds you made this process can take multiple days. | ||
# Allow up to 7 days for the slab to cure before attempting to work with the material. | # Allow up to 7 days for the slab to cure before attempting to work with the material. If you do not allow this much time the material can still be holding a substantial amount of water making it too soft to work with. | ||
# Now your slabs are ready to build with. | # Now your slabs are ready to build with. When attaching the pieces to each other use long drywall screws. You may want to drill holes where you want the screws to avoid cracking the slabs. | ||
# Decorating and painting the box is all up to you. | # Decorating and painting the box is all up to you. I Painted my box with flour based [[Natural paint]]. | ||
For additional instructions see http://www.youtube.com/watch?v=eoEYpvqLPiY and realize that there are many variations for what to add to your papercrete mix but the two main ingredients remain constant, paper and cement mix. | For additional instructions see [https://www.youtube.com/watch?v=eoEYpvqLPiY http://www.youtube.com/watch?v=eoEYpvqLPiY] and realize that there are many variations for what to add to your papercrete mix but the two main ingredients remain constant, paper and cement mix. | ||
<center> | |||
<gallery> | <gallery> | ||
File:Mold for the slabs.jpg | File:Mold for the slabs.jpg | ||
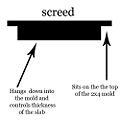
File:Screed.jpg | simple screed picture | File:Screed.jpg | simple screed picture | ||
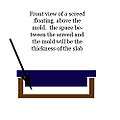
File:Simple screed.jpg | how it works | File:Simple screed.jpg | how it works | ||
</gallery> | </gallery></center> | ||
== Images == | |||
<center> | |||
<gallery> | <gallery> | ||
File:Rose box_w_paint.jpg |Finishing painting | File:Rose box_w_paint.jpg |Finishing painting | ||
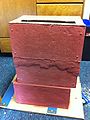
File:3 pieces.JPG |Broken down for transporting | File:3 pieces.JPG |Broken down for transporting | ||
File:Connecting Tabs.JPG | Tabs that hold it in place. | File:Connecting Tabs.JPG | Tabs that hold it in place. Made form pencils | ||
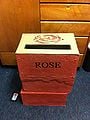
File:Front view.JPG |Almost Finished Front view | File:Front view.JPG |Almost Finished Front view | ||
File:Finally done.JPG | With a personal touch | File:Finally done.JPG | With a personal touch | ||
File:Rose image.JPG | Top down view | File:Rose image.JPG | Top down view | ||
</gallery> | </gallery></center> | ||
< | |||
== Testing Results == | |||
In testing the box works perfectly. It supports its own weight and can hold a full inventory of assorted office supplies. The opening at the top is shaped so that it does not look like a trashcan. It's long rectangular design fits most books, binders, and all writing utensils. | |||
== Next Steps == | |||
The next step is to put R.O.S.E.'s mission statement on the box somewhere. This way passers by that have never heard of R.O.S.E. know what the box is for. | |||
== Conclusion/Impressions == | |||
Overall I am not completely satisfied with the end result. One small problem at the beginning led to an escalating series of events that made most of the labor time fixing little snags here and there. The biggest problem occurred when I made the 3 sub frames of the box and found none of them lined up correctly. The solution I used was thinking in the mindset "I planned on doing this so I could..." then artistically corrected the issue by using filler to make it look like one box was melting on to the one below it, then making the bottom box seem as if it was intended to be offset. Hopefully this is the impression people will get when they see the box. While I was initially very enthusiastic to use this new material that seemed like it had tons of potential I ended up hating it. The material is sturdy and light compared to traditional concrete but it isn't very impact resistant and seems to flake off quite easily. However these issued were lessened with the addition of cardboard bushings that reduce impact and the paint which forms a protective coating. All setbacks aside this project was important to me as a transition towards appropriate technology. I now have the experience with this material and that has convinced me to try and do bigger and better things with this material and experiment with other materials. I'm excited to see how the different factors i.e. the look and presentation, of the box effect how many donations R.O.S.E. receives. | |||
== Lessons Learned == | |||
By far I learned how time and labor intensive it is to work with this material. When pouring the papercrete on the first day there were large chunks of paper in the mix instead of being evenly distributed in a homogeneous mixture. On the second day of pouring the mixture was smoother and the paper was more evenly distributed throughout the slab. Next time I would soak the paper longer and use some type of mixer to break up the paper chunks more. | |||
Also next time I would make a 3 dimensional mold and do a monolithic pour. Had I attempted that I'm sure I would have completed the project in less than half of the labor time with a smoother result. At times when I was building the box I felt it would have been easier to pour 1 giant block of papercrete and carve it out like a pumpkin. | |||
One very important thing I learned about working with natural paint is that it shrinks a lot when it dries. The paint needs at least 3 coats or it will dry and crack around curved surfaces. | |||
<!-- ==References== | |||
<references /> | |||
--> | |||
{{Page data | |||
| part-of = Engr305 Appropriate Technology | |||
| organizations = Cal Poly Humboldt | |||
| keywords = papercrete, rice flour, cardboard, paper mâché, natural paints, drop box, Earthen construction, Green living | |||
| sdg = SDG11 Sustainable cities and communities | |||
}} | |||
[[Category: | [[Category:Appropriate technology videos]] | ||
[[Category:Engineering videos]] | |||
[[Category:Earthen construction]] | |||
[[Category:Green living]] | |||
Latest revision as of 14:07, 28 February 2024

For this project I made a box out papercrete for an on-campus office supply recycling service called R.O.S.E.. The goal of the project is to create a drop box out of recycled materials to be used as a receptacle on campus to increase the amount of supplies that R.O.S.E. receives and promote awareness of the organization. To build the box I spent around 10 hours creating the necessary materials and design, and another 20 hours in its construction and overall aesthetics. The finished product fulfills most of the criteria I originally laid out, but lacks slightly in the looks department. While the aesthetics are not dead-on, the result is still a strong sturdy drop box made almost exclusively of recycled materials and painted with natural paint.
Background[edit | edit source]
R.O.S.E. is an on campus organization at Cal Poly Humboldt dedicated to recycling office supplies to help students and reduce waste. R.O.S.E. is just starting out and needs drop boxes in populated areas on campus to increase the effectiveness of their organization and promote awareness of it. The box will be a receptacle where students can drop off their school supplies that they no longer need binders, pencils, pens ect. This project will be completed before June of 2011 and the drop box will be located in either the HSU Library or the Social and Behavioral Sciences building.
Objective[edit | edit source]
The purpose of this project is incorporate recycled office materials into a drop box that will be used to raise interest in the R.O.S.E. Center. The drop boxes will be sturdy enough to hold a range of office supplies from manila folders to adding machines. We will incorporate recycled materials and office supplies in the structure, design, and decoration of the boxes. The boxes will have an artistic eye catching element, as well as a functional use for collecting materials. A way of gathering materials from the drop box to take back to R.O.S.E. must be part of the design as well. Appropriate information about R.O.S.E. and the drop box will also be incorporated into the design.
Price[edit | edit source]
Cost for Project[edit | edit source]
| Quantity | Material | Source | Cost ($) | Total ($) |
|---|---|---|---|---|
| 90 lb | Concrete | Lowes | Donated | - |
| 50 lb | Sand | Lowes | Donated | - |
| 1 | Natural dye | Phoenix Ceramic | 1.50 | 1.50 |
| 1 | Clay | Phoenix Ceramic | 1.00 | 2.50 |
| 1 | Flour | Safeway | 2.99 | 5.49 |
| 1 | Floppy Discs | R.O.S.E. | Donated | - |
| 30 lb | Paper | Anywhere | Recycled | - |
| - | 5.49 | |||
Price if all materials are purchased[edit | edit source]
| Quantity | Material | Source | Cost ($) | Total ($) |
|---|---|---|---|---|
| 90 lb | Concrete | Lowes | 5.26 | 5.26 |
| 50 lb | Sand | Lowes | 3.58 | 8.84 |
| 1 lb | Natural dye | Phoenix Ceramic | 1.50 | 10.34 |
| 1 lb | Clay | Phoenix Ceramic | 1.00 | 11.34 |
| 3 lb | Flour | Safeway | 2.99 | 14.33 |
| 30 lb | Caper | Anywhere | Recycled | 14.33 |
| - | 14.33 | |||
Criteria[edit | edit source]
| Criteria | Constraints | Weight 0-10 |
|---|---|---|
| Material | Must be made from recycled materials found in offices | 8 |
| Appearance | Must be ascetically pleasing | 9 |
| Advertising | People need to know what the box is for | 10 |
| Holding ability | The box must be able to support a box full of supplies | 9 |
How to Build Your Own[edit | edit source]
For this you will need the materials listed in the budget, a cement mixer (small), and a large bucket or drum.
- Make sure you have around 20 pounds of paper, the thinner the better. I found news paper and pages from phone books work very well. Next make sure you have a large container, if you have the choice, try to find something bigger than a 20 gallon drum, but multiple small containers work well too. Take the paper and rip it up into small pieces and put those scraps into the buckets. The smaller you get the pieces the better the papercrete will turn out.
- Once all the paper is torn up fill the buckets with water and stir the mixture well. The paper must soak for at least 24 hours but the longer it soaks the more it will break down the paper. The mixture should be thick and look somewhat like mashed potatoes.
- While the paper is soaking it is time to make the mold for what you are building. For my project I made two 4' by 1.5' frames out of 2x4's and lined them with plastic so the mix would not stick to the inside of the mold. I built a screed (a tool to level freshly poured concrete) from the scrap wood. (Refer to image below) This is not necessary but recommended if you want your thickness to constant for all slabs. NOTICE: Make more than one mold, once the mix is poured in the mold it will need 24 hours to dry before you can take it out and use the mold again.
- You will need a concrete mixer for this step. Once your paper has been soaking long enough to be the texture of a mud-like soup it is time to mix. For the purposes of stability I used 10 pounds paper (with the water squeezed out) and 10 pounds of Portland cement mix with a 32oz cup of sand thrown in. Enough water should be added so that the mixture is a thick flowing singular mass, there should be no balling of small amounts of mix rolling around in the mixer. Allow the mixer to run for at least 20 minutes(the longer it runs, the better).
- Pour the mix into the mold which should be on flat ground. Slide your screed back and forth across the top of your mold to make sure all of the mixture is an even height. If your screed is too far above the mix add more. If there is too much mix in the mold, take some out. Once the slab is the desired thickness and smoothness let the slab cure for 24 hours before attempting to remove it from the mold. Depending on the number of molds you made this process can take multiple days.
- Allow up to 7 days for the slab to cure before attempting to work with the material. If you do not allow this much time the material can still be holding a substantial amount of water making it too soft to work with.
- Now your slabs are ready to build with. When attaching the pieces to each other use long drywall screws. You may want to drill holes where you want the screws to avoid cracking the slabs.
- Decorating and painting the box is all up to you. I Painted my box with flour based Natural paint.
For additional instructions see http://www.youtube.com/watch?v=eoEYpvqLPiY and realize that there are many variations for what to add to your papercrete mix but the two main ingredients remain constant, paper and cement mix.
-
-
simple screed picture
-
how it works


Images[edit | edit source]
-

Finishing painting
-
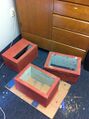
Broken down for transporting
-
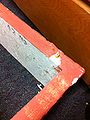
Tabs that hold it in place. Made form pencils
-
Almost Finished Front view
-
With a personal touch
-
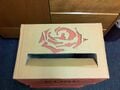
Top down view


Testing Results[edit | edit source]
In testing the box works perfectly. It supports its own weight and can hold a full inventory of assorted office supplies. The opening at the top is shaped so that it does not look like a trashcan. It's long rectangular design fits most books, binders, and all writing utensils.
Next Steps[edit | edit source]
The next step is to put R.O.S.E.'s mission statement on the box somewhere. This way passers by that have never heard of R.O.S.E. know what the box is for.
Conclusion/Impressions[edit | edit source]
Overall I am not completely satisfied with the end result. One small problem at the beginning led to an escalating series of events that made most of the labor time fixing little snags here and there. The biggest problem occurred when I made the 3 sub frames of the box and found none of them lined up correctly. The solution I used was thinking in the mindset "I planned on doing this so I could..." then artistically corrected the issue by using filler to make it look like one box was melting on to the one below it, then making the bottom box seem as if it was intended to be offset. Hopefully this is the impression people will get when they see the box. While I was initially very enthusiastic to use this new material that seemed like it had tons of potential I ended up hating it. The material is sturdy and light compared to traditional concrete but it isn't very impact resistant and seems to flake off quite easily. However these issued were lessened with the addition of cardboard bushings that reduce impact and the paint which forms a protective coating. All setbacks aside this project was important to me as a transition towards appropriate technology. I now have the experience with this material and that has convinced me to try and do bigger and better things with this material and experiment with other materials. I'm excited to see how the different factors i.e. the look and presentation, of the box effect how many donations R.O.S.E. receives.
Lessons Learned[edit | edit source]
By far I learned how time and labor intensive it is to work with this material. When pouring the papercrete on the first day there were large chunks of paper in the mix instead of being evenly distributed in a homogeneous mixture. On the second day of pouring the mixture was smoother and the paper was more evenly distributed throughout the slab. Next time I would soak the paper longer and use some type of mixer to break up the paper chunks more.
Also next time I would make a 3 dimensional mold and do a monolithic pour. Had I attempted that I'm sure I would have completed the project in less than half of the labor time with a smoother result. At times when I was building the box I felt it would have been easier to pour 1 giant block of papercrete and carve it out like a pumpkin.
One very important thing I learned about working with natural paint is that it shrinks a lot when it dries. The paint needs at least 3 coats or it will dry and crack around curved surfaces.