J.M.Pearce (talk | contribs) |
Kathy Nativi (talk | contribs) No edit summary |
||
| (12 intermediate revisions by 6 users not shown) | |||
| Line 1: | Line 1: | ||
<center>[[ | <center>[[File:Plasticbankheader.png|thumb]]</center> | ||
[http://plasticbank.org/ The Plastic Bank] is an organization designed to remove plastic waste from the world's oceans, beaches and waterways while empowering people living in poverty to raise their standard of living. | |||
[ | To achieve this goal the Plastic Bank is releasing their first version of a [[recyclebot]]. The Plastic Bank system is an industrial waste plastic/ocean plastic extruder and have provided all of the plans as [[open hardware]]. | ||
== Open Hardware Documents == | |||
* Plastic Bank Extruder v1.0 Full bill of materials: [[File:BOM2 Sheet1.pdf|thumb]] | |||
* Plastic Bank Extruder v1.0 Full bill of materials: [[File:BOM2 Sheet1.pdf]] | * Plastic Bank Extruder v1.0 Technical Drawings [[File:11TECHNICALDRAWINGS.pdf|thumb]] | ||
* Plastic Bank Extruder v1.0 Technical Drawings [[File:11TECHNICALDRAWINGS.pdf]] | * Plastic Bank Extruder v1.0 Electric wiring Diagram: [[File:Extruder wiring diagram.pdf|thumb]] | ||
* Plastic Bank Extruder v1.0 | * Plastic Bank Extruder v1.0 Assembly instructions: [[File:Plastic Bank Extruder Assembly Guide-f.pdf|thumb]] | ||
* Plastic Bank Extruder v1.0 Assembly instructions: [[File:Plastic Bank Extruder Assembly Guide-f.pdf]] | * Plastic Bank's page for the Extruder v1.0: http://plasticbank.org/extruder/ | ||
* | |||
== Operation Plastic Bank Extruder v1.0 == | |||
=== Setup Procedure: Plastic Bank Extruder v1.0 === | |||
===Setup Procedure: Plastic Bank Extruder v1.0=== | |||
====Die Setup | ==== Die Setup ==== | ||
# Ensure that the power is off, and the controls are turned off before beginning | # Ensure that the power is off, and the controls are turned off before beginning | ||
| Line 33: | Line 26: | ||
# Check to ensure that all components are mounted flush and there are no debris or residual plastic on the components before beginning the extrusion process. | # Check to ensure that all components are mounted flush and there are no debris or residual plastic on the components before beginning the extrusion process. | ||
====Heating | ==== Heating ==== | ||
# Once the die is in place, the extruder is ready to begin the heating sequence. It is important to set your desired temperatures before beginning this process as it takes time for components to heat up and cool down. | # Once the die is in place, the extruder is ready to begin the heating sequence. It is important to set your desired temperatures before beginning this process as it takes time for components to heat up and cool down. | ||
# Ensuring that the motor switch | # Ensuring that the motor switch is off, turn the extruder and control box on. | ||
# The temperatures sensors and heater bands will now display temperatures. Set temperatures by pressing the arrow keys and hitting set on each of the three heating zone regions | # The temperatures sensors and heater bands will now display temperatures. Set temperatures by pressing the arrow keys and hitting set on each of the three heating zone regions | ||
# The system generally takes 45 | # The system generally takes 45 minutes to 60 minutes to heat up. Once the extruder has reached the required melting temperature, the motor can be turned on and begin running. | ||
# Take caution when working near the barrel and die as components can be extremely hot. | # Take caution when working near the barrel and die as components can be extremely hot. | ||
===OPERATION PROCEDURE=== | === OPERATION PROCEDURE === | ||
====Preparing Input (Purging) | ==== Preparing Input (Purging) ==== | ||
# A purge material with a lower processing temperature of high melting temperature plastic (e.g. for PET <240 degrees Celsius) will be required such as PLA to clean and remove any residuals left behind from prior processes. | # A purge material with a lower processing temperature of high melting temperature plastic (e.g. for PET <240 degrees Celsius) will be required such as PLA to clean and remove any residuals left behind from prior processes. | ||
# Ensure that the input purge material and high melting temperature plastic | # Ensure that the input purge material and high melting temperature plastic material has been properly cleaned, flaked, and dried before beginning. All labels and non-high melting temperature plastic materials should be removed from the hopper. Ensure that flakes are no larger than 12mm in their largest dimension. | ||
# Feed Fifty (50) grams of the purge material in the barrel ensuring proper feed and no clumping at the barrel inlet. | # Feed Fifty (50) grams of the purge material in the barrel ensuring proper feed and no clumping at the barrel inlet. | ||
# Observe the extrudate at the die exit, the extrudate should be the same colour as the input material. Repeat the purging process until the colour matches, and the barrel and screw are completely clean. | # Observe the extrudate at the die exit, the extrudate should be the same colour as the input material. Repeat the purging process until the colour matches, and the barrel and screw are completely clean. | ||
# Now that the barrel has been purged, the high melting temperature plastic | # Now that the barrel has been purged, the high melting temperature plastic input material can be fed. Start by feeding small quantities of one tablespoon of flakes into the barrel inlet. | ||
# Monitor the process and ensure | # Monitor the process and ensure that the high melting temperature plastic is not sticking to the screw. If the feed is sticking to the screw, lower the zone 1 temperature until feed is consistent. | ||
# Once the feed temperature has been set, the extrusion hopper can be filled. Monitor the levels of the hopper consistently checking that the hopper outlet is not jammed. | # Once the feed temperature has been set, the extrusion hopper can be filled. Monitor the levels of the hopper consistently checking that the hopper outlet is not jammed. | ||
====Collecting Output | ==== Collecting Output ==== | ||
# It is imperative to constantly monitor the machine and ensure that the temperatures are not exceeding the optimum processing range. | # It is imperative to constantly monitor the machine and ensure that the temperatures are not exceeding the optimum processing range. | ||
# Observe the extrudate at the die exit. If there is no extrudate for 15 minutes after initial feeding of high melting temperature plastic , repurge the machine and follow the Preparing Input procedure again. | # Observe the extrudate at the die exit. If there is no extrudate for 15 minutes after initial feeding of high melting temperature plastic, repurge the machine and follow the Preparing Input procedure again. | ||
# If the extrudate is experiencing high levels of die swell or is liquid at the exit, decrease your ZONE 3 temperature until the extrudate is solid. | # If the extrudate is experiencing high levels of die swell or is liquid at the exit, decrease your ZONE 3 temperature until the extrudate is solid. | ||
# Once the extrusion process is complete, purge the machine once again ensuring it is fully cleaned through with a low melt temp plastic. | # Once the extrusion process is complete, purge the machine once again ensuring it is fully cleaned through with a low melt temp plastic. | ||
[[ | [[File:Plasticbank test print.jpg|thumb|[[MOST]] test print using Plastic Bank's ocean plastic filament from the Open-Source Plastic Bank Extruder V1.0. The plastic is primarily HDPE and is shown printed on common duct tape.]] | ||
== See also == | |||
* [[Plastic Bank]] | * [[Plastic Bank]] | ||
* [[Recyclebot]] | * [[Recyclebot]] | ||
| Line 69: | Line 62: | ||
* [[Life cycle analysis of distributed recycling of post-consumer high density polyethylene for 3-D printing filament]] | * [[Life cycle analysis of distributed recycling of post-consumer high density polyethylene for 3-D printing filament]] | ||
* [[Mechanical Properties of Components Fabricated with Open-Source 3-D Printers Under Realistic Environmental Conditions]] | * [[Mechanical Properties of Components Fabricated with Open-Source 3-D Printers Under Realistic Environmental Conditions]] | ||
* [[Mechanical testing of polymer components made with the | * [[Mechanical testing of polymer components made with the RepRap 3-D printer]] | ||
* [[Development and feasibility of applications for the RepRap 3-D printer]] | * [[Development and feasibility of applications for the RepRap 3-D printer]] | ||
* [[Life cycle analysis of distributed polymer recycling]] | * [[Life cycle analysis of distributed polymer recycling]] | ||
* [[Solar powered distributed customized manufacturing]] | * [[Solar powered distributed customized manufacturing]] | ||
* [[Distributed recycling of post-consumer plastic waste in rural areas]] | * [[Distributed recycling of post-consumer plastic waste in rural areas]] | ||
* [[Ethical Filament Foundation]] | * [[Ethical Filament Foundation]] | ||
* [http://3dprintingindustry.com/2014/03/19/mobile-eco-3d-printing-station/ LDPE recycling on a bike with a RepRap] from Taipei-based company [http://www.fabraft.com/ Fabraft] | * [http://web.archive.org/web/20160424042431/http://3dprintingindustry.com:80/2014/03/19/mobile-eco-3d-printing-station/ LDPE recycling on a bike with a RepRap] from Taipei-based company [http://web.archive.org/web/20200320134735/https://www.fabraft.com/ Fabraft] | ||
* UBC recycling of old prints with blender and liquid nitrogen http://ubc-rapid.com/blog/?p=183 | * UBC recycling of old prints with blender and liquid nitrogen http://web.archive.org/web/20140408053842/http://ubc-rapid.com/blog/?p=183 | ||
{{Page data}} | |||
[[Category:Recycling]] | [[Category:Recycling]] | ||
[[Category:Polymer recycling]] | [[Category:Polymer recycling]] | ||
[[Category:Appropriate technology videos]] | [[Category:Appropriate technology videos]] | ||
[[Category:3D printing]] | [[Category:3D printing]] | ||
[[Category:Upcycling]] | [[Category:Upcycling]] | ||
Latest revision as of 23:31, 15 April 2024

The Plastic Bank is an organization designed to remove plastic waste from the world's oceans, beaches and waterways while empowering people living in poverty to raise their standard of living.
To achieve this goal the Plastic Bank is releasing their first version of a recyclebot. The Plastic Bank system is an industrial waste plastic/ocean plastic extruder and have provided all of the plans as open hardware.
Open Hardware Documents[edit | edit source]
- Plastic Bank Extruder v1.0 Full bill of materials:
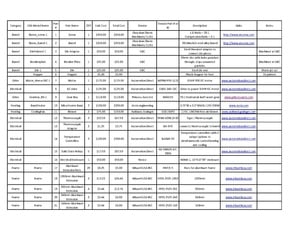
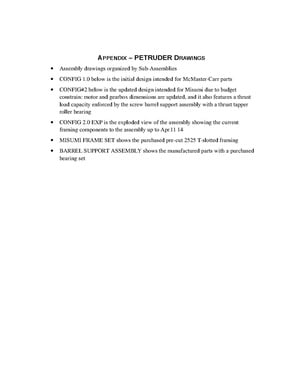
- Plastic Bank Extruder v1.0 Technical Drawings
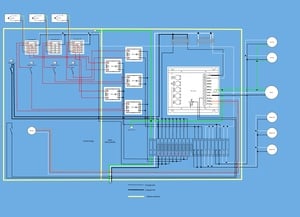
- Plastic Bank Extruder v1.0 Electric wiring Diagram:
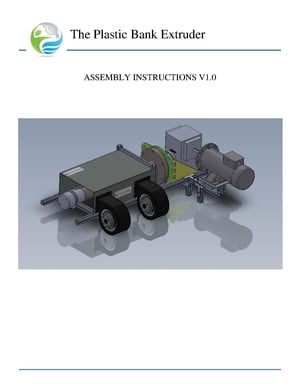
- Plastic Bank Extruder v1.0 Assembly instructions:
- Plastic Bank's page for the Extruder v1.0: http://plasticbank.org/extruder/
Operation Plastic Bank Extruder v1.0[edit | edit source]
Setup Procedure: Plastic Bank Extruder v1.0[edit | edit source]
Die Setup[edit | edit source]
- Ensure that the power is off, and the controls are turned off before beginning
- Check that there are no foreign objects in the extrusion barrel and ensure that all components (screw, barrel, breaker plate, die, and die adapter) are clean. If the barrel contains any solid objects that are not plastic flakes or plastic resin remove it using compressed air. Never insert a foreign object into the barrel at any time.
- Once the foreign objects are removed, place the breaker plate, in the breaker plate channel at the end of the barrel.
- Firmly and fully screw the die adapter onto the threading at the end of the barrel ensuring that there is no spacing left
- Choose your selected extrusion die, and use four (4) M6 bolts equally torqued to secure it in place.
- Check to ensure that all components are mounted flush and there are no debris or residual plastic on the components before beginning the extrusion process.
Heating[edit | edit source]
- Once the die is in place, the extruder is ready to begin the heating sequence. It is important to set your desired temperatures before beginning this process as it takes time for components to heat up and cool down.
- Ensuring that the motor switch is off, turn the extruder and control box on.
- The temperatures sensors and heater bands will now display temperatures. Set temperatures by pressing the arrow keys and hitting set on each of the three heating zone regions
- The system generally takes 45 minutes to 60 minutes to heat up. Once the extruder has reached the required melting temperature, the motor can be turned on and begin running.
- Take caution when working near the barrel and die as components can be extremely hot.
OPERATION PROCEDURE[edit | edit source]
Preparing Input (Purging)[edit | edit source]
- A purge material with a lower processing temperature of high melting temperature plastic (e.g. for PET <240 degrees Celsius) will be required such as PLA to clean and remove any residuals left behind from prior processes.
- Ensure that the input purge material and high melting temperature plastic material has been properly cleaned, flaked, and dried before beginning. All labels and non-high melting temperature plastic materials should be removed from the hopper. Ensure that flakes are no larger than 12mm in their largest dimension.
- Feed Fifty (50) grams of the purge material in the barrel ensuring proper feed and no clumping at the barrel inlet.
- Observe the extrudate at the die exit, the extrudate should be the same colour as the input material. Repeat the purging process until the colour matches, and the barrel and screw are completely clean.
- Now that the barrel has been purged, the high melting temperature plastic input material can be fed. Start by feeding small quantities of one tablespoon of flakes into the barrel inlet.
- Monitor the process and ensure that the high melting temperature plastic is not sticking to the screw. If the feed is sticking to the screw, lower the zone 1 temperature until feed is consistent.
- Once the feed temperature has been set, the extrusion hopper can be filled. Monitor the levels of the hopper consistently checking that the hopper outlet is not jammed.
Collecting Output[edit | edit source]
- It is imperative to constantly monitor the machine and ensure that the temperatures are not exceeding the optimum processing range.
- Observe the extrudate at the die exit. If there is no extrudate for 15 minutes after initial feeding of high melting temperature plastic, repurge the machine and follow the Preparing Input procedure again.
- If the extrudate is experiencing high levels of die swell or is liquid at the exit, decrease your ZONE 3 temperature until the extrudate is solid.
- Once the extrusion process is complete, purge the machine once again ensuring it is fully cleaned through with a low melt temp plastic.

See also[edit | edit source]
- Plastic Bank
- Recyclebot
- Evaluation of Potential Fair Trade Standards for an Ethical 3-D Printing Filament
- Life cycle analysis of distributed recycling of post-consumer high density polyethylene for 3-D printing filament
- Mechanical Properties of Components Fabricated with Open-Source 3-D Printers Under Realistic Environmental Conditions
- Mechanical testing of polymer components made with the RepRap 3-D printer
- Development and feasibility of applications for the RepRap 3-D printer
- Life cycle analysis of distributed polymer recycling
- Solar powered distributed customized manufacturing
- Distributed recycling of post-consumer plastic waste in rural areas
- Ethical Filament Foundation
- LDPE recycling on a bike with a RepRap from Taipei-based company Fabraft
- UBC recycling of old prints with blender and liquid nitrogen http://web.archive.org/web/20140408053842/http://ubc-rapid.com/blog/?p=183