LGMarshall (talk | contribs) m (→Temperature and Time Table: Grammar) |
LGMarshall (talk | contribs) (Update on the protocol, removing information on crystallinity effects.) |
||
| (35 intermediate revisions by the same user not shown) | |||
| Line 1: | Line 1: | ||
{{MOST}} | {{MOST}} | ||
[[category:MOST methods]] | [[category:MOST methods]] | ||
{{Template:Status-Model}} | |||
'''THIS METHOD IS CURRENTLY A WORK IN PROGRESS''' | '''THIS METHOD IS CURRENTLY A WORK IN PROGRESS''' | ||
| Line 6: | Line 7: | ||
==Shredding and Cleaning== | ==Shredding and Cleaning== | ||
Any PET bottles or containers which are to be to be recycled need to be ground up into smaller pieces first. This is to speed up the drying process, and also, to fit the plastic into the RecycleBot hopper. | Any PET bottles or containers which are to be to be recycled need to be ground up into smaller pieces first. This is to speed up the drying process, and also, to fit the plastic into the RecycleBot hopper. Approximately 1/4 of the mass of an average water bottle is in the thred and cap region of the main body. This is because this region has to be very resistant to deformation so that the cap can correctly screw on. | ||
[[Image:WaterBottleSticker.jpg|thumb|The leftover glue from the label on this water bottle.]] | [[Image:WaterBottleSticker.jpg|thumb|The leftover glue from the label on this water bottle.]] | ||
===Shredding and Cleaning: Equipment=== | ===Shredding and Cleaning: Equipment=== | ||
*Shredder | *Shredder | ||
*Oil-based cleaner to remove glue, see step 2. (NO WD40) | *Oil-based cleaner to remove glue, see step 2. Peanut butter, nail polish remover, and perfume are all recommended. (NO WD40) | ||
*Scissors or shears | *Scissors or shears | ||
===Shredding and Cleaning: Procedure=== | ===Shredding and Cleaning: General Procedure=== | ||
# | # Peel any labels and/or different colored plastics off of the bottle. | ||
# Remove any glue from the wrappings off using your cleaner. MOST used => Duct tape. The sticky side, if repeatedly applied and removed, can pull of the glue. This process, however, takes a significant amount of time. | |||
# Rinse out your container, and dry, to remove any leftover beverages. | |||
# Cut apart bottles and containers to fit into your shredder. The threaded section will most likely need to be removed, until a total-shredder is developed. | |||
# Shred the PET chunks. MOST has used a "Chipper Joe", green wood-chipper and a disk shredder, from Staples. The disk shredder has worked the best so far, with consistent results. The wood chipper is not great for water bottles, it regularly becomes jammed, and has inconsistent sizes. | |||
# Collect the chunks and store somewhere cool and dry until the drying step, just as a preventative measure to moisture buildup. | |||
===Cutting Techniques=== | |||
Some containers may be made of a thicker plastic than others, so different methods must be taken to prepare them. | |||
====Method 1 (Gatorade Bottles): Tested==== | |||
#Cut apart the bottle as shown in pictures. | |||
##Top and bottom off | |||
##Cut in half | |||
##Trim off curved pieces | |||
#Plug in and turn on disk shredder (NW corner of room) | |||
#Hold forwards button | |||
#Insert slightly curved section into disk shredder. | |||
#Losses of 14/24g: | |||
#*The thread | |||
#*Bottom | |||
#*Curved top | |||
<gallery mode=packed> | |||
File:PETBottleM1_1.jpg|If using a small knife, firmly pressing it into the bottom edge is a good method. If force is applied near the line, the flashing, it may be easier. | |||
File:PETBottleM1_2.jpg|After working up to the top of the bottom, slice the thread part off. | |||
File:PETBottleM1_3.jpg|After cutting the opposite side and around the bottom. | |||
File:PETBottleM1_4.jpg|One of the final halves, ready to be cut. Note the rounded part is missing. | |||
</gallery> | |||
====Method 2 (Gatorade Bottle): Tested==== | |||
NOTE: At MOST this doesn't really work, as the bottles decompress inside the wood chipper and jam. | |||
#Cut off top and bottom | |||
#Cut 1 slit in bottle lengthways | |||
#Turn on wood chipper | |||
#compress and slide into wood chipper | |||
#Losses of 10/24g: | |||
#*The thread | |||
#*Bottom | |||
<gallery mode=packed> | |||
File:PETBottleM2_1.jpg|The top and bottom of the bottle are removed, and one cut has been made along the length. | |||
</gallery> | |||
== | ====Method 3 (Plastic Water bottle): Tested==== | ||
#Cut top off of bottle | |||
#Split into 4 sections | |||
#Plug in and turn on disk shredder, in NW corner of room | |||
#Hold forwards button | |||
#Insert sections lengthways | |||
#Losses of: | |||
#*The thread | |||
= | <gallery mode=packed> | ||
File:PETBottleM3_1.jpg|Cut the top of the bottle off. | |||
File:PETBottleM3_2.jpg|Cut the bottle into two halves. The base may be difficult to cut, as it is much thicker. | |||
File:PETBottleM3_3.jpg|Cut the halves now, so that you have 4 quarters of the bottle. | |||
</gallery> | |||
=== | ====Method 4 (Water Bottle Threads): Tested==== | ||
# | #Place a large plastic container under the output of the wood chipper. Alternatively, a cardboard box may be used, but pieces of the plastic may be lost in the seams of the box. | ||
#Take the threads from the water bottles that none of the other methods can shred. | |||
#Turn on the wood chipper, and WEAR SAFETY GLASSES. | |||
# | #Carefully insert them into the wood chipper. | ||
#Turn off the wood chipper when done, and collect the results. | |||
# | #Losses of: | ||
# | #*None, as we are able to use the losses of a previous method. | ||
# | |||
# | |||
= | <gallery mode=packed> | ||
File:PETBottleM4_1.jpg|Carefully insert the tops of the bottles into the wood chippers. Never put your hands inside the wood chipper. | |||
</gallery> | |||
==[[Polymer drying protocol:MOST|PET Drying]]== | |||
PET needs to be dried prior to extrusion in a [[Recyclebot]] as otherwise it will undergo rapid hyrdolyzation at high temperatures, and reduce the molecular mass. | |||
Revision as of 00:04, 14 March 2016


Template:Status-Model THIS METHOD IS CURRENTLY A WORK IN PROGRESS
Here is outlined the method to shred, clean and dry PET at the MOST lab at Michigan Technological University. For more information on PET mechanisms please see the PET Extrusion literature review.
Shredding and Cleaning
Any PET bottles or containers which are to be to be recycled need to be ground up into smaller pieces first. This is to speed up the drying process, and also, to fit the plastic into the RecycleBot hopper. Approximately 1/4 of the mass of an average water bottle is in the thred and cap region of the main body. This is because this region has to be very resistant to deformation so that the cap can correctly screw on.

Shredding and Cleaning: Equipment
- Shredder
- Oil-based cleaner to remove glue, see step 2. Peanut butter, nail polish remover, and perfume are all recommended. (NO WD40)
- Scissors or shears
Shredding and Cleaning: General Procedure
- Peel any labels and/or different colored plastics off of the bottle.
- Remove any glue from the wrappings off using your cleaner. MOST used => Duct tape. The sticky side, if repeatedly applied and removed, can pull of the glue. This process, however, takes a significant amount of time.
- Rinse out your container, and dry, to remove any leftover beverages.
- Cut apart bottles and containers to fit into your shredder. The threaded section will most likely need to be removed, until a total-shredder is developed.
- Shred the PET chunks. MOST has used a "Chipper Joe", green wood-chipper and a disk shredder, from Staples. The disk shredder has worked the best so far, with consistent results. The wood chipper is not great for water bottles, it regularly becomes jammed, and has inconsistent sizes.
- Collect the chunks and store somewhere cool and dry until the drying step, just as a preventative measure to moisture buildup.
Cutting Techniques
Some containers may be made of a thicker plastic than others, so different methods must be taken to prepare them.
Method 1 (Gatorade Bottles): Tested
- Cut apart the bottle as shown in pictures.
- Top and bottom off
- Cut in half
- Trim off curved pieces
- Plug in and turn on disk shredder (NW corner of room)
- Hold forwards button
- Insert slightly curved section into disk shredder.
- Losses of 14/24g:
- The thread
- Bottom
- Curved top
-
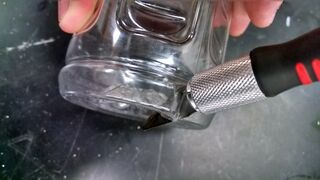
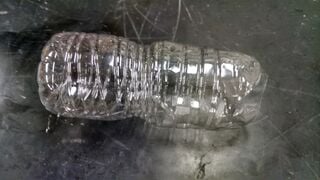
If using a small knife, firmly pressing it into the bottom edge is a good method. If force is applied near the line, the flashing, it may be easier.
-
After working up to the top of the bottom, slice the thread part off.
-
After cutting the opposite side and around the bottom.
-
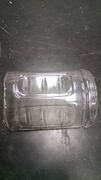
One of the final halves, ready to be cut. Note the rounded part is missing.


Method 2 (Gatorade Bottle): Tested
NOTE: At MOST this doesn't really work, as the bottles decompress inside the wood chipper and jam.
- Cut off top and bottom
- Cut 1 slit in bottle lengthways
- Turn on wood chipper
- compress and slide into wood chipper
- Losses of 10/24g:
- The thread
- Bottom
-
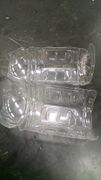
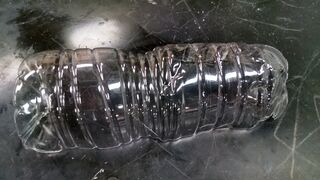
The top and bottom of the bottle are removed, and one cut has been made along the length.

Method 3 (Plastic Water bottle): Tested
- Cut top off of bottle
- Split into 4 sections
- Plug in and turn on disk shredder, in NW corner of room
- Hold forwards button
- Insert sections lengthways
- Losses of:
- The thread
-
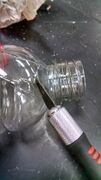
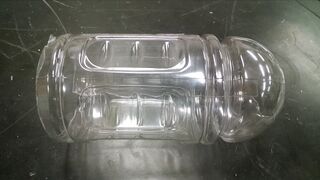
Cut the top of the bottle off.
-
Cut the bottle into two halves. The base may be difficult to cut, as it is much thicker.
-

Cut the halves now, so that you have 4 quarters of the bottle.


Method 4 (Water Bottle Threads): Tested
- Place a large plastic container under the output of the wood chipper. Alternatively, a cardboard box may be used, but pieces of the plastic may be lost in the seams of the box.
- Take the threads from the water bottles that none of the other methods can shred.
- Turn on the wood chipper, and WEAR SAFETY GLASSES.
- Carefully insert them into the wood chipper.
- Turn off the wood chipper when done, and collect the results.
- Losses of:
- None, as we are able to use the losses of a previous method.
-
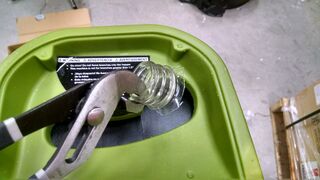
Carefully insert the tops of the bottles into the wood chippers. Never put your hands inside the wood chipper.

PET Drying
PET needs to be dried prior to extrusion in a Recyclebot as otherwise it will undergo rapid hyrdolyzation at high temperatures, and reduce the molecular mass.