LGMarshall (talk | contribs) |
LGMarshall (talk | contribs) (Added galleries for cutting procedures) |
||
| Line 14: | Line 14: | ||
*Scissors or shears | *Scissors or shears | ||
===Shredding and Cleaning: Procedure=== | ===Shredding and Cleaning: General Procedure=== | ||
# Peel any labels and/or different colored plastics off of the bottle. | # Peel any labels and/or different colored plastics off of the bottle. | ||
# Remove any glue from the wrappings off using your cleaner. MOST used => TESTING IN PROGRESS. | # Remove any glue from the wrappings off using your cleaner. MOST used => TESTING IN PROGRESS. | ||
# Rinse out your container, and dry, to remove any leftover beverages. | # Rinse out your container, and dry, to remove any leftover beverages. | ||
# Cut apart bottles and containers to fit into your shredder. The threaded section will most likely need to be removed, until a total-shredder is developed. | # Cut apart bottles and containers to fit into your shredder. The threaded section will most likely need to be removed, until a total-shredder is developed. | ||
# Shred the PET chunks. MOST has used a "Chipper Joe", green | # Shred the PET chunks. MOST has used a "Chipper Joe", green wood-chipper and a disk shredder, from Staples. The disk shredder has worked the best so far, with consistent results. The wood chipper is not great for water bottles, it regularly becomes jammed, and has inconsistent sizes. | ||
# Collect the chunks and store somewhere cool and dry until the | # Collect the chunks and store somewhere cool and dry until the re-crystallization step, just as a preventative measure to moisture buildup. | ||
===Cutting Techniques=== | |||
Some containers may be made of a thicker plastic than others, so different methods must be taken to prepare them. | |||
====Method 1 (Gatorade Bottles): Tested==== | |||
#cut apart the bottle as shown in pictures. | |||
##top and bottom off | |||
##cut in half | |||
##trim curved pieces | |||
#Plug in and turn on disk shredder (NW corner of room) | |||
#Hold forwards button | |||
#Insert slightly curved section into disk shredder. | |||
#Losses of: | |||
#*the thread | |||
#*bottom | |||
#*curved top | |||
<gallery mode=packed> | |||
File:PETBottleM1_1.jpg|If using a small knife, firmly pressing it into the bottom edge is a good method. If force is applied near the line, the flashing, it may be easier. | |||
File:PETBottleM1_2.jpg|After working up to the top of the bottom, slice the thread part off. | |||
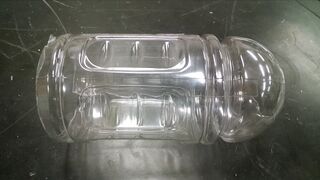
File:PETBottleM1_3.jpg|After cutting the opposite side and around the bottom. | |||
File:PETBottleM1_4.jpg|One of the final halves, ready to be cut. Note the rounded part is missing. | |||
</gallery> | |||
====Method 2 (Gatorade Bottle): Untested==== | |||
#Cut off top and bottom | |||
#cut 1 slit in bottle lengthways | |||
#Turn on wood chipper | |||
#compress and slide into wood chipper | |||
#Losses of: | |||
#*the thread | |||
#*bottom | |||
<gallery mode=packed> | |||
File:PETBottleM2_1.jpg|The top and bottom of the bottle are removed, and one cut has been made along the length. | |||
</gallery> | |||
====Method 3 (Plastic Water bottle): Tested==== | |||
#Cut top off of bottle | |||
#Split into 4 sections | |||
#Plug in and turn on disk shredder, in NW corner of room | |||
#Hold forwards button | |||
#Insert sections lengthways | |||
#Losses of: | |||
#*the thread | |||
<gallery mode=packed> | |||
File: | |||
File: | |||
File: | |||
File: | |||
</gallery> | |||
==Recrystallization== | ==Recrystallization== | ||
Revision as of 01:31, 2 November 2014


THIS METHOD IS CURRENTLY A WORK IN PROGRESS
Here is outlined the method to shred, clean and dry PET at the MOST lab at Michigan Technological University. For more information on PET mechanisms please see the PET Extrusion literature review.
Shredding and Cleaning
Any PET bottles or containers which are to be to be recycled need to be ground up into smaller pieces first. This is to speed up the drying process, and also, to fit the plastic into the RecycleBot hopper. Approximately 1/4 of the mass of an average water bottle is in the thred and cap region of the main body. This is because this region has to be very resistant to deformation so that the cap can correctly screw on.

Shredding and Cleaning: Equipment
- Shredder
- Oil-based cleaner to remove glue, see step 2. Peanut butter, nail polish remover, and perfume are all recommended. (NO WD40)
- Scissors or shears
Shredding and Cleaning: General Procedure
- Peel any labels and/or different colored plastics off of the bottle.
- Remove any glue from the wrappings off using your cleaner. MOST used => TESTING IN PROGRESS.
- Rinse out your container, and dry, to remove any leftover beverages.
- Cut apart bottles and containers to fit into your shredder. The threaded section will most likely need to be removed, until a total-shredder is developed.
- Shred the PET chunks. MOST has used a "Chipper Joe", green wood-chipper and a disk shredder, from Staples. The disk shredder has worked the best so far, with consistent results. The wood chipper is not great for water bottles, it regularly becomes jammed, and has inconsistent sizes.
- Collect the chunks and store somewhere cool and dry until the re-crystallization step, just as a preventative measure to moisture buildup.
Cutting Techniques
Some containers may be made of a thicker plastic than others, so different methods must be taken to prepare them.
Method 1 (Gatorade Bottles): Tested
- cut apart the bottle as shown in pictures.
- top and bottom off
- cut in half
- trim curved pieces
- Plug in and turn on disk shredder (NW corner of room)
- Hold forwards button
- Insert slightly curved section into disk shredder.
- Losses of:
- the thread
- bottom
- curved top
-
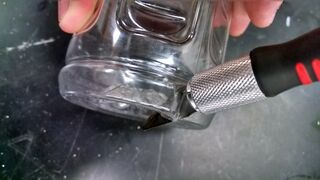
If using a small knife, firmly pressing it into the bottom edge is a good method. If force is applied near the line, the flashing, it may be easier.
-
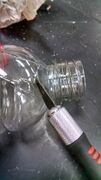
After working up to the top of the bottom, slice the thread part off.
-
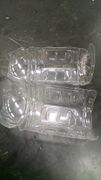
After cutting the opposite side and around the bottom.
-
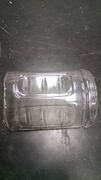
One of the final halves, ready to be cut. Note the rounded part is missing.


Method 2 (Gatorade Bottle): Untested
- Cut off top and bottom
- cut 1 slit in bottle lengthways
- Turn on wood chipper
- compress and slide into wood chipper
- Losses of:
- the thread
- bottom
-
The top and bottom of the bottle are removed, and one cut has been made along the length.

Method 3 (Plastic Water bottle): Tested
- Cut top off of bottle
- Split into 4 sections
- Plug in and turn on disk shredder, in NW corner of room
- Hold forwards button
- Insert sections lengthways
- Losses of:
- the thread
Recrystallization
Amorphous PET retains more water than crystalline PET, and also tends to clump together when dried. Temperaturesfor drying are intended to be for crystalline PET, rather than the amorphous form. Because of these factors, the amorphous PET which is collected from beverage bottles needs to be recrystallized first.
Currently, the reccommended method of doing this is to agitate and heat the amorphous shredded plastic at 180°F for around 1 hour [1]. This will increase the crystallinity of the plastic, and prepare it for drying.
Drying
PET needs to be dried prior to extrusion in a Recyclebot as otherwise it will undergo rapid hyrdolyzation at high temperatures, and reduce the molecular mass.
Drying: Equipment
- Convection Drying Oven (Any oven will generally work, ovens at home run off the same convection principles of heating and moving air. If using a home oven, be careful of temperatures, and be aware that there could potentially be burning plastic inside of it, if proper precautions are not taken)
- Shredded PET
- Drying tray (Any metal tray to hold the PET shreds)
Drying: Procedure
- Turn on the oven
- Evenly distribute the shredded PET in the drying tray. This exposes more surface area to enhance evaporation speed.
- Open the oven by firmly opening the door. It may take a quick jerk, but be careful not to topple it.
- Place the tray inside the oven.
- Close the oven door, firmly.
- Set the temperature on your oven to a value as shown by the table below. This table is a work in progress, please feel free to contribute and check!
- Wait for an amount of time also shown in the table above.
- Switch off the oven then carefully open the door after letting it cool for a few minutes.
- Quickly place the PET in an airtight container, such as inside two (2) layers of plastic bags that are twisted and tied shut. As long as the PET is not allowed to reabsorb water from the air, any arrangement will work.
- Store PET in a cool dry place until it is to be used. One excellent method is to place the dry PET inside a bag, which also has dessicant. This further dries the plastic, and will remove any moisture that may have accrued whilst handling it.
Temperature and Time Table
Important temperatures to be mindful of: 260°C is the melting point. 70-80°C is the glass transition temperature. The PET MUST be crystalline before this point, otherwise, temperatures much above the Tg will just clump the plastic together and cause it to degrade.
| 1 Hour | 2 Hours | 3 Hours | 4 Hours | 5 Hours | 6 Hours | |
|---|---|---|---|---|---|---|
| 82°C
Slightly above Tg |
No Change | No change | ||||
| 100°C | ||||||
| 125°C | ||||||
| 150°C | ||||||
| 175°C | ||||||
| 200°C | ||||||
| 225°C | ||||||
| 250°C | ||||||
| 275°C | ||||||
| 300°C |