Fall 2015
Current Status of the Project
Currently, the plastic granulator is designed and all of the parts that are capable of being machined in the M & M machine shop have been machined. Also, all of the parts that aren't able to be made in the machine shop have been shipped out and are currently being machined. All of the parts that have been shipped out (rotary blades, blade bed, screen, blade mounts, and flywheel) all should be completed and shipped back to us by the time we return for the Spring Semester.
Plastic Granulator
Project developed by Andy Schaub, Lucas Wilder (talk) 12:17, 10 December 2015 (PST), and Peter Gorecki

Abstract
Our mission is to build a Open Source Hardware Plastic Granulator to recycle old 3D prints to make new filament with the recyclebot. The evetual goal is to have the abilty to granulatete bothe HDPE and PET plastic to make recycled filament to sell through our enterprise.
- Paragraph description of the OSAT - why is it Appropriate? What need does it fulfil? Are there case studies you have found of a technology being used successfully?
- Picture of completed print using

Bill of Materials
All of the detailed drawings for each of the parts used to make the plastic granulator can be found below. Also, the fasteners needed to assemble the parts are listed.
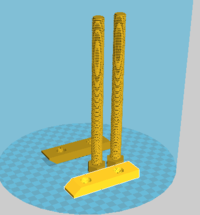
- The base rods are the supports used to hold the shredder up. There are four base rods needed to manufacture one granulator.
 These were made from a 1/8" 1.5" square tubing
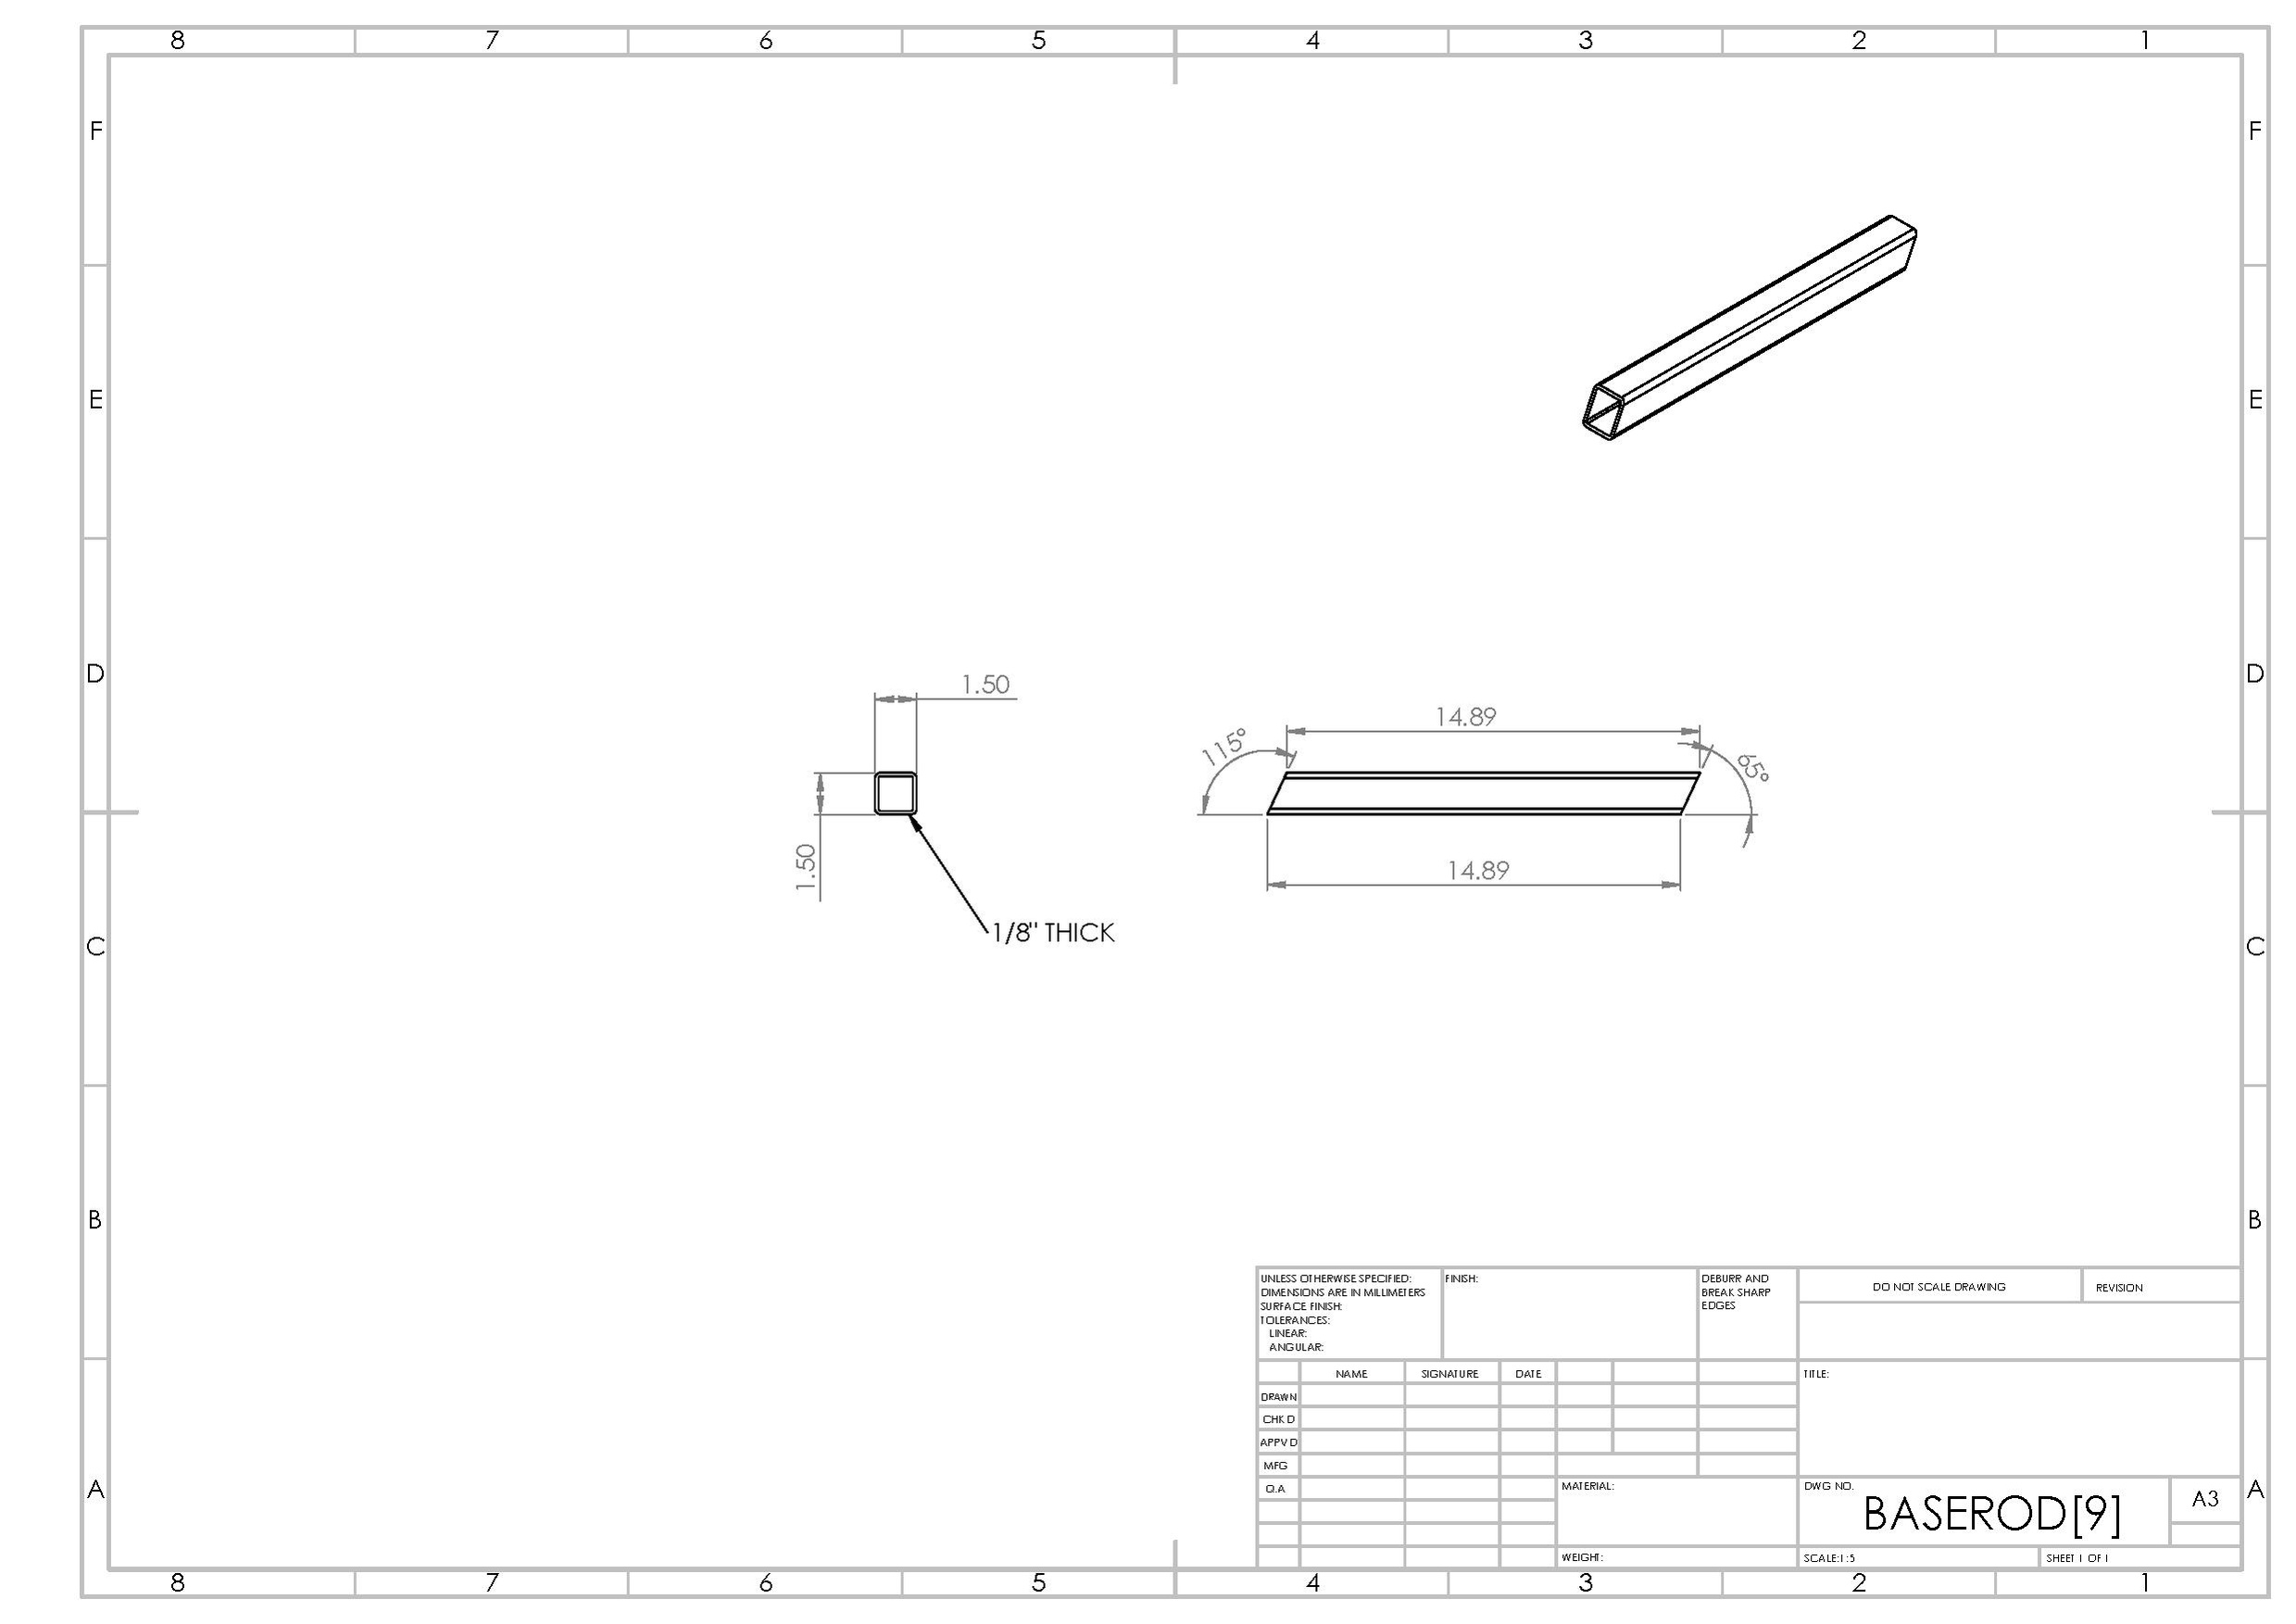
 - The bed knife is what the rotary blades use as a cutting edge. There is only one bed knife needed to manufacture one granulator.
 This is the website used to order the bed blade: Services for Plastics
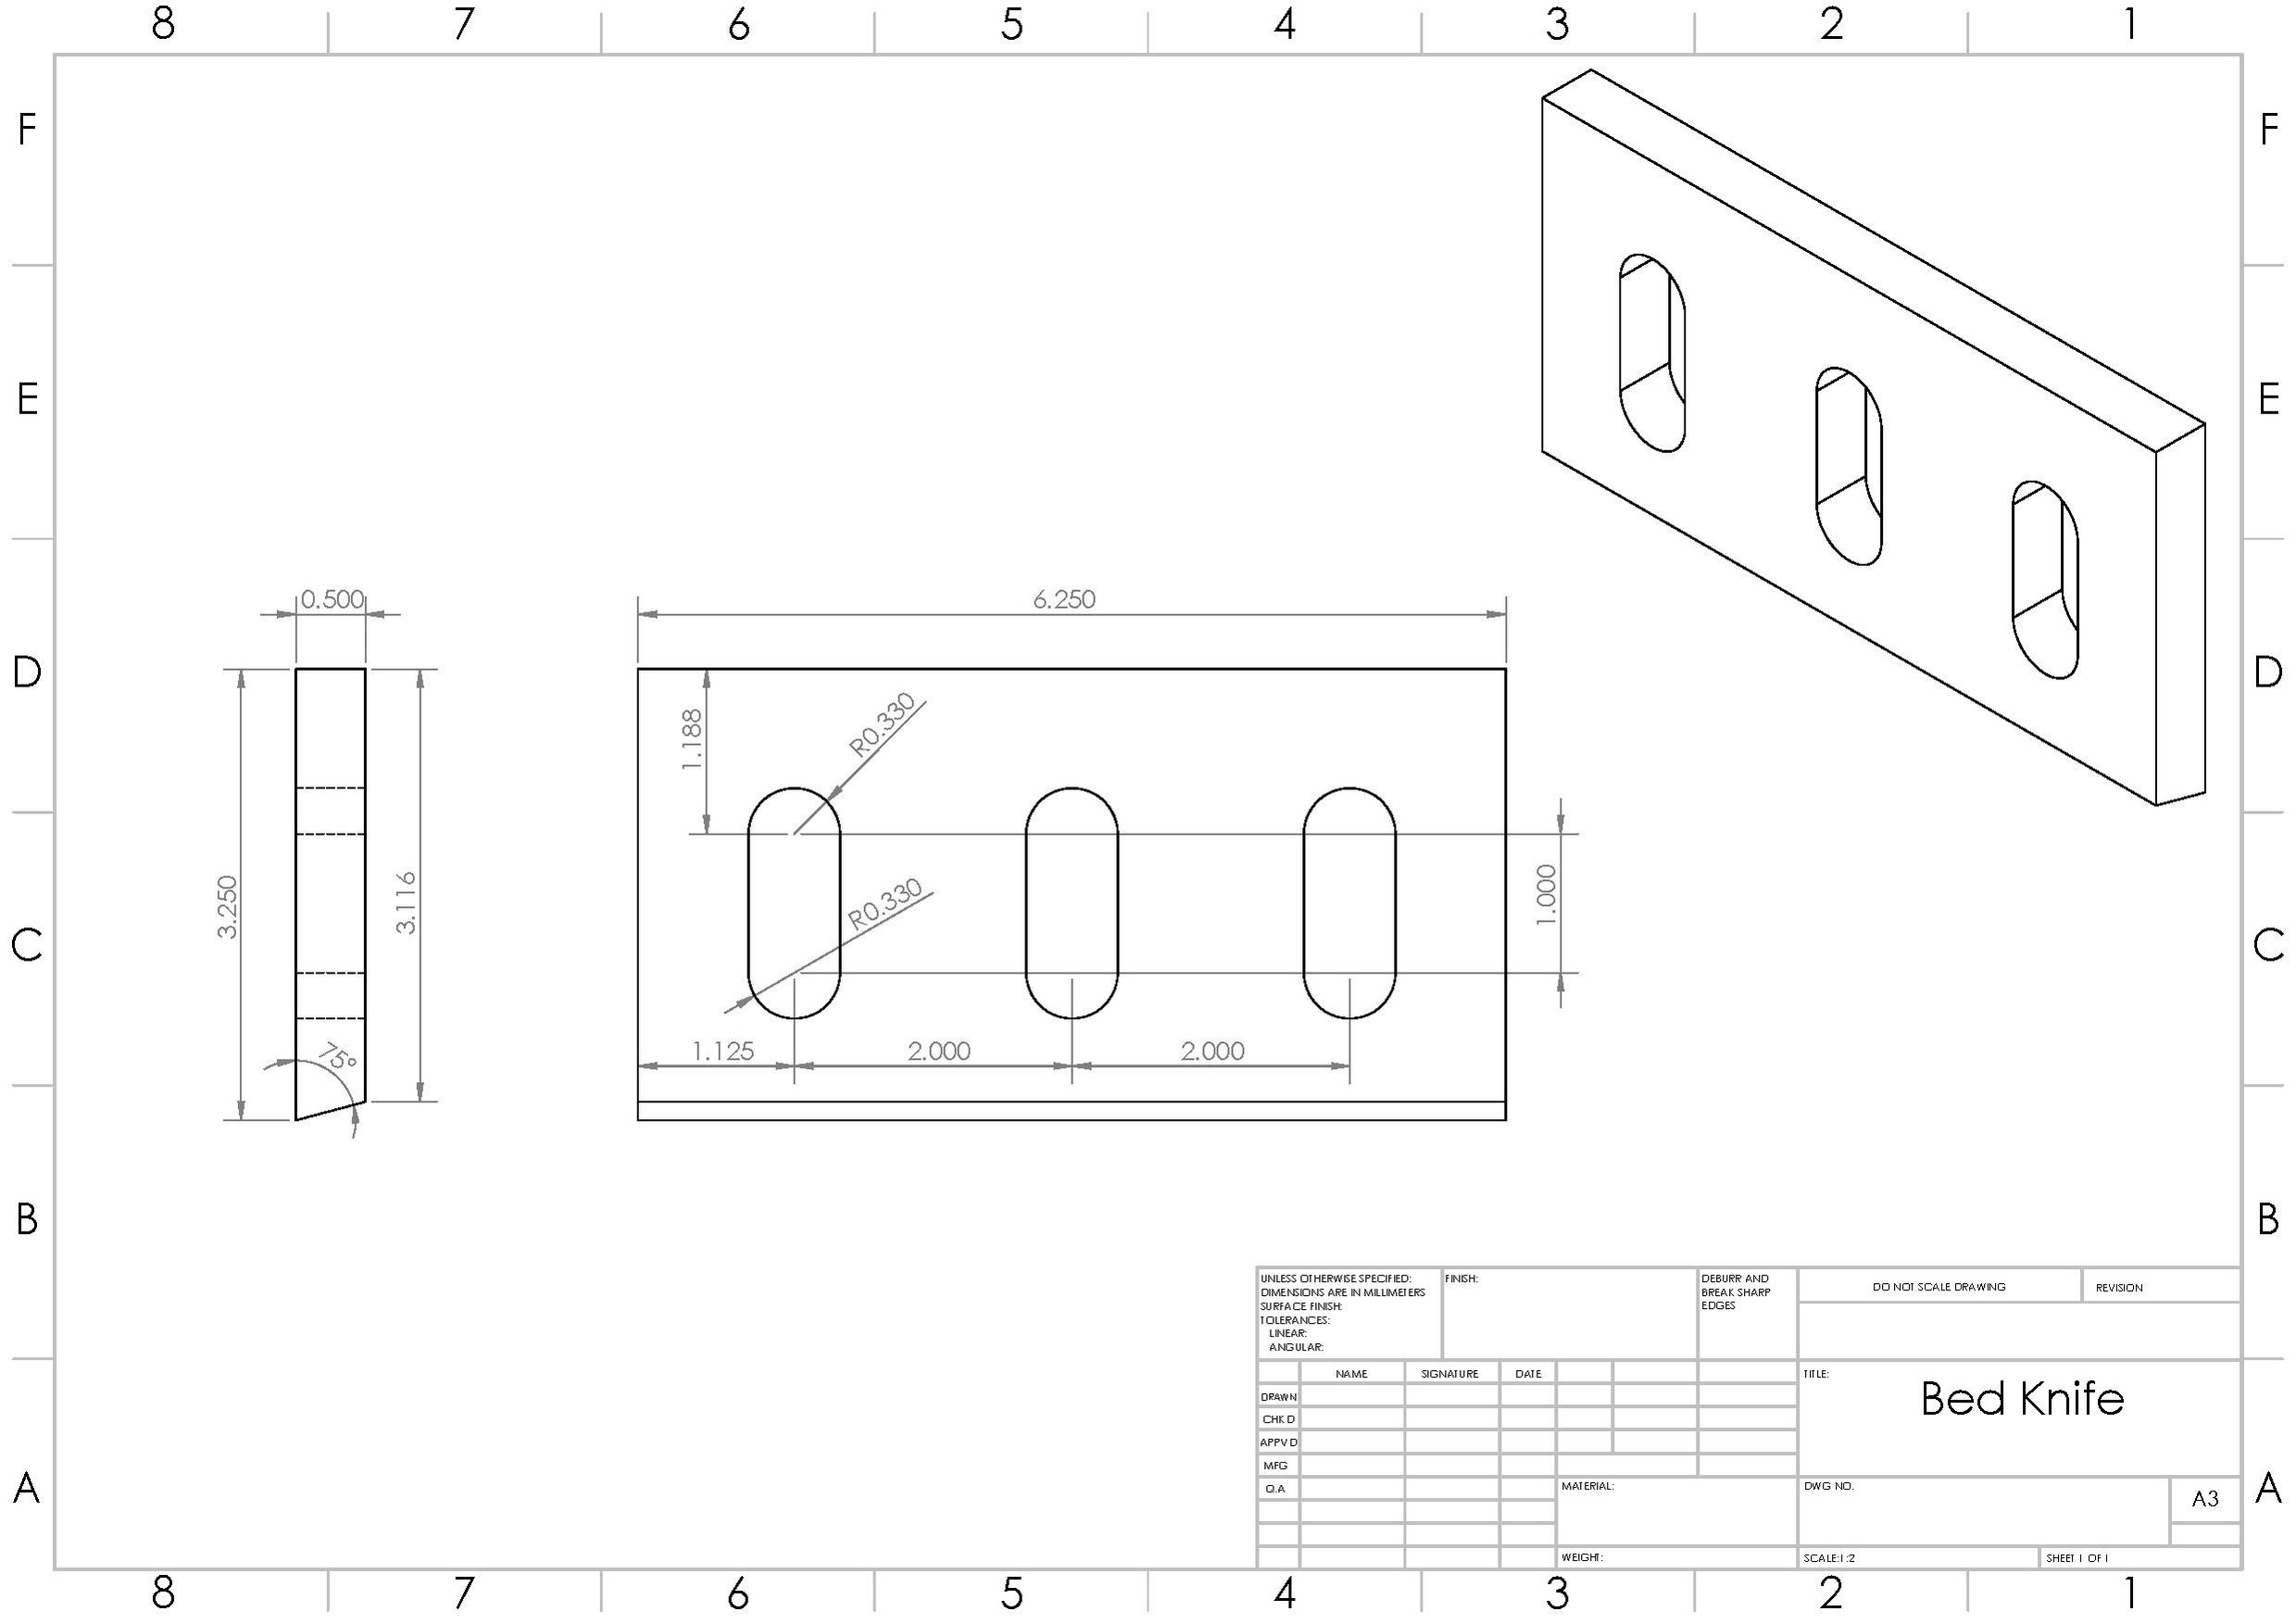
 - The blade supports are mounted to the shaft and is where the rotary blades mount. There are two blade supports needed to manufacture one granulator.
 These were made from a 1" steel plate.
 - The blade side plates are used to plates on the side of the granulator that is used to connect all of the parts. There are two blade side plates needed to manufacture one granulator.
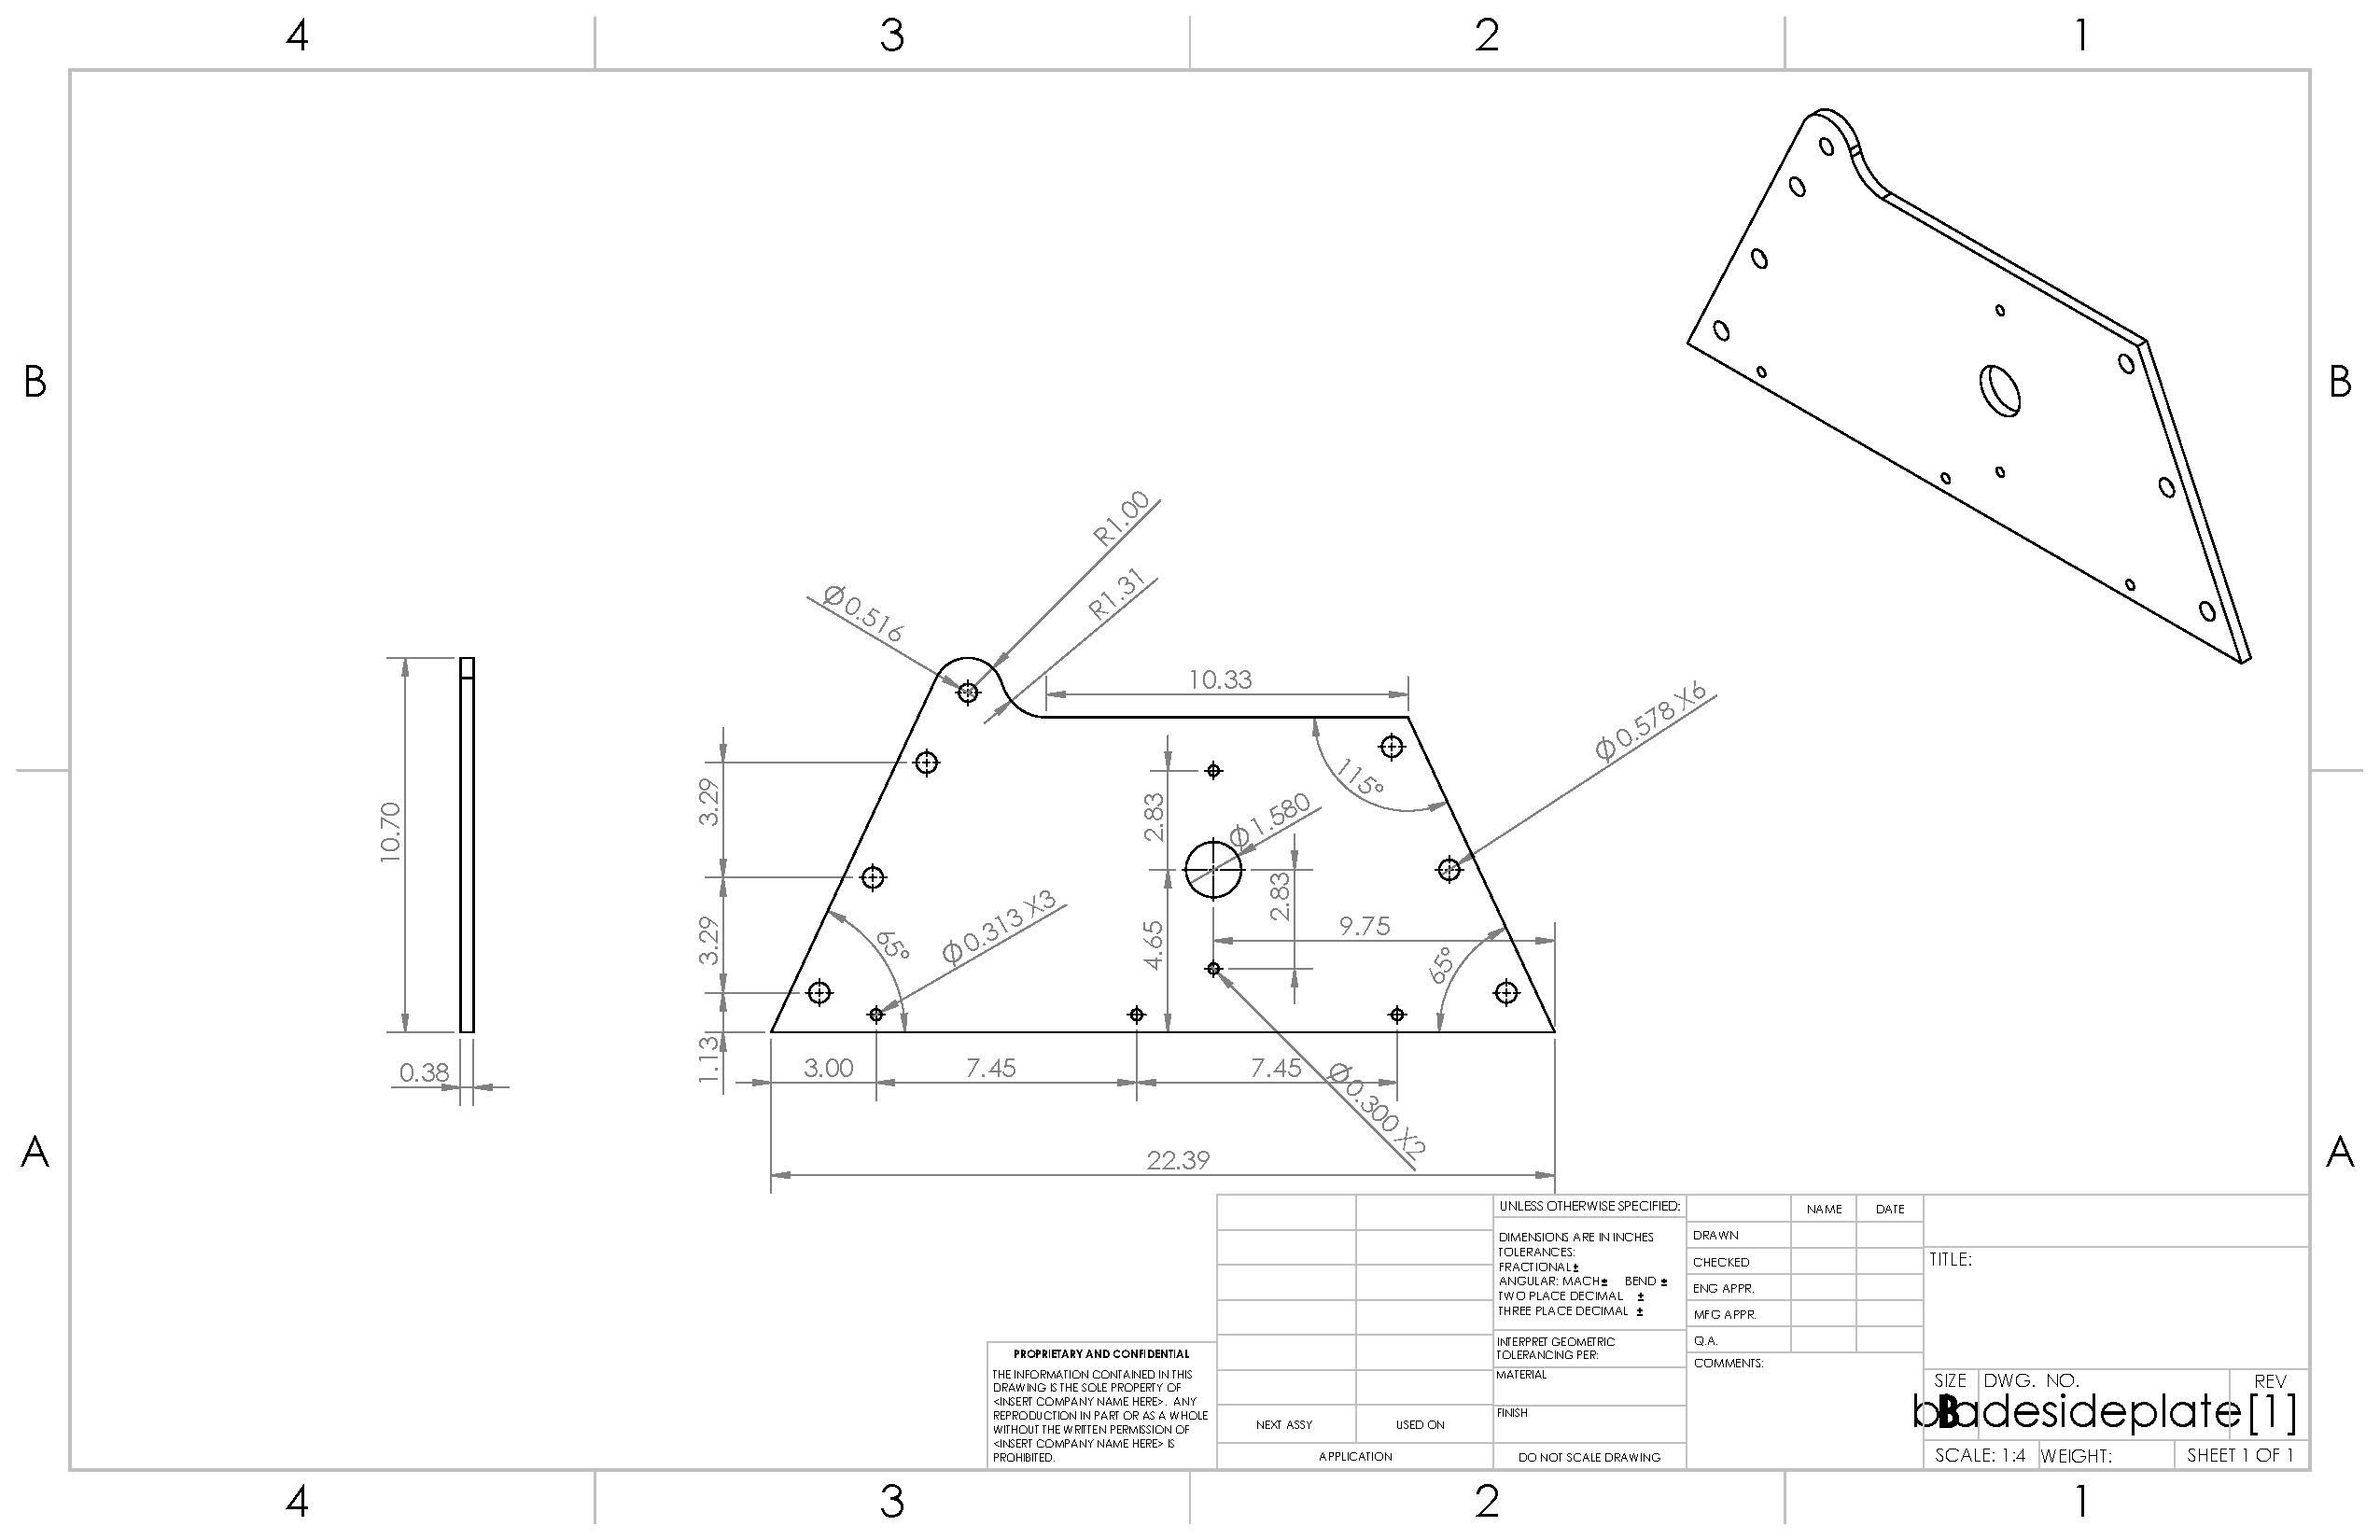 These were made from a 3/8" steel sheet.
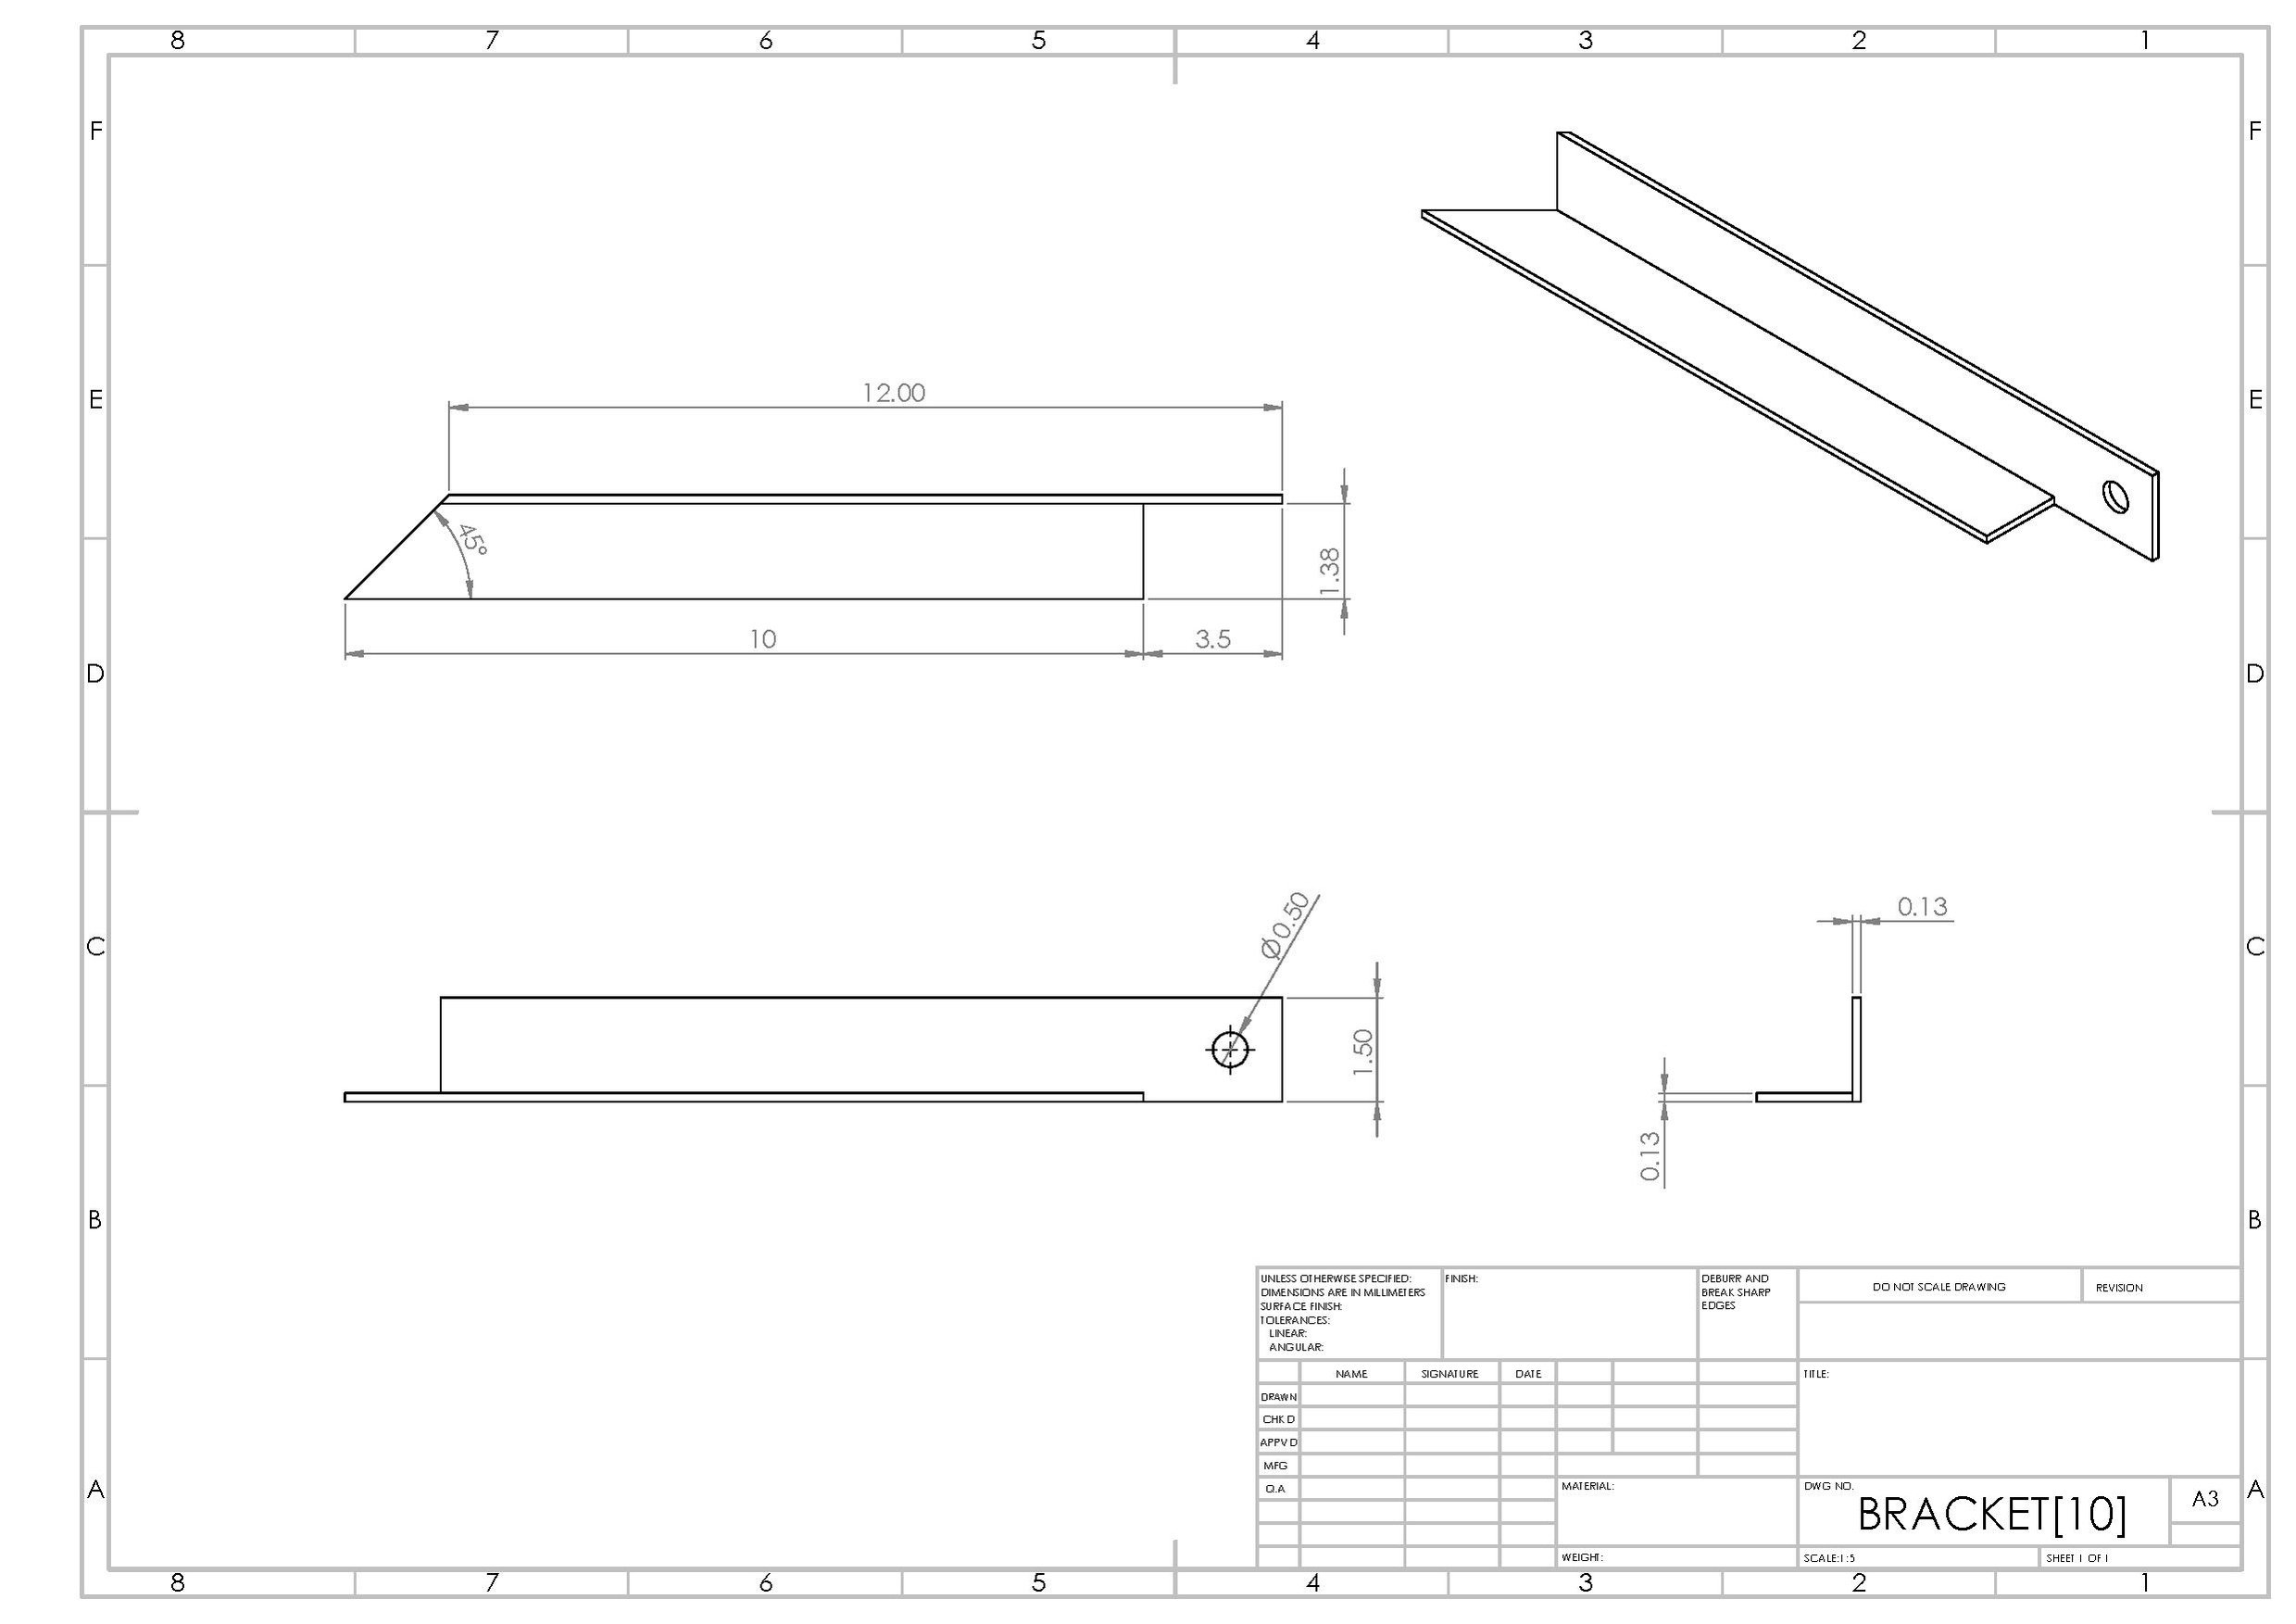
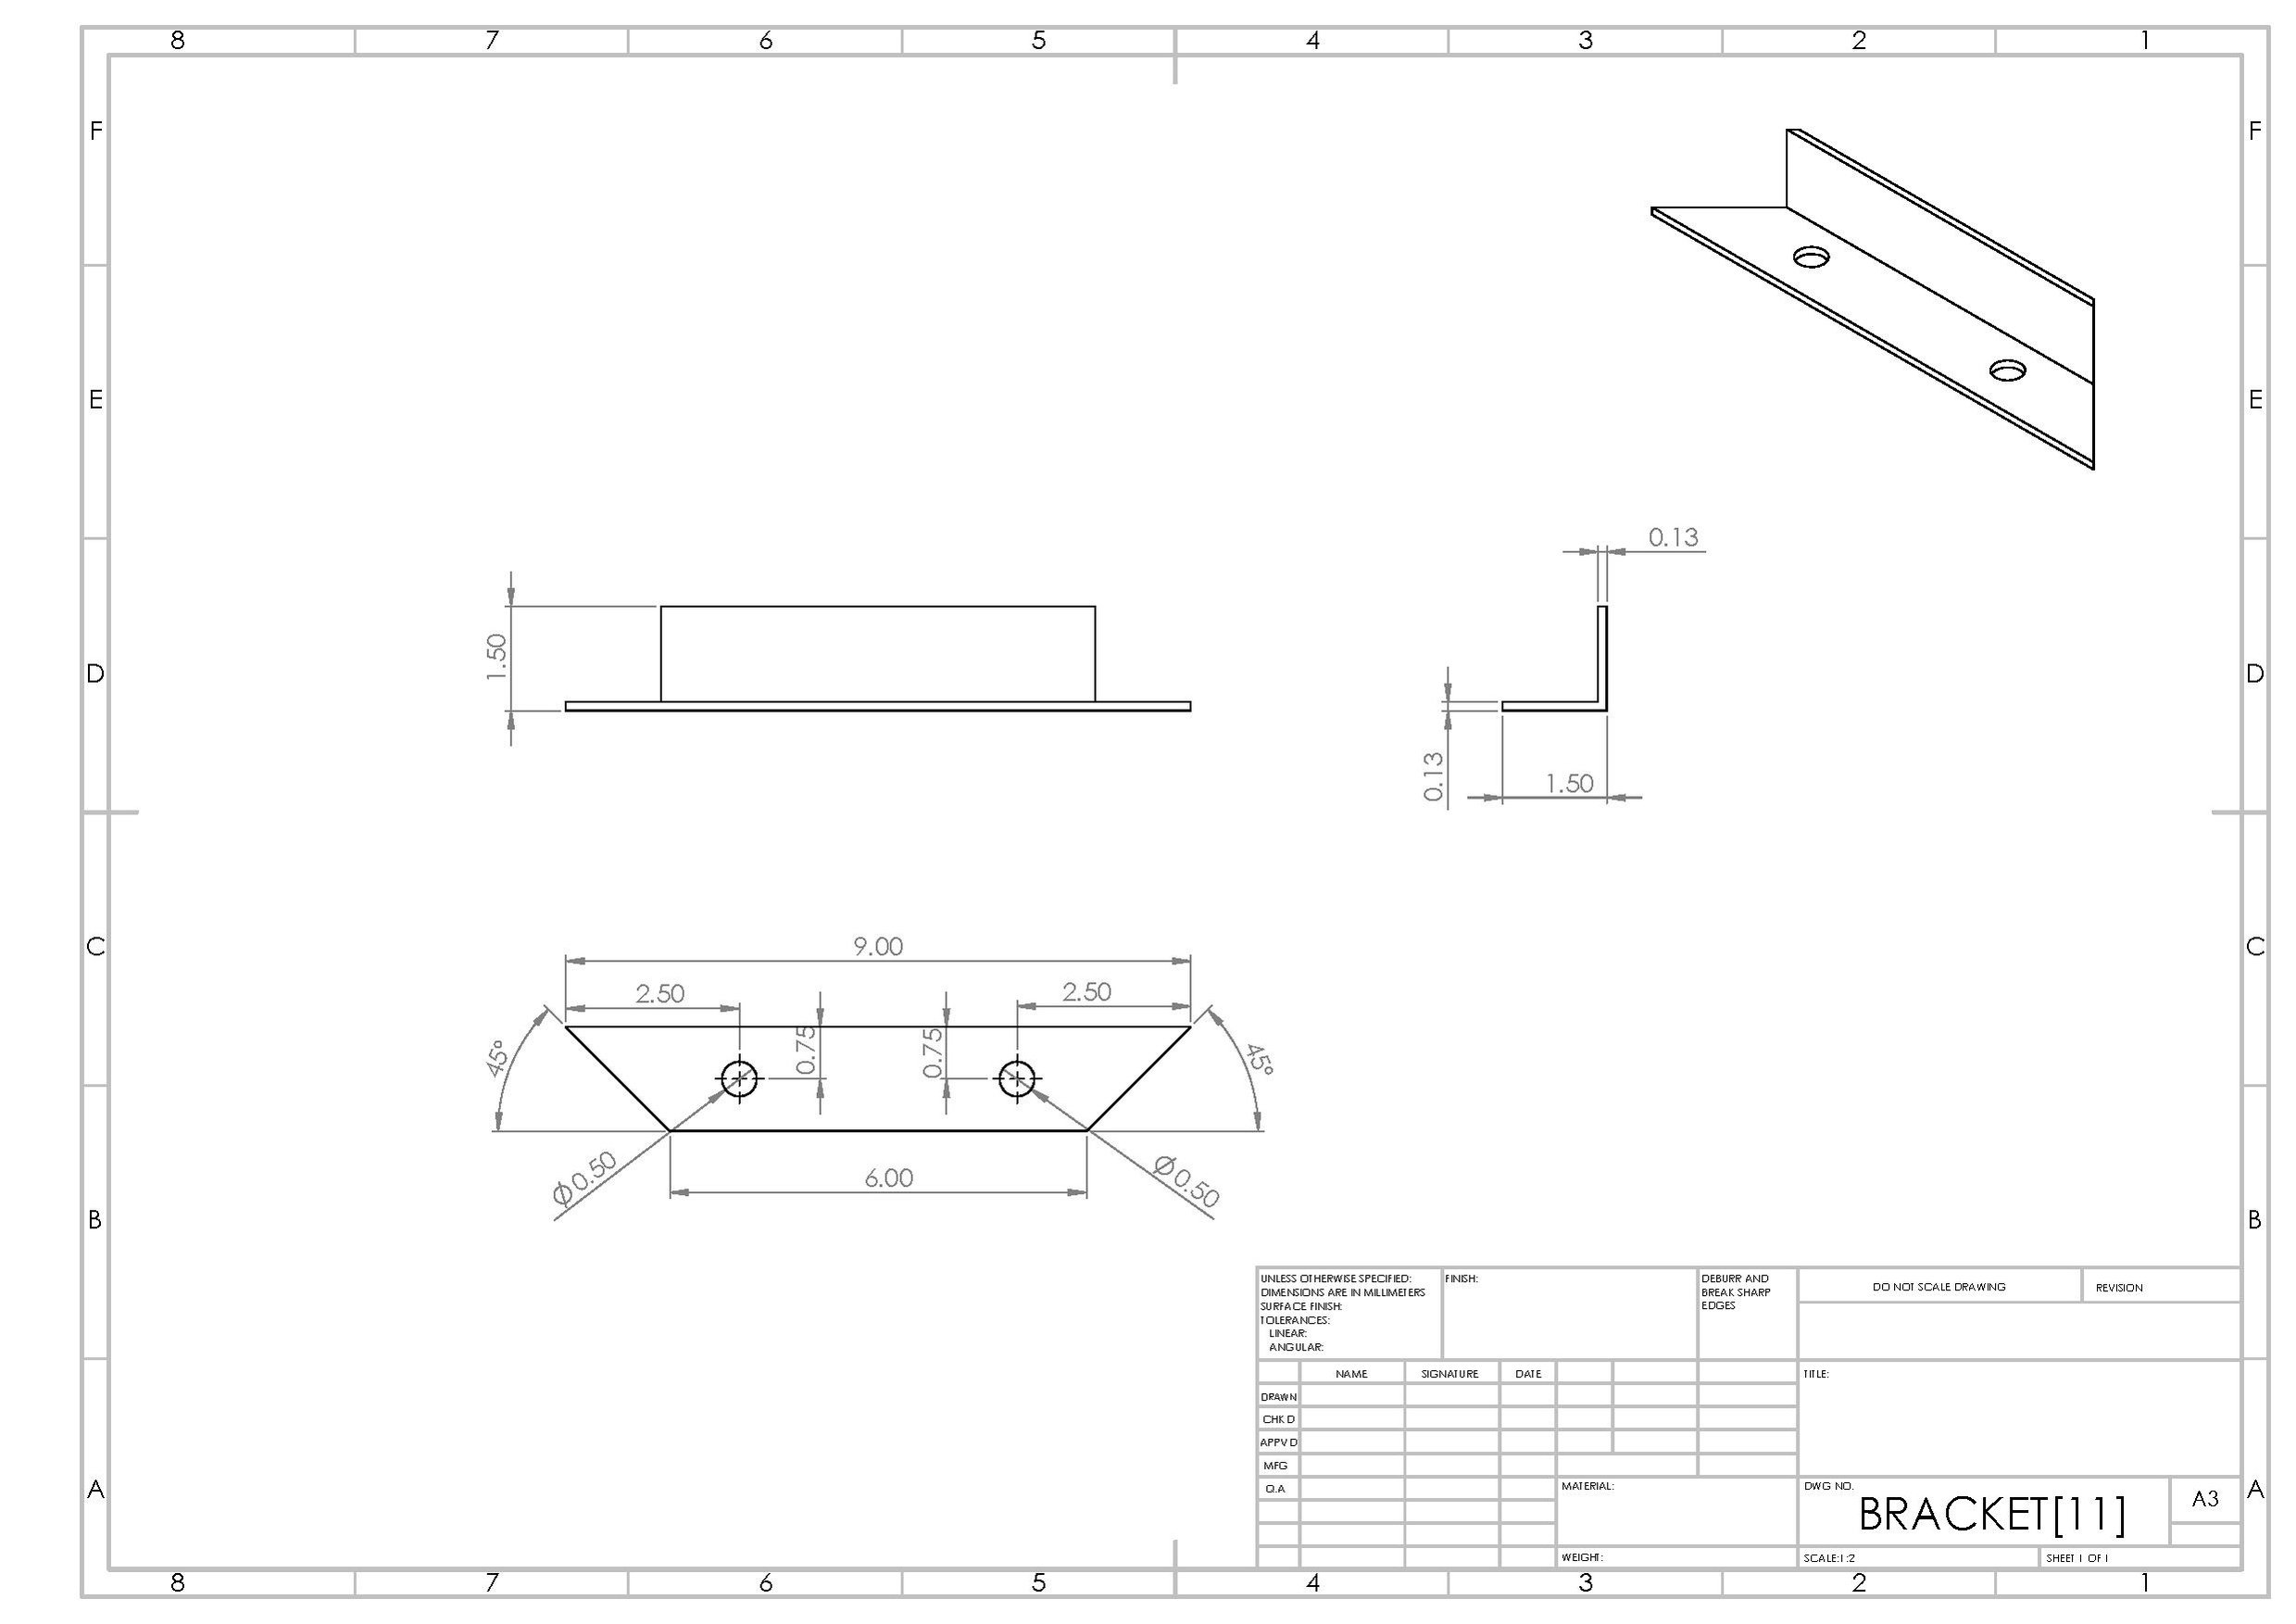
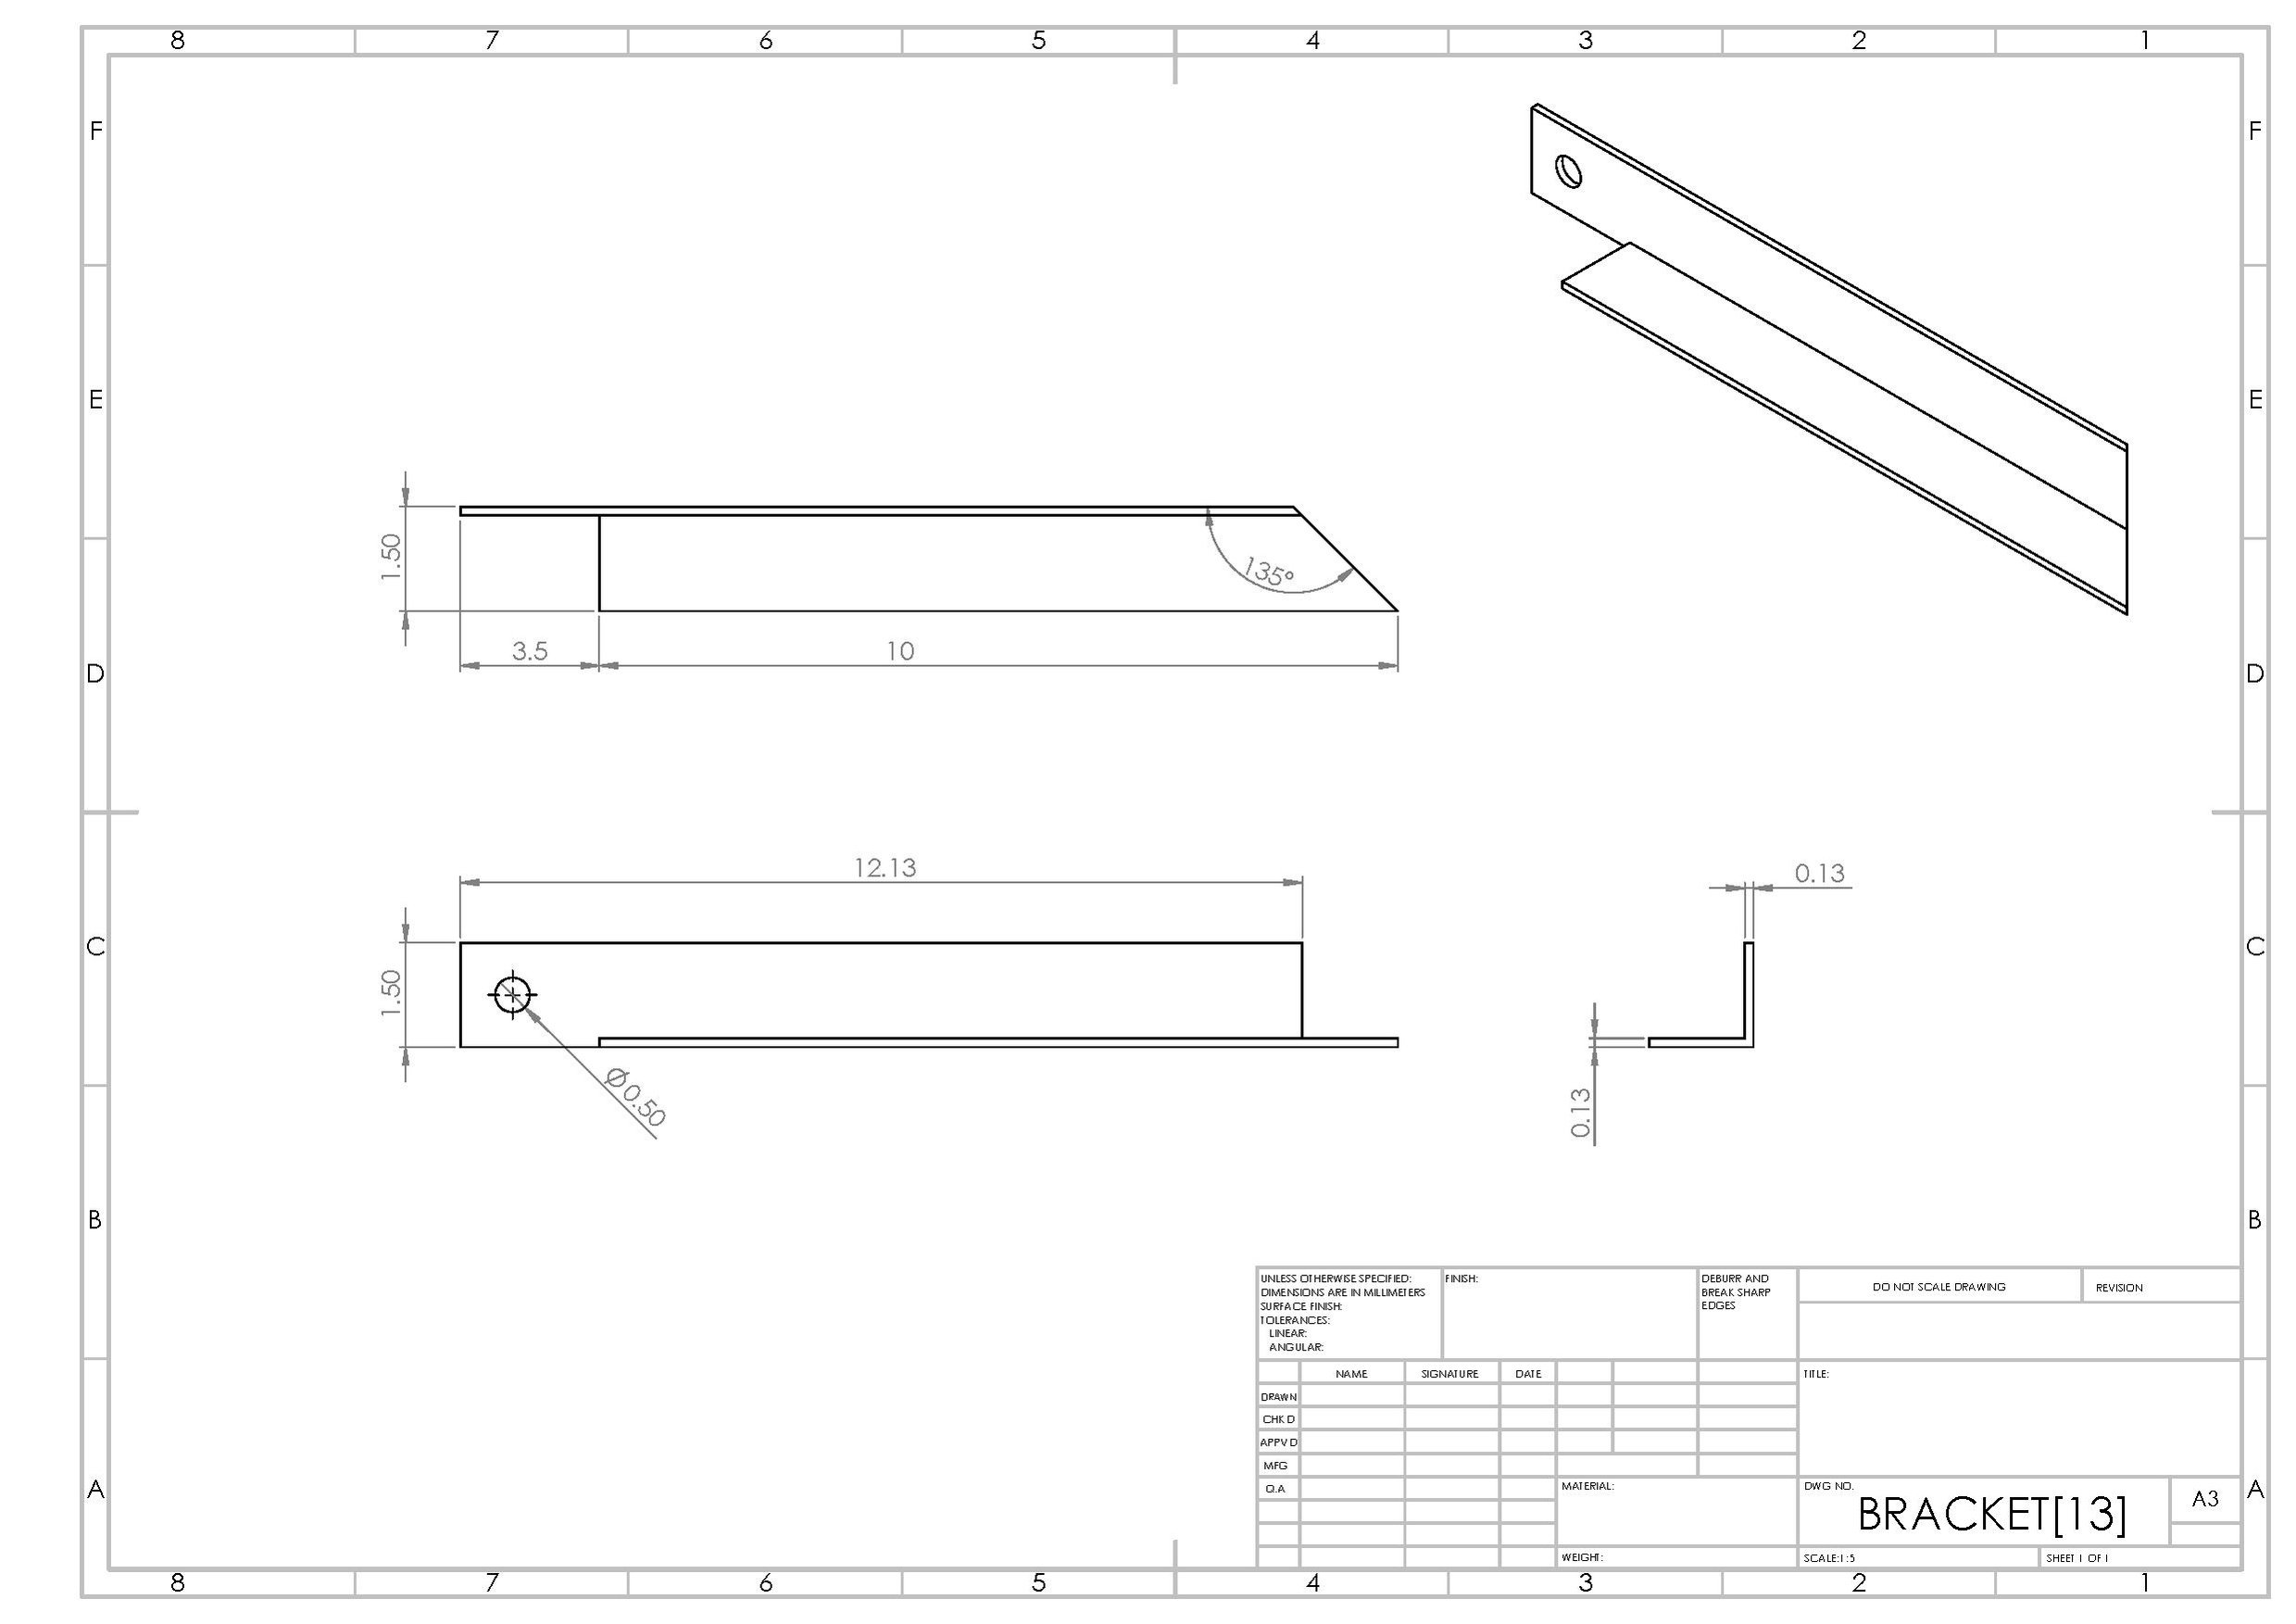
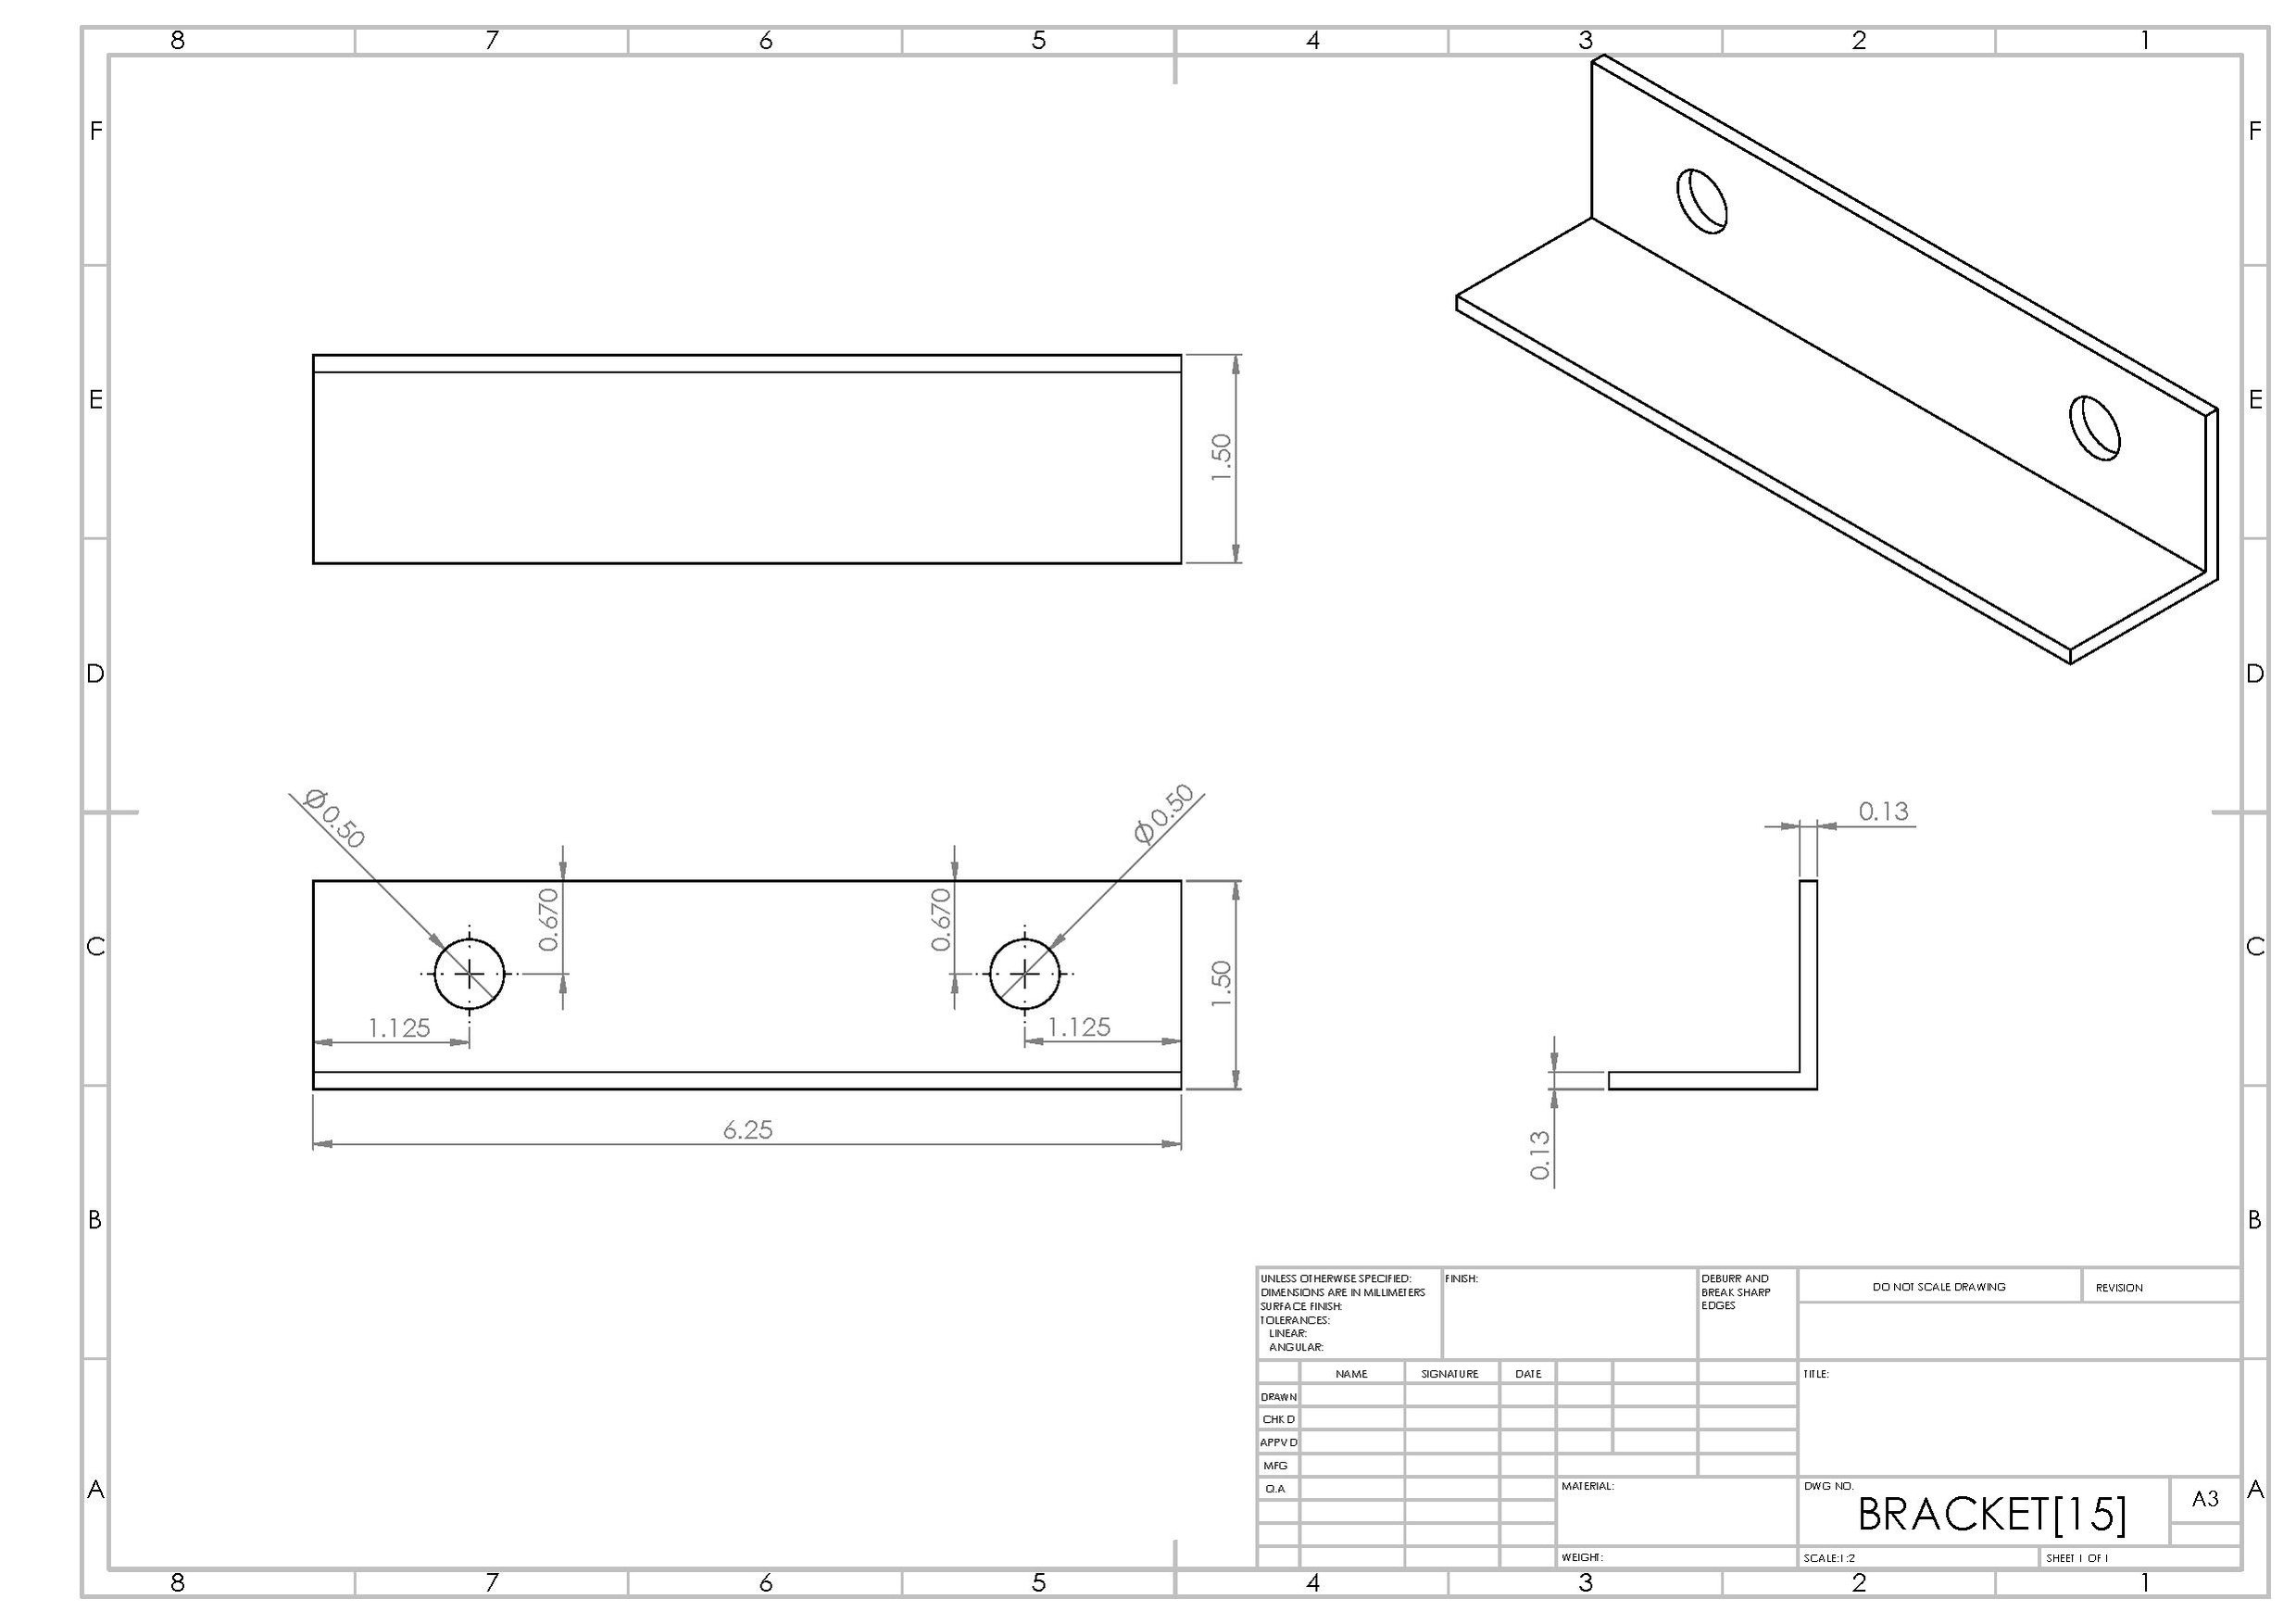
 - These next four files are the bracket mounts that connect the hopper to the main body of the granulator. These were all made from 1/8" thick 1.5" angle iron.
- The clampplates are used to mount the screen and blade bed to the shredder. There are four clampplates needed to manufacture the granulator.
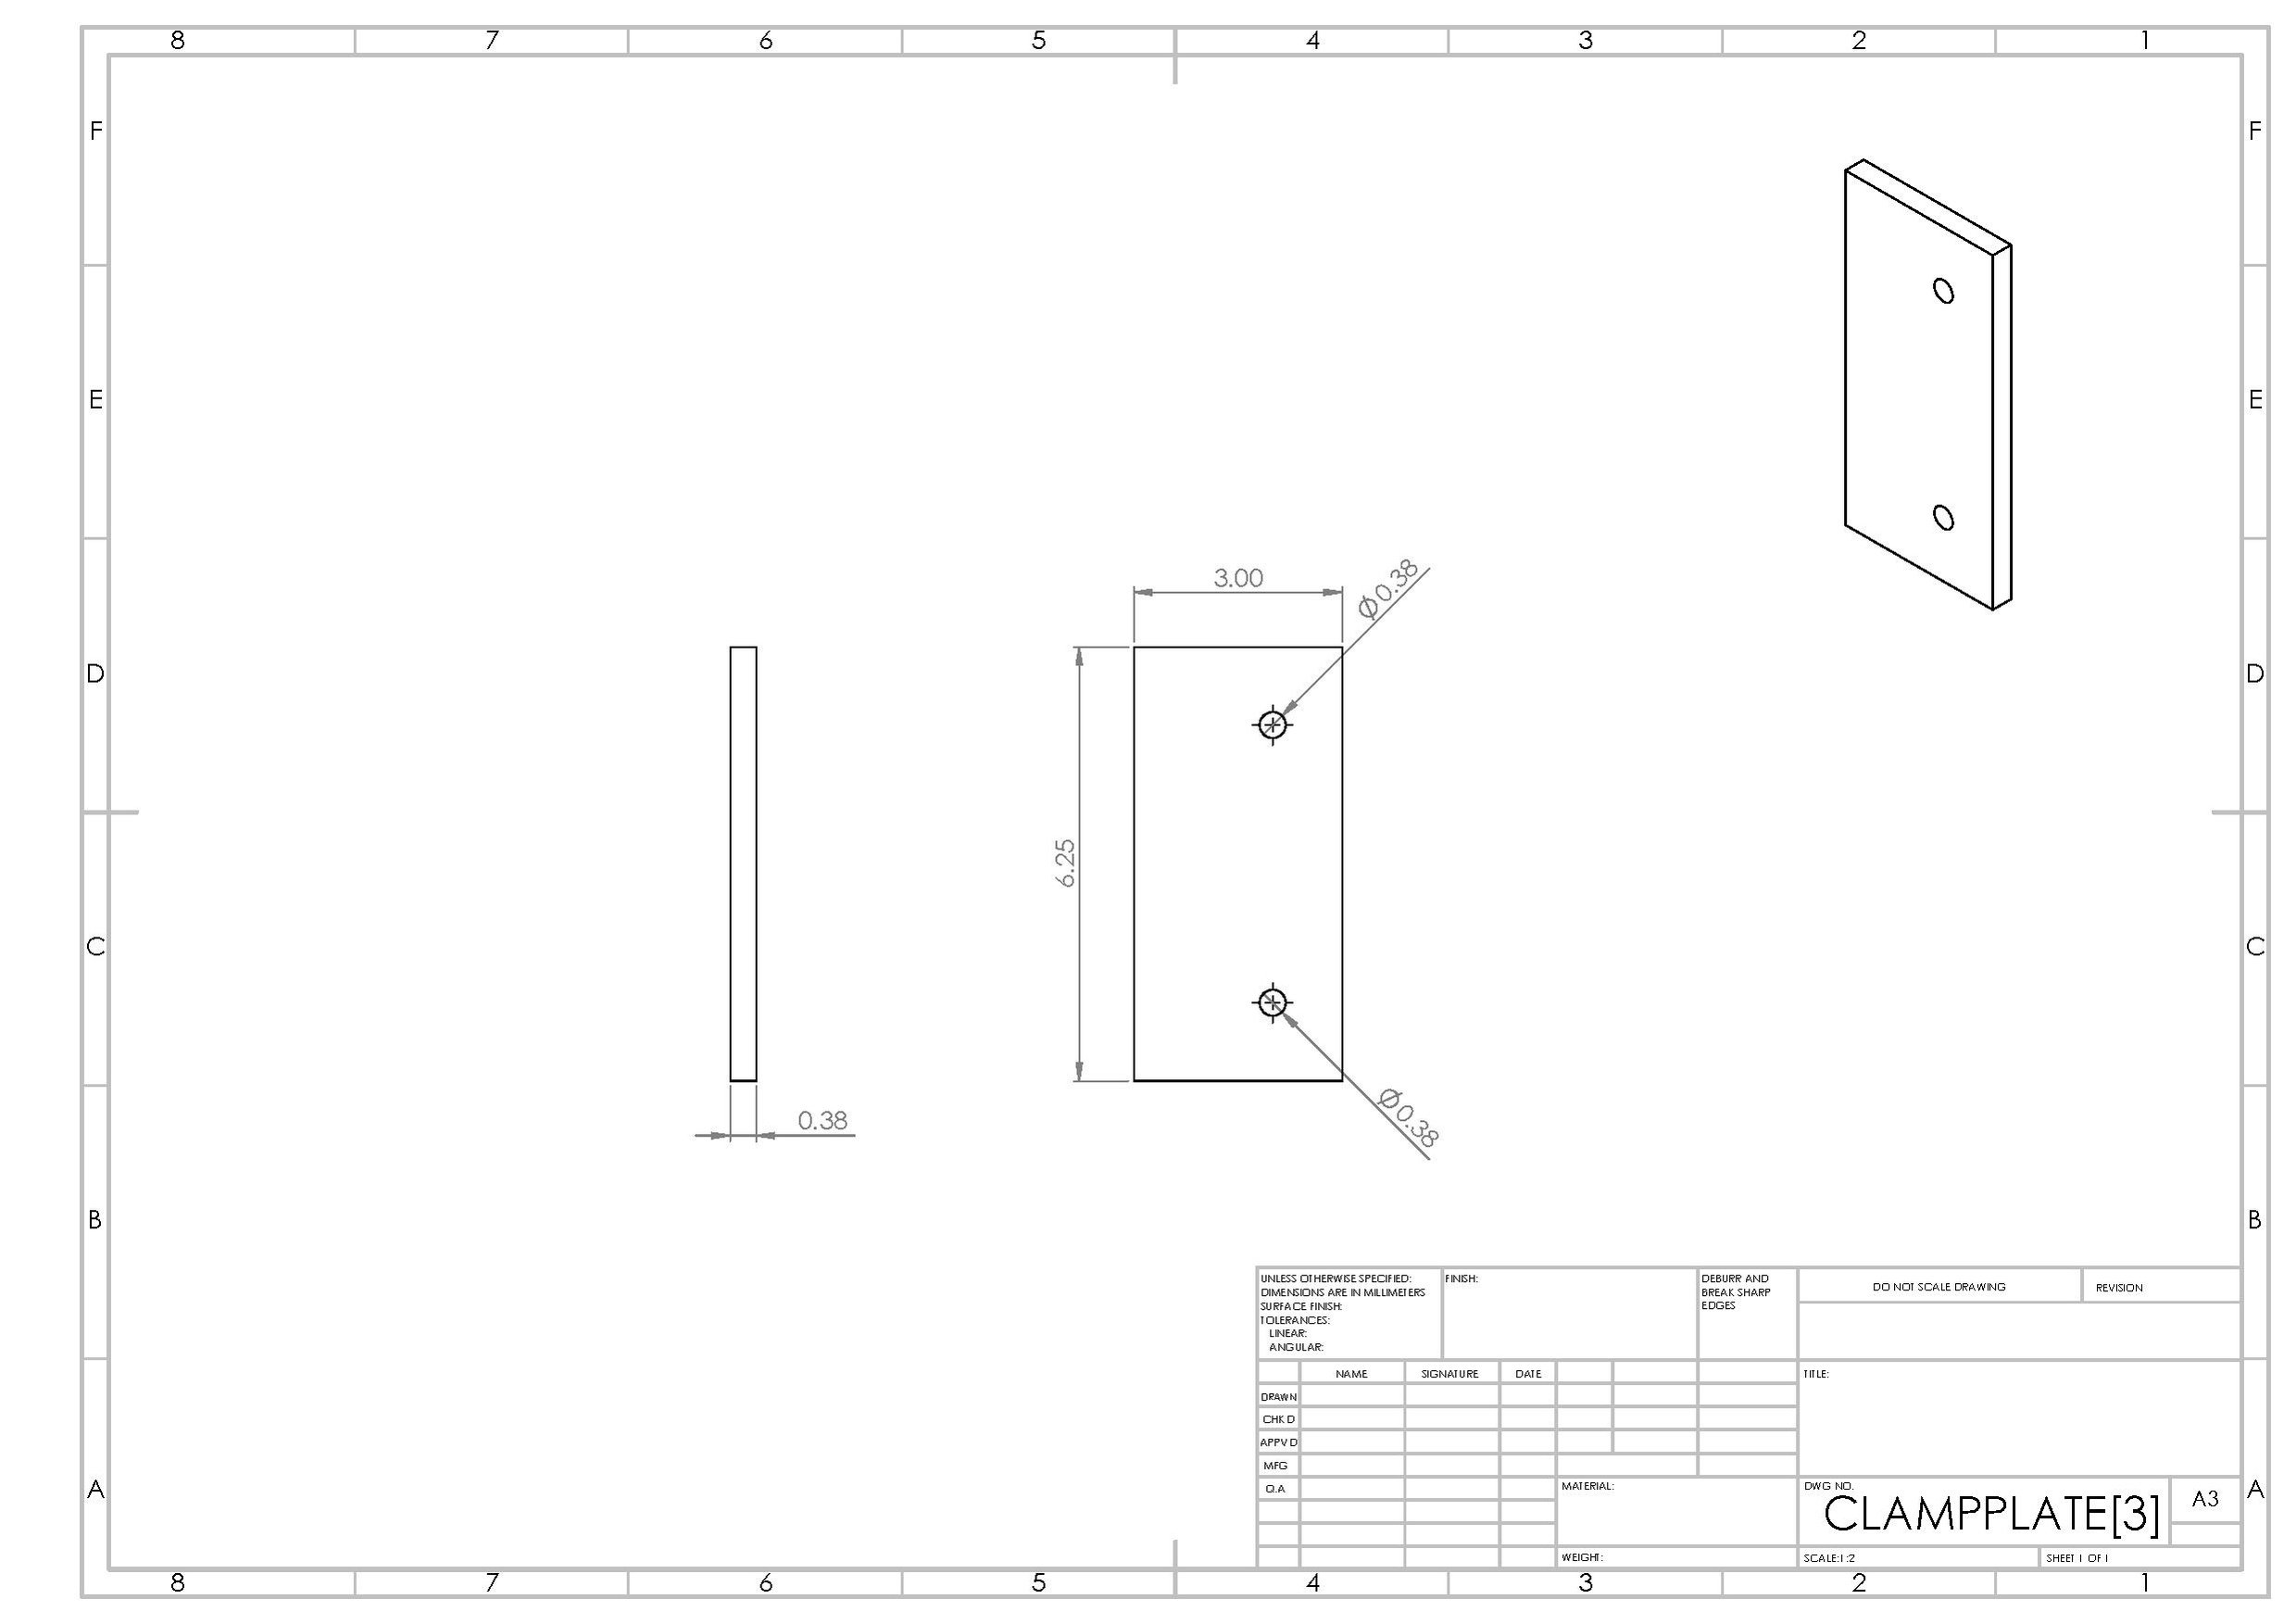 These were made from a 3/8" steel sheet.
 - The collection bin is what is used to collect the plastic that is expelled from the granulator. There is only one collection bin required to manufacture the granulator.
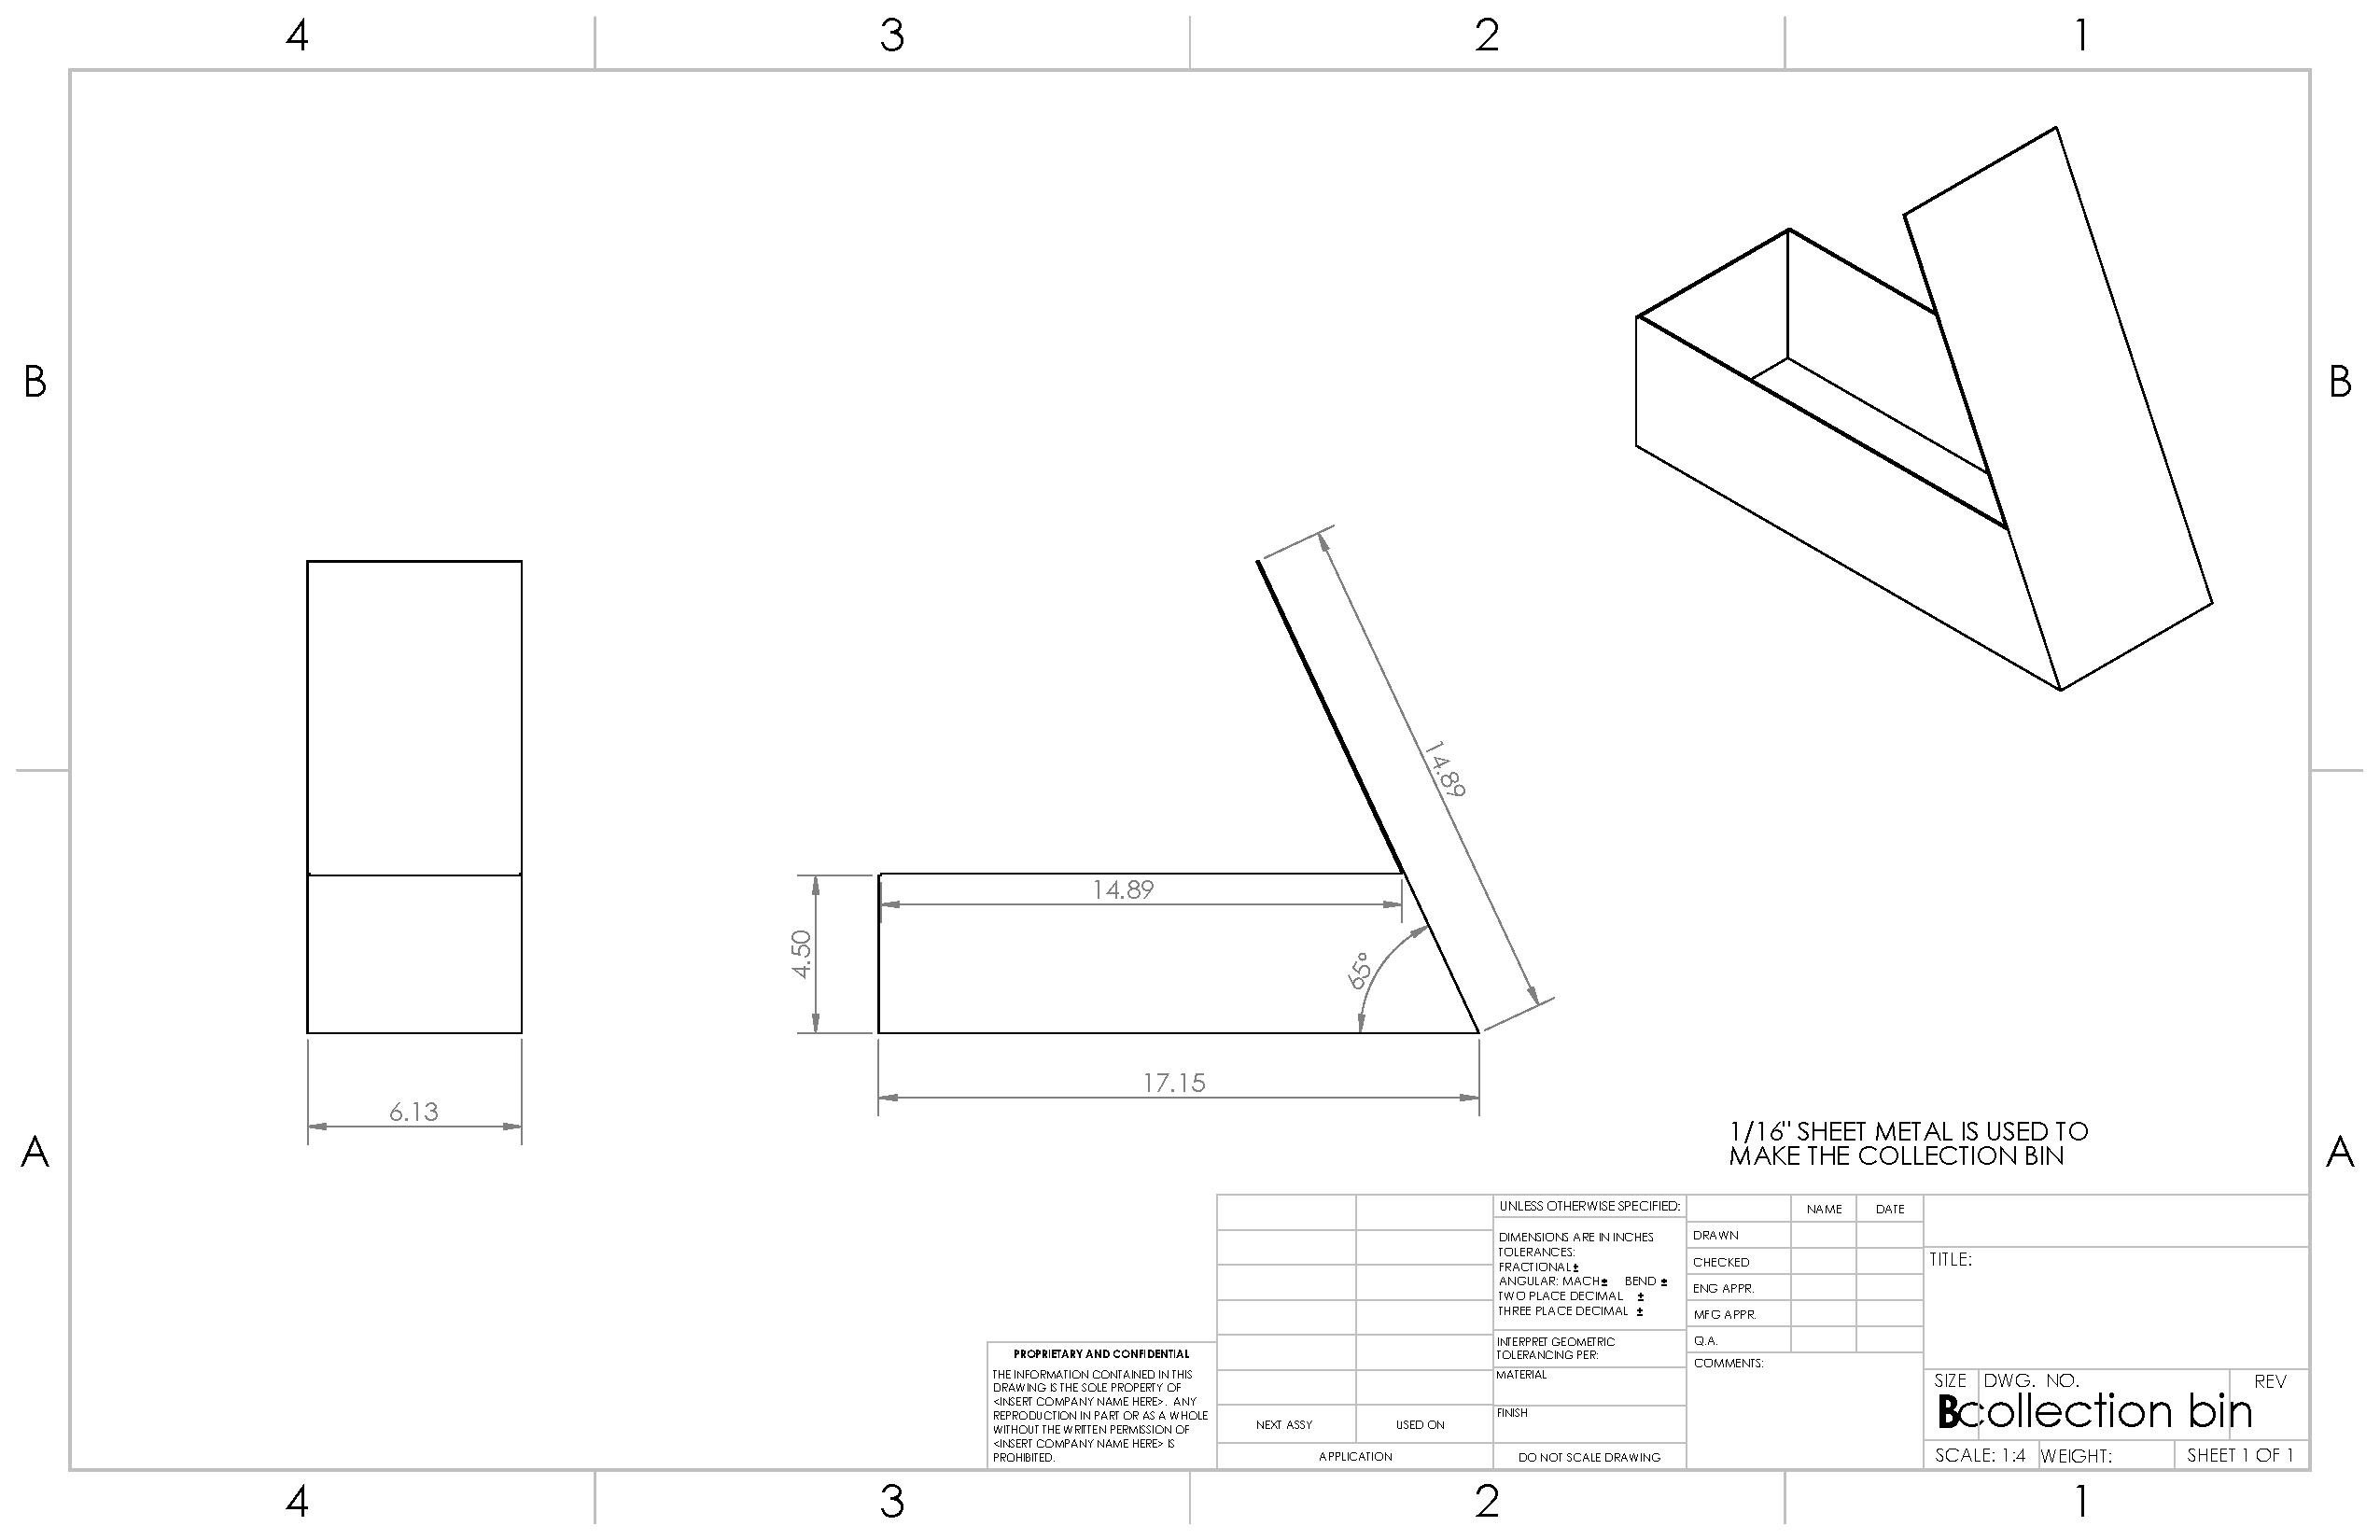 This was made from 1/16" thick sheet metal.
 - The flywheel is used to assist the blades to provide more force to shred the plastic. There is only one flywheel required to manufacture the granulator.
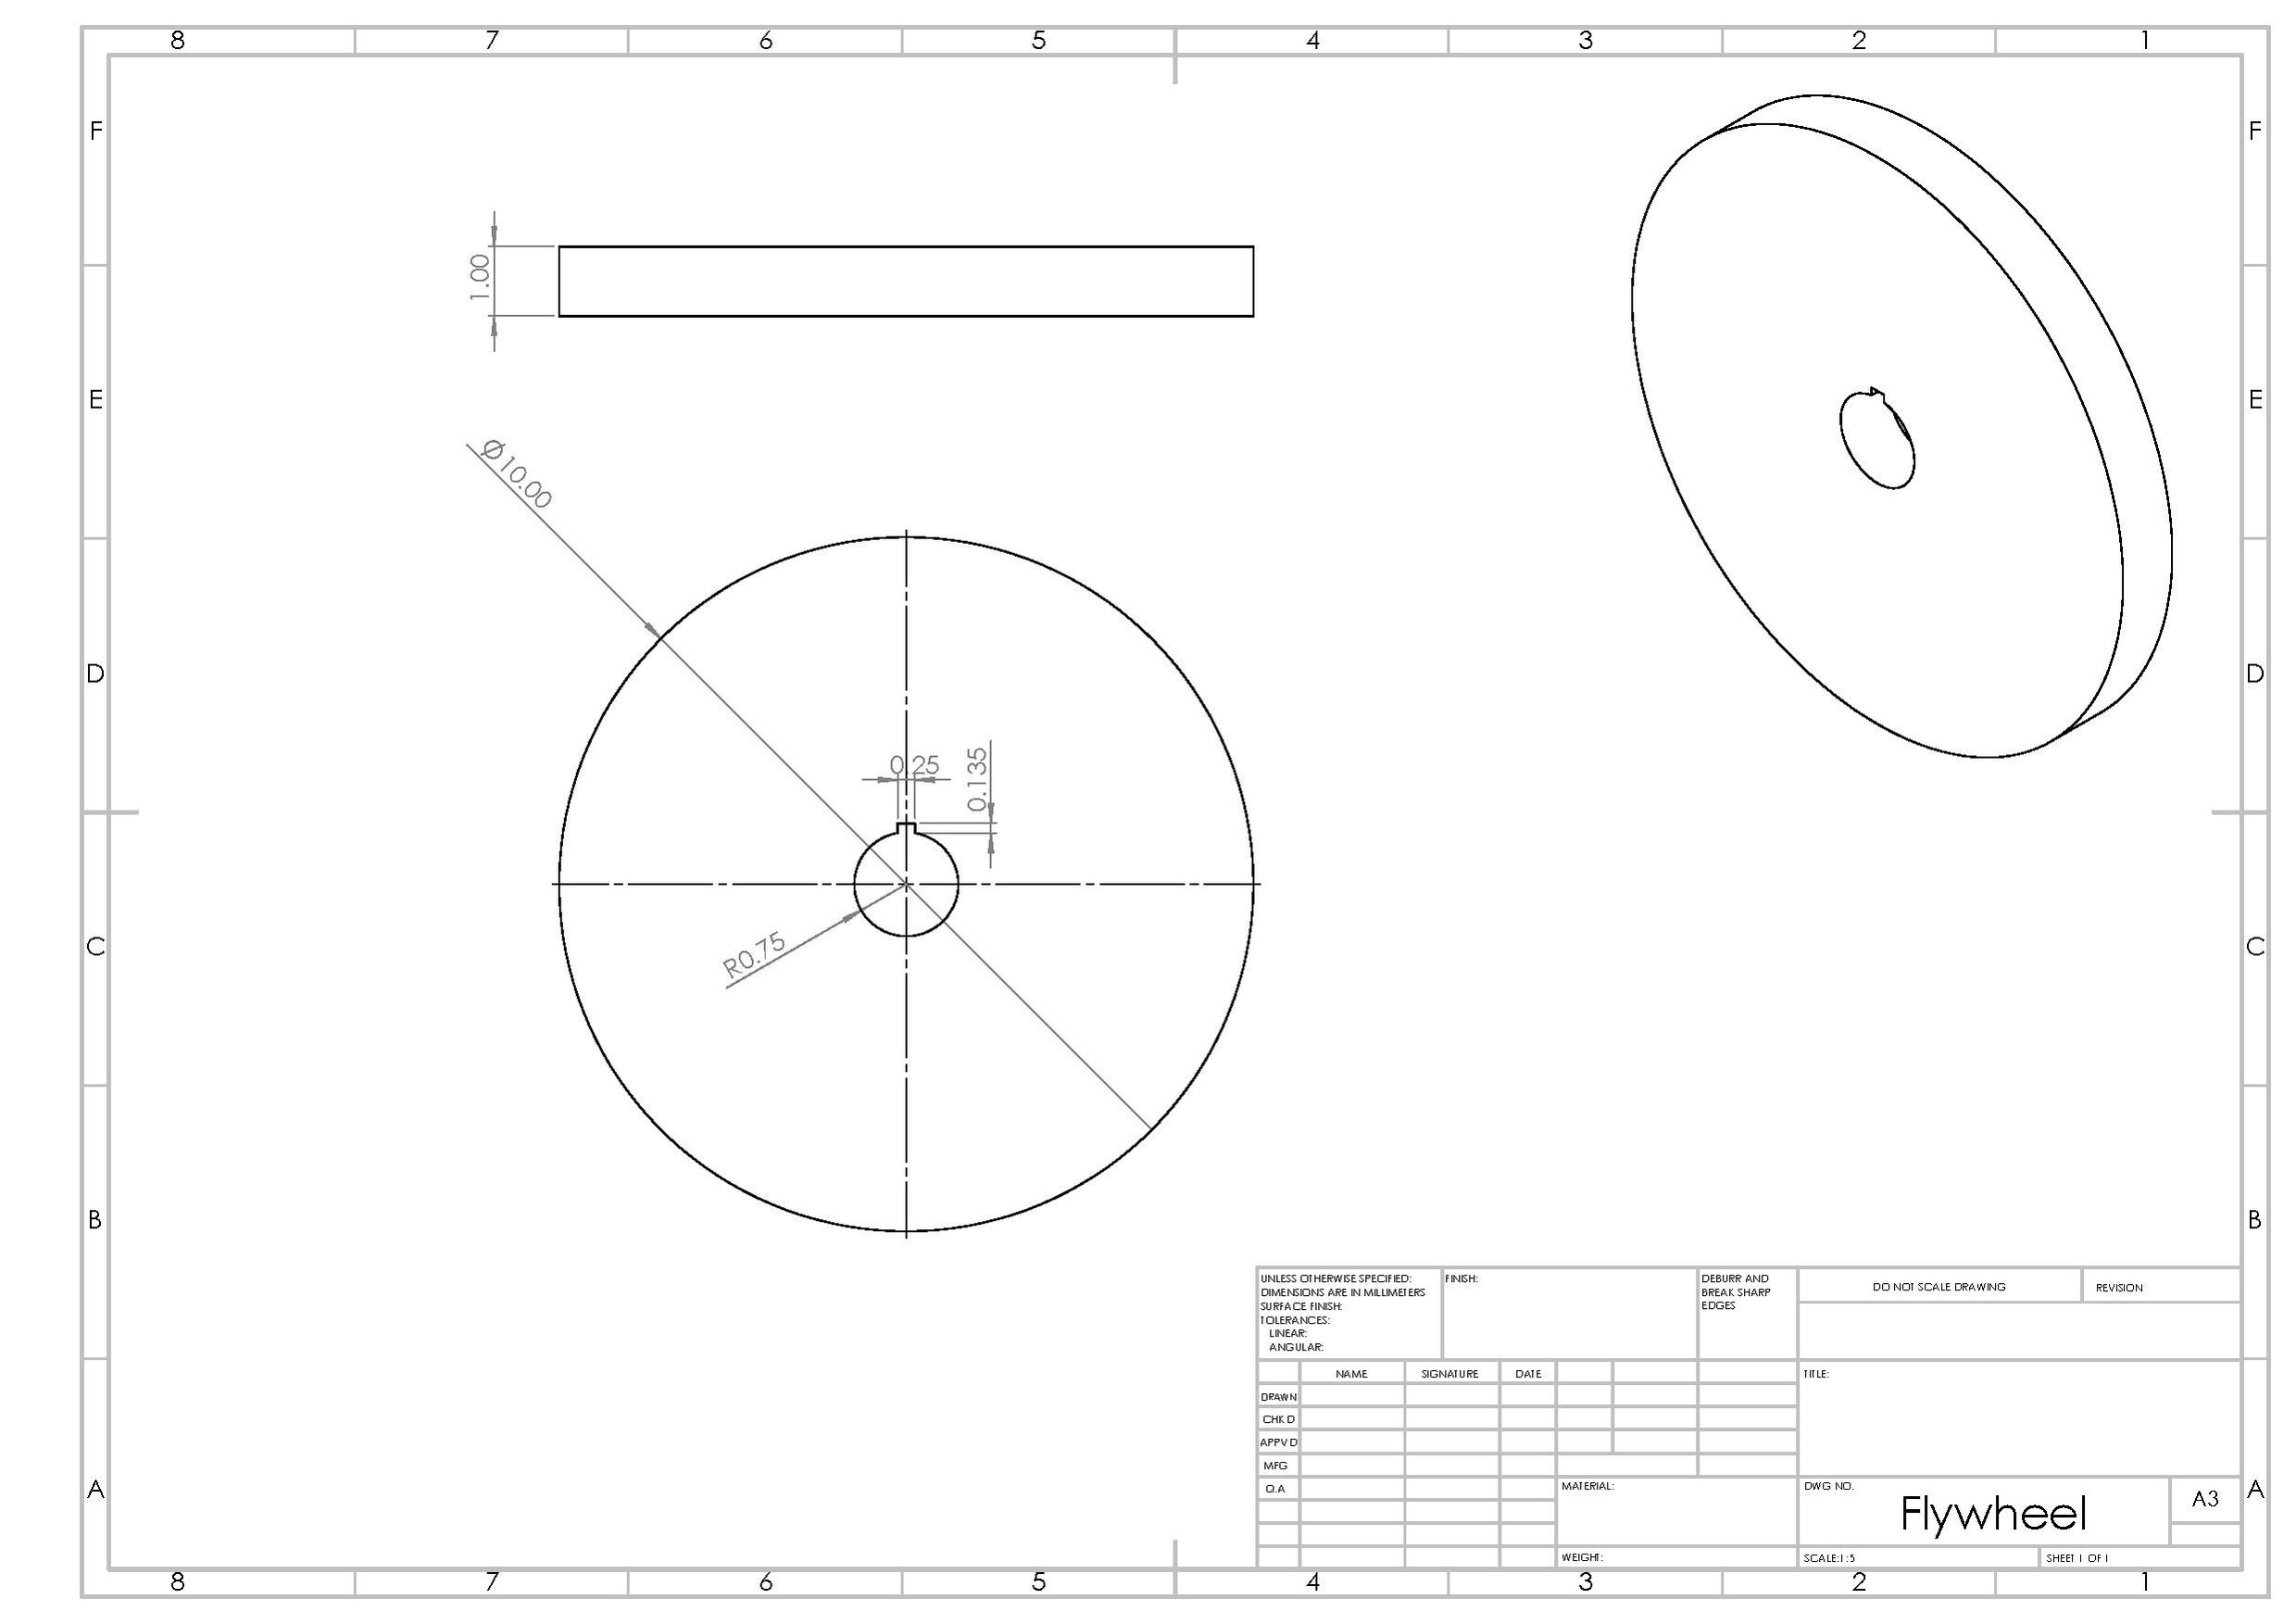 This was made from a 3/4" steel plate.
 - The motorplate is used to mount the motor to the granulator. There is only one motorplate needed to manufacture the granulator.
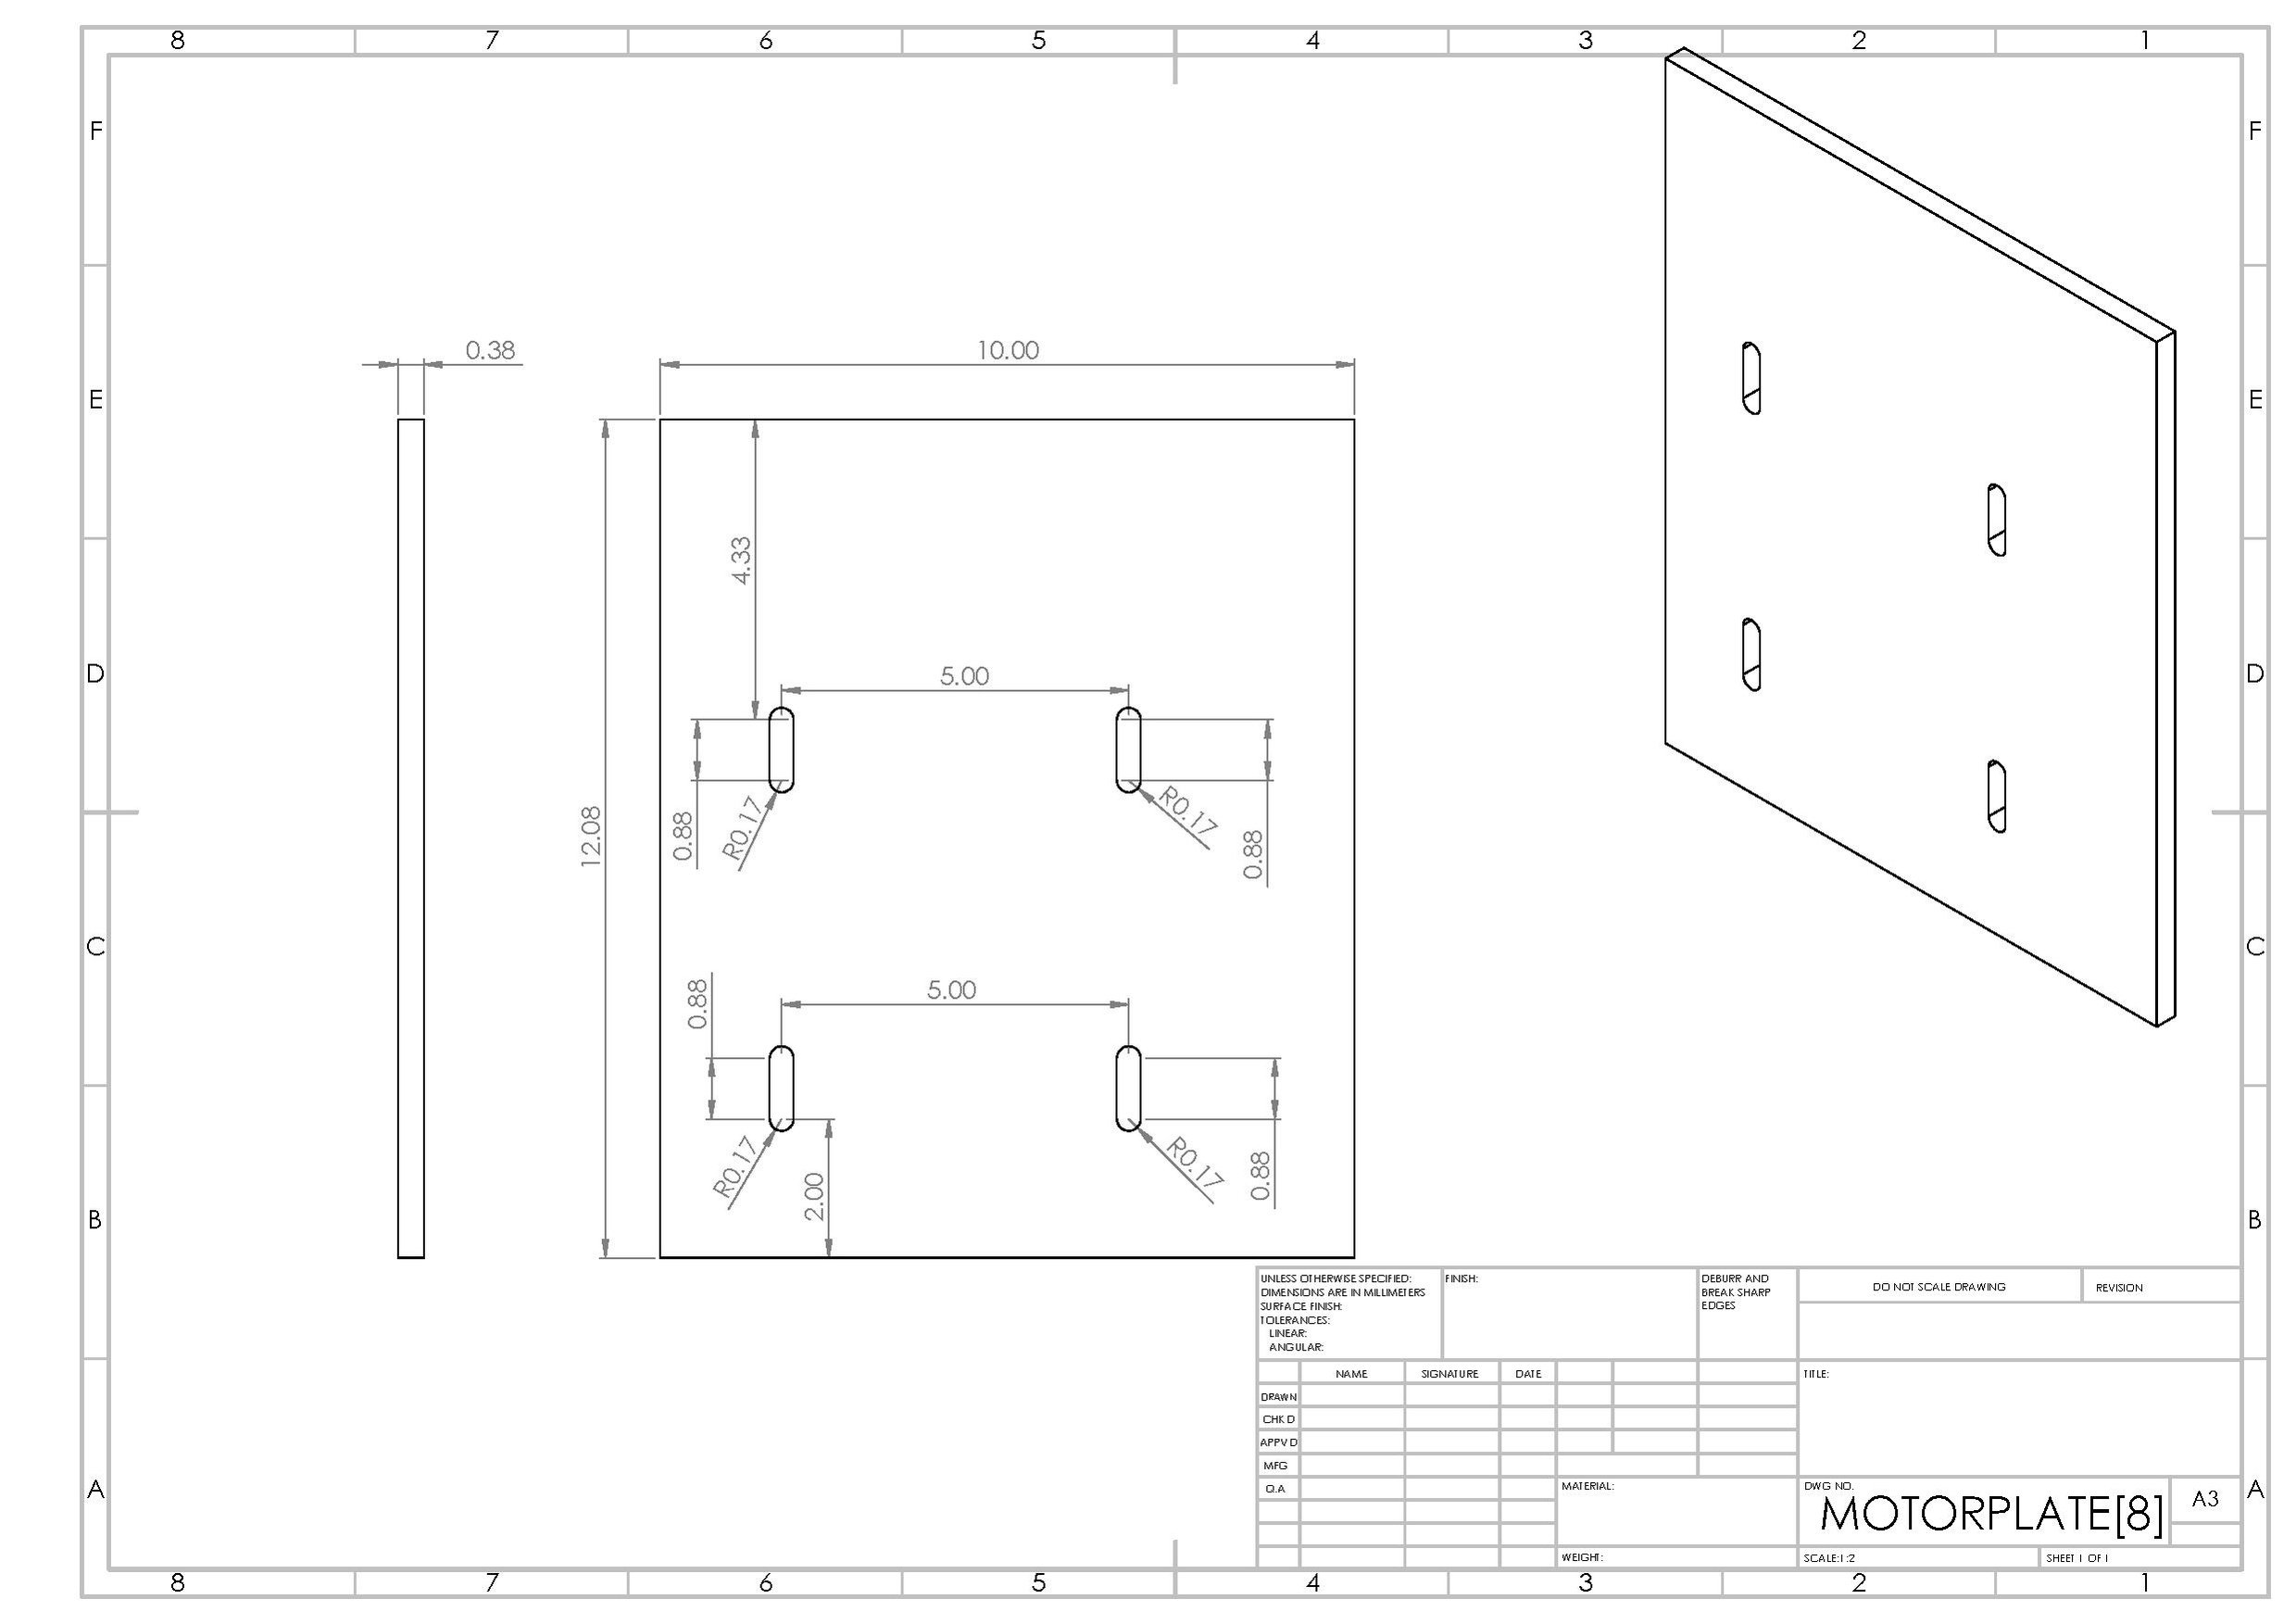 This was made from a 3/8" steel sheet.
 - The rotary blades are the blades that spin around on the shaft to shred the plastic. There are three rotary blades needed to manufacture one granulator.
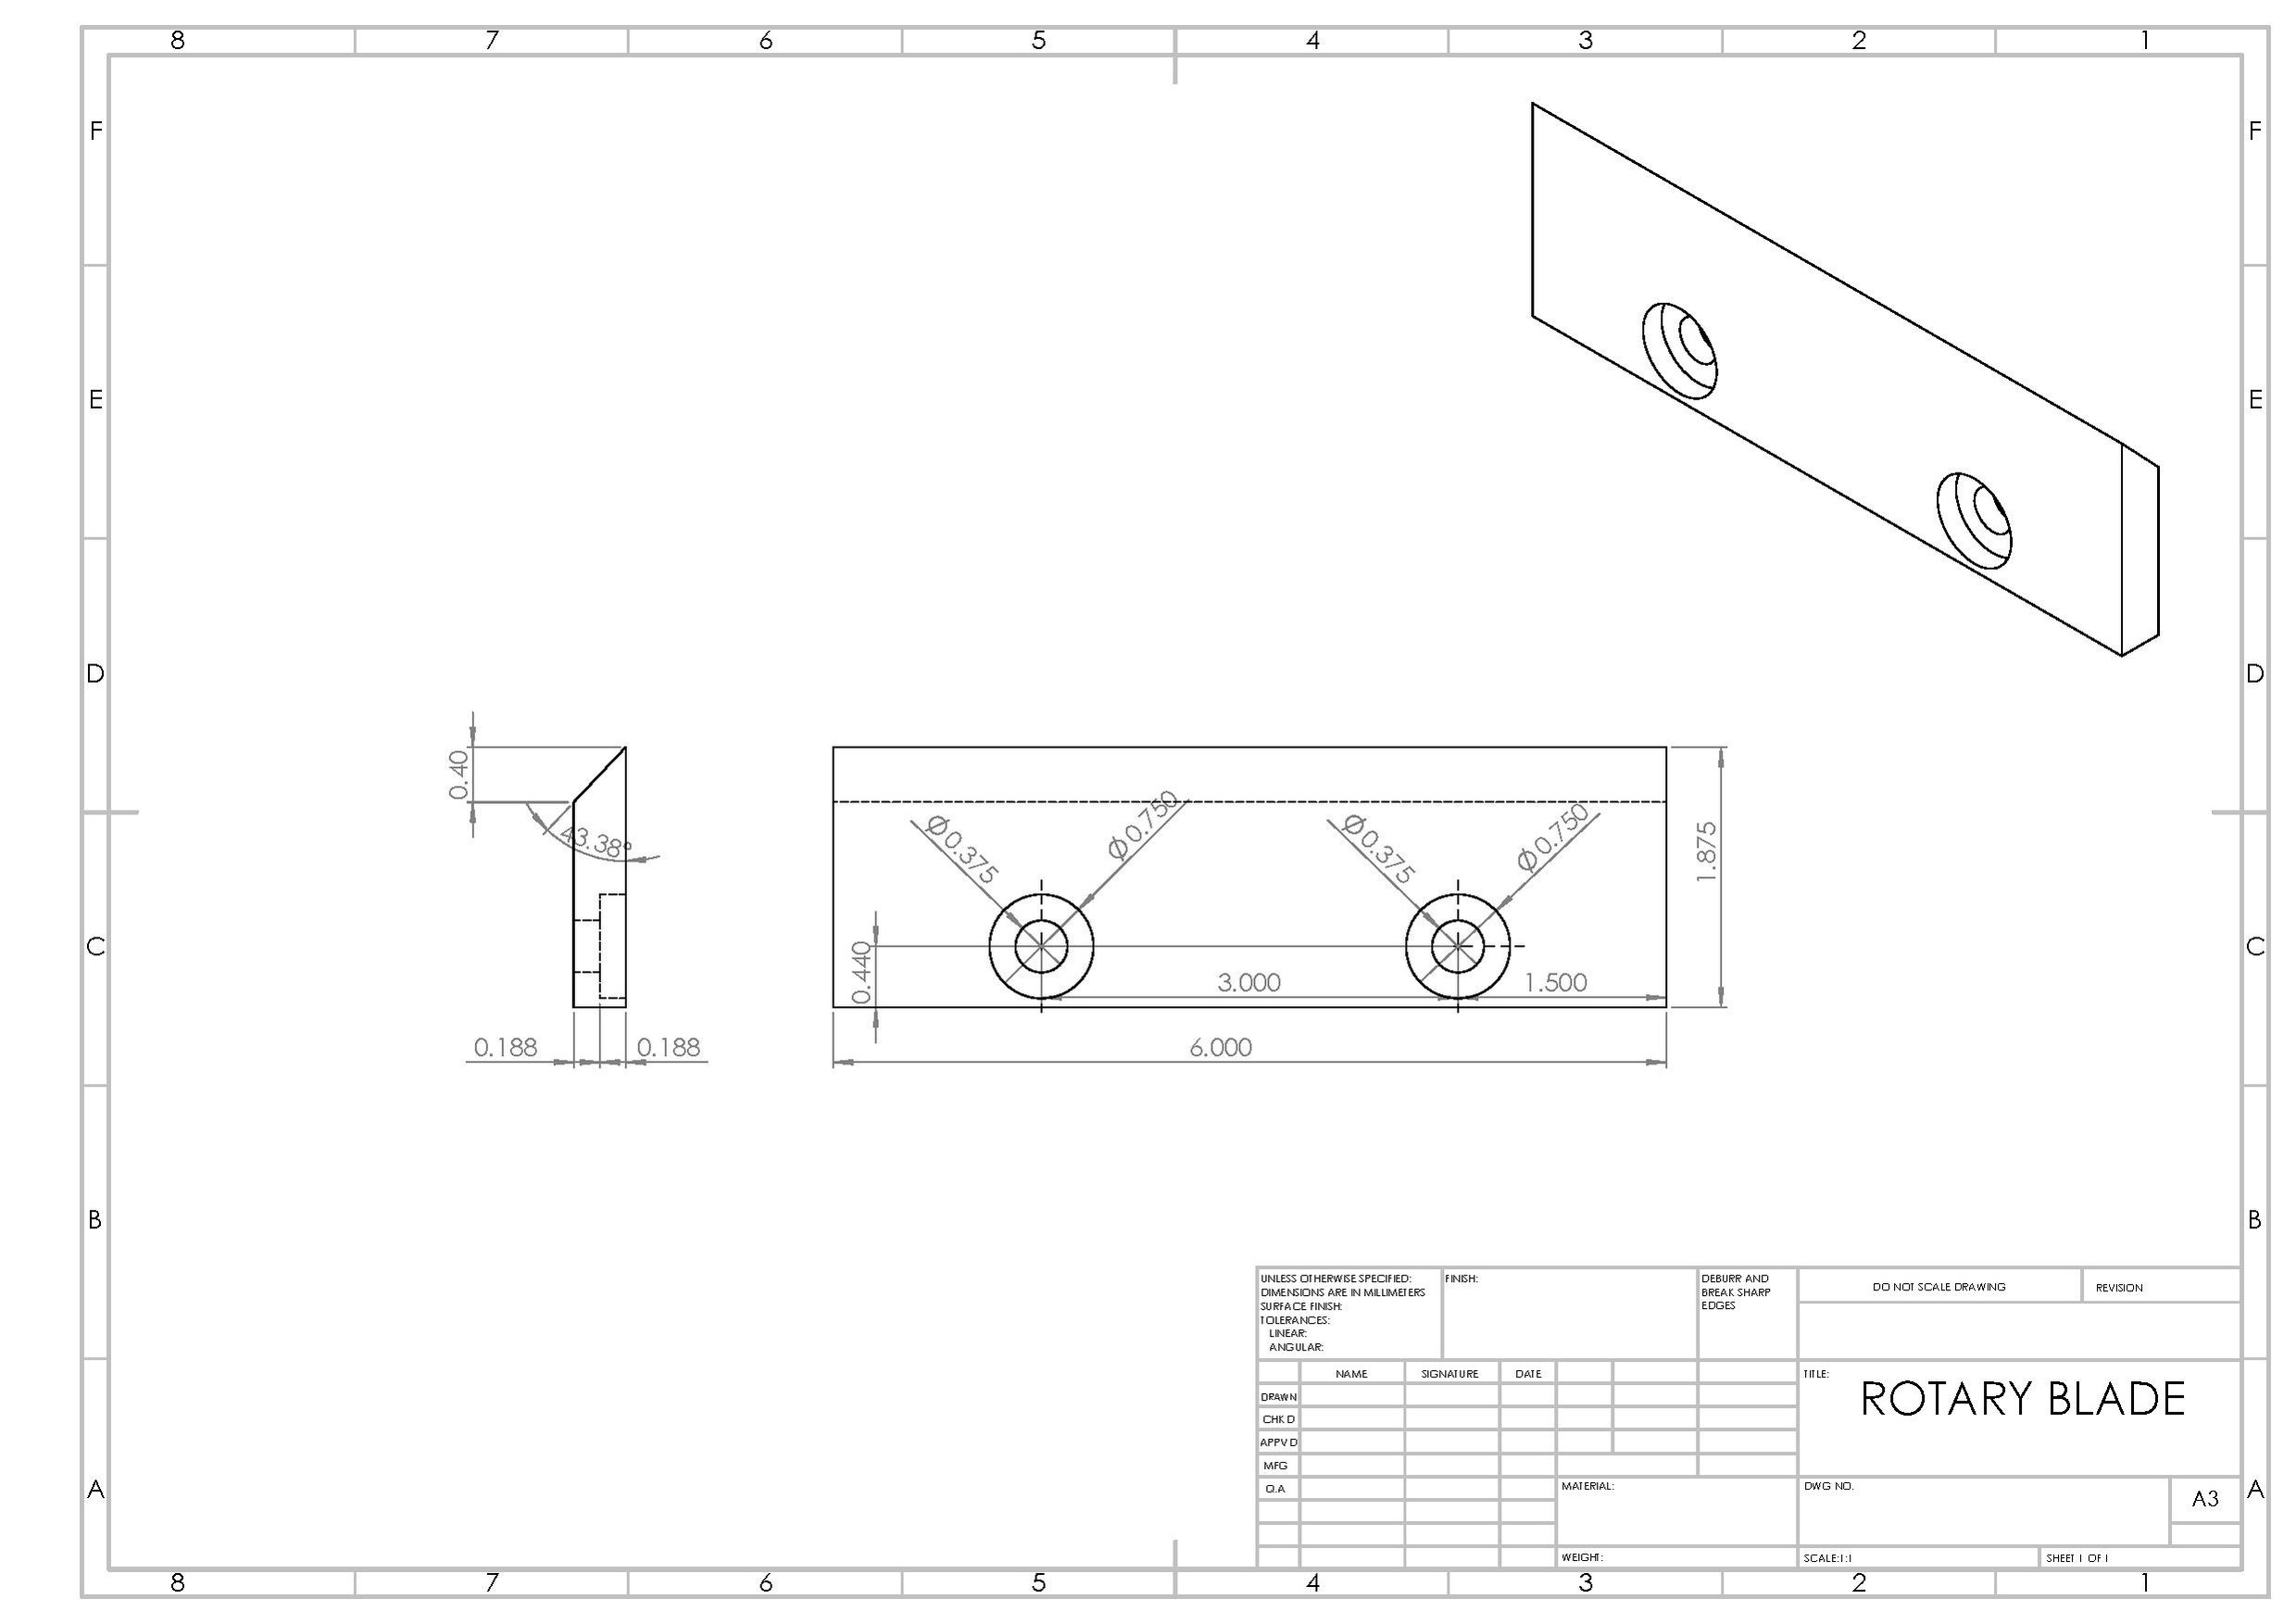 This is the website used to order the rotary blades: Services for Plastics
 - The slideplate is the plate that is used as the backing between the hopper and the blade bed and to guide the recycled plastic to the cutting edge. There is one slideplate needed to manufacture the granulator.
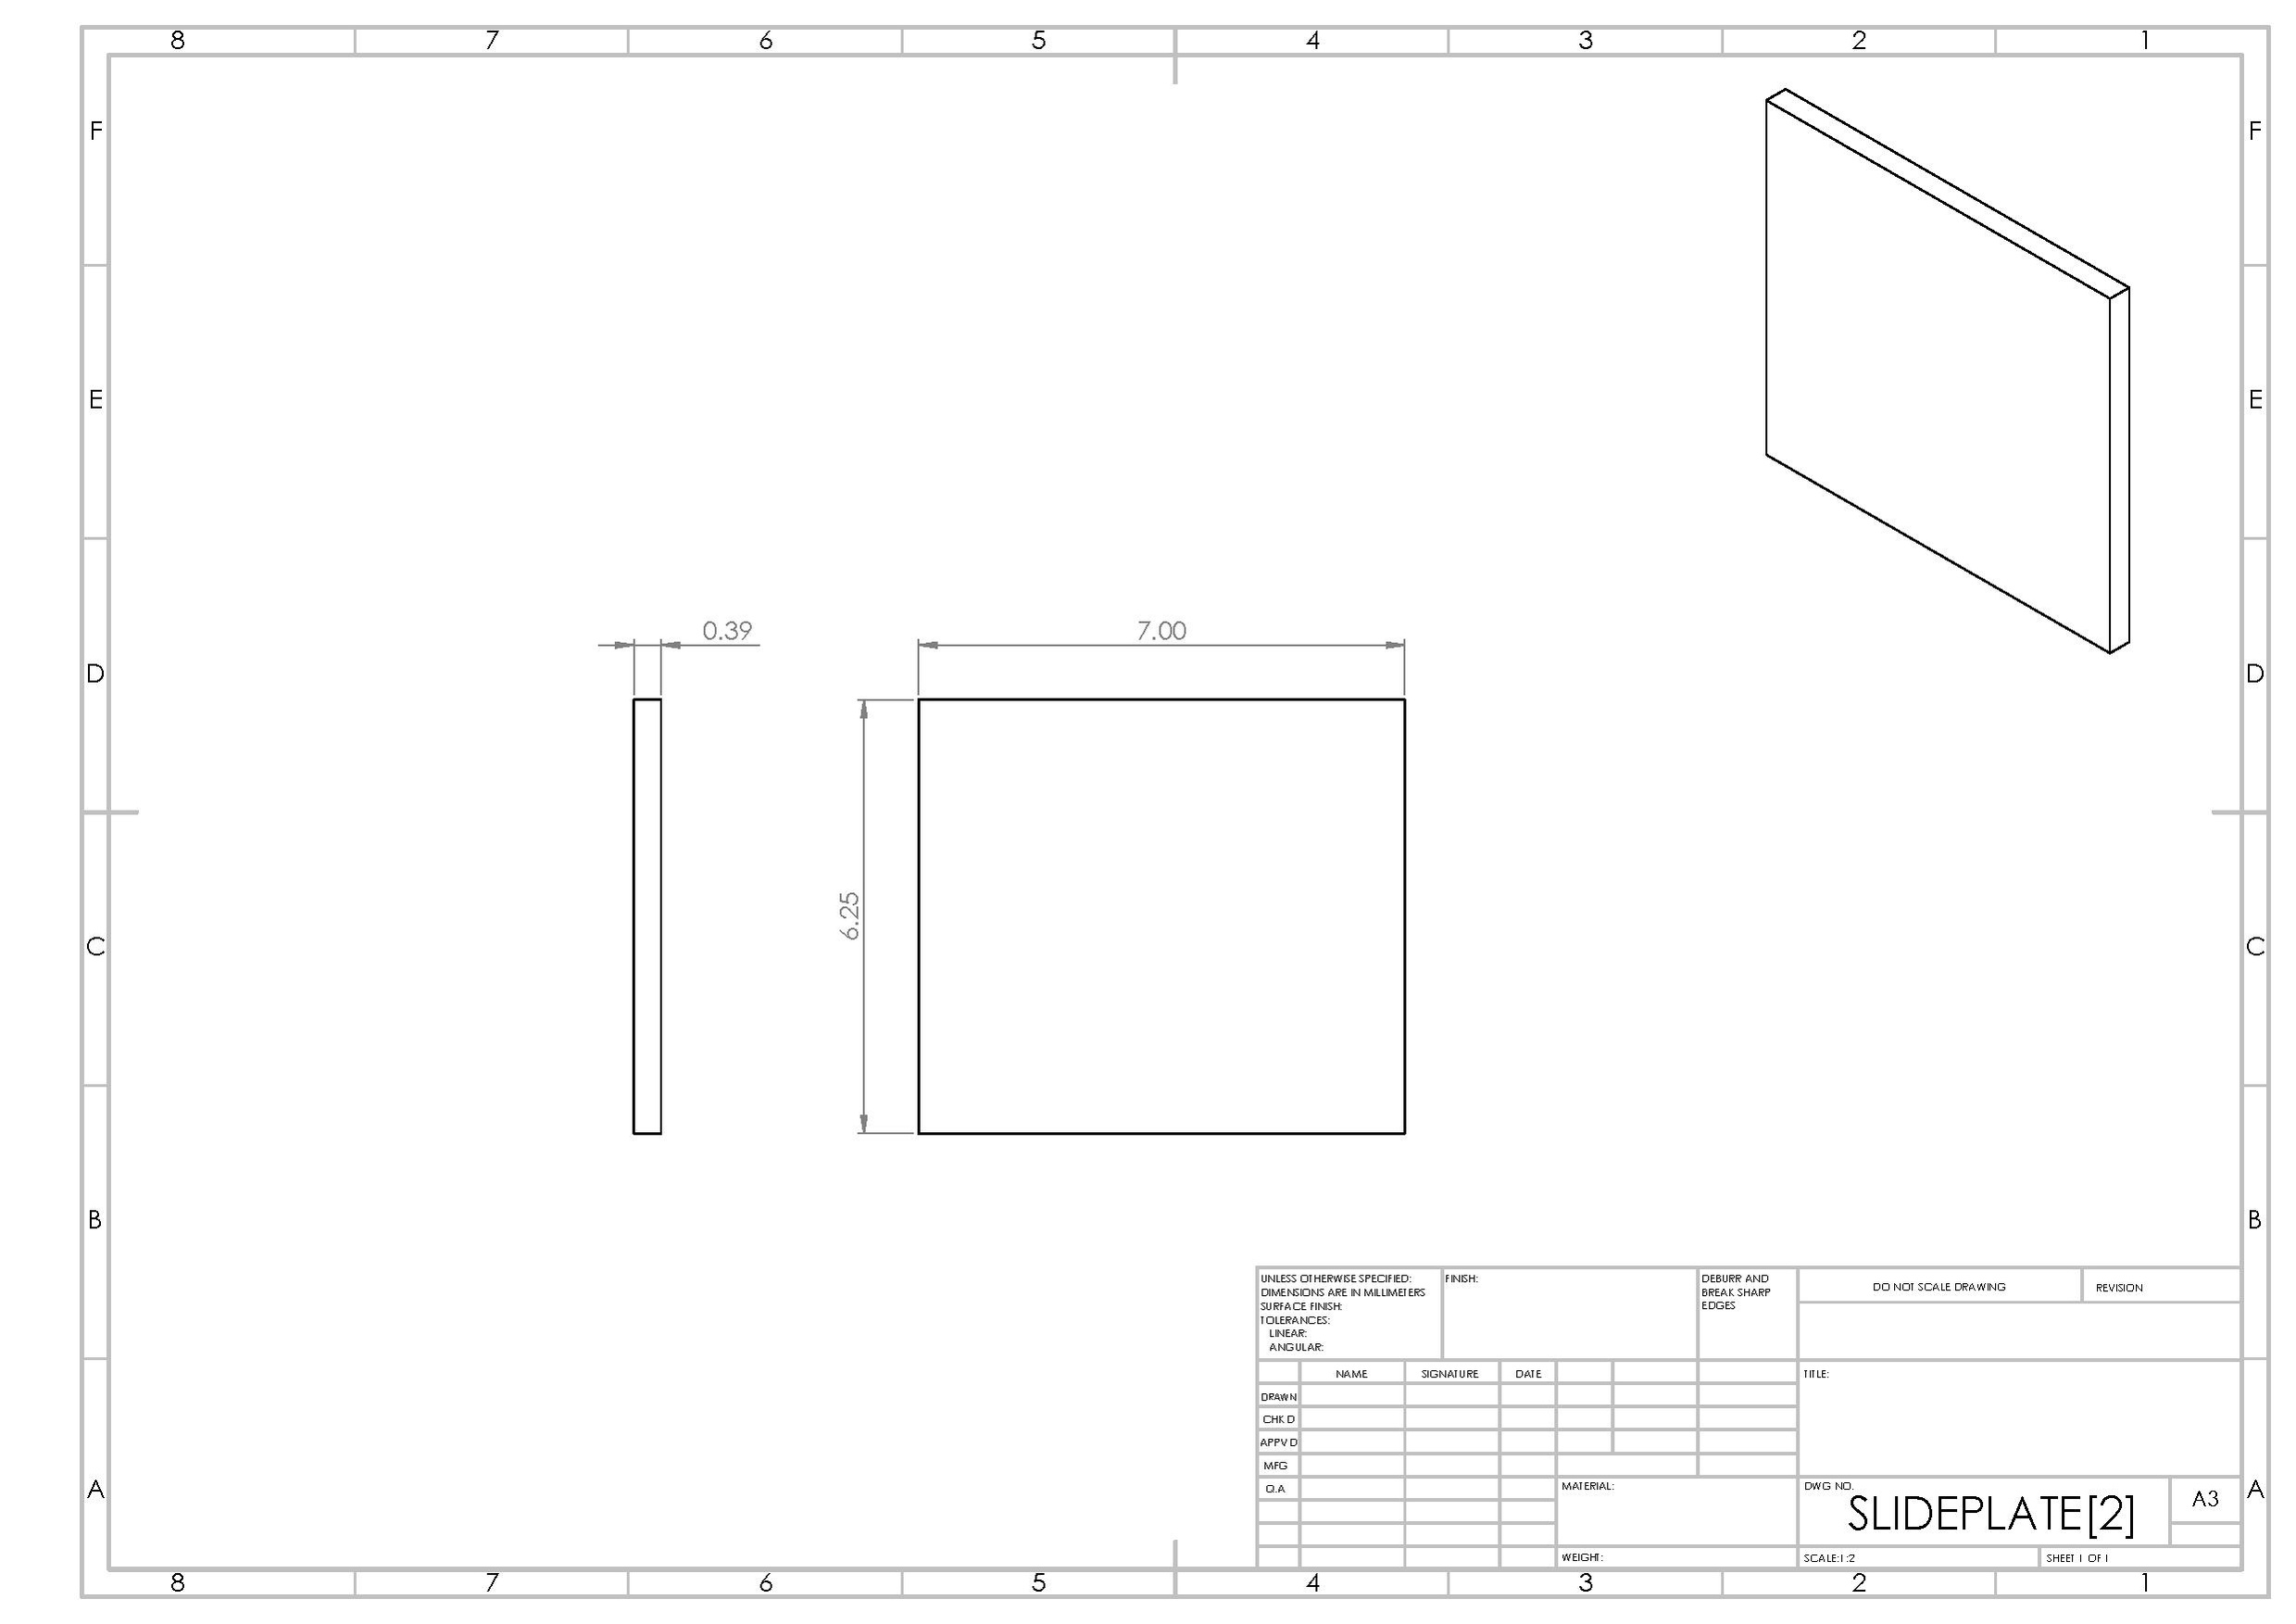 This was made from a 3/8" steel sheet.
 - The shaft is what the blade mounts are mounted to and is what they rotate about. There is one shaft needed to manufacture the granulator.
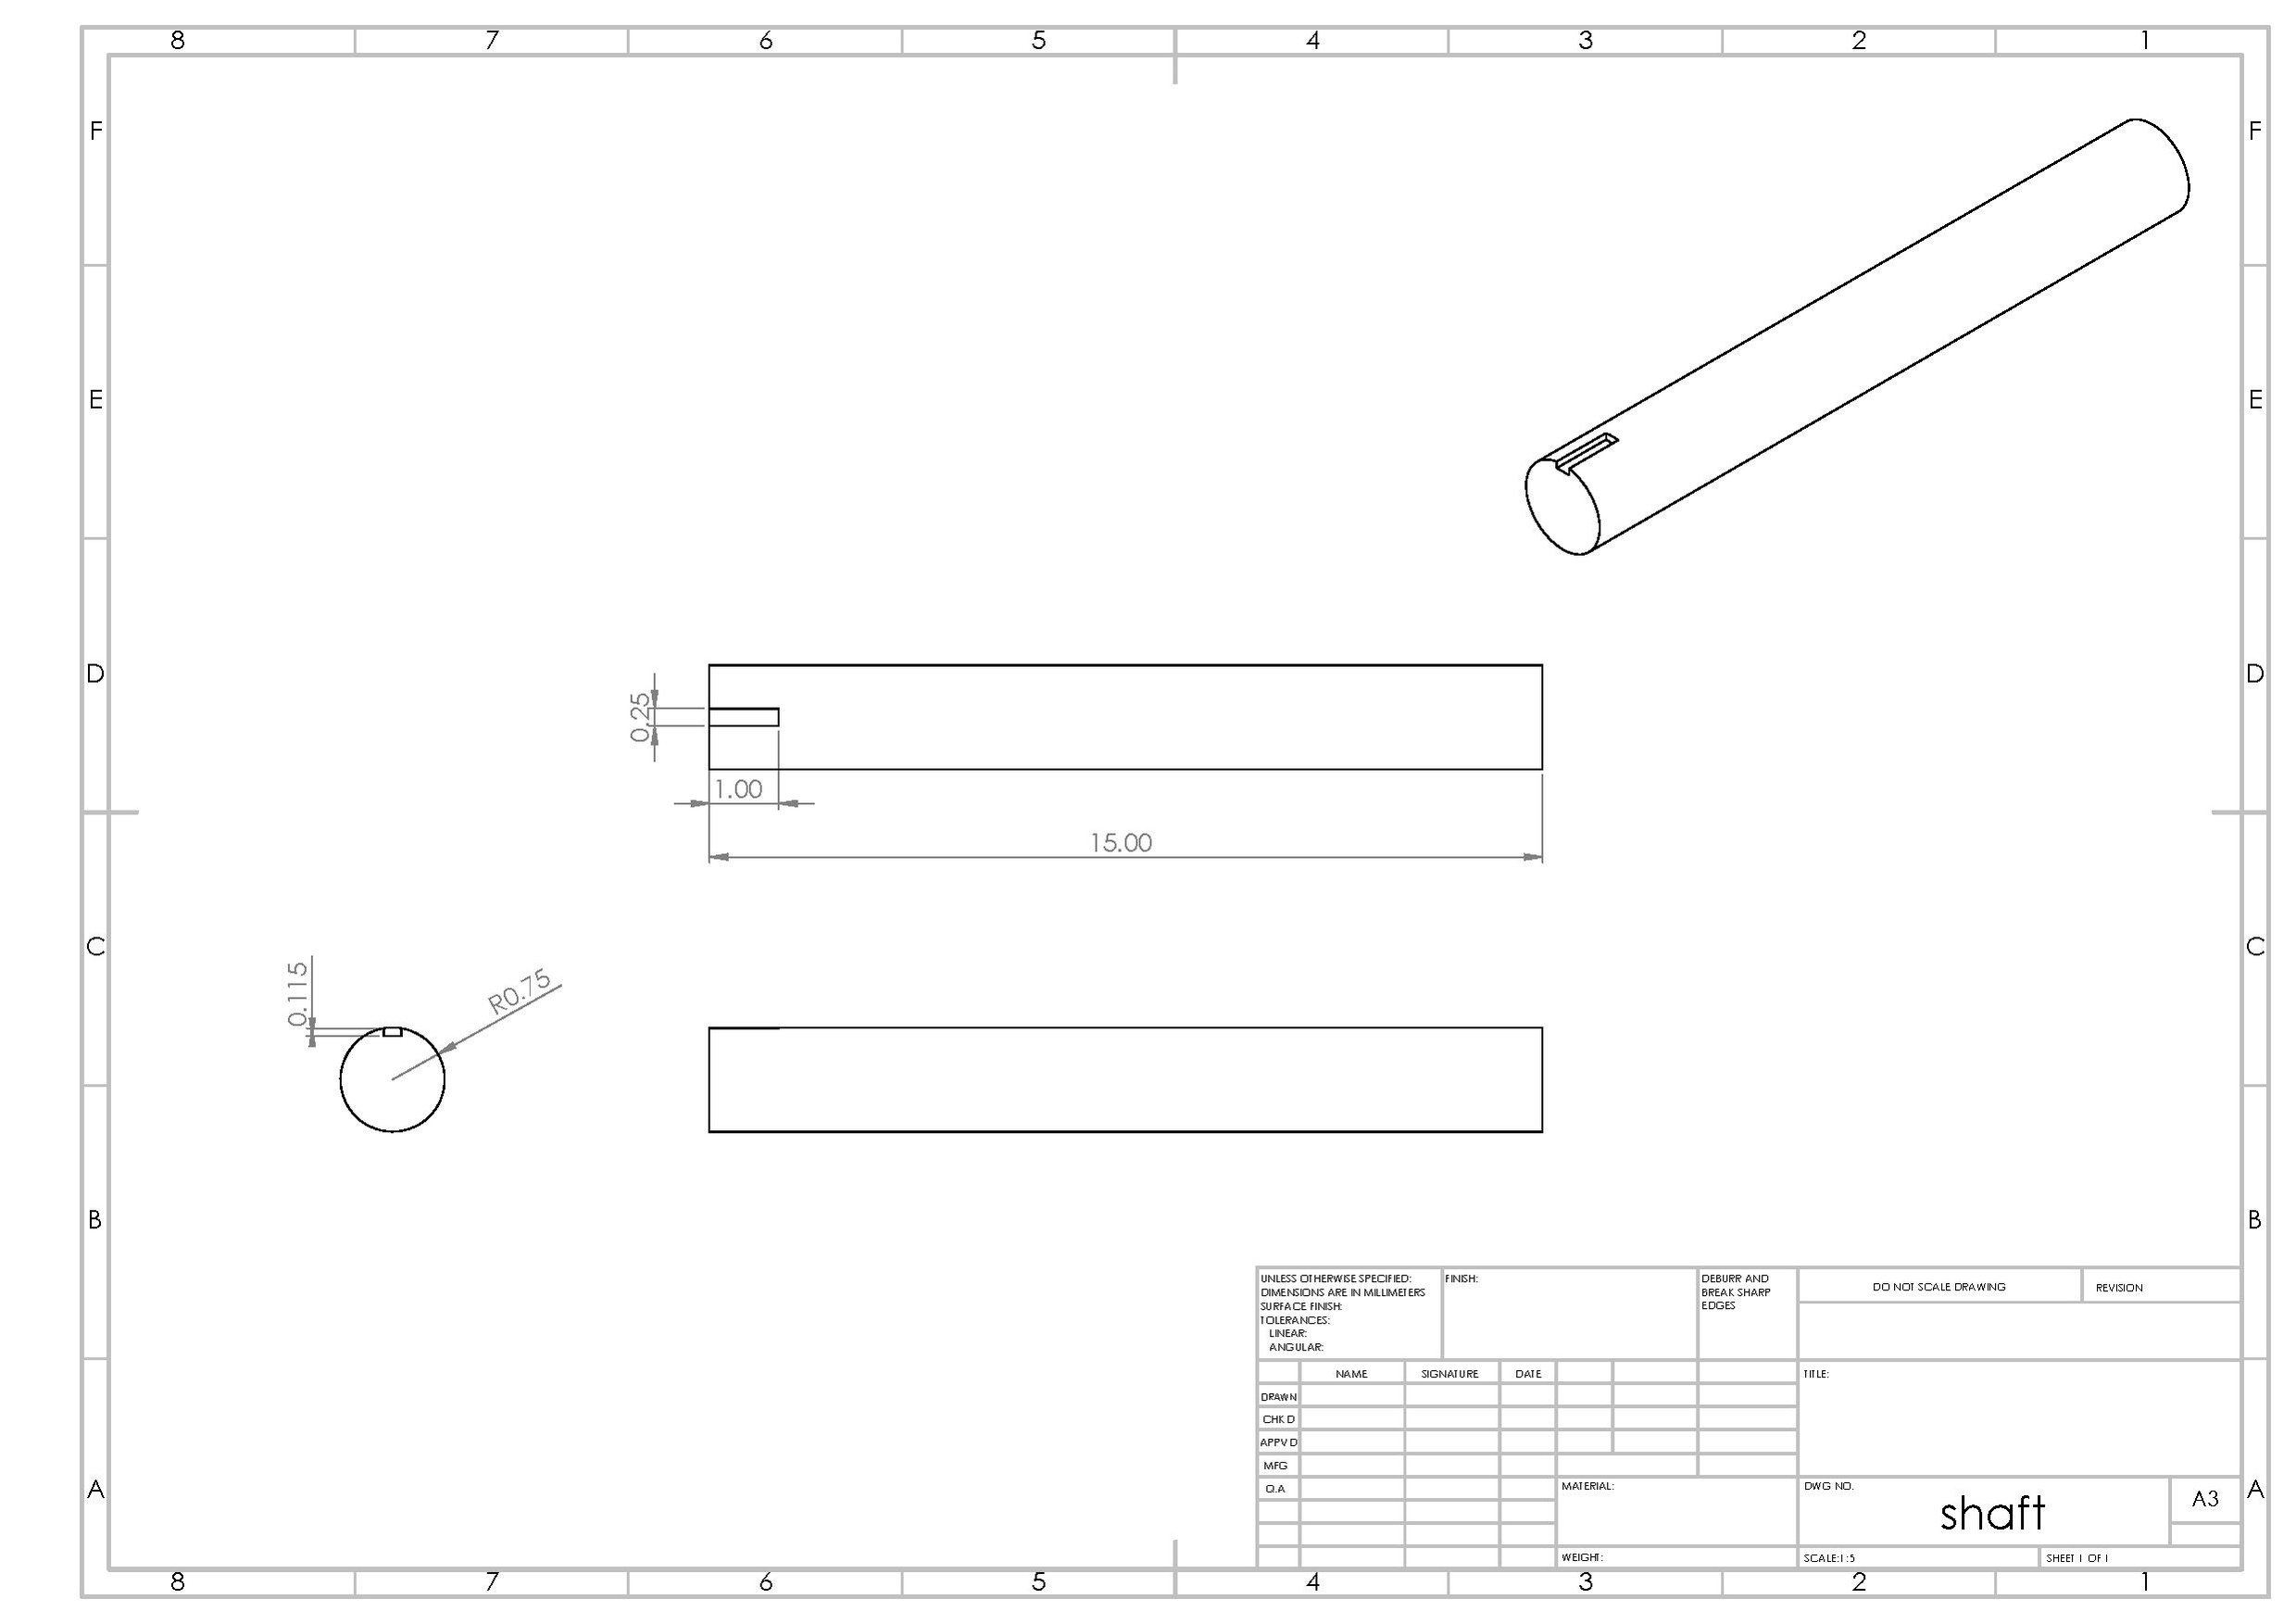 . The shaft is made out of a 1.5" diameter rod.
 - The hopper is what is mounted on top of the granulator and is what is used to help the user dispense waste plastic into the machine without the user getting too close to the blades. Only one hopper is needed to manufacture the granulator.
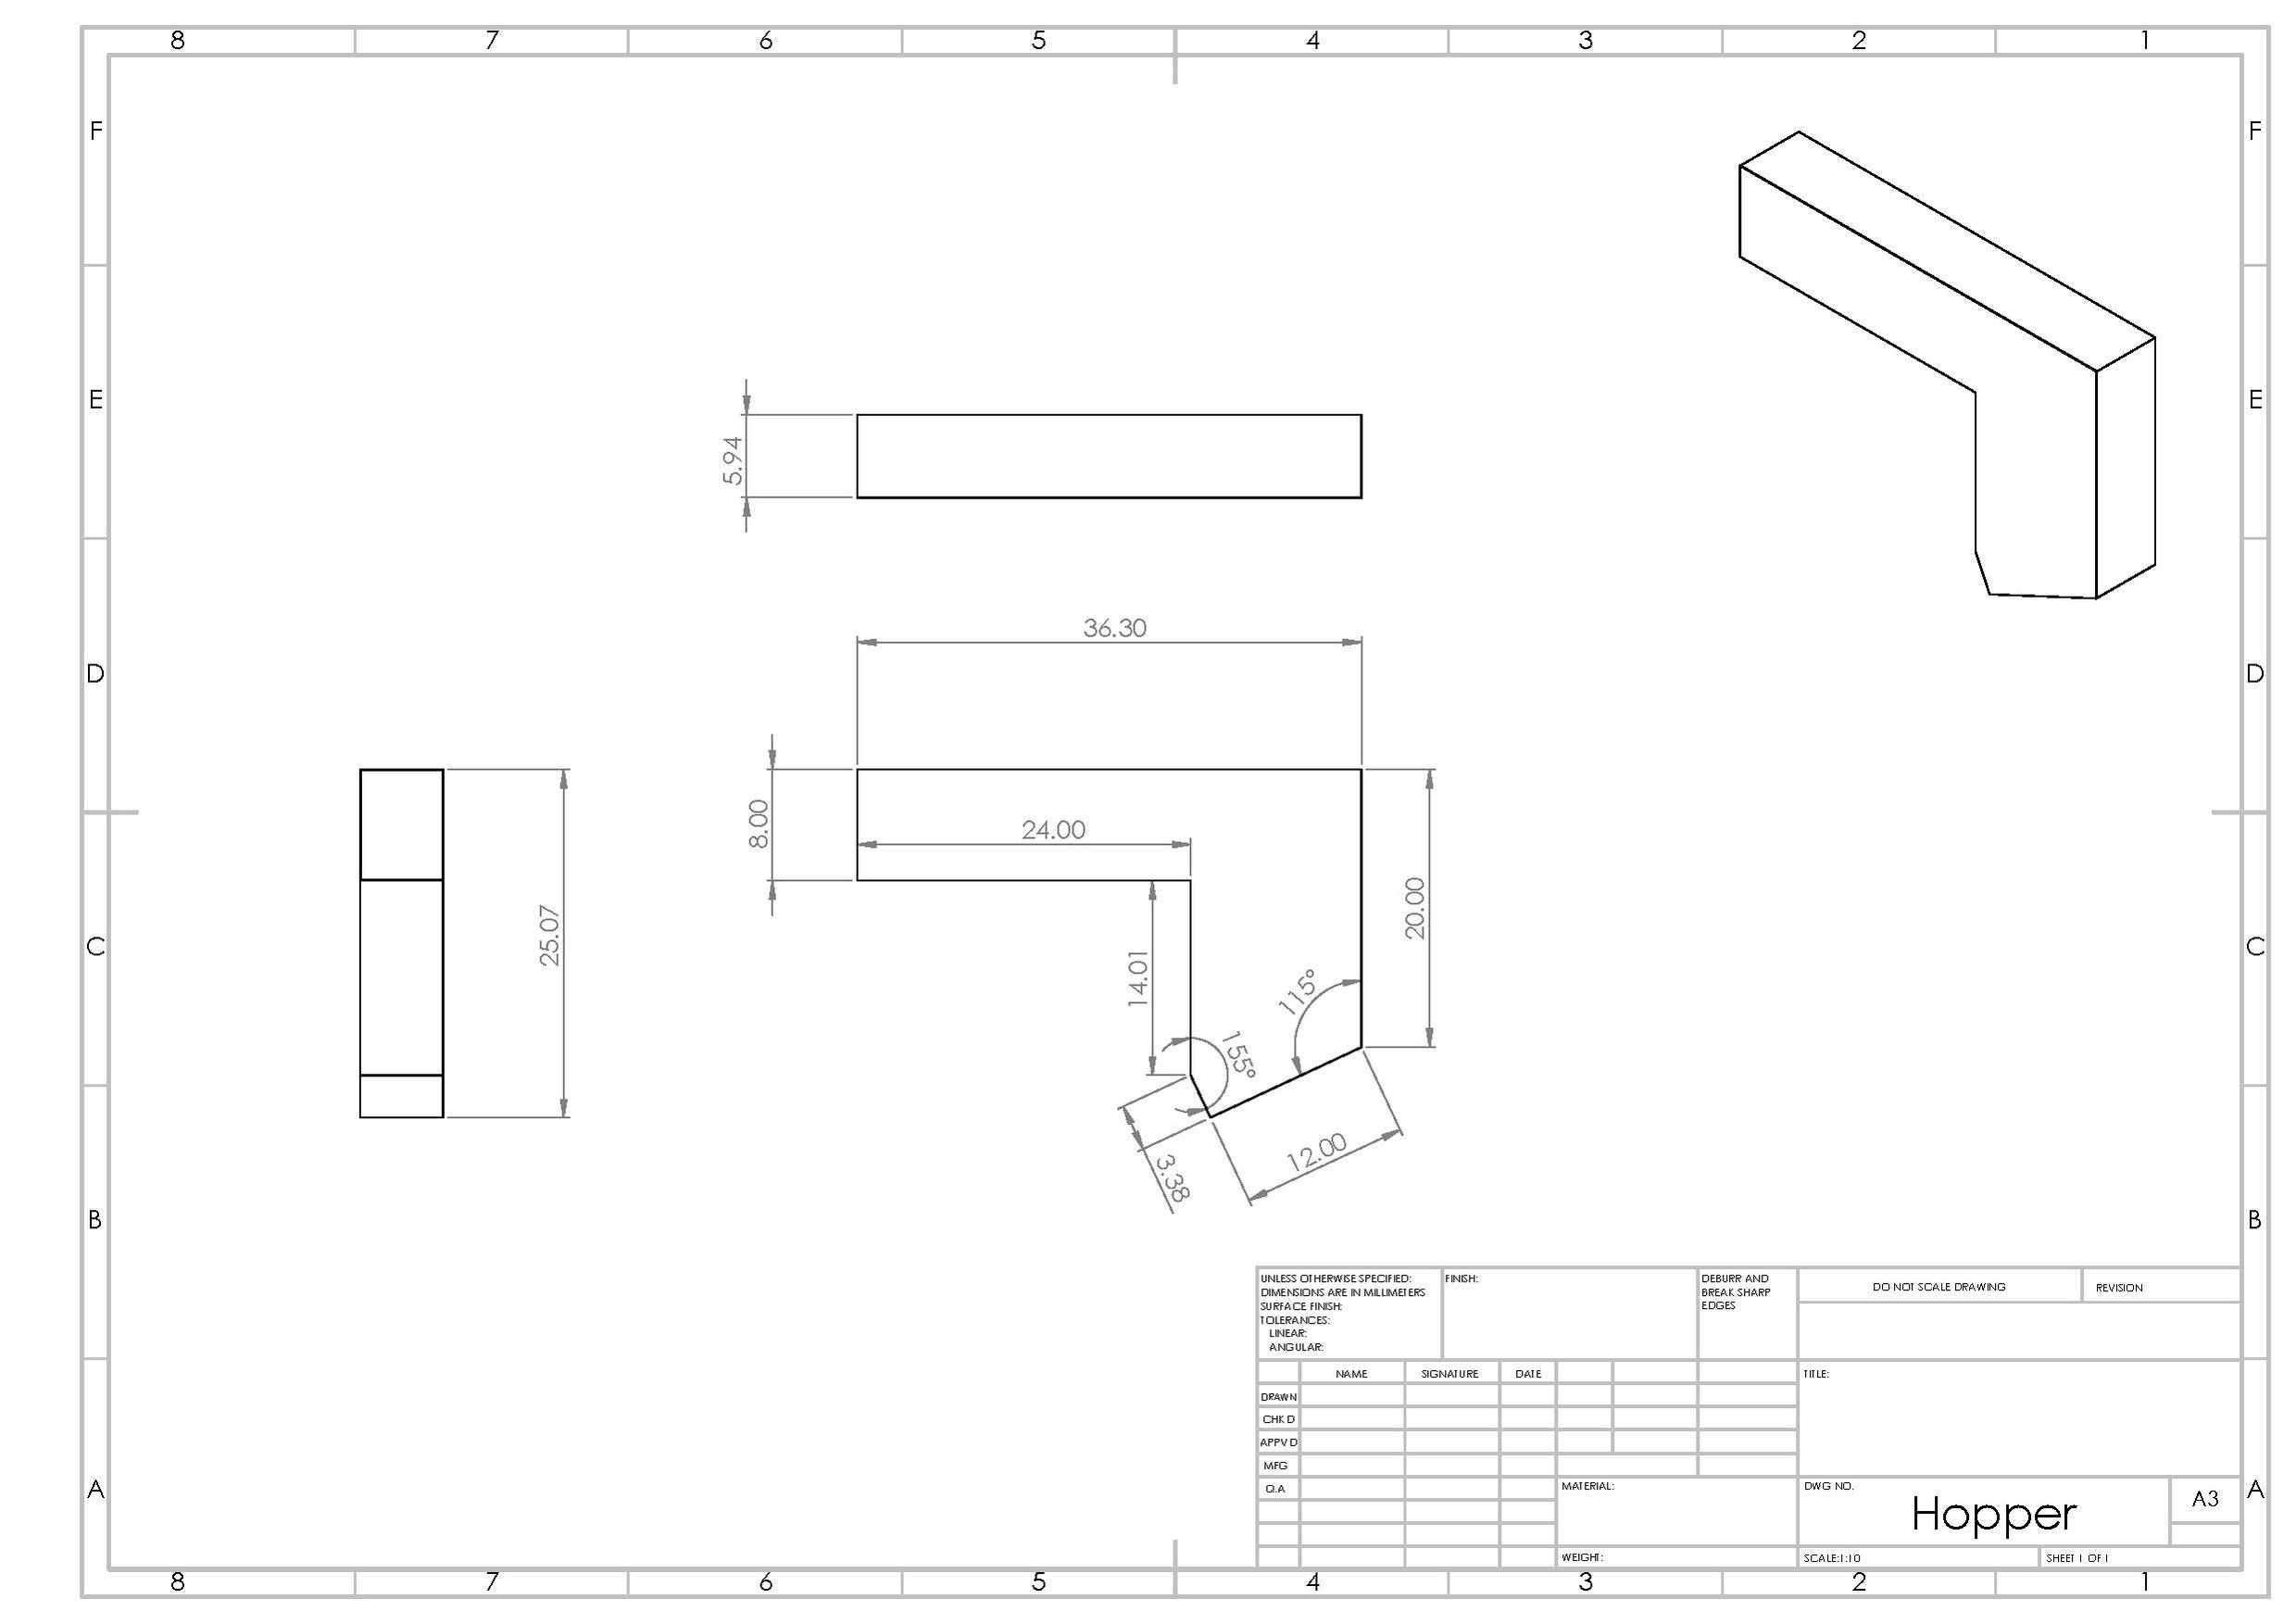 The hopper is made out of 1/16" thick steel.
 - These next parts were all purchased from the McMasterCarr website.
To mount the blades onto the blade mounts, two 3/4" long, 3/8" diameter bolts are needed to fasten each of the three blades.
To mount the frame, blade bed, and support rods on, 1" long, 9/16" diameter bolts will be needed.
Finally, two bearings will be needed to mount the 1.5" shaft on the frame. These bearings will need to have mounting bolts to fit the respective holes for the bearings that are chosen.
Update:
Free CAD 3D models will be uploaded as soon as Appropedia allows these types of files to be uploaded.
Tools needed for fabrication of the OSAT
There are serveral mnufacturing methods that we needed to use to cre
- MOST Delta RepRap or similar RepRap 3-D printer
There are several manufacturing methods that we needed to use to create the Granulator, causing us to need many different pieces of equipment:
- CNC plasma cutter
- MIG welder
- Drill press
- Brake press
Skills and Knowledge Necessary to Make the OSAT
- If you used special skill – link to relevant wikipedia or wikiversity articles/courses
There are several specialized skills that will be required to produce the shredder these include: Munufacturing Skills
- Ability to produce high quality welds on 3/8 in steel plate. This is incredibly important for the safety of the project as many parts in the machine will be under very high shock loads.
- The ability to operate a plasma cutter and a waterjet cutter.
- The ability to operate a brake press
Assembly Skills
- Mus be proficient with the proper torque for bolts to be tightened to
- Must be able to read and properly follow assembly drawings
- Need to have the ability to set the blade to blade gap to the proper tolerance, if this is wrong, there could be a catastrophic failure
Technical Specifications and Assembly Instructions
- Provide directions for print/assembly - be detailed enough in your “how to” to ensure that someone could construct the device from your description. Consider the elegance of IKEA like instructions.
- Include print time estimate
- Include assembly time estimate
- Including drawings or pictures of the device at stage of assembly at minimum. (http://www.appropedia.org/Special:Upload)
- Consider video if appropriate
| Example video summary of textbook |
|---|
Error in widget YouTube: Unable to load template 'wiki:YouTube' |
Common Problems and Solutions
- Include common mistakes/problems to avoid in building your OSAT and how to overcome them
Cost savings
- If your solution is not a low cost one then it is not really appropriate.
- Estimate your costs
- Find a commercial equivalent
- Calculate $ savings and % savings
The cheapest of any used plastic granulators that we found to buy online was approximately $1,500. The cost of ours is much less……add
References
- The sources of information (e.g. engineering handbooks, journal articles, government documents, webpages, books, magazine articles etc.). References should use the <ref> </ref> and <references/> tags and can be in any format but should include all the information necessary for someone else to find the same information you did. For example: [1]
- ↑ web page: Department of Energy (DOE) Landscaping and Energy Efficiency, DOE/GO-10095 (1995) Available: http://www.eren.doe.gov/erec/factsheets/landscape.html
<nowiki> Based on the developmental needs addressed (e.g. food, heat, electricity, clean water, health care, etc.) be sure to label your device in the proper categories e.g. use. Be sure to categorize your device so that it will be easy to find – for example “Low voltage connection basics” is categorized in