Project Title
Project developed by Bryce Stallworth [Bastallw]
Project Title is Modular Pegboard
Template:Statusboxtop Template:Status-design Template:Status-prototype You can help Appropedia by contributing to the next step in this OSAT's status. Template:Boxbottom
Abstract
- The modular pegboard is designed to replace more costly methods of tool storage. I chose to create a customizable pegboard due to the large number of applications that it can be used for. This pegboard can be used to expand an existing pegboard since it will work with standard 1/8 inch pegboard attachments. This technology addresses sustainable development goals number 8 (Decent Work and Economic Growth),9 (Industry, Innovation, and Infrastructure) and 12 (Responsible Consumption and Production). The pegboard can improve goal number 8 by allowing working people to have an affordable solution to their tool storage needs, since they would have a higher net income, by spending less money on commercial tool storage solutions. The pegboard addresses goal number 9 by allowing people to use the design in industry, determine potential areas of improvement in the design, and innovating the design to incorporate the added/customized features by modifying the provided source code to suit their particular applications better. The pegboard recognizes goal number 12 by allowing people to build as large of a pegboard as they need, instead of buying a standard size pegboard when they might not fully utilize it. That increases the environmental efficiency of the material used because you are accomplishing the same task using less material. I have not found any case studies for a customizable peg board design.
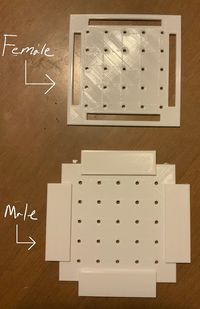
- Male and Female Pegboard Panels

Bill of Materials
- There is no extra components needed if the pegboard is not wall-mounted.
If you would like to wall mount the pegboard, you will need (4) 1/2 in screws per panel, which costs $0.10 per panel.
- All OpenSCAD files and STL files can be found on thingiverse through this link [[1]] or accessed by this URL https://www.thingiverse.com/thing:4024310/files
Tools needed for fabrication of the OSAT
- 3D Printer with at least a 7in X 7in X 1in printing area
- Drill or Screwdriver
Skills and Knowledge Necessary to Make the Modular Peg Board
You need to know how to use a drill or a screwdriver.
Technical Specifications and Assembly Instructions
- To connect the panels, snap the protruding end of one male panel into the similarly sized empty space of the female panel. To mount panels to the wall, drill a 1/2 in screw into the center of the square of material located in the corneer of each panel.
- Estimated Print Time = 4 Hrs 09 min per panel
- Assembly Time Estimate = 30 seconds per pair of panels and Mounting Time Estimate < 5 minutes for most configurations
- Including drawings or pictures of the device at stage of assembly at minimum. (http://www.appropedia.org/Special:Upload)
Common Problems and Solutions
- Drilling Screw too close to the edge of corner or peg hole. To correct this problem, drill the screw into the center (with respect to height and length).
- If you do not have a drill available to mount the pegboard, you can use a screwdriver as a substitute.
Cost savings
- If your solution is not a low cost one then it is not really appropriate.
- My Costs = $0.45 per panel
- Compared to a traditional 8in X 20in panel on amazon
My cost to Replicate = $3.60 Amazon Pegboard Price = $25.77
- $ savings = $22.17 and % Savings = 86%
Benefited Internet Communities
- Name and add links to at least 5 using single brackets around [url name]
References
- Amazon Product Used in Price Comparison - Available: https://www.amazon.com/Azar-770820-WHT-Pegboard-1-Sided-2-Pack/dp/B008M7RYAM/ref=sr_1_11?keywords=pegboard&qid=1575677150&sr=8-11 [1]
- 1/2in Screws for Mounting Pegboard Panels - Available: https://www.homedepot.com/p/Teks-8-1-2-in-Phillips-Pan-Head-Self-Drilling-Screws-300-Pack-21360/100135028 [2]
- Information about Pegboard Dimensions - Available: https://www.familyhandyman.com/storage-organization/organize-anything-with-pegboard-ideas-and-tips/ [3]
- ↑ https://www.amazon.com/Azar-770820-WHT-Pegboard-1-Sided-2-Pack/dp/B008M7RYAM/ref=sr_1_11?keywords=pegboard&qid=1575677150&sr=8-11
- ↑ https://www.homedepot.com/p/Teks-8-1-2-in-Phillips-Pan-Head-Self-Drilling-Screws-300-Pack-21360/100135028
- ↑ https://www.familyhandyman.com/storage-organization/organize-anything-with-pegboard-ideas-and-tips/