Project Title
Project developed by David Eychaner
Template:Statusboxtop Template:Status-prototype Template:Boxbottom
Abstract
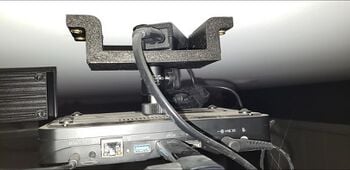
The device designed for this project was a Low Profile Projector Ceiling Mount. After gifting my parents a projector for a soon to be home theater project, I realized I had not purchased a proper ceiling mount for the device. However, unlike more expensive models, there were no aftermarket mounts available for this projector as it is advertised as a portable projector, and not a home theater version. Utilizing the standard 1/4" camera mounting thread on the base of the projector, I was able to purchase a high quality ball swivel from Amazon that is used to mount cameras. I then designed a low profile bracket that had a small shelf to manage the power supply, 4 through holes for attaching it to the ceiling, as well as a counter bored hex nut to secure the ball swivel to the bracket. Once the mount was assembled and placed on the ceiling, the projector was attached and the picture was leveled on the wall. This solved a problem in a very quick manner as well as provided me the option to make it lower in profile than other commercial variants which is extremely important due to the lower ceilings in this room. If an aftermarket one was fabricated to work with this projector, it would not be short enough to provide clearance for people walking underneath of it.
A picture of WOWOTO T8E Projector Mounted With 3D Printed Mount Assembly can be seen on the right.

Bill of Materials
- 100 grams of PLA Plastic Filament
- 4 M6 1 1/4" Drywall Screws
- 1 1/4" Hex Nut
- Ball Swivel Mount
- Upload and link to all source files from open source CAD
- Upload and link to all STLs
Tools needed for fabrication of the Mount
- MOST Delta RepRap or similar RepRap 3-D printer
- Hardware listed in the BOM
Technical Specifications and Assembly Instructions
- Print the .STL file for the mount that is linked below.
- Remove it from the Print Bed.
- Place 1/4" nut inside hex bored spot in the mount.
- Screw ball swivel mount onto hex nut that is assembled in the mount by hand.
- Screw the mount into ceiling stud with 4 M6 1 1/4" Drywall Screws
- Screw the projector onto the swivel mount.
Printable Stl file & FreeCAD Files
Files available at Thingiverse
Print Instructions
For all printed components
Material: PLA
Layer Height: 0.2mm
Wall Lines: 4
Fill Density: 35%
Print Speed: 70 mm/s
Printing Temperature: 210 C
No supports necessary.
Total Printing Time: 9 hours
Assembly time: >5min
Cost savings
- Filament Cost: $1
- Hardware Cost: $0.75
- Mount Cost: $12.00
Total Cost: $13.75
The Commercial Equivalent would cost $20.99 and we would lose functionality of the ball swivel as well as the low profile which is important for safety of people walking underneath of it, as well as to the device which is much more important to the cost savings of $7.24 or 34% savings.