Sophivorus (talk | contribs) m (Text replacement - "| affiliations = " to "| organizations = ") |
|||
| (70 intermediate revisions by 11 users not shown) | |||
| Line 1: | Line 1: | ||
[[File:OvenFinalDesign.jpg|thumb]] | |||
[[ | |||
== | {{Project data | ||
The purpose of this project is to create a low embedded energy, natural, beautiful way to cook pizza. The project will be a collaborative effort including [ | | authors = User:Ctnoonan, The Cobb Goblins, User:Minkmuse, User:Edr104, Liam Gunst | ||
| status = Deployed | |||
| completed = 2016 | |||
| made = Yes | |||
| replicated = No | |||
| cost = USD 216.14 | |||
| instance-of = Cobb oven | |||
| location = Arcata, California | |||
}} | |||
[[File:GroupPhoto8.jpg|thumb|The Cobb Goblins]] | |||
The purpose of this project is to create a low embedded energy, natural, beautiful way to cook pizza. The project will be a collaborative effort including [[Laurel Tree|Laurel Tree Charter School]], its students, Cal Poly Humboldt, our team, and the local community to demonstrating the ability to apply sustainable practices by designing products for use in daily life. | |||
== Background == | |||
The Cobb Goblins were commissioned in the Fall of 2012 as a part of [[Engr205 Introduction to Design|Engineering 215]], to design and construct an earthen pizza oven for Laurel Tree Charter School. Laurel Tree's mission is to create a sustainable model of education which provides all students with accessible curriculum, based on college preparatory standards, while developing life and socials skills in a mixed age setting. | |||
The Cobb Goblins were commissioned in the Fall of 2012 as a part of [ | |||
==Problem Statement and Criteria== | == Problem Statement and Criteria == | ||
The objective of our design is to create a sustainable, beautiful, safe, long-lasting, and functional outdoor oven for baking and cooking. The oven will be used weekly for children's pizza lunches and for the occasional school event or fundraiser. Table 1 shows the criteria created by our team in collaboration with Laurel Tree. These criteria were weighted to help choose a design that best fit the client's needs. | |||
{| class="wikitable | The objective of our design is to create a sustainable, beautiful, safe, long-lasting, and functional outdoor oven for baking and cooking. The oven will be used weekly for children's pizza lunches and for the occasional school event or fundraiser. Table 1 shows the criteria created by our team in collaboration with Laurel Tree. These criteria were weighted to help choose a design that best fit the client's needs. | ||
{| class="wikitable" | |||
|+ Table-1: Criteria and Their Importance | |+ Table-1: Criteria and Their Importance | ||
! style="background: #1A1A1A; color: white;" |Criteria | |||
! style="background: #1A1A1A; color: white;" |Importance | |||
|- | |- | ||
| Safety | |||
| align="center" |10 | |||
|- | |- | ||
| | | Construction Time | ||
|align="center"|10 | | align="center" |10 | ||
|- | |- | ||
| | | Effectiveness | ||
|align="center"| | | align="center" |9 | ||
|- | |- | ||
| | | Durability | ||
|align="center"| | | align="center" |8 | ||
|- | |- | ||
| Usability | |||
| align="center" |7 | |||
| Usability | |||
|align="center"|7 | |||
|- | |- | ||
| Sustainability | | Sustainability | ||
|align="center"|7 | | align="center" |7 | ||
|- | |- | ||
| Aesthetics | | Aesthetics | ||
|align="center"|6 | | align="center" |6 | ||
|- | |- | ||
| Student Involvement | | Student Involvement | ||
|align="center"|6 | | align="center" |6 | ||
|- | |- | ||
| Cost | |||
| align="center" |5 | |||
|} | |} | ||
==Description of Final Product: Ovenly Inferno== | == Description of Final Product: Ovenly Inferno == | ||
=== Oven Layers === | |||
==== Inner Thermal Layer ==== | |||
This layer retains heat from firing and radiates it back into the oven chamber. The mixture recipe for this layer is 1 part clay, 1 part sand. | This layer retains heat from firing and radiates it back into the oven chamber. The mixture recipe for this layer is 1 part clay, 1 part sand. | ||
====Insulation Layer==== | |||
==== Insulation Layer ==== | |||
This wooly looking layer insulates the inner layer and keeps heat from dissipating into the environment. The mixture recipe for this layer is 1 part clay, 1 part sand, and 5 parts straw. | This wooly looking layer insulates the inner layer and keeps heat from dissipating into the environment. The mixture recipe for this layer is 1 part clay, 1 part sand, and 5 parts straw. | ||
====Outer Cobb Layer==== | |||
==== Outer Cobb Layer ==== | |||
The straw in the outer cobb layer provides the tensile strength need to make the oven sturdy. This layer is also useful for applying designs to the oven's exterior. The mixture of this layer is 3 parts clay, 3 parts sand, and 1 part straw. | The straw in the outer cobb layer provides the tensile strength need to make the oven sturdy. This layer is also useful for applying designs to the oven's exterior. The mixture of this layer is 3 parts clay, 3 parts sand, and 1 part straw. | ||
====Lime Plaster==== | |||
==== Lime Plaster ==== | |||
Lime plaster is applied after the inner layers have fully dried. This layer protects the oven from the environment. | Lime plaster is applied after the inner layers have fully dried. This layer protects the oven from the environment. | ||
===Addition Features=== | |||
====Counter Top==== | === Addition Features === | ||
==== Counter Top ==== | |||
A laminate counter top was mounted to the side of the oven and held up by reclaimed wooden beams. | A laminate counter top was mounted to the side of the oven and held up by reclaimed wooden beams. | ||
====Wood Storage==== | ==== Wood Storage ==== | ||
The counter top provides space below for wood storage. | The counter top provides space below for wood storage. | ||
====Chimney==== | |||
==== Chimney ==== | |||
A half inch thick cardboard tube was covered with thermal and cobb layers and used as an anterior chimney to the oven. | A half inch thick cardboard tube was covered with thermal and cobb layers and used as an anterior chimney to the oven. | ||
====Adjustable Oxygen Intake Door==== | |||
==== Adjustable Oxygen Intake Door ==== | |||
A wooden door drilled with holes and a sliding plank allow varying levels of oxygen into the oven for different fire strengths. | A wooden door drilled with holes and a sliding plank allow varying levels of oxygen into the oven for different fire strengths. | ||
==Materials/Costs== | [[File:OvenDoor.jpg|thumb|center|Oven Door Concept Art by Sara Newell]] | ||
As many materials as possible were obtained used. | |||
{| class="wikitable | === Completed Oven === | ||
[[File:OvenFinalDesign.jpg|center|Fig. 2 Ovenly Inferno Complete|thumb]] | |||
== Materials/Costs == | |||
As many materials as possible were obtained used. Table 2 details the total materials and costs for constructing Ovenly Inferno. | |||
{| class="wikitable" | |||
|+ Table-2: Materials and Costs | |+ Table-2: Materials and Costs | ||
! style="background: #1A1A1A; color: white;"|Quantity | ! style="background: #1A1A1A; color: white;" |Quantity | ||
! style="background: #1A1A1A; color: white;" |Material | |||
! style="background: #1A1A1A; color: white;" |Cost ($) | |||
! style="background: #1A1A1A; color: white;" |Total ($) | |||
|- | |- | ||
| align="center"|27 | | align="center" |27 | ||
|align="right"| 1.95 | | Firebricks | ||
|align="right"| 52.65 | | align="right" |1.95 | ||
| align="right" |52.65 | |||
|- | |- | ||
| align="center"| | | align="center" |4 | ||
|align="right"| | | Mortar (60 lb. bags) | ||
|align="right"| | | align="right" |8.50 | ||
| align="right" |34.00 | |||
|- | |- | ||
| align="center"| | | align="center" |7 | ||
|align="right"| | | Masonry Sand (100 lb. bags) | ||
|align="right"| | | align="right" |11.00 | ||
| align="right" |77.00 | |||
|- | |- | ||
| align="center"| | | align="center" |3 | ||
|align="right"| | | Tarps | ||
|align="right"| | | align="right" |10.00 | ||
| align="right" |30.00 | |||
|- | |- | ||
| align="center"|1 | | | align="center" |1 | ||
|align="right"| | | Straw (bale) | ||
|align="right"| | | align="right" |9.00 | ||
| align="right" |9.00 | |||
|- | |- | ||
| align="center"|1 | | | align="center" |1 | ||
|align="right"| | | Work Gloves (box) | ||
|align="right"| | | align="right" |9.99 | ||
| align="right" |9.99 | |||
|- | |- | ||
| align="center"|1 | | | align="center" |1 | ||
|align="right"| | | Trowel | ||
|align="right"| | | align="right" |3.50 | ||
| align="right" |3.50 | |||
|- | |- | ||
| align="center"|1 | | | align="center" |1 | ||
|align="right"| Donated | | Plywood (4'x8') | ||
|align="right"| 0.00 | | align="right" |Donated | ||
| align="right" |0.00 | |||
|- | |- | ||
| align="center"| | | align="center" |1 | ||
|align="right"| Donated | | Mallet | ||
|align="right"| 0.00 | | align="right" |Donated | ||
| align="right" |0.00 | |||
|- | |- | ||
| align="center"| | | align="center" |80 | ||
|align="right"| | | Red Bricks | ||
|align="right"| 0.00 | | align="right" |Donated | ||
| align="right" |0.00 | |||
|- | |- | ||
| align="center"|1 | | | align="center" |1 | ||
|align="right"| | | Ton of Urbanite | ||
|align="right"| 0.00 | | align="right" |Donated | ||
| align="right" |0.00 | |||
|- | |- | ||
| align="center"| | | align="center" |40 | ||
|align="right"| | | Glass Bottles | ||
|align="right"| 0.00 | | align="right" |Donated | ||
| align="right" |0.00 | |||
|- | |- | ||
| align="center"| | | align="center" |2 | ||
|align="right"| | | Wooden Beams (4"x10"x36") | ||
|align="right"| 0.00 | | align="right" |Donated | ||
| align="right" |0.00 | |||
|- | |- | ||
| align="center"| | | align="center" |1 | ||
|align="right"| | | Countertop | ||
|align="right"| 0.00 | | align="right" |Donated | ||
| align="right" |0.00 | |||
|- | |- | ||
|-class="sortbottom" | | align="center" |1 | ||
|colspan="3" align="right" | '''Total Cost''' | | Riversand (cubic yd.) | ||
|align="right"| '''$216.14''' | | align="right" |Donated | ||
| align="right" |0.00 | |||
|- | |||
| align="center" |1 | |||
| Roll Ducttape | |||
| align="right" |Donated | |||
| align="right" |0.00 | |||
|- | |||
| align="center" |1 | |||
| 4' Level | |||
| align="right" |Donated | |||
| align="right" |0.00 | |||
|- | |||
| align="center" |Assorted | |||
| Hardware | |||
| align="right" |Donated | |||
| align="right" |0.00 | |||
|- | |||
| align="center" |1 | |||
| Wheelbarrow | |||
| align="right" |Borrowed | |||
| align="right" |0.00 | |||
|- | |||
| align="center" |1 | |||
| Soil screen | |||
| align="right" |Borrowed | |||
| align="right" |0.00 | |||
|- | |||
| align="center" |2 | |||
| Shovels | |||
| align="right" |Borrowed | |||
| align="right" |0.00 | |||
|- | |||
| align="center" |1 | |||
| Wheelbarrow | |||
| align="right" |Borrowed | |||
| align="right" |0.00 | |||
|- | |||
| align="center" |Truckloads | |||
| Clay soil | |||
| align="right" |Gathered from source | |||
| align="right" |0.00 | |||
|- | |||
|- class="sortbottom" | |||
| colspan="3" align="right" |'''Total Cost''' | |||
| align="right" |'''$216.14''' | |||
|} | |} | ||
==Results== | == Results == | ||
Ovenly Inferno is successful in producing enough pizza for the whole school during lunch time. It requires 1 ft^3 of wood to fire it in 2 hours. The oven's peak temperature is ___*F and after cooking __ pizza's the temperature is ____*F. The counter space provides adequate preparation space and the fuel is kept close in the wood storage. | Ovenly Inferno is successful in producing enough pizza for the whole school during lunch time. It requires 1 ft^3 of wood to fire it in 2 hours. The oven's peak temperature is ___*F and after cooking __ pizza's the temperature is ____*F. The counter space provides adequate preparation space and the fuel is kept close in the wood storage. | ||
====Laurel Tree Input, Oct. 2014==== | ==== Laurel Tree Input, Oct. 2014 ==== | ||
The exact operating temperatures are not known but it was estimated to be approximately 700 Degrees Fahrenheit. This figure was made an associate of Laurel Tree that manages a similar outdoor oven. Heat is not radiated on the sides or back of the oven; the insulation has proven effective. | The exact operating temperatures are not known but it was estimated to be approximately 700 Degrees Fahrenheit. This figure was made an associate of Laurel Tree that manages a similar outdoor oven. Heat is not radiated on the sides or back of the oven; the insulation has proven effective. | ||
Laurel Tree's first uses were found to be too hot; damage from this is possible but not confirmed. They now operate it at lower temperatures with success. | Laurel Tree's first uses were found to be too hot; damage from this is possible but not confirmed. They now operate it at lower temperatures with success. | ||
==Video== | == Video == | ||
== D.I.Y == | |||
{{Step | |||
| number = 1 | |||
| text = Mortar three layers of red bricks onto the foundation. | |||
| image = File:Newell_brickfooter.jpg | |||
| caption = Brick Footer | |||
}} | |||
{{Step | |||
| number = 2 | |||
| text = Stack urbanite within the footer to reach the desired height (about 36"). At the top of the stack, create a perimeter from urbanite that will be filled in. | |||
| image = File:Newell_stacked_urbanite.jpg | |||
| caption = Stacked Urbanite | |||
}} | |||
{{Step | |||
| number = 3 | |||
| text = Fill in perimeter with glass bottles laid on their side. | |||
| image = File: Newell glassbottles.jpg | |||
| caption = Glass Bottle Insulation | |||
}} | |||
{{Step | |||
| number = 4 | |||
| text = Cover and level the glass bottle layer with sand. | |||
| image = File: newell leveledsand.jpg | |||
| caption = Sand Covering | |||
}} | |||
{{Step | |||
| number = 5 | |||
| text = Arrange firebricks and tamp down onto the leveled sand. A roll of duct tape was used; however a mallet would be preferable. The bricks were labeled with numbers since they were previously arrange on a table to find the best fit. Arrange and Mortar red bricks for the mouth of the oven. | |||
| image = File: Newell firebrick.jpg | |||
| caption = Firebricks | |||
}} | |||
{{Step | |||
| number = 6 | |||
| text = Use a wooden form to help support red bricks as you mortar them into an arch. To avoid cracking, create a wedge cut keystone as the top brick in the arch. Mound wet sand on top of the firebricks to create a dome that will act as the form which the oven layers will be built on top. Cover the sand with wet newspaper so that it holds its shape and doesn't attach to the inner thermal layer. | |||
| image = File: Newell moundmouth.jpg | |||
| caption = Sand Mound and Red Brick Mouth | |||
}} | |||
{{Step | |||
| number = 7 | |||
| text = Apply the thermal layer clay mixture around the sand mound. It should be 5" thick. Pound the clay downward instead of into the mound to keep the integrity of the mound intact. Work your way up the mound in about 6" layers. | |||
| image = File: Newell thermallayer.jpg | |||
| caption = Application of the Inner Thermal Layer | |||
}} | |||
{{Step | |||
| number = 8 | |||
| text = Apply the 7" thick wooly insulation layer. | |||
| image = File: Newell woolylayer.jpg | |||
| caption = Application of Insulation Layer | |||
}} | |||
{{Step | |||
| number = 9 | |||
| text = Before applying the outer cobb layer, cut a hole in the previous two layers for the chimney. A thick cylindrical hollow cardboard tube was used. The tube was covered with the thermal layer mixture. | |||
| image = File: Newell outerlayer.JPG | |||
| caption = Application of Outer Cobb Layer | |||
}} | |||
{{Step | |||
{{ | | number = 10 | ||
| text = Use cobb to put designs onto the exterior of your oven. | |||
| image = File:asdklfasl.jpg | |||
| caption = Designs molded with cobb | |||
}} | |||
|File: | |||
| | |||
{{Step | |||
| number = 11 | |||
| text = Apply a layer of lime plaster to protect the oven from the elements. | |||
| image = File: asldkfasldkf.jpg | |||
| caption = Application of Lime Plaster | |||
}} | }} | ||
==Maintenance== | == Maintenance == | ||
The oven will need to undergo a lime wash every five years. This wash will heal the lime plaster of any cracks that may develop. The oven should be fired | The oven will need to undergo a lime wash every five years. This wash will heal the lime plaster of any cracks that may develop. The oven should be fired | ||
==Cobb Goblins== | == Discussion and Next Steps == | ||
* Many cracks have begun to form, possibly due to firing it too hot in order to dry it. These cracks will need to be patched. | |||
* As soon as the out cobb layer has dried, a layer of lime plaster will need to be applied to protect from the wet climate of Humboldt County. | |||
== Cobb Goblins == | |||
* [[User:Liamgunst|Liam Gunst]] | * [[User:Liamgunst|Liam Gunst]] | ||
* [[User:Minkmuse|Sara Newell]] | * [[User:Minkmuse|Sara Newell]] | ||
| Line 212: | Line 339: | ||
* [[User:Edr104|Evan Rehn]] | * [[User:Edr104|Evan Rehn]] | ||
==Update October 2014== | == Update October 2014 == | ||
Since the oven was constructed two years ago it has experienced damage and degradation. The oven has not received the final plaster coating that was planned. As a result it has been subject to increased weathering and cracks. Furthermore, it was reported that vandalism had occurred and the chimney destroyed. The debris was cleared and the oven remained operable. | Since the oven was constructed two years ago it has experienced damage and degradation. The oven has not received the final plaster coating that was planned. As a result it has been subject to increased weathering and cracks. Furthermore, it was reported that vandalism had occurred and the chimney destroyed. The debris was cleared and the oven remained operable. | ||
According to Laurel Tree the oven is still in use, though they claim the frequency of use would increase if repairs were made, citing more confidence in the oven as the primary reason. | According to Laurel Tree the oven is still in use, though they claim the frequency of use would increase if repairs were made, citing more confidence in the oven as the primary reason. | ||
The oven has a work station attached to it, and a series of cabinets adjacent to that. Both are exposed to the elements to some degree which was not preferable for aesthetic and durability reasons. | The oven has a work station attached to it, and a series of cabinets adjacent to that. Both are exposed to the elements to some degree which was not preferable for aesthetic and durability reasons. | ||
<gallery> | <gallery> | ||
File:oven face view.JPG|Face view of the oven, Oct. 2014 | |||
File:Oven vandalism.JPG|Chimney lost due to vandalism. | |||
File:workbench exposure.jpg|Workbench and cabinets partially exposed. | |||
</gallery> | </gallery> | ||
*[ | * [https://www.slideshare.net/slideshow/embed_code/40841807 Slideshare of October 2014 update] | ||
==Update October 2016== | == Update October 2016 == | ||
Since the last update, the staff and students have been unable to make any progress until this recent summer of 2016. One of the staff members, who goes by Sam, took the oven project under his guidance in an effort to bring the oven back to its glory days in 2012-13 when the students were able to enjoy pizzas on a regular basis. | Since the last update, the staff and students have been unable to make any progress until this recent summer of 2016. One of the staff members, who goes by Sam, took the oven project under his guidance in an effort to bring the oven back to its glory days in 2012-13 when the students were able to enjoy pizzas on a regular basis. | ||
Unfortunately they have not been able to fully fix the degradation and vandalism that occurred in 2014. However they have attempted to mend the oven back together by resurfacing and adding three layers of cobb. Initially Sam and the students decided on using cobb with crushed up mosaic tiles with the intention of giving the oven some flair. This layer unfortunately had trouble staying on so they scraped the flakes off and proceeded with two successful layers of cobb. The bottom layer of cobb contains hay and straw while the upper layer contains cattail which has helped smooth out many rough portions on the oven exterior. | Unfortunately they have not been able to fully fix the degradation and vandalism that occurred in 2014. However they have attempted to mend the oven back together by resurfacing and adding three layers of cobb. Initially Sam and the students decided on using cobb with crushed up mosaic tiles with the intention of giving the oven some flair. This layer unfortunately had trouble staying on so they scraped the flakes off and proceeded with two successful layers of cobb. The bottom layer of cobb contains hay and straw while the upper layer contains cattail which has helped smooth out many rough portions on the oven exterior. | ||
The whole oven still requires two more layers of cobb, one containing cattail, and the other the same finishing layer that has yet to be applied since the project took off in 2012. After filling out most cracks on the outer layer Sam and some students have tested the oven by having a weekly fire. According to their findings, the oven is definitely producing the same high temperatures it once was | The whole oven still requires two more layers of cobb, one containing cattail, and the other the same finishing layer that has yet to be applied since the project took off in 2012. After filling out most cracks on the outer layer Sam and some students have tested the oven by having a weekly fire. According to their findings, the oven is definitely producing the same high temperatures it once was. | ||
Other than the two additional layers of cobb, Sam and the students intend on adding a nice maple door to cover oven opening, and possibly rebuild the chimney, even though they believe it will suffice without a higher chimney. | |||
<gallery> | <gallery> | ||
| Line 246: | Line 372: | ||
</gallery> | </gallery> | ||
*[https://prezi.com/yafbys_mubbt/laurel-tree-charter-school/# Prezi of October 2014 update] | * [https://prezi.com/yafbys_mubbt/laurel-tree-charter-school/# Prezi of October 2014 update] | ||
== References/Further Reading == | |||
* Bee, Becky. (1997). "The Cobb Builders Handbook: You Can Hand-sculpt Your Own Home." | |||
Groundworks, Murphy, OR. Accessed online <http://www.weblife.org/cob/ > (Sept. 22, 2012). | Groundworks, Murphy, OR. Accessed online <http://www.weblife.org/cob/ > (Sept. 22, 2012). | ||
*Ben. (2012). | * Ben. (2012). "Pizza! This time permanent" Flirting with Yurting. | ||
<http://www.flirtingwithyurting.com/?p=459 > (Oct. 7, 2012). | <http://www.flirtingwithyurting.com/?p=459 > (Oct. 7, 2012). | ||
* | * "Blue Ox Earthen Oven." (2011). Appropedia | ||
< | |||
<https://www.appropedia.org/Blue_ox_earthen_oven> (Sept. 23, 2012). | |||
* "Building an Earthen (Cob) Oven," (2011). Sunstone Farm and Learning Center. | |||
<http://sunstonefarmandlearn.com/2011/03/24/building-an-earthen-cob-oven/> (Sept. 24, 2012). | <http://sunstonefarmandlearn.com/2011/03/24/building-an-earthen-cob-oven/> (Sept. 24, 2012). | ||
*Davies, N. (2005). | * Davies, N. (2005). "Finishing the Cob Oven." <http://www.pequals.com/at/natoven/ > (Nov. 29, 2012). | ||
* Denzer, Kiko. (2002). "Build your own Wood-Fired Earth Oven." Mother Earth News, (194), 70-74. EBSCOhost (Sept. 22, 2012). | |||
* Denzer, Kiko. (2008) "Oven dome height for different size ovens." | |||
<[https://kikodenzer.blogspot.com/2008/07/oven-dome-height-for-different-size.html http://kikodenzer.blogspot.com/2008/07/oven-dome-height-for-different-size.html]> (Oct. 7, 2012). | |||
*Denzer, Kiko. ( | * Denzer, Kiko with Hannah Field. (2007). "Build Your Own Earth Oven 3rd Ed." Hand Print Press, USA. | ||
* Galloway, Willi. (2012) "Backyard Earthen Oven." | |||
<http://www.digginfood.com/wp-content/uploads/2009/07/cure-firing.jpg> (Oct. 9, 2012). | |||
* | * "Guidelines for the Installation and Use of Open-air Barbeques". | ||
<http://www. | |||
(2008). Department of Environmental Health Food & Housing Division. <[https://web.archive.org/web/20140505133250/http://www.sdcounty.ca.gov/deh/food/pdf/publications_openairbbq.pdf | |||
http://web.archive.org/web/20140505133250/http://www.sdcounty.ca.gov/deh/food/pdf/publications_openairbbq.pdf]> (Sept. 23, 2012). | |||
* Grimmer, Anne (2011). "The Preservation and Repair of Historic Stucco" Preservation | |||
Brief, National Park Service, US Dept. of Interior. <[https://web.archive.org/web/20130515221101/http://www.nps.gov:80/hps/tps/briefs/brief22.htm | |||
http://web.archive.org/web/20130515221101/http://www.nps.gov:80/hps/tps/briefs/brief22.htm]> (Sept. 24, 2012). | |||
* Hauk, Marna and Heindsmann, Emily. (1998). "Building with mud!" Communities, (99), 36-40. EBSCOhost (Sept. 22, 2012). | |||
* "HBCSL cobb oven." (2012). Appropedia. | |||
<https://www.appropedia.org/HBCSL_cobb_oven> (Sept. 23, 2012). | |||
* | * Hernandez, Carolyn. (2012). "Building an Earth Oven." Wild Earth Builders. | ||
<<nowiki>http://wildearthbuilders.com/files/IMG_1004.jpg</nowiki>> (Oct. 7, 2012). | |||
* | * "Kitchen & Bath Industry Dimensional Guide." (2011). Kitchen and Bath Center, | ||
<[https://web.archive.org/web/20100307142026/http://mwknb.com:80/KBC%20Industry%20Dimensional%20Guide.htm | |||
http://web.archive.org/web/20100307142026/http://mwknb.com:80/KBC%20Industry%20Dimensional%20Guide.htm]> (Nov. 8, 2012). | |||
* | * Laurel Tree Charter School (2012). Mission Statement. <http://www.laureltreelc.org/Mission- | ||
<http://www. | |||
Statement.html> (Sept. 24 2012). | Statement.html> (Sept. 24 2012). | ||
*Lime & Related Products Index & Prices (2012). Mike Wye & Associates Ltd < http://www.mikewye.co.uk/mikeprices.htm | * Lime & Related Products Index & Prices (2012). Mike Wye & Associates Ltd < [https://web.archive.org/web/20140901064812/http://www.mikewye.co.uk:80/mikeprices.htm | ||
http://web.archive.org/web/20140901064812/http://www.mikewye.co.uk:80/mikeprices.htm]> (Dec. 4, 2012) | |||
* "Oven." (2012). Merriam-Webster Dictionary, | |||
<http://www.merriam-webster.com/dictionary/oven> (Nov. 29, 2012). | <http://www.merriam-webster.com/dictionary/oven> (Nov. 29, 2012). | ||
*Shimpock, Mike. (2012). | * Shimpock, Mike. (2012). "My Pizza Oven." | ||
<http://slice.seriouseats.com/assets_c/2010/08/mike-s-mpo-fin-106390.html> (Oct. 7, 2012) | |||
<[https://web.archive.org/web/20160512052323/http://slice.seriouseats.com:80/assets_c/2010/08/mike-s-mpo-fin-106390.html | |||
http://web.archive.org/web/20160512052323/http://slice.seriouseats.com:80/assets_c/2010/08/mike-s-mpo-fin-106390.html]> (Oct. 7, 2012) | |||
* Smith, Michael G. (2000). "Cobb Construction." Green Home Building. | |||
<http://www.dcat.net/resources/buildingstandards_Cobb_articles.pdf > (Sept. 24, 2012). | <http://www.dcat.net/resources/buildingstandards_Cobb_articles.pdf > (Sept. 24, 2012). | ||
*Southwick, Marcia. (1994). Build With Adobe. Swallow Press, Athens, Ohio. | * Southwick, Marcia. (1994). Build With Adobe. Swallow Press, Athens, Ohio. | ||
* "The CCAT Earthen Oven." (2004). <http://www.pequals.com/at/earthenoven/> (Nov. 29, | |||
2012). | 2012). | ||
* | * "Peoria to Open Scotland Yard Park." (2012). City of Peoria Press Release. | ||
<http://www.peoriaaz.gov/NewsPR2.aspx?PID=1690&id=54035> (Sept. 22, 2012). | |||
<[https://web.archive.org/web/20170201224840/https://www.peoriaaz.gov/NewsPR2.aspx?PID=1690&id=54035 | |||
http://web.archive.org/web/20170201224840/https://www.peoriaaz.gov/NewsPR2.aspx?PID=1690&id=54035]> (Sept. 22, 2012). | |||
* "Pizza Pans". (2012). Abest Kitchen. | |||
[http://www.akitchen.com/store/pizzapans.html <http://www.akitchen.com/store/pizzapans.html>] (Sept. 23, 2012). | [http://www.akitchen.com/store/pizzapans.html <http://www.akitchen.com/store/pizzapans.html>] (Sept. 23, 2012). | ||
* | * "Pizza Recipes". (2002). Italian Recipes, [http://www.italiancook.ca/pizza-recipes.htm <http://www.italiancook.ca/pizza-recipes.htm>] (Sept. | ||
23, 2012). | 23, 2012). | ||
*Smith, Michael G. (2000). | * Smith, Michael G. (2000). "Cobb Construction." | ||
[http://www.greenhomebuilding.com/pdf/buildingstandards_cob_articles.pdf <http://www.greenhomebuilding.com/pdf/buildingstandards_cob_articles.pdf>] (Sept. 24, 2012). | [http://www.greenhomebuilding.com/pdf/buildingstandards_cob_articles.pdf <http://www.greenhomebuilding.com/pdf/buildingstandards_cob_articles.pdf>] (Sept. 24, 2012). | ||
*Southwick, Marcia. (1994). Build With Adobe. Swallow Press, Athens, Ohio. | * Southwick, Marcia. (1994). Build With Adobe. Swallow Press, Athens, Ohio. | ||
* "What Every Member of the Trade Community Should Know About: Classification of Cooking | |||
Ranges, Stoves and Ovens." (2008). U.S. Customs and Border Protection. Washington, D.C.[https://www.cbp.gov/linkhandler/cgov/trade/legal/informed_compliance_pubs/icp086.ctt/icp086.pdf<http://www.cbp.gov/linkhandler/cgov/trade/legal/informed_compliance_pubs/icp086.ctt/icp086.pdf>] (Sept. 23, 2012). | |||
Ranges, Stoves and Ovens. | |||
* "Wood Burning Brick Oven: Construction and Cooking" (2002). Ozarkdreams. | |||
[http://www.ozarkdreams.com/BrickOven.htm <http://www.ozarkdreams.com/BrickOven.htm>] (Oct. 8, 2012). | [http://www.ozarkdreams.com/BrickOven.htm <http://www.ozarkdreams.com/BrickOven.htm>] (Oct. 8, 2012). | ||
{{Page data | |||
| part-of = Engr205 Introduction to Design | |||
| keywords = green construction, oven, sustainable building practices, clay, cobb, sand, straw, Earthen ovens | |||
| sdg = SDG04 Quality education, SDG11 Sustainable cities and communities, SDG12 Responsible consumption and production | |||
| published = 2016 | |||
| organizations = Cal Poly Humboldt, Laurel Tree Charter School | |||
| license = CC-BY-SA-3.0 | |||
| language = en | |||
}} | |||
[[Category:Earthen ovens]] | [[Category:Earthen ovens]] | ||
Latest revision as of 12:20, 28 February 2024


The purpose of this project is to create a low embedded energy, natural, beautiful way to cook pizza. The project will be a collaborative effort including Laurel Tree Charter School, its students, Cal Poly Humboldt, our team, and the local community to demonstrating the ability to apply sustainable practices by designing products for use in daily life.
Background[edit | edit source]
The Cobb Goblins were commissioned in the Fall of 2012 as a part of Engineering 215, to design and construct an earthen pizza oven for Laurel Tree Charter School. Laurel Tree's mission is to create a sustainable model of education which provides all students with accessible curriculum, based on college preparatory standards, while developing life and socials skills in a mixed age setting.
Problem Statement and Criteria[edit | edit source]
The objective of our design is to create a sustainable, beautiful, safe, long-lasting, and functional outdoor oven for baking and cooking. The oven will be used weekly for children's pizza lunches and for the occasional school event or fundraiser. Table 1 shows the criteria created by our team in collaboration with Laurel Tree. These criteria were weighted to help choose a design that best fit the client's needs.
| Criteria | Importance |
|---|---|
| Safety | 10 |
| Construction Time | 10 |
| Effectiveness | 9 |
| Durability | 8 |
| Usability | 7 |
| Sustainability | 7 |
| Aesthetics | 6 |
| Student Involvement | 6 |
| Cost | 5 |
Description of Final Product: Ovenly Inferno[edit | edit source]
Oven Layers[edit | edit source]
Inner Thermal Layer[edit | edit source]
This layer retains heat from firing and radiates it back into the oven chamber. The mixture recipe for this layer is 1 part clay, 1 part sand.
Insulation Layer[edit | edit source]
This wooly looking layer insulates the inner layer and keeps heat from dissipating into the environment. The mixture recipe for this layer is 1 part clay, 1 part sand, and 5 parts straw.
Outer Cobb Layer[edit | edit source]
The straw in the outer cobb layer provides the tensile strength need to make the oven sturdy. This layer is also useful for applying designs to the oven's exterior. The mixture of this layer is 3 parts clay, 3 parts sand, and 1 part straw.
Lime Plaster[edit | edit source]
Lime plaster is applied after the inner layers have fully dried. This layer protects the oven from the environment.
Addition Features[edit | edit source]
Counter Top[edit | edit source]
A laminate counter top was mounted to the side of the oven and held up by reclaimed wooden beams.
Wood Storage[edit | edit source]
The counter top provides space below for wood storage.
Chimney[edit | edit source]
A half inch thick cardboard tube was covered with thermal and cobb layers and used as an anterior chimney to the oven.
Adjustable Oxygen Intake Door[edit | edit source]
A wooden door drilled with holes and a sliding plank allow varying levels of oxygen into the oven for different fire strengths.

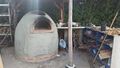
Completed Oven[edit | edit source]
Materials/Costs[edit | edit source]
As many materials as possible were obtained used. Table 2 details the total materials and costs for constructing Ovenly Inferno.
| Quantity | Material | Cost ($) | Total ($) |
|---|---|---|---|
| 27 | Firebricks | 1.95 | 52.65 |
| 4 | Mortar (60 lb. bags) | 8.50 | 34.00 |
| 7 | Masonry Sand (100 lb. bags) | 11.00 | 77.00 |
| 3 | Tarps | 10.00 | 30.00 |
| 1 | Straw (bale) | 9.00 | 9.00 |
| 1 | Work Gloves (box) | 9.99 | 9.99 |
| 1 | Trowel | 3.50 | 3.50 |
| 1 | Plywood (4'x8') | Donated | 0.00 |
| 1 | Mallet | Donated | 0.00 |
| 80 | Red Bricks | Donated | 0.00 |
| 1 | Ton of Urbanite | Donated | 0.00 |
| 40 | Glass Bottles | Donated | 0.00 |
| 2 | Wooden Beams (4"x10"x36") | Donated | 0.00 |
| 1 | Countertop | Donated | 0.00 |
| 1 | Riversand (cubic yd.) | Donated | 0.00 |
| 1 | Roll Ducttape | Donated | 0.00 |
| 1 | 4' Level | Donated | 0.00 |
| Assorted | Hardware | Donated | 0.00 |
| 1 | Wheelbarrow | Borrowed | 0.00 |
| 1 | Soil screen | Borrowed | 0.00 |
| 2 | Shovels | Borrowed | 0.00 |
| 1 | Wheelbarrow | Borrowed | 0.00 |
| Truckloads | Clay soil | Gathered from source | 0.00 |
| Total Cost | $216.14 | ||
Results[edit | edit source]
Ovenly Inferno is successful in producing enough pizza for the whole school during lunch time. It requires 1 ft^3 of wood to fire it in 2 hours. The oven's peak temperature is ___*F and after cooking __ pizza's the temperature is ____*F. The counter space provides adequate preparation space and the fuel is kept close in the wood storage.
Laurel Tree Input, Oct. 2014[edit | edit source]
The exact operating temperatures are not known but it was estimated to be approximately 700 Degrees Fahrenheit. This figure was made an associate of Laurel Tree that manages a similar outdoor oven. Heat is not radiated on the sides or back of the oven; the insulation has proven effective.
Laurel Tree's first uses were found to be too hot; damage from this is possible but not confirmed. They now operate it at lower temperatures with success.
Video[edit | edit source]
D.I.Y[edit | edit source]

Mortar three layers of red bricks onto the foundation.

Stack urbanite within the footer to reach the desired height (about 36"). At the top of the stack, create a perimeter from urbanite that will be filled in.

Fill in perimeter with glass bottles laid on their side.

Cover and level the glass bottle layer with sand.

Arrange firebricks and tamp down onto the leveled sand. A roll of duct tape was used; however a mallet would be preferable. The bricks were labeled with numbers since they were previously arrange on a table to find the best fit. Arrange and Mortar red bricks for the mouth of the oven.

Use a wooden form to help support red bricks as you mortar them into an arch. To avoid cracking, create a wedge cut keystone as the top brick in the arch. Mound wet sand on top of the firebricks to create a dome that will act as the form which the oven layers will be built on top. Cover the sand with wet newspaper so that it holds its shape and doesn't attach to the inner thermal layer.

Apply the thermal layer clay mixture around the sand mound. It should be 5" thick. Pound the clay downward instead of into the mound to keep the integrity of the mound intact. Work your way up the mound in about 6" layers.

Apply the 7" thick wooly insulation layer.

Before applying the outer cobb layer, cut a hole in the previous two layers for the chimney. A thick cylindrical hollow cardboard tube was used. The tube was covered with the thermal layer mixture.
Use cobb to put designs onto the exterior of your oven.
Apply a layer of lime plaster to protect the oven from the elements.
Maintenance[edit | edit source]
The oven will need to undergo a lime wash every five years. This wash will heal the lime plaster of any cracks that may develop. The oven should be fired
Discussion and Next Steps[edit | edit source]
- Many cracks have begun to form, possibly due to firing it too hot in order to dry it. These cracks will need to be patched.
- As soon as the out cobb layer has dried, a layer of lime plaster will need to be applied to protect from the wet climate of Humboldt County.
Cobb Goblins[edit | edit source]
Update October 2014[edit | edit source]
Since the oven was constructed two years ago it has experienced damage and degradation. The oven has not received the final plaster coating that was planned. As a result it has been subject to increased weathering and cracks. Furthermore, it was reported that vandalism had occurred and the chimney destroyed. The debris was cleared and the oven remained operable.
According to Laurel Tree the oven is still in use, though they claim the frequency of use would increase if repairs were made, citing more confidence in the oven as the primary reason.
The oven has a work station attached to it, and a series of cabinets adjacent to that. Both are exposed to the elements to some degree which was not preferable for aesthetic and durability reasons.
-
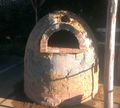
Face view of the oven, Oct. 2014
-
Chimney lost due to vandalism.
-
Workbench and cabinets partially exposed.


Update October 2016[edit | edit source]
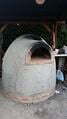
Since the last update, the staff and students have been unable to make any progress until this recent summer of 2016. One of the staff members, who goes by Sam, took the oven project under his guidance in an effort to bring the oven back to its glory days in 2012-13 when the students were able to enjoy pizzas on a regular basis.
Unfortunately they have not been able to fully fix the degradation and vandalism that occurred in 2014. However they have attempted to mend the oven back together by resurfacing and adding three layers of cobb. Initially Sam and the students decided on using cobb with crushed up mosaic tiles with the intention of giving the oven some flair. This layer unfortunately had trouble staying on so they scraped the flakes off and proceeded with two successful layers of cobb. The bottom layer of cobb contains hay and straw while the upper layer contains cattail which has helped smooth out many rough portions on the oven exterior.
The whole oven still requires two more layers of cobb, one containing cattail, and the other the same finishing layer that has yet to be applied since the project took off in 2012. After filling out most cracks on the outer layer Sam and some students have tested the oven by having a weekly fire. According to their findings, the oven is definitely producing the same high temperatures it once was.
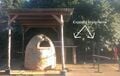
Other than the two additional layers of cobb, Sam and the students intend on adding a nice maple door to cover oven opening, and possibly rebuild the chimney, even though they believe it will suffice without a higher chimney.
-
Face view 1
-
Face view 2
-
Exposed chimney
-

Reasoning to necessary cobb additions


References/Further Reading[edit | edit source]
- Bee, Becky. (1997). "The Cobb Builders Handbook: You Can Hand-sculpt Your Own Home."
Groundworks, Murphy, OR. Accessed online <http://www.weblife.org/cob/ > (Sept. 22, 2012).
- Ben. (2012). "Pizza! This time permanent" Flirting with Yurting.
<http://www.flirtingwithyurting.com/?p=459 > (Oct. 7, 2012).
- "Blue Ox Earthen Oven." (2011). Appropedia
<https://www.appropedia.org/Blue_ox_earthen_oven> (Sept. 23, 2012).
- "Building an Earthen (Cob) Oven," (2011). Sunstone Farm and Learning Center.
<http://sunstonefarmandlearn.com/2011/03/24/building-an-earthen-cob-oven/> (Sept. 24, 2012).
- Davies, N. (2005). "Finishing the Cob Oven." <http://www.pequals.com/at/natoven/ > (Nov. 29, 2012).
- Denzer, Kiko. (2002). "Build your own Wood-Fired Earth Oven." Mother Earth News, (194), 70-74. EBSCOhost (Sept. 22, 2012).
- Denzer, Kiko. (2008) "Oven dome height for different size ovens."
<http://kikodenzer.blogspot.com/2008/07/oven-dome-height-for-different-size.html> (Oct. 7, 2012).
- Denzer, Kiko with Hannah Field. (2007). "Build Your Own Earth Oven 3rd Ed." Hand Print Press, USA.
- Galloway, Willi. (2012) "Backyard Earthen Oven."
<http://www.digginfood.com/wp-content/uploads/2009/07/cure-firing.jpg> (Oct. 9, 2012).
- "Guidelines for the Installation and Use of Open-air Barbeques".
(2008). Department of Environmental Health Food & Housing Division. <[https://web.archive.org/web/20140505133250/http://www.sdcounty.ca.gov/deh/food/pdf/publications_openairbbq.pdf http://web.archive.org/web/20140505133250/http://www.sdcounty.ca.gov/deh/food/pdf/publications_openairbbq.pdf]> (Sept. 23, 2012).
- Grimmer, Anne (2011). "The Preservation and Repair of Historic Stucco" Preservation
Brief, National Park Service, US Dept. of Interior. <[https://web.archive.org/web/20130515221101/http://www.nps.gov:80/hps/tps/briefs/brief22.htm http://web.archive.org/web/20130515221101/http://www.nps.gov:80/hps/tps/briefs/brief22.htm]> (Sept. 24, 2012).
- Hauk, Marna and Heindsmann, Emily. (1998). "Building with mud!" Communities, (99), 36-40. EBSCOhost (Sept. 22, 2012).
- "HBCSL cobb oven." (2012). Appropedia.
<https://www.appropedia.org/HBCSL_cobb_oven> (Sept. 23, 2012).
- Hernandez, Carolyn. (2012). "Building an Earth Oven." Wild Earth Builders.
<http://wildearthbuilders.com/files/IMG_1004.jpg> (Oct. 7, 2012).
- "Kitchen & Bath Industry Dimensional Guide." (2011). Kitchen and Bath Center,
<[https://web.archive.org/web/20100307142026/http://mwknb.com:80/KBC%20Industry%20Dimensional%20Guide.htm http://web.archive.org/web/20100307142026/http://mwknb.com:80/KBC%20Industry%20Dimensional%20Guide.htm]> (Nov. 8, 2012).
- Laurel Tree Charter School (2012). Mission Statement. <http://www.laureltreelc.org/Mission-
Statement.html> (Sept. 24 2012).
- Lime & Related Products Index & Prices (2012). Mike Wye & Associates Ltd < [https://web.archive.org/web/20140901064812/http://www.mikewye.co.uk:80/mikeprices.htm
http://web.archive.org/web/20140901064812/http://www.mikewye.co.uk:80/mikeprices.htm]> (Dec. 4, 2012)
- "Oven." (2012). Merriam-Webster Dictionary,
<http://www.merriam-webster.com/dictionary/oven> (Nov. 29, 2012).
- Shimpock, Mike. (2012). "My Pizza Oven."
<[https://web.archive.org/web/20160512052323/http://slice.seriouseats.com:80/assets_c/2010/08/mike-s-mpo-fin-106390.html http://web.archive.org/web/20160512052323/http://slice.seriouseats.com:80/assets_c/2010/08/mike-s-mpo-fin-106390.html]> (Oct. 7, 2012)
- Smith, Michael G. (2000). "Cobb Construction." Green Home Building.
<http://www.dcat.net/resources/buildingstandards_Cobb_articles.pdf > (Sept. 24, 2012).
- Southwick, Marcia. (1994). Build With Adobe. Swallow Press, Athens, Ohio.
- "The CCAT Earthen Oven." (2004). <http://www.pequals.com/at/earthenoven/> (Nov. 29,
2012).
- "Peoria to Open Scotland Yard Park." (2012). City of Peoria Press Release.
<[https://web.archive.org/web/20170201224840/https://www.peoriaaz.gov/NewsPR2.aspx?PID=1690&id=54035 http://web.archive.org/web/20170201224840/https://www.peoriaaz.gov/NewsPR2.aspx?PID=1690&id=54035]> (Sept. 22, 2012).
- "Pizza Pans". (2012). Abest Kitchen.
<http://www.akitchen.com/store/pizzapans.html> (Sept. 23, 2012).
- "Pizza Recipes". (2002). Italian Recipes, <http://www.italiancook.ca/pizza-recipes.htm> (Sept.
23, 2012).
- Smith, Michael G. (2000). "Cobb Construction."
<http://www.greenhomebuilding.com/pdf/buildingstandards_cob_articles.pdf> (Sept. 24, 2012).
- Southwick, Marcia. (1994). Build With Adobe. Swallow Press, Athens, Ohio.
- "What Every Member of the Trade Community Should Know About: Classification of Cooking
Ranges, Stoves and Ovens." (2008). U.S. Customs and Border Protection. Washington, D.C.<http://www.cbp.gov/linkhandler/cgov/trade/legal/informed_compliance_pubs/icp086.ctt/icp086.pdf> (Sept. 23, 2012).
- "Wood Burning Brick Oven: Construction and Cooking" (2002). Ozarkdreams.
<http://www.ozarkdreams.com/BrickOven.htm> (Oct. 8, 2012).