Abstract

The Fall 2012 Engr215 Introduction to Design class teamed up with their client, Laurel Tree Charter School, to design and build various projects around the school. The Current Specialists were formed to design and build an apparatus that could teach the principles of parallel and series wiring to 7th-12th graders in science classes at Laurel Tree. The Current Specialists are Conor Ritz, Nic Sabo, Arrow Walker, and Brian Weekly. Once the problem was formulated, brainstorming sessions, both formal and informal, were held in order to develop a number of alternative solutions. The solutions were evaluated based on a set of criteria formulated by the Current Specialists and Becca Schuler, a representative of laurel tree. A Delphi matrix and group deliberation was used to come to a decision on the best alternative. The final decision was made after the results of the Delphi matrix were presented to Becca. Onderdonk's Box was chosen as the final design because it most appropriately fit the criteria and the client's requirements.
Background/Objective
Laurel Tree Charter School is a K-12 school located in Arcata CA that is focused on a sustainable model of education and development of life and social skills . The Fall 2012 Engineering 215 project was to design and implement educational apparatuses with an emphasis on sustainability. The objective of the Current Specialists was to design, build and implement a learning apparatus to teach the difference between series and parallel wiring. The device was required to include an element of mystery while catering to grades 7-12.
Problem Statement and Criteria
Problem Statement
The objective of Onderdonk's box is to use an element of surprise or mystery to teach Laurel Tree's students about electrical wiring. The goal of the Current Specialists was to execute a solution to this problem in a novel way and in doing so, leave students with a deep-rooted level of interest and understanding of series and parallel wiring. The following is the table of criteria used to evaluate the various alternative solutions to the problem.
| Criteria | Constraints | Weights |
|---|---|---|
| Safety | The model should minimize the possibility that students get shocked or otherwise injured. Wires should be safe to touch or covered. | 10 |
| Fixability | The model should have readily accessible components that are easy and cheaply replaced. Repairs should be simple to perform. | 8 |
| Durability | The model must be built to last for as long as possible. The ideal longevity of the project is 2-5 years. | 7 |
| Mystery | The model must use the element of surprise to reinforce the lesson. | 7 |
| Educational Value | The model should be designed to teach students series and parallel wiring theory and help them retain the information most effectively. | 7 |
| Cost | The model should minimize cost where possible. The predetermined budget of 400 dollars may not be exceeded. | 2 |
Description of Final Project
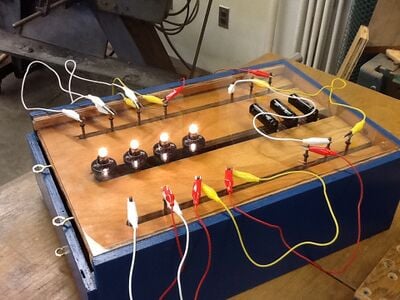
The finished product is a wooden box (18”x13”x6”) that is placed on a table and interacted with by students. The top of the box is comprised of a pane of transparent polycarbonate with holes drilled through it to accommodate 4 light bulbs, 3 batteries, and 14 conductive terminals; one positive terminal and one negative terminal for each light bulb and battery. Beneath the polycarbonate is a “slider” which prevents the student from viewing the wiring inside of the box. The slider has channels that allow the conductive terminals and the leads on the batteries and light bulbs to sit beneath the slider and therefore be out of view when the slider is in place. This allows the light bulbs and batteries to be wired to terminals in a way that is mysterious and puzzling to students. The slider can then be removed to create a surprising reveal, allowing students to see how the components are actually wired.


Instructions for Use
Students are given Onderdonk’s box with the slider in place and a circuit wired inside the box. The circuit may be series, parallel, or a combination of the two and it may be straightforward or more perplexing. An instructor does this by removing the bottom access panel and connecting the leads on the batteries and light bulbs to the various copper terminals. Students are unable to see inside the box or inspect the wiring due to the slider being in place and have no information on how the box is wired.
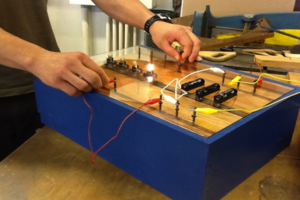
Students are provided with alligator clip leads and must use them to test and make observations about the circuit as shown in Figure 1. This interaction with the box can be described as similar to a logic puzzle. Through trial and error coupled with logical thinking, students are able to determine how the components are wired together and in doing so, gain more knowledge on series and parallel wiring.
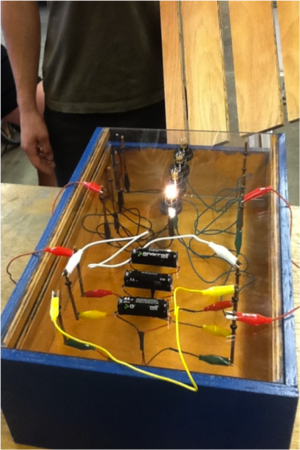
At the end of the exercise, the slider can be removed and students are able to see inside the box and inspect the actual wiring demonstrated in Figure 2. If their hypothesis on how the box is wired is incorrect, they are able to learn from their mistakes by having an instructor explain how the circuit is wired while looking directly into the box.
As stated earlier, Onderdonk’s box can be wired to be either elementary in difficulty, or very challenging. Additionally, each time the box is used, a new configuration can be wired. Included with the box is a document containing the following information, for the instructor’s use: instructions for safety and use, example circuit diagrams ranging from simple to challenging, a lesson outline, and a template of handout worksheets for students.
Maintenance
Maintenance on the box is extremely simple since components are easily accessible from the top of and from beneath the box via the access panel. Soldering may be necessary depending on the nature of the repair. The box accepts AA batteries and light bulbs with an E10 screw base, a common type of base. Light bulbs should be in the 3-4 volt range. The components, wires, and the teacher’s manual can be stored inside the box when not in use.
Here is a video which shows the box in use.
Costs
The following chart details the expenses involved in designing and building Onderdonk's box.
| Material | Use | Quantity | Retail Cost ($) | Our Cost ($) |
|---|---|---|---|---|
| E10 Lamp Base | Holds Light Bulbs | 4 | 8.60 | 8.60 |
| #13 Miniaure Bulb | Light Bulb | 6 | 2.34 | 2.34 |
| #407 Miniature Bulb | Light Bulb | 6 | 2.64 | 2.64 |
| 1/2 inch Plywood | Box Construction | 4'/8' | 14.00 | 0.00 |
| Polycarbonate | Clear Box Top | 12"x18" | 13.69 | 0.00 |
| Shipping | Specialty Bulbs | N/A | 13.40 | 13.40 |
| Copper Rod | Connects interior to exterior circuit | 14 | 13.80 | 0.00 |
| Alligator Clips | Connects Copper Rods | 20 | 6.78 | 6.78 |
| Wood Glue | Box Construction | 1 | 5.92 | 0.00 |
| Spray Paint | Paint Box | 1 | 4.95 | 4.95 |
| Alligator Clip Heads | For internal wiring | 10 | 3.66 | 3.66 |
| Eye Screw | Slider handles | 3 | 2.99 | 2.99 |
| Clear Coat Spray | Protective layer | 1 | 4.82 | 4.82 |
| Sand Paper | Sanding box | 3 | 3.21 | 3.21 |
| Wood Staples | Holding box together | 20 | Donated | 0.54 |
| E6000 Glue | Gluing components | 1 | Donated | 1.09 |
| Battery Housing | Holds batteries | 4 | 4.36 | 4.36 |
| Total | $60.07 | $126.69 | ||
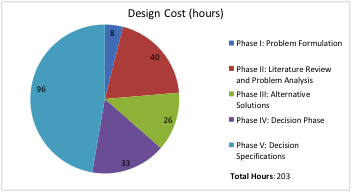
Below is a pie chart detailing how the total hours spent on this project were distributed over various phases. A total of 203 hours were spent on this project
Results
The finished product is both simplistic and versatile. The slider component which was included to incorporate an element of mystery is successful in blocking the inner wiring of the box from view. The bottom access panel provides easy access for rewiring and repair of the box and allows components and documents to be stored when the device is not in use. There is no risk of injury for instructors or students.
How to Build
The instructions for building Onderdonk's Box can be found here: Build Instructions
Discussion
Onderdonk's Box teaches students differences between parallel and series wiring. Students are able to trace their steps using the provided worksheet to see how the terminals are connected underneath the reveal slider. After the students have made their decision on which way Onderdonk's Box is wired, the slider is removed and the answer is revealed. Students can then check their worksheet with the actual wiring.
There are advantages and disadvantages to using the design for Onderdonk's Box. The advantages are the design's low cost to reproduce, repair, and maintain, and well as the box's compact design to allow for easy set-up and storage. The main disadvantage of this design is the potential of a short circuit.
Next Steps
There are a few steps which could be taken towards improving this design. The box could be modified to accept components other than light bulbs such as small electric motors, computer fans, etc. The box could also be produced in higher quantity as it might be beneficial from an instructors perspective to have each student provided with a smaller version of Onderdonk's box. Students would then have the ability to design circuits for one another and trade boxes so they could try and determine each other's circuits. Another useful step would be to find a way to reduce the cost of producing a box.
Conclusions
We succeeded in designing an apparatus with an element of mystery that can teach students grades 7th through 12th the differences between series and parallel lighting. Our design is a simple, effective and affordable teaching aid.

