Background
Problem
Criteria and Constraints
The following criteria were decided upon for this project. Criteria are weighted with "10" being of greatest importance and "1" being of least importance.
| Criteria | Weight | Constraints |
|---|---|---|
| Safety | 10 | Does not contain toxic chemicals that will cause harm to occupants. The structure is built to code and will not cause physical harm to occupants. |
| Durability | 9 | The structure will withstand the elements of Santo Dominingo. This includes potential earthquakes and hurricanes, humidity, high temperatures, and heavy rains. |
| Reproducability | 8 | The structure could be reproduced by local builders without outside assistance. |
| Cost | 8 | The project is less expensive to construct than traditional building styles. |
| Construction time | 8 | The structure can be completed before July 8. |
| Educational Value | 8 | The project instructs builders and future occupants on the alternative building technique used in construction. |
| Reduction of carbon footprint | 7 | Materials should represent a lower carbon footprint than traditional building methoda. Materials should be obtained locally when possible. |
| Comfort | 6 | The structure is comfortable for occupants. Room temperature should be similar to that of other structures at the site. |
| Aesthetics | 5 | The structure is pleasing to look at. |
Location
The building project was constructed in La Yuca del Naco, a small barrio located in Santo Domingo. It was built on the second floor, behind the classrooms of a community school.


.jpeg)
.jpg)
Prototypes
We constructed a number of prototypes/tests to get a feel for what would work best for our plastic bottle walls. Things we took into consideration were: how to orient the bottles, how to prevent bottle movement within the wire mesh, to fill or not to fill the bottles with trash, what mix of sand to cement to use, and how to attach the wire mesh to the wood frame.
| Description | Picture #1 | Picture #2 |
|---|---|---|
| Prototype #1: For this prototype we learned that a 1:1 sand to cement ratio was not ideal due to costs. We filled the bottles with plastic trash and foam trash, and learned that the process of filling bottles and finding trash takes a lot of time. Also, we connected the wire to the frame by pounding over nails to hold the wire in place. |  |
 |
| Prototype #2: In this second edition test we shifted to a mixture of 4:1 sand to cement on one side, and 5:1 sand to cement on the other. To prevent the bottles from moving around we used found wire to tie the two surfaces of wire mesh together. We also placed trash in the holes between the bottles so that we used less cement than the fist prototype. Staples were used instead of nails to hold mesh to frame. |  |
 |
| Prototype #3: The main changes to this test round was a new orientation of the bottles in an attempt to reduce empty spaces that would either be filled with plastic or more concrete. Also, a new chicken wire situation was tested by connecting the wire inside of the wood frame instead of on the outside of the frame. This prototype was not plastered due to the poor performance of the new wire configuration, which did not hold the bottles in place. |  | |
| Prototype #4: This final prototype incorporates the new orientation of bottles from prototype #3, however this time they are connected at the neck by a scrap piece of chicken wire to provide more stability. | 
|
Budget
| Materials | Unit Price (Pesos) | Quantity | Total |
|---|---|---|---|
| Bags of Cement | $ | ? | $ |
| Sand | $ | ? | $ |
| Chicken Wire | $ | ? | $ |
| Metal Wire | $ | ? | $ |
| Nail | $ | ? | $ |
| Roofing Nail | $ | ? | $ |
| Staples | $ | ? | $ |
| Wood | $ | ? | $ |
| Rebar | $ | ? | $ |
| Gutter | $ | ? | $ |
| Zinc | $ | ? | $ |
| Varnish | $ | ? | $ |
| Total Cost = | $ |
Research
Recycled Materials Construction
- Papercrete:recycled pulped paper with clay, or cement, and other soil
- Earthships:uses other tires filled with sand or soil and stacked to create a structure
- Ecoladrillo: uses plastic bottles filled with styrofoam and other cleaned dry items

Examples
Earthen Construction
- Adobe: consists of clay
- Superadobe: adobe mixed with cement instead of various other materials to create a stronger mixture
- Cobb: similar to adobe, consists of clay, straw and sand. Cobb, unlike adobe, is applied in one mass.
- Wattle and Daub: combination of wood and plaster
- Rammed Earth: similar to adobe and cobb, rammed earth uses clay and sand. material is compressed into place to form very flat vertical surfaces
- Poured Earth: similar to concrete, except instead of sand and gravel, ordinary soil is used and mixed with Portland cement.
- Earthbags: also called sandbags, stack bags filled with soil to create housing or buildings. For permenant residence or buildings, plaster should cover or coat the bags to prevent the bags from decaying through sunlight. Furthermore, wires should be used to give the structure more stability.
- Rock: laying rockes with mortar
Wood/Fiberous Materials
- Strawbale: uses baled straw covered in earthen or lime stucco. [2]
- Bamboo
- Rice Slip or Straw Slip: Uses straw or rice dipped into a clay slip and then packed into a building frame. This requires some other sort of material for frame.
- Corkwood:masonry mortar is used to cement smaller logs, the size of firewood, together. this will require post of some sort to create the basic structure.
Timeline
- June 13, 2011 = Team comes together for first time.
- June 15, 2011 = First meeting with community members and HSU/UNIBE team appropriate building.
- June 16, 2011 = Bottle collection begins
- June 17, 2011 = First test wall section built (ecoladrillo prototype 1.0, bottles stacked directly/stuffed with trash)
- June 18, 2011 = Second test wall section built (ecoladrillo prototype 2.0, inner chicken wire method)
- June 19, 2011 = Third test wall section built (ecoladrillo prototype 3.0, bottles stacked directly, new concrete mixture)
- June 20, 2011 = Prototype 3.0 completed. First papercrete test block produced.
- June 21, 2011 = Fourth test wall section built (ecoladrillo prototype 4.0, staggered bottles held by chicken wire ). Papercrete frame (wooden) and second batch of paper crete test blocks poured. Bottle collection stations placed on UNIBE campus.
- June 22, 2011 = Third papercrete test block with lime poured
- June 23, 2011 = Intense bottle collection begins
- June 24, 2011 = Construction of columns begins. Mass production of papercrete starts.
- June 25 -July 2, 2011 = Intensive construction continues
- July 4-6, 2011 = Completion/clean up of construction. Educational kiosk set up. Completion of Appropedia page. Community celebration at school.
Construction Process
Process: Building Columns
The first step we took in the on-site construction process was to build columns. We decided to go with traditional concrete columns as the main support for our structure because of their strength, local knowledge available to help us build them, and their prevalence regionally in current construction makes them trusted by the community.
With the help of local engineer José García and visiting engineer Tressie Blue we assessed the current school structure and decided on the placement and design of our columns. Two columns would be located on the second floor directly above the preexisting columns below them. We drilled holes 20cm down into the existing columns, and then pounded rebar into them. These pieces of rebar stuck approximately 45cm above ground and were then secured to the rebar frame of the column with wire ties (Fig 4).
The big column: A third column was to be located in the SW corner of the building. After assessment of the lower level, we found that there was currently no column in that corner of the school building, so we decided to create one that would be two stories tall beginning on the ground level. This would increase overall structural stability for the school and provide the load-bearing column needed for the ecoladrillo room. In order to achieve a higher level of strength we chiseled a hole in the roof (Fig 3) where the column was to be placed so that we could lower down an entire two story tall rebar column frame without having to cut it in half.
Securing the big column: After much consideration it was decided that to secure the big column we would drill 20cm into the floor of the first level, and sink the rebar in there. However, after we began drilling we found that after only 8cm there was a pocket of airspace beneath the cement floor. This would not provide enough stability to for our column. Luckily there were two back up plans. One was to build a concrete footing above the ground (0.8m x 0.8m x 0.6m with a mesh work of short rebar pieces placed into the middle). The second idea was to drill holes on both sides of the wall at every 40cm interval that corresponded with the rebar rings on the frame of the column. These holes would be drilled at different angles into the wall and a 20cm piece of rebar would be placed in them, leaving 10cm in the wall and 10cm sticking out. The piece sticking out would be wired to the column frame. In the end, we chose option number two.
Attachment points for chicken wire: To create strong connection points for the chicken wire (which eventually creates the walls by holding in the bottles), we placed wire sticking out of the columns. The wires were spaced every twenty centimeters running up and down the column along two lines, each line 8cm apart (Fig 8). We chose the 8cm spacing because it was the size of our largest diameter bottle, and we wanted the chicken wire to fit snugly. This method actually turned out well, and we were able to attach the chicken wire easily and pull it relatively tight. We also used two different gauges for the wire connection points, which yielded differing opinions as to which was more effective. The thinner gauged wire was easier to manipulate yet required more tying to ensure a solid connection.
-
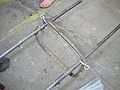
Fig 1: Tie ribs with metal wire.
-
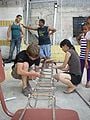
Fig 2: Place ribs every 20cm.
-
Fig 3: Make holes.
-
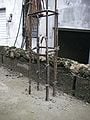
Fig 4: Tie the rebar.
-
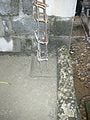
Fig 5:
-
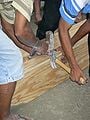
Fig 6: Make forms.
-
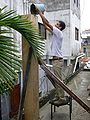
Fig 7: Place forms around the rebar and pour cement.
-
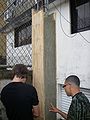
Fig 8: Remove forms.


Column Materials & Budget
| Materials | Unit Price (RD$) | Quantity | Total (RD$) |
|---|---|---|---|
| Bags of Cement | 267 RD$ | 4 | 1068 RD$ |
| Gravel and sand mixture | Donated | 12 wheel barrows | 0 |
| Metal Wire | 36.21/lbs | 3 lbs | 108.63 |
| Nails | $ | ? | $ |
| 4'/8' Plywood Board | $ | 2 | $ |
| Rebar 3/8" by 20' | 154.75 | 8 | 1238.00 |
| Rebar Rings/Ribbing | 18.10 | 32 | 579.20 |
| Total Cost = | $ |
Process: Building Frames
-
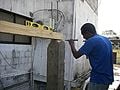
Fig 1: Making the columns the correct height.
-
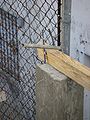
Fig 2: Using a metal pipe and arm power to bend the rebar over the wood frame, as to secure it firmly.
-
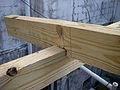
Fig 3: Notching cut into roof frame to enhance stability.
-
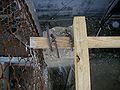
Fig 4: Rebar bent over to secure frame to columns.
-
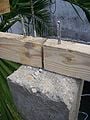
Fig 5: Rebar from the column is threaded through holes drilled in the wood.
-
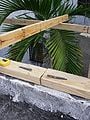
Fig 6: Holes were drilled along the pre-existing school roof and the wood framing for the roof. Rebar was pounded through the wood and into the hole in the concrete below. Finally rebar bent over to secure frame to roof.
-
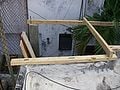
Fig 7: Roof framing continues.
-
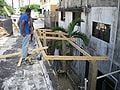
Fig 8: Broader view of roofing process.


Process: Building Bottle Walls
Plastic bottles: As identified by the community as a resource, and as observed by our team, plastic bottles are abundant on the streets of Santo Domingo. In the beginning of the process we estimated that it would take about 1800 plastic bottles to complete our project. We obtained our bottles through a mixture of hunting bottles in the streets with 30-55gal plastic bags, locating signs and collection boxes at UNIBE and local colmados, and donations from La Yuca residents. When hunting for bottles we recommend looking in places where people tend to congregate. For example, in a matter of 1 hour, three people were able to collect approximately 500 bottles in a bottle-rich area called the Malecón in Zona Colonial, Santo Domingo.
Bottle recommendations: When collecting it is helpful to have the bottles be intact (not squished or broken) and with the bottle caps present. When building your walls it will be helpful to have bottles of similar sizes. We found that it helps to make at least two rows, one on top of the other, out of the same size bottles. This helps reduce open space between bottles and in-turn reduces cement use. We found that other bottle builders recommend that the bottles be cleaned and dried before placing them in your walls, however, due to a lack of time and abundance of rain, many of our bottles were neither clean nor dry.
To fill or not to fill: Something we asked ourselves and other bottle builders was “should we fill the bottles with plastic garbage, or not?” There are many bottle builders who do fill the bottles with plastic trash before inserting them into the walls. We quickly realized that filling the bottles with trash takes a huge amount of time, as does collecting the trash itself. Through talking with others who have used this construction technique before we found that the most common reason to fill the bottles with trash is to remove the trash from the community, not to ad structural integrity. As our walls were not intended to be load bearing and with the small amount of time we had, we decided it would be better not to fill the bottles. In the future more research could be done into how filling the bottles with trash relates to insulation value.
-
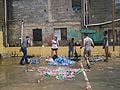
Fig 1: Collect bottles.
-
Fig 2: Build a wood frame.
-
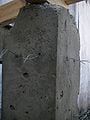
Fig 3: Column prepared for chicken wire attachment.
-

Fig 4: Tie the chicken wire to the columns.
-
Fig 5: Reinforcement for chicken wire on the floor level.
-

Fig 6: Place the bottles in the wall.
-
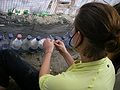
Fig 7: Tie the both sides of chicken wires with string or metal wire.
-
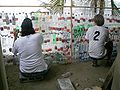
Fig 8: Slowly rolling chicken wire up the wall as bottles are placed inside.
-
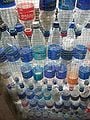
Fig 9: Up close view of bottle orientation.
-
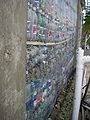
Fig 10: View of outside face of the wall after inside has been plastered.
-
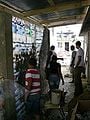
Fig 11: Plastering.
-
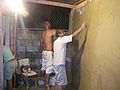
Fig 12: Finishing plaster for inside of the walls


Process: Installing A Roof
-
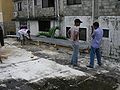
Fig 1: Installing the roof.
-
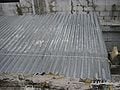
Fig 2: Finishing installation.

