| Line 474: | Line 474: | ||
| $3828 | | $3828 | ||
|- | |- | ||
| Staples | | Staples | ||
| $ | | $ | ||
| ? | | ? | ||
| $ | | $ | ||
|- | |||
| 1x3, Pine | | 1x3, Pine | ||
| $15/boardfoot | | $15/boardfoot | ||
| Line 499: | Line 496: | ||
| Portland Cement | | Portland Cement | ||
| $267/ft^3 | | $267/ft^3 | ||
| 7 | | 7 ft^3 | ||
| $ | | $1869 | ||
|- | |- | ||
| 2" Wood Nails | | 2" Wood Nails | ||
Revision as of 22:45, 18 July 2011
Background
Students from both Humboldt State University and UNIBE, RevArt, and the neighborhood of La Yuca completed this project for the Escuela Basica Nurys Zarzuela in La Yuca, del Naco, Santo Domingo, Dominican Republic. The school was facing pressure to increase the size of the school due to limited space and high enrollment. By building a new room at the school we could both increase the amount of space and explore the effectiveness of alternative building techniques.
Problem
The goal of this project was to explore cost-effective, environmentally appropriate alternatives to traditional building methods in the Dominican Republic while creating additional space for the Escuela Basica Nurys Zarzuela.
Criteria and Constraints
The following criteria were decided upon for this project. Criteria are weighted with "10" being of greatest importance and "1" being of least importance.
| Criteria | Weight | Constraints |
|---|---|---|
| Safety | 10 | Does not contain toxic chemicals that will cause harm to occupants. The structure is built to code and will not cause physical harm to occupants. |
| Durability | 9 | The structure will withstand the elements of Santo Dominingo. This includes potential earthquakes and hurricanes, humidity, high temperatures, and heavy rains. |
| Reproducability | 8 | The structure could be reproduced by local builders without outside assistance. |
| Cost | 8 | The project is less expensive to construct than traditional building styles. |
| Construction time | 8 | The structure can be completed before July 8. |
| Educational Value | 8 | The project instructs builders and future occupants on the alternative building technique used in construction. |
| Reduction of carbon footprint | 7 | Materials should represent a lower carbon footprint than traditional building methoda. Materials should be obtained locally when possible. |
| Comfort | 6 | The structure is comfortable for occupants. Room temperature should be similar to that of other structures at the site. |
| Aesthetics | 5 | The structure is pleasing to look at. |
Literature Review
The following is a summary of research done prior to the build process to gain information on possible solutions to the problem and determine which might be the most feasible.
Climate and Conditions
This project is heavily influenced by local climate and therefore the local climate needed to be addressed before informed design decisions could be made. The following was considered when designing the new structure:
- Humidity: The average relative humidity in the Dominican republic is 64%.
- Rain: The Dominican Republic receives nearly sixy inches of rain annually. Downpours are frequent and can be heavy. Tropical storms and hurricanes are common.
- Heat: The average temperature in Santo Domingo is 78F, with average highs at 87F. The temperature climbs above 90F frequently and can make living inside structures unbearable. The temperature fluctuates relatively little over the day/night due to constant humidity. Seasonally there is also little variation.
- Wind: Wind speeds are typically very low in Santo Domingo, but again, hurricanes are not uncommon
![[1]](/File:SantoDomingoClimateChart.gif)
- Earthquakes: While earthquakes are less common in Santo Domingo than in other parts of Hispaniola, they are still a very real threat and needed to be addressed as such.
Building in the Tropics
Building design must reflect the aforementioned conditions in a way that creates an inhabitable and comfortable environment for the occupant. A number of steps can be taken to minimize heat gain and increase ventilation.
- Increase the R-value of the roof and sun-exposed walls by insulating. Utilize thermal mass in shaded areas, and minimize materials with high thermal mass in areas that receive a lot of sun. Failure to do this will result in continued heating of the structure after nightfall. This is undesirable in hot, humid areas like the tropics where nighttime lends little cooling.
- Ensure a cooler microclimate around the structure by using plants to shade the area. Reduce the use of reflective surfaces in areas that receive a lot of sunlight. Paint the outside with light, reflective surfaces. Do not place windows in areas that receive direct sunlight.
- To increase ventilation, maximise the structure's access to wind. Place ventilation openings in the direction of prevailing winds and leave open space within the home so that breezes can flow through. Particularly, maximize ventilation near the roof so that hot air can escape.[2]
Alternative Building Methods
Many possibilities were considered as alternative building materials, with only a select few considered as potentially feasible based on available materials and climatic variables. The following is a summary of these potential options.
Papercrete
Papercrete is a mixture of shredded paper and portland cement. It is often packed into bricks which are let dry prior to construction. The mixture of cement to paper depends upon the climate; greater amounts of cement are more applicable in rainy, humid climates. Sand may also be added in small amounts as a fire retardant, and lime can be added to deter pests.
-
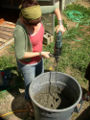
Mixing wet paper and cement with a paint-mixing bit
-
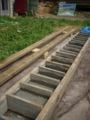
Form for drying papercrete bricks
-
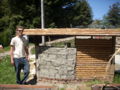
Papercrete brick wall prior to plastering
-
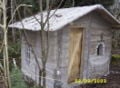
Example of a small papercrete shed


Advantages
- It has high compressive strength can bear load. Papercrete will not crack like concrete does.
- It has a high R-value (about 2.5)
- It does not burn, but does smolder.
- Eliminates paper from the waste stream.
- Is very earthquake-resistant.
- Repels rodents and insects with a small amount of borax added to the mix.
- Can be scaled up. Large batches of papercrete and bricks can be made fairly easily. Large mixers can be powered by car when hooked up to the drive shaft.[3]
- Bricks can be standardized
- Is an available construction material in many places.
- Can be made to resist water more with the addition of lime.
Disadvantages
- Must be somewhat protected from moisture. Papercrete will absorb moisture from the ground and can take a long time to dry. This encourages mold and deterioration of the wall
- The drying process can take a long time and may not be suitable in humid climates.
- Depending on the amount of cement used, may not be the most sustainable option.
- Requires a lot of paper.
Eco-ladrillo
Eco-ladrillo (eco-brick) is the term applied to a method of building in which used plastic bottles are recycled into building blocks for constructing the walls. There are many methods to building with bottles, but the most common method follows the picture below.
![[5]](/File:Building_a_bottle_wall.JPG)
Bottles can be stuffed with trash, therefore increasing the number of airpockets and increasing the R-value of the walls. Alternatively, bottles can be filled with dirt/adobe/etc to increase the thermal mass of the walls. For spaces to let light in, bottles can be cut and stacked without fill. Below are examples of two types of eco-ladrillo.
Advantages
- Can be adapted either for high R-value or high thermal mass. Bottles are a flexible building material and provide comfortable habitation in a range of climates.
- Bottles are abundant and completely free. Structures can be built for a much lower cost than many traditional building techniques.
- Using recycled bottles eliminates plastic from the waste stream
- If built properly, eco-ladrillo structures can withstand seismic activity well.
Disadvantages
- Unless filled with earth, bottle walls are not load-bearing structures. Alternative framework must support the roof and other loads.
- Extremely labor-intensive. This is not always a bad thing; in many places there is an ample supply of labor and time available. [6]
Wattle and Daub
Wattle and daub consists of two components. The first, the "wattle," is made of flexible wooden strips woven between vertical wooden poles. The "daub" is a kind of plaster (similar in composition to cob) which is used seal this framework. The makeup of the daub depends on location and available materials, but it commonly is a mix of some of the following ingredients:
Binders: Clay, mud, lime, chalk, limestone
Aggregates: Sand, earth, gravel
Reinforcement: Straw, hay, flax, grass
The binder holds the daub together, the aggregates give it bulk, and the reinforcement gives it tensional strength and flexibility. [7]
-
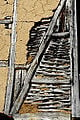
Old deteriorating daub, easy to repair
-
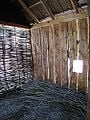
View from inside a house with one incomplete wall
-
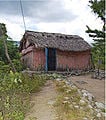
Wattle and daub housin in the Dominican Republic
-
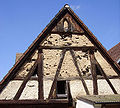
Old wattle and daub house in France


Advantages
- Requires very few tools. Construction can be done with little experience.
- Made of naturally occurring, abundant materials that can be found almost worldwide.
- Highly durable if properly constructed.
- Historically proven method of construction. Failure points well known and repair methods have years of practice.
- Long-term sustainability.
- If properly designed, the high thermal mass of these buildings can keep the building comfortable.
- Is not load-bearing.
Disadvantages Most problems arise from improper design or construction, which can be avoided with good initial planning.
- Although construction simple, it requires a lot of labor.
- Drying of the daub can take days or weeks, depending on the climate.
- Daub can degrade if exposed frequently to water.[8]
Rice & Clay Slip
Rice slip a building material made from waste rice material that is dipped in clay slip. This mixture is packed into wooden forms and let dry for a period of days or weeks depending on the climate. Once dry, the forms are removed and the wall can be finished with clay plaster.[9] While most previously constructed buildings have been made with straw and clay slip, a similar example using rice waste can be found in Nicaragua:

Advantages
- Where there is agricultural waste available, rice fiber can be extremely inexpensive.
- More sustainable than building with wood, which can take many years before it can be harvested and used for construction. Rice is available annually, or biannually if there are two harvests.
- Does not require expensive tools, and is relatively easy to construct even for beginners.
- Has a high R-value.
- Can be quite earthquake-resistant if constructed properly.
Disadvantages
- Takes a long time to dry, especially in wet climates.
- Must be kept relatively dry or plastered with a material that repels water.
- Cannot bear much load by itself. [10]
Final Design
Community-HSU Dominicana Program Joint Decision
There were a few meetings prior to the beginning of the design process and design decision making. In these meetings, community involvement was essential. They had more knowledge relating to what was needed, where it was needed, and how problems could be solved. Having in mind that our focus was alternative building, we presented the community with some options. In class, we had learned about alternative building techniques, and presented the community with four of these potentially feasible options: wattle and daub, papercrete, rice and clay slip, or eco-brick (plastic bottle construction). The community and the building team of the HSU Dominicana Program came to a joint decision. This decision was based on our previously determined criteria, availability of materials, and community interests. All methods based on purely natural materials, or grown materials, like wattle and daub, bamboo and adobe were dismissed, because these materials are simply not available in the urban setting of the community. In the meeting, the conclusion was that the most accessible materials were plastic bottles and paper, and so it was decided that papercrete and eco-ladrillo construction were our best options.
Location
The building project was constructed in La Yuca del Naco, a small barrio located in Santo Domingo. It was built on the second floor, behind the classrooms of Escuela Basica Nurys Zarzuela primary school. The decision was based mostly upon where space was available, which was limited. Structural analysis proved the site would support a room if it were first reinforced.
-

The primary school
-
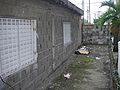
Second-story roof build site
-
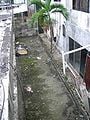
Second story view from roof above
-
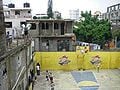
View of La Yuca from the top of the school
-
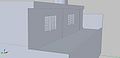
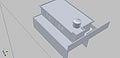
3D rendering of build site
-
3D rendering of school
-

3D rendering of aerial view of school
-

Sketch of build site dimensions: cross-section and aerial of 1st and 2nd floor


.jpeg)
.jpg)


Prototypes
We constructed a number of prototypes/tests to get a feel for what would work best for our plastic bottle walls. Things we took into consideration were: how to orient the bottles, how to prevent bottle movement within the wire mesh, to fill or not to fill the bottles with trash, what mix of sand to cement to use for the plaster, and how to attach the wire mesh to the wood frame.
| Description | Picture #1 | Picture #2 |
|---|---|---|
| Prototype #1: For this prototype we learned that a 1:1 sand to cement ratio was not ideal due to costs. We filled the bottles with plastic trash and foam trash, and learned that the process of filling bottles and finding trash takes a lot of time. Also, we connected the wire to the frame by pounding over nails to hold the wire in place. |  |
 |
| Prototype #2: In this second edition test we shifted to a mixture of 4:1 sand to cement on one side, and 5:1 sand to cement on the other. To prevent the bottles from moving around we used found wire to tie the two surfaces of wire mesh together. We also placed trash in the holes between the bottles so that we used less cement than the fist prototype. Staples were used instead of nails to hold mesh to frame. |  |
 |
| Prototype #3: The main changes to this test round was a new orientation of the bottles in an attempt to reduce empty spaces that would either be filled with plastic or more concrete. Also, a new chicken wire situation was tested by connecting the wire inside of the wood frame instead of on the outside of the frame. This prototype was not plastered due to the poor performance of the new wire configuration, which did not hold the bottles in place. |  | |
| Prototype #4: This final prototype incorporates the new orientation of bottles from prototype #3, however this time they are connected at the neck by a scrap piece of chicken wire to provide more stability. | 
|
Papercrete Prototypes
For papercrete protoyping, we used several formulas that responded in different ways, according to the proportion of the materials used. The basic ingredients in the formula, which were mixed in different proportions according to the mix prepared, were:
- Soaked Paper (Newspaper)
- Portland Cement
- Sand
- Lime
Guided by our criteria, the formulas we prepared had to meet certain requirements:
- Cheap
- Safe
- Durable
- Easily Reproduced
| Description | Image |
|---|---|
| Batch#1:For this first batch, we used the recommended proportion of paper to cement for humid climates, which is, in weight, 50% paper and 50% cement. We added sand to the mix, and that made the end formula 45% paper, 45% cement and 10% sand. The mix was made in two separate buckets, only to make it more manageable. The volume and weight of both buckets and all the ingredients were correctly measured, as is shown in the picture. The paper was soaked for a few hours, and then very well shredded into fine pieces both by hand and with a special drillbit. The mix was then poured into the forms and left to dry. |  |
| Batch#2: For this batch, we decided to make standard-sized blocks, as all the people with building experience in the community are used to working with these kinds of blocks. For this batch, we decided to add lime, as it makes papercrete less prone to smoldering, and thus safer as a building material. The proportion of ingredients was 40%paper, 40% cement, 15% sand (fine) and 5% lime. |  |
Papercrete Brick Prototypes
| Description | Image |
|---|---|
| Batch #1:The bricks from this first batch were rather small. Standard brick-sized. They proved to be highly efficient when put under compressive stress, but the tensile strength was rather poor, and the brick actually broke apart during medium handling. Notice the stress marks from tensile force. The falling apart of the brick would have no effect on compressive strength, as evidenced in the picture. The total weight is 80lb, and we can conclude it could have taken much more without major difficulty. No deformations or marks of any kind were seen on the brick after the weight was removed. Notice, on the last frame, how the center of the brick is still not completely dry. The color is rather darker, evidencing the presence of water. This part was softer to the touch. The completely dry parts felt as hard as regular concrete. Drying time: 4 weeks. |  |
| Batch #2(1): This batch was made with the second mix. This mix included 5% lime in it. These bricks proved to be a little less efficient than the first ones (regarding tensile strength), and felt softer to the touch than the bricks from batch #1. This was, again, due to the bricks not being completely dry. Some small chunks fell apart during medium handling, and they were generally moist. There were no signs of deformation when the bricks were subjected to holding 100lbs of weight. We can conclude that their compressive strength is able to withstand a lot more. Drying time: 3.5 weeks. |  |
| Batch #2(2): This batch was made of standard-sized papercrete blocks (16 inches long, 8 inches wide, and 8 inches tall) These blocks proved to be highly inefficient, and large chunks fell apart with light handling. We can conclude, however, that this was mostly due to the blocks still being very moist. Longer drying times could be assumed to yield stronger blocks, and thus perfectly usable ones. Further study is however needed. Drying time: 2 weeks, 5 days. | |
| Comparison of feel and stiffness of blocks and bricks:
Although a very relative and not standardized method of testing, this gives a general idea of how the blocks performed under the same amount of concentrated pressure. Using medium pressure with the thumb, all bricks had a different reaction. The first, brick-sized and 4-week drying bricks had absolutely no reaction to the concentrated pressure. They felt very hard to the touch, and the stiffness is comparable to concrete. The second bricks were the ones were lime was added and 3.5 weeks drying time. There was some resistance to the concentrated force exerted on them, but with a higher amount of pressure (not so much, comparable to pushing a button rather firmly) the brick was easily penetrated. In the last image, the block tested was the standard-sized one with a little under 3 weeks drying time. There was no resistance to the finger whatsoever, and it was very easy to puncture the surface of it. The feel was soft and rather spongy. Again, this was a relative method that does not intend to throw standard results of any kind. It does, however, give a general idea of how the bricks behaved under normal handling conditions. |
 |
General Conclusions
The first thing we found, is that the smaller, brick-sized prototypes were the easiest to make. This is mostly due to the amount of drying undergone by the bricks. Small bricks dry quicker, and therefore harden faster. Our first batch was tested at 4 weeks after they were taken out of their molds, and their performance proved to be very efficient when under compressive stress, but their tensile strength was rather disappointing. Although more tests should be made, we can infer, by observation, that drying is the biggest issue regarding tensile strength in papercrete blocks. Those that were drier performed better than those that were less dry.
Due to the long drying time of papercrete, and the fact that the whole program was only 6 weeks long, there was no use of papercrete in the actual construction. Although further research is needed, we can however conclude that papercrete could be a viable option in humid climates, given enough drying time. This time can be made considerably shorter if some critical steps are taken, some of which we tried under informal conditions. These are: compression of the blocks when poured into the forms, proper drainage (that is, designing a form that allows water to be shed more quickly), using pure sand and lime, that is without any clay in them, as clay is very hard to dry, and proper planning. If the weather is humid and rainy, blocks take longer and longer to dry.
From our research, the final conclusion is that the only disadvantageous factor in papercrete block-making is drying time, because the amount of moisture in our blocks is what determined how well they performed, both under compressive and tensile forces. From observation, we can conclude that drier bricks mean harder bricks, and hard bricks have both good tensile and compressive strength. Papercrete block-making could be planned for the dry season, and the bricks could even be dried indoors, in a warmer and drier environment. Further research would prove the efficiency of the technique.
Final Design Specifications
Walls: Conclusions based on the papercrete tests ruled out papercrete as a viable option for the span of our project. There simply would not be enough time to wait for papercrete to dry and complete the build process. Furthermore there was uncertainty about papercrete's performance in rainy, humid climates. We decided to build two walls out of plastic bottles, secured by 1cm metal screening, and plastered with traditional concrete plastering.For the third wall we would utilize the school's existing concrete block wall. The fourth wall was already partially complete, consisting of a 5'3" concrete block wall dividing the school and neighboring property. The rest of the wall would be filled in with reused styrofoam.
Columns: Since the walls themselves would not be able to support load, We decided to go with traditional concrete columns as the main support for our structure because of their strength, local knowledge available to help us build them, and their prevalence regionally in current construction makes them trusted by the community. With the help of local engineer José García and visiting engineer Tressie Blue we assessed the current school structure and decided on the placement and design of our columns. Two columns would be located on the second floor directly above the preexisting columns below them. A third column was to be located in the SW corner of the building. After assessment of the lower level, we found that there was currently no column in that corner of the school building, so we decided to create one that would be two stories tall beginning on the ground level. This would increase overall structural stability for the school and provide the load-bearing column needed for the ecoladrillo room.
Door Access: Prior to construction, access the site was difficult. The best way to add access to the future room would be to knock a hole into a small room adjacent to the build site.
Roof: The roof would be made of a wooden frame and corrugated zinc plates, as is the norm in the Dominican Republic. A number of things were taken into consideration when designing the roof, and a corrugated zinc roof was decided on for a number of reasons:
- Cost: aluzinc cost 5-10 times as much as zinc, and did not fit in our budget
- Weight: lacking columns on one side, a heavy concrete roof would need to be tied into the wall with rebar to be structurally sound. A zinc roof would be much lighter and could be supported easily by the adjacent roof and columns.
- Time constraints: A concrete roof would be much more labor-intensive and would take time for the concrete to set. A zinc roof could be constructed in half a day and fit into our time constraints much better.
Below are the initial designs of the new storage room. The gap on the right side of the 3D render was later changed due to structural constraints.


Construction Process
Process: Building Columns
The first step we took in the on-site construction process was to build the columns. To secure them to the existing structure, we drilled holes 20cm down into the existing columns, and then pounded rebar into them. These pieces of rebar stuck approximately 45cm above ground and were then secured to the rebar frame of the column with wire ties (Fig 4).
The big column: The third column would take slightly more work In order to achieve a higher level of strength we chiseled a hole in the roof (Fig 3) where the column was to be placed so that we could lower down an entire two story tall rebar column frame without having to cut it in half.
Securing the big column: After much consideration it was decided that to secure the big column we would drill 20cm into the floor of the first level, and sink the rebar in there. However, after we began drilling we found that after only 8cm there was a pocket of airspace beneath the cement floor. This would not provide enough stability to for our column. Luckily there were two back up plans. One was to build a concrete footing above the ground (0.8m x 0.8m x 0.6m with a mesh work of short rebar pieces placed into the middle). The second idea was to drill holes on both sides of the wall at every 40cm interval that corresponded with the rebar rings on the frame of the column. These holes would be drilled at different angles into the wall and a 20cm piece of rebar would be placed in them, leaving 10cm in the wall and 10cm sticking out. The piece sticking out would be wired to the column frame. In the end, we chose option number two.
Attachment points for chicken wire: To create strong connection points for the chicken wire (which eventually creates the walls by holding in the bottles), we placed wire sticking out of the columns. To do this, we drilled 1/4" holes in the forms where we wanted the wires to attach. After pouring concrete, we simply bent short pieces of wire in half and inserted them into the holes. As the concrete hardened it secured the wire attachment points. The wires were spaced every 20cm running up and down the column along two lines, 8cm apart (Fig 8). We chose the 8cm spacing because it was the size of our largest diameter bottle, and we wanted the chicken wire to fit snugly. This method actually turned out well, and we were able to attach the chicken wire easily and pull it relatively tight. We also used two different gauges for the wire connection points, which yielded differing opinions as to which was more effective. The thinner gauged wire was easier to manipulate yet required more tying to ensure a solid connection.
-
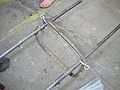
Fig 1: Tie ribs with metal wire.
-
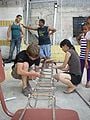
Fig 2: Place ribs every 20cm.
-
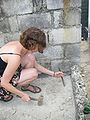
Fig 3: Make holes for the rebar, 20cm+ deep.
-
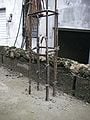
Fig 4: Pound in rebar, tie in rebar for columns.
-
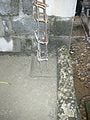
Fig 5:
-
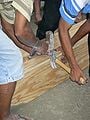
Fig 6: Make forms.
-
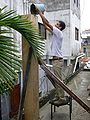
Fig 7: Place forms around the rebar and pour cement.
-
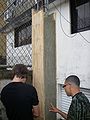
Fig 8: Remove forms after 24 hours.


Column Materials & Budget
| Materials | Unit Price (RD$) | Quantity | Total (RD$) |
|---|---|---|---|
| Portland Cement | $267/ft^3 | 4 | 1068 RD$ |
| Gravel and sand mixture | Donated | 12 ft^3 | 0 |
| 10g Metal Wire | 36.21/lbs | 3 lbs | 108.63 |
| 2" Wood Nails | $28/lb | 2 lb | $56 |
| 4'/8' Plywood Board | $1100 | 2 | $2200 |
| Rebar 3/8" by 20' | 154.75 | 8 | 1238.00 |
| Rebar Rings/Ribbing | 18.10 | 32 | 579.20 |
| Total Cost | $5249.83 |
Process: Building Frames
-
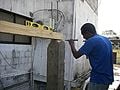
Fig 1: Making the columns the correct height.
-
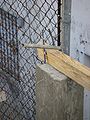
Fig 2: Using a metal pipe and arm power to bend the rebar over the wood frame, as to secure it firmly.
-
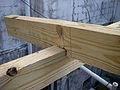
Fig 3: Notching cut into roof frame to enhance stability.
-
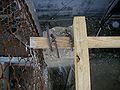
Fig 4: Rebar bent over to secure frame to columns.
-
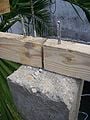
Fig 5: Rebar from the column is threaded through holes drilled in the wood.
-
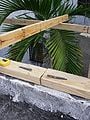
Fig 6: Holes were drilled along the pre-existing school roof and the wood framing for the roof. Rebar was pounded through the wood and into the hole in the concrete below. Finally rebar bent over to secure frame to roof.
-
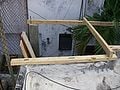
Fig 7: Roof framing continues.
-
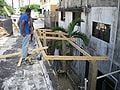
Fig 8: Broader view of roofing process.


Roofing Materials & Budget
| Materials | Unit Price (RD$) | Quantity | Total (RD$) |
|---|---|---|---|
| 3'x6' Corrugated Zinc Panels | $270 | 14 | $3780 |
| 2x4, Pine | |||
| 1x4, Pine | |||
| 4" Wood Nails | $45/lb | 2 lb | $90 |
| 20 ft, 4" PVC | 1 | ||
| 10 ft, 4" PVC | 1 | ||
| Rebar | Scrap,Donated | 9 | $0 |
| 2" Zinc Roofing Nails | 2 lb | ||
| Total Cost |
Process: Building Bottle Walls
Plastic bottles: As identified by the community as a resource, and as observed by our team, plastic bottles are abundant on the streets of Santo Domingo. In the beginning of the process we estimated that it would take about 1800 plastic bottles to complete our project. We obtained our bottles through a mixture of hunting bottles in the streets with 30-55gal plastic bags, locating signs and collection boxes at UNIBE and local colmados, and donations from La Yuca residents. When hunting for bottles we recommend looking in places where people tend to congregate. For example, in a matter of 1 hour, three people were able to collect approximately 500 bottles in a bottle-rich area called the Malecón in Zona Colonial, Santo Domingo.
Bottle recommendations: When collecting it is helpful to have the bottles be intact (not squished or broken) and with the bottle caps present. When building your walls it will be helpful to have bottles of similar sizes. We found that it helps to make at least two rows, one on top of the other, out of the same size bottles. This helps reduce open space between bottles and in-turn reduces cement use. We found that other bottle builders recommend that the bottles be cleaned and dried before placing them in your walls, however, due to a lack of time and abundance of rain, many of our bottles were neither clean nor dry.
To fill or not to fill: Something we asked ourselves and other bottle builders was “should we fill the bottles with plastic garbage, or not?” There are many bottle builders who do fill the bottles with plastic trash before inserting them into the walls. We quickly realized that filling the bottles with trash takes a huge amount of time, as does collecting the trash itself. Through talking with others who have used this construction technique before we found that the most common reason to fill the bottles with trash is to remove the trash from the community, not to ad structural integrity. As our walls were not intended to be load bearing and with the small amount of time we had, we decided it would be better not to fill the bottles. In the future more research could be done into how filling the bottles with trash relates to insulation value.
-
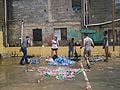
Fig 1: Collect bottles.
-
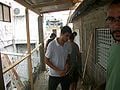
Fig 2: Build a wood frame.
-
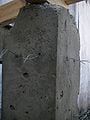
Fig 3: Column prepared for chicken wire attachment.
-

Fig 4: Tie the chicken wire to the columns.
-
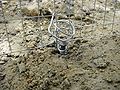
Fig 5: Reinforcement for chicken wire on the floor level.
-

Fig 6: Place the bottles in the wall.
-
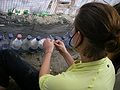
Fig 7: Tie the both sides of chicken wires with string or metal wire.
-
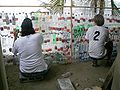
Fig 8: Slowly rolling chicken wire up the wall as bottles are placed inside.
-
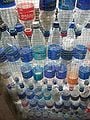
Fig 9: Up close view of bottle orientation.
-
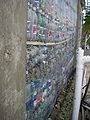
Fig 10: View of outside face of the wall after inside has been plastered.
-
Fig 11: Plastering.
-
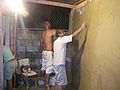
Fig 12: Finishing plaster for inside of the walls


Bottle Wall Materials & Budget
| Materials | Unit Price (RD$) | Quantity | Total (RD$) |
|---|---|---|---|
| Wire ties | Donated | 300+ | $0 |
| 1cm Chicken Wire, 3'wide | $66/yard | 58 yards | $3828 |
| Staples | $ | ? | $ |
| 1x3, Pine | $15/boardfoot | 48 boardfeet | $720 |
| Bottles | $0 | 1700 | $0 |
| Medium-grain sand | $600/m^3 | ? | $ |
| Portland Cement | $267/ft^3 | 7 ft^3 | $1869 |
| 2" Wood Nails | $28/lb | 2 lb | $56 |
| 1.5" Concrete Nails | $30/lb | 2 lb | $60 |
| Total Cost |
Process: Installing A Roof
-
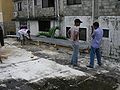
Fig 1: Installing the roof.
-
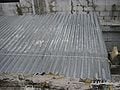
Fig 2: Finishing installation.


Conclusions
A lot of learning took place through the development of this project, and there are many things that can be improved upon in the future.
The Good
The Bad
Next Steps
Special Thanks
References
- ↑ http://www.climatetemp.info/dominican-republic/
- ↑ http://www.ecosavvy.com.au/assets/files/HotTipsForCoolHomesTropics.pdf
- ↑ http://www.livinginpaper.com/
- ↑ http://www.greenhomebuilding.com/papercrete.htm
- ↑ http://inspirationgreen.com/plastic-bottle-schools.html?searched=plastic+bottle+schools&advsearch=allwords&highlight=ajaxSearch_highlight+ajaxSearch_highlight1+ajaxSearch_highlight2+ajaxSearch_highlight3
- ↑ http://www.appropedia.org/Ecoladrillo
- ↑ http://www.buildingconservation.com/articles/wattleanddaub/wattleanddaub.htm
- ↑ http://www.appropedia.org/Wattle_and_daub
- ↑ http://www.harvesthaven.com/newbuildings/newbuildings_index.html
- ↑ http://www.appropedia.org/Rice_Slip