| Line 25: | Line 25: | ||
TOOL REQUIREMENTS MAY VARY BASED ON NUT & BOLT SELECTION | TOOL REQUIREMENTS MAY VARY BASED ON NUT & BOLT SELECTION | ||
== Skills and Knowledge Necessary to Make the OSAT == | |||
* None other than 3D printing knowledge | |||
== Technical Specifications and Assembly Instructions== | |||
[[Image:Slicing berry comb.PNG|200px|right]] | |||
[[Image:Berry Picker Parts.jpg|200px|right]] | |||
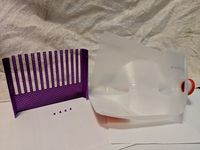
# Cut the bottom of the milk jug off | |||
## Cut two slits up the flatter corners of the milk jug on either side of the handle up to where the bottle starts to bend to the top | |||
## Cut along the part where it starts to bed to cut off the side of the milk jug. This will be where the comb attaches to the milk jug | |||
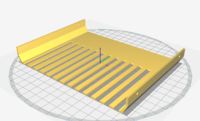
# Print the main comb as shown: | |||
## I recommend printing at least 2 lines for the wall and at least 20% infill | |||
## My printer has a nozzle size of 0.4mm so a wall thickness of at least 0.8mm | |||
## With layer height = 0.2mm, line width = 0.4mm, infill = 20%, at 60mm/s the estimated print time is 2 hours 30 minutes and uses 28g of plastic | |||
# Print 4 pegs (or find 4 pegs) | |||
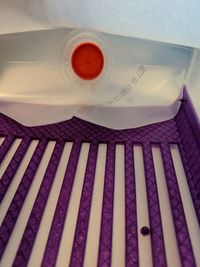
# Fit the milk jug into the slit in the comb, secure one side at a time with the pegs, tucking and trimming the excess "top" part of the jug to make the "back" part of the scoop catcher | |||
[[Image:Berry Picker Scoop Back.jpg|200px|right]] | |||
=== Common Problems and Solutions=== | |||
* Sometimes the back part doesn't want to fold in to create the back nicely, you can cut along the seam of the jug more to give yourself more leeway in folding it | |||
* It helps to pre-poke the milk jug with something sharp to make a starter hole before inserting the pegs first (I used a pen) | |||
== Cost savings== | |||
# 28g of PLA ($0.42 USD) + recycled milk jug (free) | |||
# Compared to [[commercial berry picker | https://www.amazon.com/Metallic-Ergonomic-Picking-Swedish-Ivique/dp/B074JC6PL2/ref=asc_df_B074JC6PL2/?tag=hyprod-20&linkCode=df0&hvadid=216726582865&hvpos=1o1&hvnetw=g&hvrand=11381708582107255407&hvpone=&hvptwo=&hvqmt=&hvdev=c&hvdvcmdl=&hvlocint=&hvlocphy=9017742&hvtargid=pla-357566735718&psc=1]] at $16.97 | |||
# Cost savings of 16.55 (97.5% cost savings) | |||
== Benefited Internet Communities == | |||
* Name and add links to at least 5 using single brackets around [url name] | |||
==References== | |||
* The sources of information (e.g. engineering handbooks, journal articles, government documents, webpages, books, magazine articles etc.). References should use the <nowiki> <ref> </ref> and <references/> </nowiki>tags and can be in any format but should include all the information necessary for someone else to find the same information you did. For example: <ref> web page: Department of Energy (DOE) Landscaping and Energy Efficiency, DOE/GO-10095 (1995) Available: http://www.eren.doe.gov/erec/factsheets/landscape.html</ref> | |||
<references/> | |||
<nowiki> | |||
Based on the developmental needs addressed (e.g. food, heat, electricity, clean water, health care, etc.) be sure to label your device in the proper categories e.g. use [[Category:Water]]. Be sure to categorize your device so that it will be easy to find – for example “Low voltage connection basics” is categorized in | |||
Revision as of 16:03, 6 December 2018
Hemostats
Project developed by User:Patrick Gilland
Template:Statusboxtop Template:Status-design Template:Status-prototype You can help Appropedia by contributing to the next step in this OSAT's status. Template:Boxbottom
Abstract
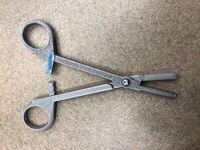
- Hemostats are a medical alternative to clamps. They are especially useful when the user only has one hand available or access to something from one side. This fully customizable 3-D printed option makes hemostats available to doctors in remote locations at a low cost.
Bill of Materials
- 2 x Printed Hemostat
- 1 x 3mm by 10mm long**
- 1 x 3mm nut**
NUT & BOLT DIMENSIONS MAY CHANGE WITH CUSTOMIZATION OF PRINT
Tools needed for fabrication of the OSAT
- MOST Delta RepRap or similar RepRap 3-D printer
- Phillips head screw driver
- 5.5 mm wrench
TOOL REQUIREMENTS MAY VARY BASED ON NUT & BOLT SELECTION
Skills and Knowledge Necessary to Make the OSAT
- None other than 3D printing knowledge
Technical Specifications and Assembly Instructions


- Cut the bottom of the milk jug off
- Cut two slits up the flatter corners of the milk jug on either side of the handle up to where the bottle starts to bend to the top
- Cut along the part where it starts to bed to cut off the side of the milk jug. This will be where the comb attaches to the milk jug
- Print the main comb as shown:
- I recommend printing at least 2 lines for the wall and at least 20% infill
- My printer has a nozzle size of 0.4mm so a wall thickness of at least 0.8mm
- With layer height = 0.2mm, line width = 0.4mm, infill = 20%, at 60mm/s the estimated print time is 2 hours 30 minutes and uses 28g of plastic
- Print 4 pegs (or find 4 pegs)
- Fit the milk jug into the slit in the comb, secure one side at a time with the pegs, tucking and trimming the excess "top" part of the jug to make the "back" part of the scoop catcher

Common Problems and Solutions
- Sometimes the back part doesn't want to fold in to create the back nicely, you can cut along the seam of the jug more to give yourself more leeway in folding it
- It helps to pre-poke the milk jug with something sharp to make a starter hole before inserting the pegs first (I used a pen)
Cost savings
- 28g of PLA ($0.42 USD) + recycled milk jug (free)
- Compared to https://www.amazon.com/Metallic-Ergonomic-Picking-Swedish-Ivique/dp/B074JC6PL2/ref=asc_df_B074JC6PL2/?tag=hyprod-20&linkCode=df0&hvadid=216726582865&hvpos=1o1&hvnetw=g&hvrand=11381708582107255407&hvpone=&hvptwo=&hvqmt=&hvdev=c&hvdvcmdl=&hvlocint=&hvlocphy=9017742&hvtargid=pla-357566735718&psc=1 at $16.97
- Cost savings of 16.55 (97.5% cost savings)
Benefited Internet Communities
- Name and add links to at least 5 using single brackets around [url name]
References
- The sources of information (e.g. engineering handbooks, journal articles, government documents, webpages, books, magazine articles etc.). References should use the <ref> </ref> and <references/> tags and can be in any format but should include all the information necessary for someone else to find the same information you did. For example: [1]
- ↑ web page: Department of Energy (DOE) Landscaping and Energy Efficiency, DOE/GO-10095 (1995) Available: http://www.eren.doe.gov/erec/factsheets/landscape.html
<nowiki> Based on the developmental needs addressed (e.g. food, heat, electricity, clean water, health care, etc.) be sure to label your device in the proper categories e.g. use. Be sure to categorize your device so that it will be easy to find – for example “Low voltage connection basics” is categorized in
