No edit summary |
No edit summary |
||
| Line 9: | Line 9: | ||
==Introduction== | ==Introduction== | ||
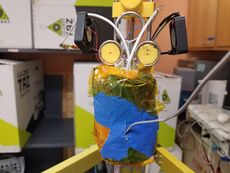
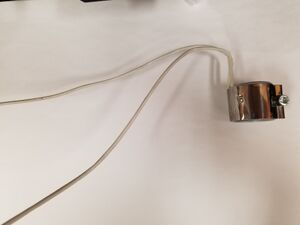
Filament 3D printers can do a wide variety of tasks and projects that come appealing to many people. However, the type of material that can be used in these printers are limited to the type of head that is attached to the printer, as well the material properties. If the filament is not completely uniform in diameter, the print will have a high possibility of failure. Thus the heated syringe delta 3D printer is a perfect resource for being able to print in multiple different materials such as plastic bags or water bottles. The syringe printer consists of a modified, fully built open source delta printer that uses the same Franklin software as the original. The link for the original delta design is given in the references. The syringe, itself, consists of a seasoning injector that is covered in fiberglass insulation and a pipe heater. | Filament 3D printers can do a wide variety of tasks and projects that come appealing to many people. However, the type of material that can be used in these printers are limited to the type of head that is attached to the printer, as well the material properties. If the filament is not completely uniform in diameter, the print will have a high possibility of failure. Thus the heated syringe delta 3D printer is a perfect resource for being able to print in multiple different materials such as plastic bags or water bottles. The syringe printer consists of a modified, fully built open source delta printer [1] that uses the same Franklin software as the original. The link for the original delta design is given in the references. The syringe, itself, consists of a seasoning injector that is covered in fiberglass insulation and a pipe heater. | ||
[[File:pipeheater.jpg|thumb|center|Fig 01: The pipe heater used to heat the syringe.]] | [[File:pipeheater.jpg|thumb|center|Fig 01: The pipe heater used to heat the syringe.]] | ||
| Line 32: | Line 32: | ||
==Calibration & Tolerances== | ==Calibration & Tolerances== | ||
*Calibration of delta requires the use of Franklin and is a similar process to a standard delta model. The link to learn how to do this is given: https://www.appropedia.org/Franklin [2] | *Calibration of delta requires the use of Franklin and is a similar process to a standard delta model. The link to learn how to do this is given: https://www.appropedia.org/Franklin [2] | ||
*Using a stainless steel injector as a syringe does limit the temperature range to between room temperature and 300 degrees Celsius. A temperature higher than 300C may result in the O-ring inside the | *Using a stainless steel injector as a syringe does limit the temperature range to between room temperature and 300 degrees Celsius. A temperature higher than 300C may result in the O-ring inside the seasoning injector to melt. | ||
*Wiring between syringe and printer are TBA | *Wiring between syringe and printer are TBA | ||
| Line 49: | Line 49: | ||
== References == | == References == | ||
[1] | [1]Michigan Tech Open Sustainability Technology Lab, "Open source low cost syringe printer", 2019. https://www.appropedia.org/Open_source_low_cost_syringe_printer | ||
[2] Michigan Tech Open Sustainability Technology Lab, "Franklin", 2017. https://www.appropedia.org/Franklin | [2] Michigan Tech Open Sustainability Technology Lab, "Franklin", 2017. https://www.appropedia.org/Franklin | ||
Revision as of 17:45, 16 January 2020

Introduction
Filament 3D printers can do a wide variety of tasks and projects that come appealing to many people. However, the type of material that can be used in these printers are limited to the type of head that is attached to the printer, as well the material properties. If the filament is not completely uniform in diameter, the print will have a high possibility of failure. Thus the heated syringe delta 3D printer is a perfect resource for being able to print in multiple different materials such as plastic bags or water bottles. The syringe printer consists of a modified, fully built open source delta printer [1] that uses the same Franklin software as the original. The link for the original delta design is given in the references. The syringe, itself, consists of a seasoning injector that is covered in fiberglass insulation and a pipe heater.

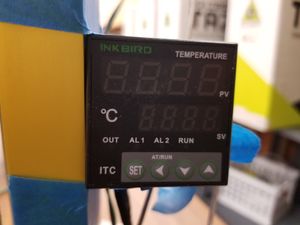
The syringe is then heated by using a temperature controller, shown below, to allow for the material to melt through and onto the automatic, moving bed.

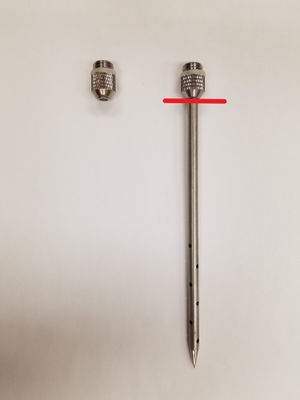
In regards to the nozzle, the injector accessories were cut using a hacksaw to create a nozzle for the material to escape through.

Safety
Be cautious when handling the syringe after heating it up as it will be hot to touch, along with the material that has been released from the syringe. Be wary around the wires that may be exposed as well as be aware of whether or not the printer is plugged in before handling any wiring.
Equipment or Bill of Materials
3D-printed Parts
TBA
Mechanical Parts
Wiring Components
TBA
Calibration & Tolerances
- Calibration of delta requires the use of Franklin and is a similar process to a standard delta model. The link to learn how to do this is given: https://www.appropedia.org/Franklin [2]
- Using a stainless steel injector as a syringe does limit the temperature range to between room temperature and 300 degrees Celsius. A temperature higher than 300C may result in the O-ring inside the seasoning injector to melt.
- Wiring between syringe and printer are TBA
Operation & Procedure
- Add the confirmed material so that it fills up about 3/4 of the shaft of the syringe. The top of the syringe should spin off relatively easily.
- Place the syringe on the holder that is connected to the printer.
- Plug the printer and the heat source into an outlet. Connect the Ethernet cable from the printer to a laptop/desktop, and connect to Franklin. The two fans should automatically turn on. If they do not, confirm that the wiring is correct.
- Before heating up the syringe, confirm that the bed of the printer is calibrated correctly. Do this by following the instructions in the Franklin Appropedia page [2].
- Set the desired temperature using the temperature controller and wait for the syringe to heat up.
- Insert a sliced G-code into the Franklin software.
- To confirm that the material is ready to be printed, assess whether or not the material is exiting the syringe or if the syringe can easily be pushed down without making any unusual noises. If the syringe has a hard time extruding, or the material is not coming out of the nozzle, increase the temperature until the desired results are achieved.
- Once the syringe is up to temperature, start the print by clicking on the 'Start' button in Franklin.
Shutdown
To shutdown the printer, click shutdown in Franklin and then carefully unplug the power supply and the heat source from the outlet. Let the syringe, and the print, cool down before attempting to remove either one.
References
[1]Michigan Tech Open Sustainability Technology Lab, "Open source low cost syringe printer", 2019. https://www.appropedia.org/Open_source_low_cost_syringe_printer
[2] Michigan Tech Open Sustainability Technology Lab, "Franklin", 2017. https://www.appropedia.org/Franklin

