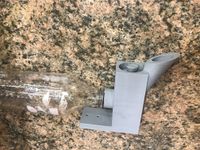
Portable Hand Washing Station
Project developed by Trevor Marvin User: Tjmarvin
Template:Statusboxtop Template:Status-design You can help Appropedia by contributing to the next step in this OSAT's status. Template:Boxbottom
Abstract
- Hand washing is an essential part to maintain proper hygiene and to prevent the spread of sickness. In places that do not have access to running water do not have the ability to frequently wash their hands and increase the chance of sickness to spread. With a portable easy to use unit that uses a limited amount of water to be able to have in a village or house in a place with out access to running water could help prevent spread of sicknesses. Current solution is to use a larger jug hanging from a tree for a small town or village to share.

Bill of Materials
- PLA Plastic Filament - Approx: 200g Cost: ~$4
- Rubber O-Rings - 2: 3/4" ID x 15/161" OD Cost: $1
- Electrical Tap - 4" Cost:$0.25
- Common Used Bottle 12oz to 2L - Garbage Cost: Free
Total Cost: $5.25
Tools needed for fabrication of the OSAT
- MOST Delta RepRap or similar RepRap 3-D printer
Technical Specifications and Assembly Instructions
Used 2 Liter Bottle Holder by (c) 2013 Laird Popkin, based on http://www.threadspecs.com/assets/Threadspecs/ISBT-PCO-1881-Finish-3784253-18.pdf. Credit to eagleapex for creating and then deleting http://www.thingiverse.com/thing:10489
OpenSCAD Files
Files available at [[1]]
Printable Stl files
File:MainDespensor.scad File:Knob SmallerD.scad
Print Instructions
For all printed components
Material: PLA
Layer Height: 0.15mm
Shell Thickness: 4mm
Fill Density: 10%
Print Speed: 110 mm/s
Printing Temperature: 205 C
Supports are Necessary
Total Printing Time: 10 hours
Assembly time: <5min
Assembly Instructions
- Materials: 2 Printed Pieces, Electrical Tape, 2 O-Rings, Bottle.
- The assembly is very straight forward from looking at the pictures.
Once the Printing is done take 1 of the two o-rings and put it around the end of the bottle so if the cap was screwed back on there is a good seal. Take the other o-ring and put it around the insert where the groove is. Roll the o-ring into place using a table or flat surface. Apply the electrical tape around the o-ring to create a tighter seal and hold the o-ring into place.
Common Problems and Solutions
- Water leaking out is a common problem even when the knob is all the way in. The solution is to add more electrical but the knob will be harder to move in and out.
Cost savings
- Total Cost of Print: $5.25
- The closest online equivalent is at least $225
- Savings: $219.75
- Precent Reduction: 97.6%
Benefited Internet Communities
- Blue Planet Network http://blueplanetnetwork.org/
- ACTS https://acts.ca/
- Bloodwater https://www.bloodwater.org/
- Care https://www.care.org/
- Charity:Water https://www.charitywater.org/.
</nowiki>