Lizkimbrough (talk | contribs) |
Lizkimbrough (talk | contribs) No edit summary |
||
| Line 1: | Line 1: | ||
[[File:A bin.jpg]] | |||
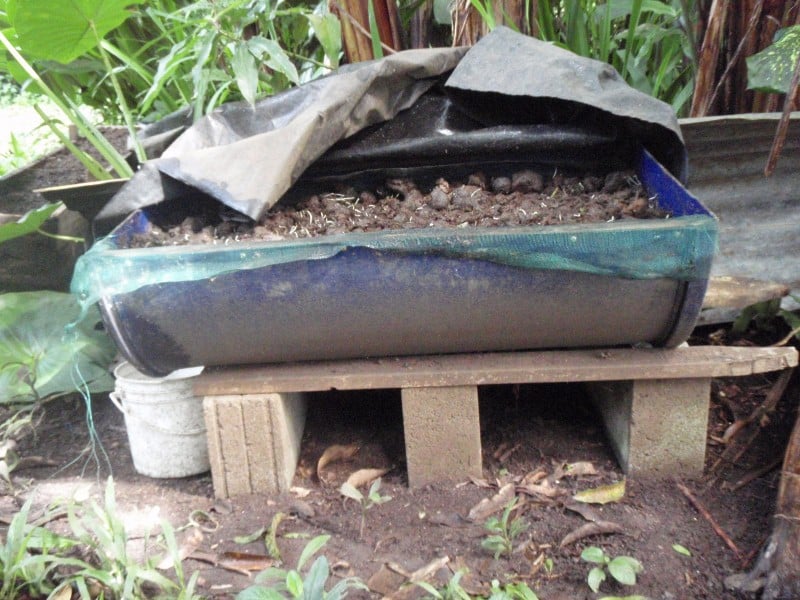
The vermicomposting system (aka worm bin) at Finca Amrta is simple, affordable and elegant. After much experimentation they have found this to be the best solution for their environment which has a rainy and dry season and is warm during the days and cool at night. | The vermicomposting system (aka worm bin) at Finca Amrta is simple, affordable and elegant. After much experimentation they have found this to be the best solution for their environment which has a rainy and dry season and is warm during the days and cool at night. | ||
| Line 19: | Line 21: | ||
*Worms | *Worms | ||
==Building the bin== | ==Building the bin== | ||
1. Cut a plastic barrel in two halves. Miguel used a jigsaw for this | 1. Cut a plastic barrel in two halves. Miguel used a jigsaw for this | ||
Revision as of 17:08, 28 August 2010
The vermicomposting system (aka worm bin) at Finca Amrta is simple, affordable and elegant. After much experimentation they have found this to be the best solution for their environment which has a rainy and dry season and is warm during the days and cool at night.
This system works with horse manure. Apparently other types of manures need to be composted before they are added to worm bins, but the pH and composition of healthy horse manure mixes well with worms.
Now that they have found this system, they hope to build a small shelter and a frame to mount about 8 of these bins.
Materials for 2 bins
- 55 gallon plastic barrel
- hard wood
- sheet metal screws
- pea gravel
- screen (smaller the better)
- sheet of plastic
- material for lid (roofing material shown)
- a base (concrete blocks and wood or a well build frame)
- small bucket to capture liquids that drain off
- Sifted compost
- Horse manure
- Worms
Building the bin
1. Cut a plastic barrel in two halves. Miguel used a jigsaw for this
2. Reinforce with long sides so the plastic doesn’t bend. The barel can be mounted onto a frame (not shown) or reinforced with hard wood. Shown here is a 1x1 piece of hardwood cut to fit the long side of the barrel. The wood is screwed into the inside of the barrel with sheet metal screws.
3. A small hole is drilled on one side of the barrel to drain liquids.
4. The bin should be located in a relatively cool and shady spot.
5. The barrel is set on an incline and filled with pea gravel.
6. The gravel is covered with screen, the smaller the better: window screen, fly screen, mosquito netting, etc..)
7. The barrel is then filled with sifted compost and horse manure.
8. The bin has a lid and a roof of some sort. A wooden lid is good for holding moisture in. Shown here is a simple sheet of plastic and a piece of roofing material to keep the rain out.
9. Add worms.
Additional Tips
When they are ready to harvest worm castings, they add fresh horse manure to the top and wait for the worms to move to this payer. The worms are scooped into a bucket, castings removed, fresh compost and manure are added to the empty bin and worms are returned to their home!
The medium in the bins should always be moist. In the dry season, they lightly water the bin as needed.
The liquid run-off, sometimes called worm-tea, is an excellent foliar or rooting medium for use in gardening or can be diluted and poured onto garden directly.
