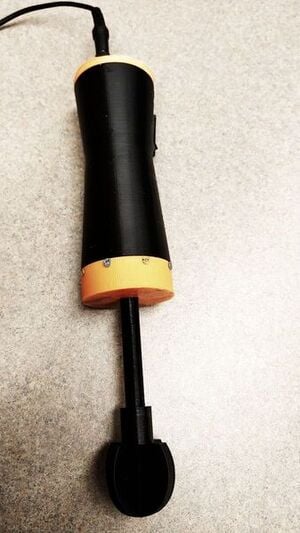
- An electric hand-whisk is a handheld mechanism used for whisking, beating or stirring different liquids. It generates this whisking or mixing action by rotating the mixing device, also known as whisk, in a vertical manner. This is designed to be as small as it can be and hence is easily portable. A motor drives the whisk, which is immersed in liquids, and performs the whisking action.
This electric hand-whisk:
- is compact and easily portable
- can be used to whisk/mix eggs, whip cream, mix powders in liquid.
Materials Needed[edit | edit source]
- 3-d printer
- 12V DC motor
- ON/OFF Switch
- Female pin with DC 12V adaptor
- Adhesive
- #2-56 screws
Items to 3D Print[edit | edit source]
All OpenSCAD and STL files are available here
The part list is:
- Main Body
- Whisk shaft
- Whisk body
- Upper Cap
- Lower Cap
Tools needed for fabrication of the whisk[edit | edit source]
- MOST Delta RepRap or similar RepRap 3-D printer
Skills and Knowledge Necessary to edit design[edit | edit source]
- 3D Modelling software - FreeCAD/OpenSCAD
- CURA for slicing and printing
Instructions[edit | edit source]
- Print the mentioned in the Items to 3-d print
- Connect wires to the two ends of the motor
- Insert the electric motor from the lower part of the main body and place it on the base plate provided inside the body.
- Draw out the wires from the holes provided on the base plate.
- Attach the whisk shaft on to the shaft of the motor.
- Put the lower cap on to the main body and fix it using #2-56 screws.
- Attach the whisk body on to the whisk shaft.
- Connect the wire from the negative end of the motor to the negative end of the DC female pin.
- Connect the wire from the positive end of the motor to the switch and connect a wire from the switch to the positive end of the DC female pin.
- Fit the ON/OFF switch on the slot provided for it on the main body.
- Fix the upper cap on the main body using adhesives.
- Switch ON and use the whisk for desired purpose.
Cost[edit | edit source]
- Filament- approx $3
- Motor - $12
- Female Pin - $6
- Screws - $1
Total cost- $22
Working Prototype[edit | edit source]
Commercially equivalent[edit | edit source]
The commercial equivalent can be found anywhere from $25 to $350
