Backround

During the summer of 2008 we, Desiree Woods and Angela Swigart, created a small organic garden at a local kindergarten and daycare center named "Nuevo Sol" in Parras, Mexico. Nuevo Sol has been serving the Parras community for 16 years, and for the first years of its life was the only public kindergarten/daycare center in Parras. Nuevo Sol is administered by Señora Sofia Garcia Dominguez, and works with children aged 2 months to 10 years. It is a year-round school, however the majority of students attend during the regular school year. Nuevo Sol primarily serves single parent homes or low income families, and acts as a place where parents can drop off their children while they go to work. Señora Sofia has two main goals for Nuevo Sol which are to provide quality care for low income and underprivileged children, as well as to work with the mothers to develop independent living skills.
Nuevo Sol seems to work on a pay-as-you-go system and the children are daily rotating in and out of the center on a need by need basis. Never the less, the days are relatively structured, with time for exercise, three healthy meals a day, a nap and, of course, playtime! It is open from 7am to 6pm, with an after school program lasting until 8pm to accommodate those mothers that may need to work longer hours.
After discussing the needs of the school with Señora Sofia and the practical application of these ideas with the owner of the property Señor Juan Jaime, it was decided that we would help to create an organic garden for the school. Our meeting times were 12-2 in the afternoon twice a week for 4 weeks and during those times we were blessed to be allowed to play and work in the garden with the children at the school.
Objectives
- The garden will serve as a learning laboratory by demonstrating the possibility of, and techniques for, consuming home-raised food. For this reason the garden will grow locally used food and will use only supplies that can be found in Parras. We also hope to work with the children to make individual and family sized planters out of recycled crates and bottles to show that one doesn’t need a lot of space to create an organic vegetable garden.
- The garden will grow, will not need a lot of maintenance and upkeep to be long lasting (at least one grow cycle) and will be ascetically pleasing.
- Through hands on experience the children will learn the basics about life systems- such as what a plant needs to live, the parts of a plant and the importance of eating healthy.
- On the last day of our class we will host a party for the parents of the students, as well as for our fellow classmates and teachers, where we will show them all of the students’ hard work. At the party we will also show off the rain catchment system that will be made to give water to our garden (please read below or click Daycare rainwater catchment system for more information on this system).
Working as a Team
Because one of our objectives is to have the Learning Garden function as an example of how to grow a garden in many different situations we want to make sure that the systems that we use in our garden are completely do-able for the average Parras citizen. However a number of the children at the center do not have extra water at home with which to irrigate a garden, and it is therefore not a viable option for their families. Therefore, we will work in conjunction with another team from the Parras 2008 group to develop a rainwater catchment system. With this system we want to be able to capture enough rainwater off of the building’s roof to completely irrigate the garden. We hope this will further demonstrate the possibilities of living an independent and sustainable life using locally available resources.
Appropriate Technology Criteria
The following criteria were determined to aid us in judging the appropriateness of our project, the success of it, and to help us coordinate our project priorities. Each criterion was weighted independently from the other criteria, and show how important the criteria being met is to the overall success of our project.
| Criteria | Weight (1-10 with 10 being the highest) |
|---|---|
| The garden and lessons are safe for children | 10 |
| The lessons and garden use local resources | 9 |
| The lessons are replicable | 6 |
| The garden will last one full growth cycle | 9 |
| The entire system will be made for less then $750 (pesos) | 7 |
| Uses existing knowledge | 8 |
| The garden will be used by the school | 8 |
| Children are interested in the garden/vegetables | 9 |
| Garden(s) act as example of independent living | 8 |
| Project has support from teachers/administration | 9 |
Budget
| Item | Price/Item (pesos) | Quantity of Items | Cost (pesos) |
|---|---|---|---|
| Seed | $10 | 3 | $30 |
| Bags of Soil | $30 | 6 | $180 |
| Herbs | $10 | 5 | $50 |
| Copies | $.50 | 12 | $5 (2 given free) |
| Toxic Free and Water Based Paint | $57 | 3 | $228 |
| Paint Brushes | $7 | 10 | $70 |
Our Designs


Garden: Our garden measures approximately 280cm by 280cm, and we have 3.5 rows of tomatoes and peppers that are each 28cm long. Along the fence we have planted a mount of squash and cucumber (so that the two may climb the fence instead of spreading out, and along the sidewalk is an herb mound with oregano and chamomile. We used the inter-planting of tomatoes and peppers in our rows because when put together they help to ward off insects as well as replenish the nutrients in the soil. Oregano and chamomile are not especially sensitive to the existence of other plants, however we wanted to keep them away from the squash and cucumber plants which tend to take up a lot of space. We decided to place the squash and cucumber plants near the fence so that they could have something to climb and will not just spread out and take over the garden. The tomatoes and peppers we placed in the middle of the garden because we did not want passing animals to eat them or pee on them so that the children could eat the fruits should they get hungry. We placed walkways between each row and mound so as to allow for easy access to the plants, as well as to provide a clear pathway for the children to walk.
Individual Planters: Making the individual planters were a large part of our project, and are actually quite easy to make. They are good for starting seedlings because they provide a lot of protection from the seeds. The supplies that you need are recycled plastic bottles (the longer you want the seeds to stay in the bottles the bigger the bottles should be), scissors, seeds and soil.
1) Wash and dry the bottles thoroughly
2) Cut the bottles in half and use only the bottom half
3) Poke small holes in the bottom of the bottles to use for drainage
4) Put soil in bottles (leave around 1-2 inches of space along the top)
5) Plant seeds in bottle (if the seed packet does not say a depth to plant the seeds, a good rule of thumb is about as deep as you pinkie nail is long)
6) Water, put in sunlight and watch grow!
7) When you can begin to see the roots of the plant from the bottom of the bottle, or when they are pressed up against the sides of the bottle, it is time to transplant the seeding into something bigger.
Crate Planters: The other craft that project that we did was to construct planters out of recycled wooden vegetable crates. The crates were donated to us for free from the super, and are very easy to find in Parras. These crates served as an example of the possibilities for indoor gardening if there is not a lot of space available. The supplies necessary for these planters are wooden crates, plants, paint, nails and a hammer or an industrial staple gun, and a bag of nutrient rich soil
1) Remove all pointy pieces of wood or nails
2) Paint crates
3) Remove the soil from the bag and cut the bag open on two sides to that it becomes one piece of cloth that can be laid out flat
4) Poke small holes in the cloth for drainage and aeration
5) Line the inside of the crate with the bag, and it is best to nail or staple the bag to the crate along the reinforced corners of the crate to avoid splitting the wood with the nail
6) Be sure to hammer the sharp side of the nail flat if it comes through the other side of the crate, as you don’t want any kids poking themselves
7) Put soil in crate
8) Plant plants
9) Water, place in sunlight and watch grow!!
Week #1
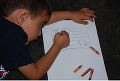
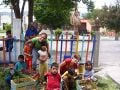
The first week we were not able to begin teaching until Thursday because we wanted to have all of our supplies ready for the kids. Once we actually got into the classroom we found that we were going to be working with ages 3-7, instead of 8 to 10 as we had been told. Therefore, our lesson plan had to be adjusted quickly and on the spot. We learned immediately that the majority of children enjoyed drawing, and that it was much more effective to teach the little ones on an one on one basis then in a large group. We ended up spending the majority of our teaching time drawing plants and talking about what a plant needs to live. Once we got outside and into the garden the kid seemed to calm down a bit, and we were able to get quite allot of work done. The only problems that we encountered during the outside work were that they enjoyed throwing dirt at each other and had some problems sharing gardening tools. For a complete lesson plan please see El Nuevo Sol/Lesson Plan 1
-
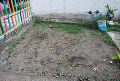
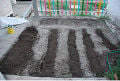
Before. note the weeds and clay-like soil
-
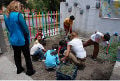
Working in the Garden
-
Weeding
-
Tilling
-
After!!!!!


Week #2
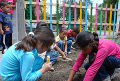
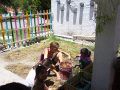
The second week our main objective was to teach the children the basics about planting both seeds and transplanting, as well as the basics about a plant's life cycle. We did this on a large scale by actually planting seeds and plants in the garden, and on a small scale by creating individual planters out of recycled bottles. When we were planting in the garden we divided the kids into three teams, with one team planting oregano and chamomile seeds, another planting squash seeds and cucumber and the other transplanting tomatoes and peppers. We allowed each student a chance to switch teams, and this worked quite well (although it was occasionally difficult to keep track of what every one was doing). A technique that we found worked very well was to put the older and more low key kids in charge of teaching the others how to plant the seeds. During the next class, when we made the individual planters, the kids really seemed to enjoy having their own planter to work with. We also found that there were much less problems regarding sharing and keeping them organized. They were a bit frustrated that they couldn’t see the sprouts immediately, and because they were not able to get the immediate gratification they lost interest in the bottle gardens after they were completed. This week we changed our teaching strategy to working more one on one with the kids. It was much more effective at imparting the material, however it made it more difficult to reach every single child. The younger ones (3-5) were very happy to draw pictures, and the older ones (5-7) reacted best when they were talked to individually and could express the concepts through drawing. To see the second lesson plan, where we planted the garden and taught the children about plant parts please click El Nuevo Sol/Lesson Plan 2. To see the third lesson plan where we made individual planters out of recycled water bottles and taught about the plant life cycles please see El Nuevo Sol/Lesson Plan 3 and to see the seed story (and accompanying pictures) that we wrote in spanish to teach the children about the life cycle of a plant please click Plant Life Cycle Story (in spanish)
-
Learning plant parts
-
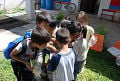
Putting soil in the individual planters
-
Everyone with their planters (below the kids on the sidewalk)
-
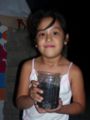
The first sprout of the planters!!


Week #3
The third week our main objective was to teach the kids about the nutritional benefits of eating vegetables, the viability of having your own garden, as well as to determine what lessons they had absorbed. We did this by creating large family sized planters out of recycled vegetable crates and dirt bags and allowing the kids to transplant into them. This crate activity enabled us to see what areas of garden building they were familiar with and had remembered from our work the past two weeks, and what lessons we needed to improve upon (based upon how well they were able to create a garden in the crates). We got a very good response from them as far as understanding what a plant needs to survive, and many even remembered what vitamin a does! We also made (painted and planted) the crates in pairs of two, and this seemed to work much better. When working in small groups the boys were much less rowdy, and the girls focused each other to the task at hand. It also allowed for the teachers to give students individual attention, without being overwhelmed. This week the main difficulties that we encountered were getting the students to wear their paint smocks, as well as being able to tell which students should work in a group and which should not. To see the fourth lesson plan where we teach about what vitamins each plant has, as well as paint the crates please click El Nuevo Sol/Lesson Plan 4. For the fifth lesson plan where we transplanted the plants into the crates and reviewed important concepts see El Nuevo Sol/Lesson Plan 5
-

Drawing a good garden
-
Learning about plant nutrition
-
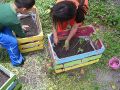
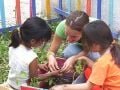
Planting the crate planters
-
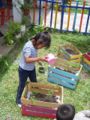
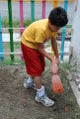
Watering their planters
-

An example of a crate planter
-
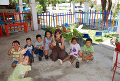
The whole gang!


Week #4
The fourth week was our last week, and unfortunately we were only able to have one class on Tuesday. During that class (and due to the request of Lilly the teacher), we taught the children the english names of the vegetables in our garden. We started out by sitting in a group and having everyone repeat the name after us, when this didn’t work (the children got very intimidated to speak) we decided to change tactics. The next option that we tried was to work individually with them to draw the vegetable and tell them what the word is in English. This worked much better because we were able to spend more time with the children who wanted to learn, however it also made it more difficult to keep control over those that did not. In addition, the last day was when we had planned to teach the children how to weed. Many of the younger ones had difficulty distinguishing between a seedling and a weed, so we found that it worked much better to have them weed around the tomato plants (where the difference between the plants and the weeds are much more obvious) then around the squash and the herb plots. Finally we talked with the children individually (while weeding) about why its good to use recycled material. Upon meeting with Lilly and Sophia, it was also decided that having a daylong presentation of our system with the parents was not a viable option for us due to scheduling conflicts. Instead we were asked if the two groups could collaborate to make a poster that explains what our system is, and how it exemplifies independence. This poster was then waterproofed and hung outside so that the parents could read about our project on their own time. To see a complete version of our final lesson plan please click El Nuevo Sol/Lesson Plan 6
-
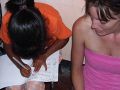
Teaching English
-
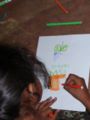
Learning in action!
-

The rock star gardener
-
Weeding

.jpg)

.jpg)
Continuation Plan
The continuation plan for Nuevo Sol is very simple. Every week the garden needs to be weeded, and re-mulched every two weeks and watered every day (especially important because of the dry soil). Following is a calendar that we will be giving the owner of Nuevo Sol, which says the basic activities that need to be done each month for the next year to the garden
September: Any of the squash and cucumbers that have overgrown their mound need to be dug up, and the weak looking tomatoes or pepper plants need to be thinned out to make room for the roots of the full grown plants. Most importantly…ENJOY THE VEGGIES!
October: Continue to mulch the ground and also put another layer of the topsoil (we are leaving a bag there) on the garden. Normally during October a top crop is planted to replenish the soil’s nitrogen, however many of these crops are not easily available in Parras. Therefore, the soil, which is rich in nitrogen, should do the job
November: Stake the tomato and pepper plants and securely tie them so that the winds to not rip them out of the soil. Put extra mulch on the oregano and chamomile to protect them from the wind
December: Nothing really needs to be done at this point (except for the normal weeding and watering)
January: This is a really good time to turn the soil. It will expose all of the insects or their eggs that may have grown during the winter to the cold temperatures, animals and rain.
February: Slowly begin to remove the heavy layer of winter mulch as you see any signs of new growth. You want to begin to reacclimatize the plants to the light and sun and heat very slowly
March: Remove the rest of the mulch and stop weeding between the rows but keep the rows themselves clean. This will allow for the soil to accumulate a large amount of bio-matter, and once they have been weeded (best done at end of month) the soil will be much healthier.
April: Plant any new seeds that you want in the garden, especially ones from the individual planters that have survived. Begin to become diligent about weeding the mounds and watering
May: Late may is the time to transplant any tomato or pepper plants from the crates that have survived the winter into the garden.
June: Have fun with the new Parras 2008 group!
Words of Advice
While this project was a very rewarding experience it had its challenging times as well. Following is a short list of pieces of advice gained from our experiences for the next person that decides to take on the amazing experience of working with young kids to build a garden.
1) Be very clear about the ages of children that you want to teach. We went into this project expecting to be teaching 8-10 year olds- an age we were both comfortable with- however the first day we were on site we discovered that the children were much younger. The children were wonderful to work with and eventually we adjusted our teaching style, lesson plans and expectation to better match their ages. However our program could have been much stronger from the get go had we known what ages we were going to be teaching.
2) Try to get a consistent group of kids. Because Nuevo Sol operates on a pay as you basis many of the children rotate in and out of the kindergarten. This made it difficult for the lessons to extend for more then one day because every class there would be a new student, or someone would be missing. However if this is impossible (which it may well be if you are going to be working at Nuevo Sol), don’t be discouraged because many times the other children will catch up the new student.
3) If there are specific plants that you want in your garden, go to Saltillo to buy them. There is a very small selection of plants and seeds in Parras, and we were limited by such a thin pool to choose from. Thankfully we were lucky enough to have the majority of our plants donated to us- however this also left us with a very small plant choice as well.
4) Get lots of Spanish support. When interacting with young kids it is important that your Spanish is understandable. They will not correct or help you, and if they are confused or don’t understand what you are saying they will completely ignore you. Have a list of vocabulary words for each lesson and become familiar with commands.
Calendario de Siembra
| Planta | Tiempo plantar | Crecer con | Dìas Cosecha |
| Acelga | Directa: Dicimbre a Abril | Lechuga, Escarola | 50-70 |
| Calabacita | Directa: Oct a Nov | Maíz, Poroto, Acelga | 120-150 |
| Lechuga | Directa: Agosto a Marzo | Acelga, Rabancito, Zanahoria, Repollo | 50-70 |
| Maíz | Directa: Sept | Porto, Zapallo, Acelga | 100-130 |
| Melón | Directa: Sept a Oct. | Maìz, Acelga | 100 |
| Perejil | Directa: Sept a Oct. Y Feb-Mar. | Tomate | 60-90 |
| Pimiento | Almàcigo Julio a Agosto translante:Oct | Zanahoria | 75 |
| Rabanito | Directa: Agosto a Oct y Feb a Mar. | Zanahoria, Tomate, Lechuga | 25-30 |
| Repollo | Sept. a Oct y Oct a Nov | Lechuga, Apio, Zanahoria | 90-100 |
| Tomate | oct a Dic | Albahaca, Zanahoria | 80-100 |
| Zanahoria | Agosto a Nov | Tomate, Lechuga, Escarola, Rabanito | 150 |
Vocabulary
Here is a list of some words and commands that may be helpful when dealing with small children and/or when teaching about gardening
| English | Spanish |
|---|---|
| Give me your attention | Darme su atencion |
| Do not yell | No griten |
| Don't throw that | No tiren eso |
| Don't hit her | No la golpies |
| You need to share | Hay que compartir |
| Don't eat that | No comas eso |
| Good Job | Muy bien |
| Form a line | Formen una linea |
| One at a time | Solo uno a la vez |
| Hierba | Herb |
| Cosecha | Harvest |
| Maleza | weed |