m (→Background: Removed internal link) |
m (Standardize wikitext) |
||
| (24 intermediate revisions by 11 users not shown) | |||
| Line 1: | Line 1: | ||
{{ | {{Project data | ||
| made = Yes | |||
| instance-of = Windbelt | |||
The following page is the result of an ENGR 305 project in the Spring of 2011 completed by Greg Pfotenhauer and Agustin Gonzalez. This page covers a brief overview of windbelt technology, design objectives and criteria, cost, a DIY guide, further steps to be taken on the project, and conclusion on the results of the semester's work. | }} | ||
The following page is the result of an ENGR 305 project in the Spring of 2011 completed by Greg Pfotenhauer and Agustin Gonzalez. This page covers a brief overview of windbelt technology, design objectives and criteria, cost, a DIY guide, further steps to be taken on the project, and conclusion on the results of the semester's work. | |||
===Background=== | === Background === | ||
The windbelt, first designed by Shawn Frayne <ref> http://www.humdingerwind.com/ | The windbelt, first designed by Shawn Frayne,<ref>[https://web.archive.org/web/20180727133403/http://www.humdingerwind.com:80/ http://web.archive.org/web/20180727133403/http://www.humdingerwind.com:80/]</ref> is a device that converts wind into usable electricity by the principle of aeroelastic flutter. Unlike conventional wind turbines, windbelts are effective at producing electricity at low wind speeds. Regions that typically have lower average wind speeds are perfect for windbelt installations. However, windbelt design is relatively new and experimental. New materials and new designs must be tested to advance this potential source of clean energy. | ||
===Opportunity Definition=== | === Opportunity Definition === | ||
Though conventional windmills produce relatively little power at low wind speeds, windbelts can take advantage of the areas low average wind speeds. So far, three separate groups of Humboldt | |||
Though conventional windmills produce relatively little power at low wind speeds, windbelts can take advantage of the areas low average wind speeds. So far, three separate groups of Cal Poly Humboldt students have built windbelts, each time improving the windbelts design. This project serves to test new materials and windbelt designs. | |||
== Literature Review == | |||
The following is a review of the literature of the available information relating to windbelts. | The following is a review of the literature of the available information relating to windbelts. | ||
===Windbelt Basics=== | === Windbelt Basics === | ||
The windbelt, invented by Shawn Frayne in 2004, is a device that converts wind power into electricity. The device is fairly simple, consisting of a taut string or ribbon strung between two points. Wind blowing across the taut material produces the aeroelastic flutter effect, causing the ribbon to vibrate. This motion is translated into electricity by permanent magnets on the ribbon. The magnets move in and out of electromagnetic coils in accordance with the motion of the ribbon. This induces a current in the coil's wire. | |||
</ref> | The windbelt, invented by Shawn Frayne in 2004, is a device that converts wind power into electricity. The device is fairly simple, consisting of a taut string or ribbon strung between two points. Wind blowing across the taut material produces the aeroelastic flutter effect, causing the ribbon to vibrate. This motion is translated into electricity by permanent magnets on the ribbon. The magnets move in and out of electromagnetic coils in accordance with the motion of the ribbon. This induces a current in the coil's wire.<ref>http://www.rexresearch.com/frayne/frayne.htm</ref> | ||
[[File:Diagram of Windbelt.jpg|thumb | [[File:Diagram of Windbelt.jpg|thumb]] | ||
Unlike conventional wind turbines, which require expensive bearings and gears to be efficient, windbelts are relatively easy to construct at a low cost. This makes the windbelt much more feasible than conventional wind turbines for areas with low average wind speeds. | Unlike conventional wind turbines, which require expensive bearings and gears to be efficient, windbelts are relatively easy to construct at a low cost. This makes the windbelt much more feasible than conventional wind turbines for areas with low average wind speeds.<ref>http://www.brighthub.com/environment/renewable-energy/articles/50528.aspx</ref> | ||
http://www.brighthub.com/environment/renewable-energy/articles/50528.aspx | |||
</ref> | |||
=== Components === | |||
The following makeup the basic components of a windbelt: | The following makeup the basic components of a windbelt: | ||
'''Frame''' | '''Frame''' | ||
Windbelts are exposed to the elements and are subject to UV radiation, temperature change, moisture, and variable wind speeds. Therefore, the frame must be durable. This means the frame should be as strong as possible. | Windbelts are exposed to the elements and are subject to UV radiation, temperature change, moisture, and variable wind speeds. Therefore, the frame must be durable. This means the frame should be as strong as possible. | ||
Consideration should also be taken as to how the windbelt will stand or be mounted. High winds can create a lot of torque upon the windbelt's mount and can damage the windbelt or the structure it is attached to if the mount breaks.<ref> | Consideration should also be taken as to how the windbelt will stand or be mounted. High winds can create a lot of torque upon the windbelt's mount and can damage the windbelt or the structure it is attached to if the mount breaks.<ref>https://www.appropedia.org/Samoa_Hostel_Windbelt</ref> | ||
'''Ribbon''' | '''Ribbon''' | ||
The ribbon must be lightweight and thin so it acts like an airfoil when wind blows across it. It must be fairly rigid, as too much elasticity will disrupt the vibration of the ribbon. The ribbon will be taut and subjected to potentially high wind speeds, so the material must have a high tensile strength. Finally, it must maintain its shape over time to be effective (objects that do not deform quickly over time are said to have low "creep.") This being said, there are relatively few materials (so far) that pose as promising materials for windbelt construction. The material used in Shawn Frayne's design is a mylar-coated taffeta. <ref> | The ribbon must be lightweight and thin so it acts like an airfoil when wind blows across it. It must be fairly rigid, as too much elasticity will disrupt the vibration of the ribbon. The ribbon will be taut and subjected to potentially high wind speeds, so the material must have a high tensile strength. Finally, it must maintain its shape over time to be effective (objects that do not deform quickly over time are said to have low "creep.") This being said, there are relatively few materials (so far) that pose as promising materials for windbelt construction. The material used in Shawn Frayne's design is a mylar-coated taffeta.<ref>http://www.physics.org:80/featuredetail.asp?id=47</ref> Similar materials, such as kevlar, tape, or camera film can be used alternatively. Further testing of ribbon materials is necessary to improve the efficiency of windbelts. | ||
http://www.physics.org/featuredetail.asp?id=47 | |||
</ref> | |||
'''Magnets''' | '''Magnets''' | ||
Permanent magnets are used to induce current in the coils when vibrating in and out of the coil. The magnets must be fairly lightweight so as not to disrupt the aeroelastic flutter of the ribbon. Neodymium magnets are the most commonly used. <ref> | Permanent magnets are used to induce current in the coils when vibrating in and out of the coil. The magnets must be fairly lightweight so as not to disrupt the aeroelastic flutter of the ribbon. Neodymium magnets are the most commonly used.<ref>http://international.nsbe.org/documents/Final%20CDO%20Report%20-%20University%20of%20Toronto%20and%20University%20of%20Cape%20Coast.pdf</ref> | ||
http://international.nsbe.org/documents/Final%20CDO%20Report%20-%20University%20of%20Toronto%20and%20University%20of%20Cape%20Coast.pdf | |||
</ref> | |||
'''Coils''' | '''Coils''' | ||
The coils must be made of a conductive metal. Copper is by far the least expensive of metals that conduct well. Coils can be wound by hand, lessening the cost. Some industrial supply stores will wind the coils for you but at high cost. <ref> | The coils must be made of a conductive metal. Copper is by far the least expensive of metals that conduct well. Coils can be wound by hand, lessening the cost. Some industrial supply stores will wind the coils for you but at high cost.<ref>https://www.appropedia.org/HSU_Chiapas_Windbelt_ASE#Rolling_Coil</ref> | ||
</ref> | '''Connectivity''' | ||
Electricity produced by windbelts is of inconsistent voltage. Voltage is relative to wind speed, and so voltage must be regulated for use. Small windbelt systems are capable of supplying power to standard USB ports, while larger systems can supply power for 12V DC circuits. Even larger arrays have the potential for grid-tied AC systems, but these are still in the experimental phase.<ref>http://www.kentlaw.edu/faculty/fbosselman/classes/.../Sarah%20Fanto.ppt</ref> | |||
== Windbelt Design Objective == | |||
The specific design of this windbelt is based upon a slightly different set of objectives than its predecessors. For this project, the ultimate goal was to create a prototype that could be easily replicated by almost anyone at a very low cost. Construction would require little building skill and would consist of mostly recycled parts. Power and efficiency are not the aim of this windbelt; rather, it will serve as a way for people to learn about windbelt design by getting hands-on experience by building one themselves.<ref>http://www.instructables.com/id/Windbelt-from-hard-drive-voice-coil-and-magnets/</ref> | |||
The specific design of this windbelt is based upon a slightly different set of objectives than its predecessors. For this project, the ultimate goal was to create a prototype that could be easily replicated by almost anyone at a very low cost. Construction would require little building skill and would consist of mostly recycled parts. Power and efficiency are not the aim of this windbelt; rather, it will serve as a way for people to learn about windbelt design by getting hands-on experience by building one themselves <ref> http://www.instructables.com/id/Windbelt-from-hard-drive-voice-coil-and-magnets/ </ref> | |||
The hope is that this model will help build a bigger base of people who are working to perfect the windbelt design. Though larger windbelt prototypes can be daunting and expensive for the average individual, the design of this specific windbelt allows interested hobbyists to get their foot in the door and expand upon their original design later. | The hope is that this model will help build a bigger base of people who are working to perfect the windbelt design. Though larger windbelt prototypes can be daunting and expensive for the average individual, the design of this specific windbelt allows interested hobbyists to get their foot in the door and expand upon their original design later. | ||
| Line 63: | Line 59: | ||
Additionally, some new ribbon materials will be tested as there are yet few feasible options. | Additionally, some new ribbon materials will be tested as there are yet few feasible options. | ||
==Criteria== | == Criteria == | ||
The final design for the windbelt was determined by ranking each design by the following criteria. The criteria are ranked from 1-10, with 10 being a criterion of the most importance. | The final design for the windbelt was determined by ranking each design by the following criteria. The criteria are ranked from 1-10, with 10 being a criterion of the most importance. | ||
{| class="wikitable | <center> | ||
{| class="wikitable" | |||
! Criteria | |||
! Constraints | |||
! Weight | |||
|- | |- | ||
| Safety | |||
| The windbelt must not inflict physical or electrical injury | |||
| 10 | |||
|- | |- | ||
| | | Cost | ||
|The windbelt must | | The windbelt must be as inexpensive as possible | ||
| | | 9 | ||
|- | |- | ||
| | | Environmental Impact | ||
|The | | The Windbelt must use recycled parts wherever possible | ||
|9 | | 9 | ||
|- | |- | ||
| | | Durability | ||
| | | Windbelt must be able to withstand the elements | ||
| | | 5 | ||
|- | |- | ||
| Power Capacity | |||
| The project must produce some noticeable power | |||
| 4 | |||
|Power Capacity | |||
|The project must produce some noticeable power | |||
|4 | |||
|- | |- | ||
| Aesthetics | |||
| Windbelt must be pleasing to look at | |||
| 2 | |||
|} | |} | ||
==The Building Process== | </center> | ||
== The Building Process == | |||
The following is a step-by-step guide to building an easy, affordable windbelt. | The following is a step-by-step guide to building an easy, affordable windbelt. | ||
===Tools=== | === Tools === | ||
The following tools are needed to complete this project: | The following tools are needed to complete this project: | ||
===Materials=== | * Hand saw | ||
* Multimeter | |||
* Precision Torx screwdriver set (for taking apart hard drive) | |||
* Scissors | |||
* Wire stripper (scissors can be used alternatively) | |||
* Soldering gun | |||
* Drill | |||
* Hacksaw or jigsaw | |||
* Phillips head and flat head screwdrivers | |||
* C-Clamp | |||
* Pliers | |||
* Sandpaper or belt sander | |||
=== Materials === | |||
Many of these materials can be found at recycling centers or thrift stores. | Many of these materials can be found at recycling centers or thrift stores. | ||
| Line 143: | Line 146: | ||
'''Nylon Spacers''' Two spacers will be needed to offset the magnet from the wood. We used 1/4" long spacers, but this is really dependant on how much room is needed for the hard drive coil. | '''Nylon Spacers''' Two spacers will be needed to offset the magnet from the wood. We used 1/4" long spacers, but this is really dependant on how much room is needed for the hard drive coil. | ||
===Cost=== | === Cost === | ||
The cost of these materials can be cut to a minimum if recycled materials are used. This project can be built for as little as $10. | The cost of these materials can be cut to a minimum if recycled materials are used. This project can be built for as little as $10. | ||
<center> | |||
{| class="wikitable sortable" | {| class="wikitable sortable" | ||
! Item | |||
! Retail | |||
! Our cost | |||
|- | |- | ||
| Wood | |||
| 4.99 | |||
| DONATED | |||
|Wood | |||
|4.99 | |||
|DONATED | |||
|- | |- | ||
| | | Used/Broken hard Drive | ||
|N/A - variable | | N/A - variable | ||
|DONATED | | DONATED | ||
|- | |- | ||
| | | Ribbon | ||
| | | N/A - variable | ||
|DONATED | | DONATED | ||
|- | |- | ||
| | | High-tec Solder | ||
|2.99 | | 2.99 | ||
| | | DONATED | ||
|- | |- | ||
| | | Ring Hangers | ||
|. | | 2.99 | ||
| | | 2.99 | ||
|- | |- | ||
| | | Right Angled 1/2" PVC | ||
| | | .79 | ||
| | | DONATED | ||
|- | |- | ||
| | | Gorilla Glue | ||
|.39 | | 7.39 | ||
| | | ON HAND | ||
|- | |- | ||
| | | Tension Pin | ||
| | | .39 | ||
| | | .39 | ||
|- | |- | ||
| | | 30g Insulated Wire | ||
|2. | | 2.79 | ||
| | | ON HAND | ||
|- | |- | ||
| | | LED | ||
|2. | | 2.49 | ||
|2. | | 2.49 | ||
|- | |- | ||
| Various nuts, bolts, and washers | |||
| 2.20 | |||
| 2.20 | |||
|- | |- | ||
|- | |- | ||
| Nylon Spacers (2) | |||
| .34 | |||
| .34 | |||
|- | |- | ||
|- | |- | ||
! TOTAL | |||
| 27.36 | |||
| 8.75 | |||
|- | |- | ||
|} | |} | ||
===Steps=== | </center> | ||
=== Steps === | |||
<gallery> | <gallery> | ||
File:Materials Windbelt ENGR 305.JPG|Gather materials | File:Materials Windbelt ENGR 305.JPG|Gather materials | ||
| Line 214: | Line 222: | ||
File:Cut ribbon.JPG|Cut the ribbon to a length slightly longer than the piece of wood | File:Cut ribbon.JPG|Cut the ribbon to a length slightly longer than the piece of wood | ||
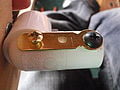
File:Fastening of HDD magnets.JPG|Fasten the HDD magnets as shown. | File:Fastening of HDD magnets.JPG|Fasten the HDD magnets as shown. | ||
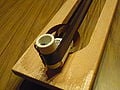
File:Soldering of HDD coil to wire.JPG|Remove excess circuitry from HDD coil and solder a wire to each solder point. | File:Soldering of HDD coil to wire.JPG|Remove excess circuitry from HDD coil and solder a wire to each solder point. | ||
File:Drill HDD coil pivot hole.JPG| Line up HDD coil with the magnets and drill a hole in the wood for the pivot | File:Drill HDD coil pivot hole.JPG| Line up HDD coil with the magnets and drill a hole in the wood for the pivot | ||
File:Test wires for complete circuit.JPG |Test resistance to make sure soldering was successful. An OL (overload) means that the circuit is incomplete! | File:Test wires for complete circuit.JPG |Test resistance to make sure soldering was successful. An OL (overload) means that the circuit is incomplete! | ||
| Line 221: | Line 229: | ||
File:Attach tensioning device.JPG|Drill a hole in the PVC and wood. Slip a bolt through and tighten with a nut and washers on either side. | File:Attach tensioning device.JPG|Drill a hole in the PVC and wood. Slip a bolt through and tighten with a nut and washers on either side. | ||
File:Attach ribbon to tension pin.JPG |Slip ribbon in tension pin's groove. Glue with gorilla glue and set with tape if necessary. | File:Attach ribbon to tension pin.JPG |Slip ribbon in tension pin's groove. Glue with gorilla glue and set with tape if necessary. | ||
File:Attach HDD coil to pivot.JPG|Slip bolt through pivot hole and one of the holes in the HDD coil. Tighten with nut if necessary | File:Attach HDD coil to pivot.JPG|Slip bolt through pivot hole and one of the holes in the HDD coil. Tighten with nut if necessary | ||
File:Drill starter holes for screws.JPG |Drill small starter holes for clamp screw holes | File:Drill starter holes for screws.JPG |Drill small starter holes for clamp screw holes | ||
File:Attach ring hanger clamp.JPG |Screw the ring hanger into PVC. Do not tighten yet. | File:Attach ring hanger clamp.JPG |Screw the ring hanger into PVC. Do not tighten yet. | ||
| Line 229: | Line 237: | ||
To test the windbelt, blow a large fan across the belt or hold it out the window of your car if there is no wind available. | To test the windbelt, blow a large fan across the belt or hold it out the window of your car if there is no wind available. | ||
{{ | {{Video|s0V5m1SmulQ}} | ||
== Next Steps == | |||
=== Conclusion === | |||
This project is an easy DIY windbelt that helps to convey the concept of aeroelastic flutter, but is not practical for power production. Windbelt technology is still in its infancy and needs a broader base of researchers building and testing a number of different variables that affect windbelt power output. Currently, prototypes are being built and tested by many different groups of students but as of yet there is no open-source data for precise design. A windbelt or testing device that allows the builder to easily alter variables would lead to better planning and allow for more careful and precise building. The following variables might be considered in the construction of such a device: | This project is an easy DIY windbelt that helps to convey the concept of aeroelastic flutter, but is not practical for power production. Windbelt technology is still in its infancy and needs a broader base of researchers building and testing a number of different variables that affect windbelt power output. Currently, prototypes are being built and tested by many different groups of students but as of yet there is no open-source data for precise design. A windbelt or testing device that allows the builder to easily alter variables would lead to better planning and allow for more careful and precise building. The following variables might be considered in the construction of such a device: | ||
| Line 247: | Line 257: | ||
'''Wind Speed''' A wind tunnel with variable wind speed would be optimal for testing these variables under different wind speeds. | '''Wind Speed''' A wind tunnel with variable wind speed would be optimal for testing these variables under different wind speeds. | ||
===Lessons Learned=== | === Lessons Learned === | ||
A few things were taken away from this project as a result of building, failing, and rebuilding a number of times: | A few things were taken away from this project as a result of building, failing, and rebuilding a number of times: | ||
*Magnetic tape is too plastic and deforms over time. It is not suitable for windbelt construction. | |||
*Using a HDD for producing usable electricity is unlikely, but it is a good tool for teaching builders the concept behind windbelts. | * Magnetic tape is too plastic and deforms over time. It is not suitable for windbelt construction. | ||
*Camera film is a similar material to mylar-coated taffeta (Shawn Frayne's material used). It appears to be a suitable material for windbelt construction. It has low creep, is relatively strong, is not elastic, and does not deform plastically. However, it is becoming increasingly hard to find and expensive. | * Using a HDD for producing usable electricity is unlikely, but it is a good tool for teaching builders the concept behind windbelts. | ||
*Conclusions from windbelt prototypes are hard to pinpoint. There are many variables that may or may not be controlled in such a design. Adequate control of such variables with a more precise system would lead to conclusions with less doubt. | * Camera film is a similar material to mylar-coated taffeta (Shawn Frayne's material used). It appears to be a suitable material for windbelt construction. It has low creep, is relatively strong, is not elastic, and does not deform plastically. However, it is becoming increasingly hard to find and expensive. | ||
*Using two separate, parallel ribbons causes the windbelt to behave erratically as it disrupts the airflow over the ribbons. | * Conclusions from windbelt prototypes are hard to pinpoint. There are many variables that may or may not be controlled in such a design. Adequate control of such variables with a more precise system would lead to conclusions with less doubt. | ||
* Using two separate, parallel ribbons causes the windbelt to behave erratically as it disrupts the airflow over the ribbons. | |||
==References== | |||
== Team == | |||
* [[User:GregPfotenhauer|Greg Pfotenhauer]] | |||
* [[User:humble12|Augustin Gonzalez]] | |||
== References == | |||
<references /> | <references /> | ||
{{Page data}} | |||
[[Category:Engr305 Appropriate Technology]] | [[Category:Engr305 Appropriate Technology]] | ||
[[Category:Windbelts]] | |||
[[ | [[Category:Appropriate technology videos]] | ||
[[ | [[Category:Engineering videos]] | ||
Latest revision as of 19:43, 8 June 2023
The following page is the result of an ENGR 305 project in the Spring of 2011 completed by Greg Pfotenhauer and Agustin Gonzalez. This page covers a brief overview of windbelt technology, design objectives and criteria, cost, a DIY guide, further steps to be taken on the project, and conclusion on the results of the semester's work.
Background[edit | edit source]
The windbelt, first designed by Shawn Frayne,[1] is a device that converts wind into usable electricity by the principle of aeroelastic flutter. Unlike conventional wind turbines, windbelts are effective at producing electricity at low wind speeds. Regions that typically have lower average wind speeds are perfect for windbelt installations. However, windbelt design is relatively new and experimental. New materials and new designs must be tested to advance this potential source of clean energy.
Opportunity Definition[edit | edit source]
Though conventional windmills produce relatively little power at low wind speeds, windbelts can take advantage of the areas low average wind speeds. So far, three separate groups of Cal Poly Humboldt students have built windbelts, each time improving the windbelts design. This project serves to test new materials and windbelt designs.
Literature Review[edit | edit source]
The following is a review of the literature of the available information relating to windbelts.
Windbelt Basics[edit | edit source]
The windbelt, invented by Shawn Frayne in 2004, is a device that converts wind power into electricity. The device is fairly simple, consisting of a taut string or ribbon strung between two points. Wind blowing across the taut material produces the aeroelastic flutter effect, causing the ribbon to vibrate. This motion is translated into electricity by permanent magnets on the ribbon. The magnets move in and out of electromagnetic coils in accordance with the motion of the ribbon. This induces a current in the coil's wire.[2]

Unlike conventional wind turbines, which require expensive bearings and gears to be efficient, windbelts are relatively easy to construct at a low cost. This makes the windbelt much more feasible than conventional wind turbines for areas with low average wind speeds.[3]
Components[edit | edit source]
The following makeup the basic components of a windbelt:
Frame
Windbelts are exposed to the elements and are subject to UV radiation, temperature change, moisture, and variable wind speeds. Therefore, the frame must be durable. This means the frame should be as strong as possible.
Consideration should also be taken as to how the windbelt will stand or be mounted. High winds can create a lot of torque upon the windbelt's mount and can damage the windbelt or the structure it is attached to if the mount breaks.[4]
Ribbon
The ribbon must be lightweight and thin so it acts like an airfoil when wind blows across it. It must be fairly rigid, as too much elasticity will disrupt the vibration of the ribbon. The ribbon will be taut and subjected to potentially high wind speeds, so the material must have a high tensile strength. Finally, it must maintain its shape over time to be effective (objects that do not deform quickly over time are said to have low "creep.") This being said, there are relatively few materials (so far) that pose as promising materials for windbelt construction. The material used in Shawn Frayne's design is a mylar-coated taffeta.[5] Similar materials, such as kevlar, tape, or camera film can be used alternatively. Further testing of ribbon materials is necessary to improve the efficiency of windbelts.
Magnets
Permanent magnets are used to induce current in the coils when vibrating in and out of the coil. The magnets must be fairly lightweight so as not to disrupt the aeroelastic flutter of the ribbon. Neodymium magnets are the most commonly used.[6]
Coils
The coils must be made of a conductive metal. Copper is by far the least expensive of metals that conduct well. Coils can be wound by hand, lessening the cost. Some industrial supply stores will wind the coils for you but at high cost.[7]
Connectivity
Electricity produced by windbelts is of inconsistent voltage. Voltage is relative to wind speed, and so voltage must be regulated for use. Small windbelt systems are capable of supplying power to standard USB ports, while larger systems can supply power for 12V DC circuits. Even larger arrays have the potential for grid-tied AC systems, but these are still in the experimental phase.[8]
Windbelt Design Objective[edit | edit source]
The specific design of this windbelt is based upon a slightly different set of objectives than its predecessors. For this project, the ultimate goal was to create a prototype that could be easily replicated by almost anyone at a very low cost. Construction would require little building skill and would consist of mostly recycled parts. Power and efficiency are not the aim of this windbelt; rather, it will serve as a way for people to learn about windbelt design by getting hands-on experience by building one themselves.[9]
The hope is that this model will help build a bigger base of people who are working to perfect the windbelt design. Though larger windbelt prototypes can be daunting and expensive for the average individual, the design of this specific windbelt allows interested hobbyists to get their foot in the door and expand upon their original design later.
Additionally, some new ribbon materials will be tested as there are yet few feasible options.
Criteria[edit | edit source]
The final design for the windbelt was determined by ranking each design by the following criteria. The criteria are ranked from 1-10, with 10 being a criterion of the most importance.
| Criteria | Constraints | Weight |
|---|---|---|
| Safety | The windbelt must not inflict physical or electrical injury | 10 |
| Cost | The windbelt must be as inexpensive as possible | 9 |
| Environmental Impact | The Windbelt must use recycled parts wherever possible | 9 |
| Durability | Windbelt must be able to withstand the elements | 5 |
| Power Capacity | The project must produce some noticeable power | 4 |
| Aesthetics | Windbelt must be pleasing to look at | 2 |
The Building Process[edit | edit source]
The following is a step-by-step guide to building an easy, affordable windbelt.
Tools[edit | edit source]
The following tools are needed to complete this project:
- Hand saw
- Multimeter
- Precision Torx screwdriver set (for taking apart hard drive)
- Scissors
- Wire stripper (scissors can be used alternatively)
- Soldering gun
- Drill
- Hacksaw or jigsaw
- Phillips head and flat head screwdrivers
- C-Clamp
- Pliers
- Sandpaper or belt sander
Materials[edit | edit source]
Many of these materials can be found at recycling centers or thrift stores.
Wood A piece of wood at least 6" wide and 2-3 feet long will be used for the frame. Just about any piece of wood fitting this description will do, but a thinner piece of wood will be easier to work with. For this project, we used 1/2" thick door paneling and cut it to 2.5 feet.
Used Hard Drive Many computer repair stores, e-waste collection sites, and even thrift stores will have old or broken hard drives available. Many times people are more than willing to give them away for free as e-waste can be troublesome to get rid of.
Ribbon A number of materials can be used/tested on this device. After a few tries we settled on camera film, which is strong, does not deform plastically, and produces the aeroelastic flutter effect.
High-tec Solder A small amount of high-tech solder will be used for attaching wires to the hard drive coil. Solder can be found at hardware stores or RadioShack.
Ring Hangers and Screws These hangers are used for wall-hangings and can be bought for a couple dollars at a hardware store. This will be used for the tensioning clamp.
Right-angled PVC A piece of right-angled PVC will be used to quickly adjust the tension in the ribbon. Half-inch diameter works best.
Gorilla Glue This wonderful stuff will be used to secure the ribbon to the hard drive coil. Gorilla tape may also be used to reinforce the connection.
Tension Pin A small (<1/8") tension pin will fasten the ribbon to the hard drive coil.
LED A low-voltage LED can be attached to demonstrate the power output of the windbelt. We chose a 1.8V, 20ma red LED.
Light Gage Insulated Wire 24-30g wire works best and will connect the solder points on the hard drive coil to the LED.
Various Nuts and Bolts The sizes of these will depend largely on the hard drive coil and will be fitted to the specifications of the system. One 1/8" bolt, nut, and two washers work well to secure the PVC piping. Three additional bolts, nuts, and washers will be used to secure the magnets and coil.
Nylon Spacers Two spacers will be needed to offset the magnet from the wood. We used 1/4" long spacers, but this is really dependant on how much room is needed for the hard drive coil.
Cost[edit | edit source]
The cost of these materials can be cut to a minimum if recycled materials are used. This project can be built for as little as $10.
| Item | Retail | Our cost |
|---|---|---|
| Wood | 4.99 | DONATED |
| Used/Broken hard Drive | N/A - variable | DONATED |
| Ribbon | N/A - variable | DONATED |
| High-tec Solder | 2.99 | DONATED |
| Ring Hangers | 2.99 | 2.99 |
| Right Angled 1/2" PVC | .79 | DONATED |
| Gorilla Glue | 7.39 | ON HAND |
| Tension Pin | .39 | .39 |
| 30g Insulated Wire | 2.79 | ON HAND |
| LED | 2.49 | 2.49 |
| Various nuts, bolts, and washers | 2.20 | 2.20 |
| Nylon Spacers (2) | .34 | .34 |
| TOTAL | 27.36 | 8.75 |
Steps[edit | edit source]
-
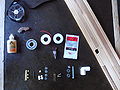
Gather materials
-
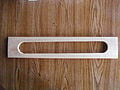
Drill a starter hole, and cut out center of wood piece leaving at least 4" on either side
-
Cut the ribbon to a length slightly longer than the piece of wood
-
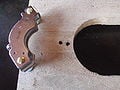
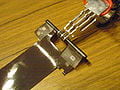
Fasten the HDD magnets as shown.
-
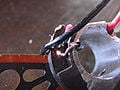
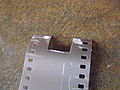
Remove excess circuitry from HDD coil and solder a wire to each solder point.
-
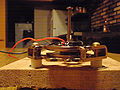
Line up HDD coil with the magnets and drill a hole in the wood for the pivot
-

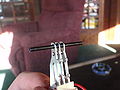
Test resistance to make sure soldering was successful. An OL (overload) means that the circuit is incomplete!
-
Center the tension pin on the outermost holes. Glue with gorilla glue and let dry for 1-2 hours.
-
Cut a notch in the ribbon where the HDD coil will go. BE CAREFUL NOT TO TEAR RIBBON.
-
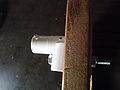
Drill a hole in the PVC and wood. Slip a bolt through and tighten with a nut and washers on either side.
-
Slip ribbon in tension pin's groove. Glue with gorilla glue and set with tape if necessary.
-
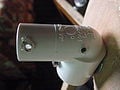
Slip bolt through pivot hole and one of the holes in the HDD coil. Tighten with nut if necessary
-
Drill small starter holes for clamp screw holes
-
Screw the ring hanger into PVC. Do not tighten yet.
-
Slide ribbon through ring hanger clamp and tighten. Adjust tension by rotating PVC
-
Solder other ends of wires to LED. Attach wires to wood but leave slack for movement


To test the windbelt, blow a large fan across the belt or hold it out the window of your car if there is no wind available.

Next Steps[edit | edit source]
Conclusion[edit | edit source]
This project is an easy DIY windbelt that helps to convey the concept of aeroelastic flutter, but is not practical for power production. Windbelt technology is still in its infancy and needs a broader base of researchers building and testing a number of different variables that affect windbelt power output. Currently, prototypes are being built and tested by many different groups of students but as of yet there is no open-source data for precise design. A windbelt or testing device that allows the builder to easily alter variables would lead to better planning and allow for more careful and precise building. The following variables might be considered in the construction of such a device:
Tension Minute alteration of tension can have large effects on the motion of the ribbon. A tensioning device that can incrimentally increase/decrease tension would allow a user to observe the effects of ribbon tension.
Ribbon Length The length of the ribbon affects periodic motion of the ribbon. Easily changing ribbon length would allow users to find a "sweet spot" for vibration.
Ribbon Material Easy replacement of the ribbon can allow users to test various materials and their effects on power output.
Coil/Magnetic Field Interactions Easy alteration of the placement of magnets relative to the field would allow users to test the effects of magnet movement within the field.
Magnet Placement Various placements of the magnets on the ribbon will alter the motion and the field interactions, changing power output.
Wind Speed A wind tunnel with variable wind speed would be optimal for testing these variables under different wind speeds.
Lessons Learned[edit | edit source]
A few things were taken away from this project as a result of building, failing, and rebuilding a number of times:
- Magnetic tape is too plastic and deforms over time. It is not suitable for windbelt construction.
- Using a HDD for producing usable electricity is unlikely, but it is a good tool for teaching builders the concept behind windbelts.
- Camera film is a similar material to mylar-coated taffeta (Shawn Frayne's material used). It appears to be a suitable material for windbelt construction. It has low creep, is relatively strong, is not elastic, and does not deform plastically. However, it is becoming increasingly hard to find and expensive.
- Conclusions from windbelt prototypes are hard to pinpoint. There are many variables that may or may not be controlled in such a design. Adequate control of such variables with a more precise system would lead to conclusions with less doubt.
- Using two separate, parallel ribbons causes the windbelt to behave erratically as it disrupts the airflow over the ribbons.
Team[edit | edit source]
References[edit | edit source]
- ↑ http://web.archive.org/web/20180727133403/http://www.humdingerwind.com:80/
- ↑ http://www.rexresearch.com/frayne/frayne.htm
- ↑ http://www.brighthub.com/environment/renewable-energy/articles/50528.aspx
- ↑ https://www.appropedia.org/Samoa_Hostel_Windbelt
- ↑ http://www.physics.org:80/featuredetail.asp?id=47
- ↑ http://international.nsbe.org/documents/Final%20CDO%20Report%20-%20University%20of%20Toronto%20and%20University%20of%20Cape%20Coast.pdf
- ↑ https://www.appropedia.org/HSU_Chiapas_Windbelt_ASE#Rolling_Coil
- ↑ http://www.kentlaw.edu/faculty/fbosselman/classes/.../Sarah%20Fanto.ppt
- ↑ http://www.instructables.com/id/Windbelt-from-hard-drive-voice-coil-and-magnets/