Dust Mask Filter
Project developed by User:Hschabes
Template:Statusboxtop Template:Status-design Template:Status-prototype Template:Status-deployed Template:Status-model Template:Status-verified Template:Boxbottom
Abstract
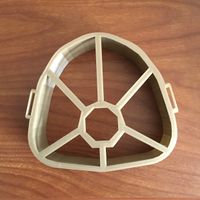
Appropriate technology is designed to be "appropriate" to the context in which it is used. Most appropriate technologies are sustainable, small, and cost efficient. They help put power into the hands of the people at a more grassroots level. I designed a simple dust mask that can help protect people during construction and cleaning activities where they can inhale potentially harmful debris. This is appropriate because it allows people to create their own dust masks to fit the correct size (by scaling up or down), and it uses more readily available materials. Dust masks are a safety tool for communities that leave near tech dump sites, are working to restore their environment, or even for many agricultural practices.
Bill of Materials
- FreeCAD file: File:Dust Mask Complete 1.FCStd
- STL File: couldn't figure our the problem :(
- PLA Filament roll --> $20.89 for approx. 330m ($0.06/m)
- Elastic --> $6.99 for 10ft ($0.69/ft) [2]
- Sock --> $9.99 for a 10pk ($0.50 per sock) [5]
- Scissors --> $4.89
Tools needed for fabrication of the OSAT
- Jellybox or similar RepRap 3-D printer
- CAD program like FreeCAD (if building from scratch)
- Slicer program like Cura (if building from scratch)
- PLA Filament of your choice
- Elastic (Or if unavailable: string, rubber bands, shoelaces, or anything that can easily be tied and adjusted to fit the mask around the face.)
- Sock (Or if unavailable: another piece of unused fabric that can fit abound the mask. Can be secured with the elastic or similar material.)
- A cutting tool (scissors, knife, etc.)
Skills and Knowledge Necessary to Make the OSAT
- If you making the OSAT from scratch, then you need to have knowledge of FreeCAD or another CAD software.
- Knowledge of Cura or a related slicer program
- Knowledge of 3D printer upkeep
Technical Specifications and Assembly Instructions
- Download the file to your device and Slice it with Cura or s similar program (recommended: 1.2 wall thickness and 20% infill)
- Save the file to the SD card and plug the SD card into the Printer
- Choose that file to print and wait approximately 3.5 hours
- After you remove the completed print from the print bed, take the sock and use the elastic side to grab the ridges of the mask
- Then thread the elastic (or other material) through the holes on each side of the mask
- Tighten to face
- Print time estimate: 3h 30m
- Assembly time estimate: 5m
ASSEMBLY
Common Problems and Solutions
- Make sure you use strong enough material to tie the mask to your face
- If the mask does not fit comfortably, try placing more fabric between the mask and your face
- Make sure there are no gaping holes between you and the mask
Cost savings
- Estimated cost: ($0.06*18.25)= $1.09 for filament. Ideally, the elastic and the fabric would be recycled from clothes around the area and would not add to the cost of the mask.
- $1.09+0.69(elastic)+$0.50 (sock)= $2.28
- Commercial equivalent: $6.88 [6]
- $ savings: $4.60
- % savings: 66.8%
References
.


