Alex Kampf (talk | contribs) |
Sophivorus (talk | contribs) m (Text replacement - "contact-appropedia-user" to "authors") |
||
| (21 intermediate revisions by 6 users not shown) | |||
| Line 1: | Line 1: | ||
{{Infobox device | |||
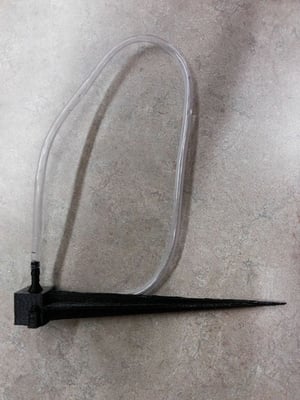
|image=Drip_Irrigation_Stake_assembly.jpg | |||
|description=The OSAT is Drip irrigation assembly combining the stake and drip emitter with tubing. The drip irrigation system has been around for years, but this is the first of its kind to be 3D printed. | |||
|intended-use=agriculture, development, industry | |||
|keywords=3D printing, water, drip irrigation | |||
|development-stage=prototype | |||
|made=Yes | |||
|made-independently=No | |||
|countries-of-design=United States | |||
|project-affiliation=Category:MTU, Category:MOST | |||
|main-materials=Plastic | |||
|sustainable-development-goal=Sustainable Development Goal 12, Sustainable Development Goal 9 | |||
|contact-affiliation=MOST | |||
|authors=User:Alex Kampf | |||
|documentation-language=English | |||
|manifest-language=English | |||
|manifest-date-updated=2020-06-04 | |||
|manifest-author-name=Kathy Nativi | |||
|manifest-author-affiliation=Appropedia | |||
|manifest-author-email=info@appropedia.org | |||
|title=Drip irrigation stake | |||
}} | |||
{{777}} | {{777}} | ||
==Drip Irrigation Stake == | ==Drip Irrigation Stake == | ||
Project developed by [Alex Kampf] | |||
{{ | {{Status|design}} | ||
{{Status|prototype}} | |||
{{ | |||
==Abstract== | ==Abstract== | ||
| Line 28: | Line 49: | ||
# Print the stake part of the Drip irrigation stake assembly on its side. Print the top piece with the nozzle pointing up, make sure to print waste material that is as tall as the nozzle in height. | # Print the stake part of the Drip irrigation stake assembly on its side. Print the top piece with the nozzle pointing up, make sure to print waste material that is as tall as the nozzle in height. | ||
# Estimated print time of 1 hour and 40 minutes | # Estimated print time of 1 hour and 40 minutes | ||
=== Common Problems and Solutions=== | === Common Problems and Solutions=== | ||
* Make sure to print the top piece with the tube connector pointing up with waste material that is as tall in order to avoid a failed build of the nozzle segment, also print slower with longer duration on each layer. Lay the stake piece on its side when printing the parts. Otherwise the tube will be clogged and the stake will be structurally unsound, also make sure to put enough glue in between the top piece and the stake piece. | * Make sure to print the top piece with the tube connector pointing up with waste material that is as tall in order to avoid a failed build of the nozzle segment, also print slower with longer duration on each layer. Lay the stake piece on its side when printing the parts. Otherwise the tube will be clogged and the stake will be structurally unsound, also make sure to put enough glue in between the top piece and the stake piece. | ||
[[category:OSAT 3D-Printable Designs]] | |||
Revision as of 13:24, 17 October 2020
Drip Irrigation Stake
Project developed by [Alex Kampf] Template:Status Template:Status
Abstract
- The OSAT is Drip irrigation assembly combining the stake and drip emitter with tubing. The Drip Irrigation Stake fulfills the purpose of providing an efficient way to water plants while using the minimum amount of water. The drip irrigation system has been around for years, but this is the first of its kind to be 3D printed.

Bill of Materials
Tools needed for fabrication of the OSAT
- MOST Delta RepRap or similar RepRap 3-D printer
Skills and Knowledge Necessary to Make the OSAT
- If you used special skill – link to relevant wikipedia or wikiversity articles/courses
Technical Specifications and Assembly Instructions
- Print the stake part of the Drip irrigation stake assembly on its side. Print the top piece with the nozzle pointing up, make sure to print waste material that is as tall as the nozzle in height.
- Estimated print time of 1 hour and 40 minutes
Common Problems and Solutions
- Make sure to print the top piece with the tube connector pointing up with waste material that is as tall in order to avoid a failed build of the nozzle segment, also print slower with longer duration on each layer. Lay the stake piece on its side when printing the parts. Otherwise the tube will be clogged and the stake will be structurally unsound, also make sure to put enough glue in between the top piece and the stake piece.