(→Lamps) |
|||
| (14 intermediate revisions by 6 users not shown) | |||
| Line 1: | Line 1: | ||
[[Image:spectroscopy switchon.jpg|thumb]] | |||
{{MOST}} | {{MOST}} | ||
'''what is it - -make model link to spec sheet - photo''' | '''what is it - -make model link to spec sheet - photo''' | ||
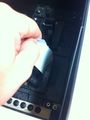
== Gloves and safety glasses == | |||
Dr. Frost requires everyone who is working in her lab wear gloves and safety glasses. | Dr. Frost requires everyone who is working in her lab wear gloves and safety glasses. | ||
<gallery> | <gallery> | ||
File:glovesandgoggles.jpg| | |||
</gallery> | </gallery> | ||
== Lamps == | == Lamps == | ||
In order to switch the lamps on, you must flip the green switch to on. | In order to switch the lamps on, you must flip the green switch to on. | ||
*Click start button | |||
*Wait at least ten minutes for the machine to set up before starting program | * Click start button | ||
*There should be a loud cranking noise, which means that the machine is working correctly. | * Wait at least ten minutes for the machine to set up before starting program | ||
* There should be a loud cranking noise, which means that the machine is working correctly. | |||
<gallery> | <gallery> | ||
File:spectroscopy_switchon.jpg|UV spectroscopy unit switched to on | |||
</gallery> | </gallery> | ||
<references /> | |||
program details: | |||
*The icon you want is called Scan-Lambda 35 | program details: | ||
* The icon you want is called Scan-Lambda 35 | |||
<gallery> | <gallery> | ||
File:lambda_icon.jpg|program icon | |||
File:initializing.jpg|when the program is first started, it will initialize | |||
</gallery> | </gallery> | ||
===Cuvettes=== | |||
=== Cuvettes === | |||
<gallery> | <gallery> | ||
File:spectroscopy_chamber.jpg|Reference is to the right, samples to the left | |||
</gallery> | </gallery> | ||
The reference cuvette is the one that is farthest away from the front of the machine. | The reference cuvette is the one that is farthest away from the front of the machine. | ||
*Located near the back of the UV chamber. | |||
* Located near the back of the UV chamber. | |||
A beam of light will be split into two beams | A beam of light will be split into two beams | ||
*These beams will shine through your sample and a reference then compare the two wavelengths | |||
* These beams will shine through your sample and a reference then compare the two wavelengths | |||
The sample cuvette should be placed in the sample cuvette holder | The sample cuvette should be placed in the sample cuvette holder | ||
*The sample should be taped as flat as possible against the cuvette's outer layer | |||
**do not tape sample to the inside of the cuvette | * The sample should be taped as flat as possible against the cuvette's outer layer | ||
** do not tape sample to the inside of the cuvette | |||
<gallery> | <gallery> | ||
File:loaded_cuvette.jpg|Samples attached with tape to cuvette | |||
</gallery> | </gallery> | ||
| Line 47: | Line 62: | ||
<gallery> | <gallery> | ||
File:autozero.jpg|autozero the machine | |||
File:autozero_message.jpg|click "OK" to autozero | |||
File:start.jpg|click start button to start running samples | |||
File:start_message.jpg|click "OK" | |||
</gallery> | </gallery> | ||
== Export == | == Export == | ||
To export click file->export, then pick a destination file to export. | |||
To export click file->export, then pick a destination file to export. | |||
The most important detail about exporting your data is to switch the Data from "spectrum export file" to "XY Data (raw)" | The most important detail about exporting your data is to switch the Data from "spectrum export file" to "XY Data (raw)" | ||
<gallery> | <gallery> | ||
File:export.jpg|file->export | |||
File:browse_for_folder.jpg|browse for destination folder | |||
File:select_folder.jpg|select which folder you want | |||
File:raw_data.jpg|switch checked boxes | |||
</gallery> | </gallery> | ||
==Finding | == Finding the spectroscopy beam == | ||
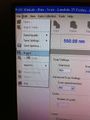
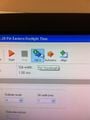
In order to find out exactly where the UV spectrometer is shining its light, you have to set it to the green wavelength (anywhere from 577-492 nm). First click the change lambda button, then enter your desired wavelength into the input box, and finally use a slip of paper with the UV spectrometer open to find the few-nanometer-wide slit. | |||
<gallery> | <gallery> | ||
File:set_lambda.jpg|click the set lamda button | |||
File:findgreen.jpg|insert slip of paper with the overhead lights turned off. | |||
</gallery> | </gallery> | ||
{{Page data}} | |||
[[Category:MOST methods]] | |||
[[ | |||
Latest revision as of 16:51, 23 June 2023


what is it - -make model link to spec sheet - photo
Gloves and safety glasses[edit | edit source]
Dr. Frost requires everyone who is working in her lab wear gloves and safety glasses.

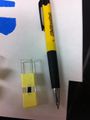
Lamps[edit | edit source]
In order to switch the lamps on, you must flip the green switch to on.
- Click start button
- Wait at least ten minutes for the machine to set up before starting program
- There should be a loud cranking noise, which means that the machine is working correctly.
-
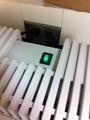
UV spectroscopy unit switched to on
program details:
- The icon you want is called Scan-Lambda 35
-
program icon
-
when the program is first started, it will initialize

Cuvettes[edit | edit source]
-
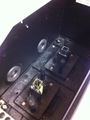
Reference is to the right, samples to the left

The reference cuvette is the one that is farthest away from the front of the machine.
- Located near the back of the UV chamber.
A beam of light will be split into two beams
- These beams will shine through your sample and a reference then compare the two wavelengths
The sample cuvette should be placed in the sample cuvette holder
- The sample should be taped as flat as possible against the cuvette's outer layer
- do not tape sample to the inside of the cuvette
-
Samples attached with tape to cuvette

Once you have the cuvettes and your samples prepared, autozero and start the machine.
-
autozero the machine
-

click "OK" to autozero
-
click start button to start running samples
-
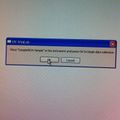
click "OK"


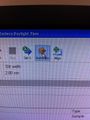
Export[edit | edit source]
To export click file->export, then pick a destination file to export.
The most important detail about exporting your data is to switch the Data from "spectrum export file" to "XY Data (raw)"
-
file->export
-
browse for destination folder
-

select which folder you want
-
switch checked boxes


Finding the spectroscopy beam[edit | edit source]
In order to find out exactly where the UV spectrometer is shining its light, you have to set it to the green wavelength (anywhere from 577-492 nm). First click the change lambda button, then enter your desired wavelength into the input box, and finally use a slip of paper with the UV spectrometer open to find the few-nanometer-wide slit.
-
click the set lamda button
-
insert slip of paper with the overhead lights turned off.

