No edit summary |
|||
| Line 22: | Line 22: | ||
== Skills and Knowledge Necessary to Make the OSAT == | == Skills and Knowledge Necessary to Make the OSAT == | ||
* | * No special skills required! | ||
== Technical Specifications and Assembly Instructions== | == Technical Specifications and Assembly Instructions== | ||
Revision as of 21:15, 5 December 2019
Daily Menstrual Cycle Tracker
Project developed by [jjwyrzyk]
Template:Statusboxtop Template:Status-design Template:Status-prototype You can help Appropedia by contributing to the next step in this OSAT's status. Template:Boxbottom
Abstract
- This project is a desktop menstrual cycle tracker, that one simply uses by moving the pointer as each day passes. In many countries and cultures, contraceptives are expensive and frowned upon, even with married couples. Couples in poverty struggle with having too many children, nevertheless. A method for preventing pregnancy without use of conventional contraceptives is by having sex at the correct time in a menstrual cycle to minimize the chance of a birth. This device cheaply allows women to track their cycle easily, and can also be used when a couple is having trouble having kids. Women having a good awareness of their cycles is also crucial to maintaining their health.
- Picture of completed print using your printer
Bill of Materials
- BOM: Bottom(1), Base (1), Pointer(1), Small Attracting Magnets(optional) (2)
- See source information on Thingiverse: [1]
Tools needed for fabrication of the OSAT
- MOST Delta RepRap or similar RepRap 3-D printer
- Super Glue
- 3 Different Color Paints (Preferably Green, Red and Brown)
Skills and Knowledge Necessary to Make the OSAT
- No special skills required!
Technical Specifications and Assembly Instructions
- Print time: ~3 Hours
- Assembly time ~15 mins
- Center the Bottom underneath the Base, and super glue into place.

- Flip assembly over, then glue or use existing adhesive to attach magnet half into the center of Bottom, such that it is in the center hole.

- Glue or use existing adhesive to attach magnet half into the bottom of the Pointer.

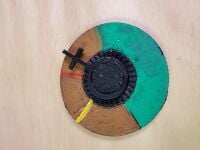
- Paint the top of Base as shown in the picture. On this model:

- Green means that the chance of getting pregnant is high.
- Brown means that there is a low chance of getting pregnant.
- The yellow line is the marker for 26 days, and can be used as a reference for is the user's period has occurred early.
- The red line signifies the start of the user's period.
- Place the pointer in the hole as shown, and advance a notch clockwise as each day goes by!
Common Problems and Solutions
- Make sure you advance the tracker clockwise!
- Sand the parts as necessary to make the movement smoother.
Cost savings
- Total filament usage: 35g = ~$0.70
- Magnets: $1.00 at Hardware Store
Commercial equivalent: $29 [2] $28.30 savings and 97.5% savings
Benefited Internet Communities
- Name and add links to at least 5 using single brackets around [url name]
References
[1]
- ↑ web page: Go on Shops: Cycle Beads,Available: https://goonshops.com/products/cyclebeads-helps-a-woman-track-her-cycle-with-a-color-coded-string-of-beads-and-clearly-identify-the-days-when-pregnancy-is-most-likely?variant=15888111173695&gclid=CjwKCAiA8qLvBRAbEiwAE_ZzPTpJrG5kRnJHOvaFRxdux1qvk4vZ3v0zxVtYnvhbNQXAuwKkikEVghoCe48QAvD_BwE
.