Abstract
Background
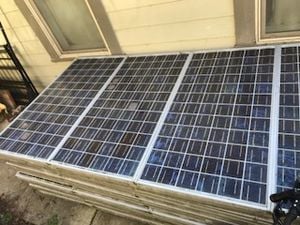
The Campus Center for Appropriate Technology(CCAT) located at Humboldt State University in California received a donation of solar panels and requested that an engineering 305 team build a solar charging station that can be used for times when access to electricity becomes restricted and to educate the general public on how to build their own solar charging station. This was in response to the blackouts that swept through California in late 2019, leaving many people with limited access to a steady supply of electricity. In the future it is highly likely that these blackouts will continue to occur and grow progressively worse, therefore it would be beneficial for people to have some means by which to charge their basic necessities, such as their phones and computers. A simple, portable photovoltaic system would be an ideal solution to power outages.

Problem statement
People need access to a steady supply of electricity during times such as the blackouts, so the objective of our project is to create a simple solar charging station that will be able to provide a reliable source of electricity during power outages and can also be used to educate the general public on how to build their own solar charging station. Aptly named a solar bug out box, this charging station will be a simple, portable and easily replicable system. This bug out box will harness photovoltaic energy so that the users can charge various devices and possibly run appliances in times when our conventional electrical grid fails.
Literature Review
This is a review of the available literature pertinent to the a specific project.
Solar Power Basics
A simple photovoltaic(PV) system consists of one or more solar panels(a solar array), a charge controller and a battery or battery bank. While the sun hits the solar panels, those panels turn energy from the sunlight into direct current(DC) electricity which is then stored in the battery. The charge controller regulates the flow of electricity to and from the battery, preventing the electricity from flowing out of the battery back to the solar array as well as preventing overcharging of the battery. An inverter may be required to convert the electricity from DC to AC(Alternating Current) depending on what is being powered.[1] The amount of power produced by a PV system depends on the size, efficiency, and amount of light received by the solar panels.
Solar Power concerns
The biggest problem with solar power is the fact that it will not generate any electricity without sunlight. A PV system will produce minimal to no power during nights, cloudy days and in shaded areas. Solar energy may not be the right answer for an individuals energy needs if they are in an area with limited exposure to sunlight. Solar panels have limited efficiency as well, with the most efficient solar panel converting roughly 22% of energy from sunlight into usable energy. Most solar panels fall within a 16-20% efficiency range. [2]
Design efficiencies
When talking about solar panels more specifically past and future uses, design efficiencies of the panels themselves is an important factor to consider. It is said that panels today are becoming harder and harder to disassemble which could be bad if you would want to recycle them after their use. But this could also be a good thing if the user wanted to reuse the panels for a different project afterwards. Reusing panels would somewhat force “design implications” in that if more panels are reused, it would generate a response to design panels to last longer and be updated to allow for easy refurbishment or parts replacement.[3]
Partial Shading
Partial Shading and mismatch losses are also something to consider when thinking about solar panels. In an analysis it was found that in an area that has slightly higher shade than average area showed a performance reduction of about 22% due to shading. This shading can be from anything such as building all the way to trees. Of that 22%, 70% was from the actual shading while the remaining 30% was power loss because of mismatch of current and voltage. There are suggestions to help alleviate some of the loss but ultimately is going to come down to the system you are working with.[4]
Tilt Angles
The tilt angles of the solar panels is also something to consider. The angle of the tilt can affect the overall annual energy yield of the whole system. And has a lot of different parts or elements that influence it. These elements can include but are not limited to the latitude, “clear-ness index”, air conditions, and climate condition. Moreover, the annual optimum tilt angle is almost shifted by 10°with respect to the latitude of the location.[5]
Components of a Photovoltaic System
In depth information about the different components of a photovoltaic system and what we will use for our project. [6]
Solar Panels
Solar panels are composed of many individual cells called solar cells. Solar cells are composed of semiconductor materials which generate energy when light hits the cell, the sum of which is the total energy produced by the panel. [7] The ability of a solar panel to convert sunlight into usable energy is called its efficiency, which ranges from 15% to nearly 23%. It is also important to consider that sunlight is required to strike the solar cells in order for the solar panels to generate energy so optimal placing of the panels to receive as much sunlight as possible is crucial. Shade can decrease energy output by more than 50%. [8]
Charge Controller
Regulates electric current flowing through it. We used one to regulate electron current flowing into the battery from our panel.
Batteries
The battery is where all the unused energy generated from the solar panels is stored. Depending on the individuals energy needs, different sizes of batteries will be required. A larger PV system will require a battery with a higher storage capacity, or will require hooking up multiple batteries to the system creating a battery bank. A battery's capacity is the total amount of energy a battery can store, typically measured in kilowatt hours(kWh). Batteries also have a depth of discharge(DoD) which is the amount of energy that should be used so that some is left over, so that the battery is never fully drained. [9]
Battery Types (sourced and paraphrased from energysage.com)[10]
Lead acid
Lead acid batteries are a tested technology that has been used in off-grid energy systems for decades. Lower DoD (depth of discharge). Lower cost. This is the kind we used due to budget constraints in prototyping.
Lithium ion
The majority of new home energy storage technologies use some form of lithium ion chemical composition. Lighter, more compact, higher DoD, longer lifespan, but more expensive than lead acid.
Saltwater
Relatively new technology. No heavy metals; no complicated disposal, relying instead on saltwater electrolytes. Saltwater batteries are relatively untested compared to the other types, one company that makes solar batteries for home use (Aquion) filed for bankruptcy in 2017. A review and the schematics of the Aquion saltwater battery are found here. [11] BlueSky Energy has created their own saltwater battery circa 2019. [12]
Inverter
Converts DC voltage to AC voltage.
Load
The load for a system is the end use, the appliance or system that uses the power from the battery that was generated by the solar panels. The load determines the amount of energy required from the system and therefore dictates the size of the system needed. For example a 50 watt light bulb will require a significantly smaller PV system than an entire house.[13]
Designing interpretive materials
Interpretive materials for a solar powered bug out box should include a placard on how to wire a basic PV system using some sort of box/container as the body of the bug out box. This would include mounting the solar panel on top of the box, cutting or drilling a hole through the lid for the wiring to pass through and making sure that hole is sealed properly, and wiring the battery and charge controller. We want to keep the designs minimal for ease of use and convenience. [14]
Prototyping
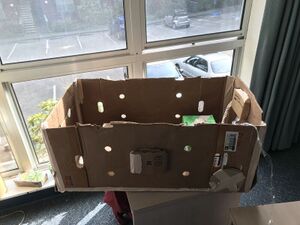
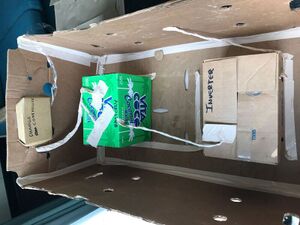
From this prototype, our team learned that the box was too large to be easily portable, also another learning experience was given to us in the early stages of planning because our team originally thought that we could use car batteries instead of deep cycle batteries. We also learned that a charge controller is necessary to make a fully functioning system.


Construction
When designing this system we wanted to ensure that the construction/build would be easy to replicate if someone wanted to do this on their own. With that said to start make sure you have all the necessary parts and that your parts are compatible with the system you want to build. In our case we designed for a 12 Volt system.
Start by cutting the male/female cigar plug adapters in half so that each part has either a male or female part with some of the wiring. It may look like one wire but it is not. There are actually two wires, one side is positive and the other will be negative. To find out which is which test with a voltmeter, to do this you will need to strip the ends of the cut in half wire (side note: do your best to try and not touch the exposed wire with your fingers when testing to allow for a more accurate reading).
On the back of the panel there should be a black box. You will need to open it to and test (with voltmeter) to find out which terminal is negative and which is positive. Once you have figured out which is which you can attach a female part of a cigar plug to the correct terminals. In our case the negative terminal was to the right and the positive was to the left. In figure 7 of the table below you can see how it should look when the cigar plug adapter is attached to the panel. Side note: It is very important that you connect the battery to the charge controller before you connect the panel to the charge controller. So once you have the cigar plug attached to the panel leave it alone and move on to the charge controller.
On the charge controller there are six terminals. Two (one positive and one negative) are for the panel, two (one positive and one negative) are for the battery, and two (one positive and one negative) are for the load, but for this project we will only be using the terminals for the panel and battery. To be able to connect the charge controller to the panel we are going to use the male part of a cigar plug adapter (see figure 3 in the table below). You will have to cut and strip the wire then test (with voltmeter) to see which is positive and negative. Then to attach to the actual charge controller all you have to do is loosen the screw for that terminal insert the wire and tighten the screw back in. Make sure that the parts of exposed wire cannot touch each other.
For the battery terminals take two wires and do the same. It is important to note that on the positive wire from the charge controller to the battery we have a fuse to protect the battery incase of overcharge you can see this in figure 5 of the table below. For the battery itself we have the negative side to the right and the positive to the left (see in figure 2 of the table below). In our case the red wire indicated positive and the black is negative. There will be four different wires hooked up to the battery, two on the negative and two for the positive. So from the charge controller you will have one wire connecting to the positive side of the battery with a fuse and the negative wire connecting to the negative side of the battery (again you can see this in figure 5). The other two wires come from a female part of a cigar plug adapter (see figure 6). You will have to agin test the wires from the adapter to find out which is positive and which is negative so you can hook them up to the battery.
After this the system will almost be all connected. From the female cigar plug attached to the battery you will be able to connect the inverter which already has a male cigar port attached to it (see figure 4).
So at this point you should have the charge controller connecting to a male cigar plug adapter and to the battery. From the battery there should be the wires from the charge controller with a fuse and the wires from the female cigar plug adapter. The inverter with the male part of a cigar plug will now be able to connect to the female part connecting to the battery. Lastly you can now go back and connect the female part of the solar panel to the male part connected to the charge controller. The system should now all be connected (see figure 8).
Weighted Criteria and Constraints
This criterion sets our group to a standard that lines up with the expectations of our client. This also helps us personally quantify our effectiveness and execution for the solar bugout box. The scale (1-10) represents the importance level of meeting the constraint of each listed criteria.
| Criteria | Constraints | Weight (1-10) |
|---|---|---|
| Cost | Within budget | |
| Battery Life | ≥2 years | |
| Battery Capacity | ≥4 hours of charge | |
| Voltage | ≥110 volts | |
| Weather Resistance | ≥plywood | |
| Daily Usage | ≥2 hours/day | |
| Weight | <100 pounds | |
| Aesthetics | Must be noticeable and appealing to use | |
| Educational Aspect | Must include an educational piece on construction. | |
| Safety & Placement | Must not interfere with traffic, but be convenient to use | |
| Reproducibility | The structure can be reproduced by following educational aspect. |
Tentative Time Line
| Project | Started | Completion |
|---|---|---|
| Plan Budget | March 3 | March 8 |
| Prototypes | March 3 | March 8 |
| Get Materials | March 10 | March 15 |
| Build Wagon | March 15 | March 30 |
| Wire solar panels | April 6 | April 21 |
| Attach panels, batteries, controller, inverter to wagon | April 20 | May 3 |
Costs
CCAT gave us a $300 budget to complete this project. We needed less than half that to complete a base model, but more could be invested to scale up energy output or ease transportation. *Costs given do not include delivery.
- $13.99 Ironton 120W Inverter (1 plug+2 USB)
- $36.99 12v 18amp hour lead acid battery
- $14.37 10A charge controller
- $17.97 (3x $5.99) 12V socket adapters(we cut these in half)
- $1.19 3/4" x 60' industrial electrical tape
- $11.99 10 ft 12 gauge black+red PV wire
- $8.49 60 piece assorted fuses
- $7.99 3 Pack -12V Water-resistant Add-A-Circuit Blade Type Inline Fuse holder
- Total Cost: $112.98
- $17.67 of this is in parts not fully consumed by one model, e.g. tape, fuses, and fuse holders.
Operation
CONNECT BATTERY TO CHARGE CONTROLLER AND THEN SOLAR PANEL TO CHARGE CONTROLLER.
Or stuff maybe explodes. Fortunately in our system, the battery is wired to the charge controller, so it will always be connected first.
To operate our system, plug the solar panel into the charge controller, the inverter into the battery, and the load into the inverter.
Maintenance
Replace blown fuses. When cleaning solar panels, use plain water. Soap leaves a residue dirt sticks to.
Schedule
Check connections before first use and after moving system.
Conclusion
Testing results
Our prototype worked! We can charge laptops, cell phones, and other electronics.
Discussion
Highly disappointed could not make toast. All components are realistically small enough to strap to back of panel for increased mobility.
Lessons learned
Car batteries are not suitable for pv systems. They're meant to stay near fully charged and give that starting jolt. Fuses are your friend. Connect the battery before the solar panel. Sizing a system to suit a need involves sizing almost every component.
Next steps
There's several directions this project could take. CCAT has enough donated solar panels to cover a building or host a workshop. HEIF may be interested in funding a solar powered community space. Multi panel power wagons could be built and used for events on sunny days and/or where outlets are not traditionally available. The city may find use for those power wagons to aid homeless camps.
Troubleshooting
If individual parts are damaged, see manufacturer's statement. Be careful with corroded batteries.
| Problem | Suggestion |
|---|---|
| Not working | Check connections |
| Does not make toast | Wail in agony. |
| Funny noise/ not working | Check fuse |
References
- ↑ The Solar Electric Independent Home Book.
- ↑ Clean Energy Reviews
- ↑ http://humboldt-dspace.calstate.edu/bitstream/handle/10211.3/124757/McKeown_Kyle_Sum2014.pdf?sequence=1
- ↑ https://www.nrel.gov/docs/fy11osti/50003.pdf
- ↑ https://reader.elsevier.com/reader/sd/pii/S0038092X12000953?token=D86CBD7A38EED93094BF9C2C9A3BC3C63F3CCA48760DC0A834D993C1F29E69D9E79889FA7F62F6F339E12077CD163826
- ↑ This is an example of a named reference. You can use these named references to repeat citation content throughout the document.
- ↑ https://science.nasa.gov/science-news/science-at-nasa/2002/solarcells/
- ↑ The Solar Electric Independent Home
- ↑ Hawkins Electrical Guide No. 3 copywrited 1917 by THEO. AUDEL. & CO., New York
- ↑ https://www.energysage.com/solar/solar-energy-storage/what-are-the-best-batteries-for-solar-panels//
- ↑ https://www.solarquotes.com.au/blog/aquion-salt-water-battery/
- ↑ https://www.bluesky-energy.eu/en/saltwater_battery/
- ↑ Hawkins Electrical Guide No. 3 copywrited 1917 by THEO. AUDEL. & CO., New York
- ↑ https://www.getty.edu/education/museum_educators/downloads/aaim_quickguide.pdf