Background
Rainwater harvesting is an ancient technology[1]. Today's systems are certainly much different than those that people implemented before the dawn of PVC[2]. The idea is simple enough:
- Notice that stream of water pouring out of your gutter's downspout
- Look down at your monthly water bill[3]
- Look back at the downspout
- Start seeking out a large container
The question is: how do you get clean water from that downspout and into a holding tank where it will be easily accessible? This project seeks to address that question with a simple and easily interpreted small-scale version of a rainwater catchment system.

Opportunity Definition
Humboldt State University's Campus Center for Appropriate Technology, or CCAT, is a "live-in demonstration home" where students have the opportunity to live amongst and learn about various aspects of appropriate technology. It is a resource for the campus and the greater community that allows for the dissemination of ideas and examples of appropriate technologies. One such example is a cob bench that was built over the last few years. Since cob is made of clay, sand, and hay, the bench needs to be sheltered from rain[4]. There is a roof over the bench to do just that. This roof is sizable enough to create a significant amount of runoff during a storm event. This runoff will be collected through a catchment system. Conveniently enough, the structure is located amongst CCAT's gardens and above their orchard. This will allow for the collected rainwater to be used without any assistance from pumps, due to the tank's elevated position above the target use area. When collecting rainwater to be used in a garden, a simple system can be put together relatively easily. This system is meant to be a small-scale model of a full catchment system, therefore, for educational purposes, it may be a more complex system than one would expect to find in a garden.
Criteria
Replicable--The system needs to be simple enough to be easily replicated.
Educational--The system will serve as a small-scale example of rainwater harvesting.
Accessible--Because of its small size, this system will be easily accessible. One will be able to see all of the components of a rainwater harvesting system in a relatively small space.
Adaptable--The system will be simple enough that visitors will be able to see how the system works together, and that it can represent both a small-scale garden catchment system, as well as a larger-scale home catchment system.
Durable--The system should last through many years of use.
Efficient--All water collected should be used.
Frugal--This system will be built with many reused materials to show that this type of system can be fashioned out of materials found around the community.
Budget
| Qty | Item | Cost | Total |
|---|---|---|---|
| 12 ft. | Gutter | free | 0 |
| 2 square feet | Window screen | free | 0 |
| 1 | 3"-1 1/2" Reducer | $7.99 | $7.99 |
| 1 | 2 Gallon Bucket | free | 0 |
| 30 ft. | Garden hose | free | 0 |
| 1 | Bulkhead fitting | $9.00 | $9.00 |
| 1 | 3/4 inch Hose bib | $4.99 | $4.99 |
| 1 | 1 1/2" PVC pipe, 8 inches | free | 0 |
| 1 | 55 Gallon Barrel | free | 0 |
| Handful of | Screws | free | 0 |
| 25 | Bricks | free | 0 |
| 1 tube | Silicone Caulk | $5.99 | $5.99 |
| a little bit | Teflon Tape | free | 0 |
| Total | $27.97 |
Literature Review
Arcata, CA Average Precipitation[1]
| January | February | March | April | May | June | July | August | September | October | November | December | Annual |
|---|---|---|---|---|---|---|---|---|---|---|---|---|
| 5.97 in. | 5.51 in. | 5.55 in. | 2.91 in. | 1.62 in. | 0.65 in. | 0.16 in. | 0.38 in. | 0.86 in. | 2.36 in. | 5.78 in. | 6.35 in. | 38.10 in. |
These rainfall averages show that the amount of available water that falls from the sky is varied throughout the year. In Humboldt, the rainy season usually occurs during the fall, winter, and spring, while the summer months are relatively dry. This demonstrates a need for a relatively large holding tank that will collect water through the rainy season, making it available during the drier summer months.
Roof Footprint and Potential Collection
The roof footprint is the area upon which rain will fall. An easy way to measure your footprint is to pretend that your structure doesn't have a roof, that you are measuring the footprint of your structure. This is the actual area that water is falling on. Also, the footprint area is not affected by the slope of your roof. Measure the length of the walls of your house or other structure (garden shed, dog house, etc.), then find the surface area.
The roof covering the cob bench is nearly trapezoidal. With some measurements, it looks a bit like this:
 Pretty sweet, huh?
Now, we all remember how to find the surface area of a trapezoid, right? Well, don't worry, it comes out to roughly 150 square feet after doing some creative math:
16ft. + 11.5ft. = 27.5
27.5 / 2 = 13.75
13.75 x 10.8 = 148.5 square feet
In theory, about .62 gallons per square foot of collection surface per inch of rainfall can be collected.[2] So, for this system, that comes out to:
0.62 gallons x 150 square feet x 1 inch = 93 gallons collected per inch of rain falling on this 150 square foot roof.
First Flush Diverter
When it starts to rain, the first flow of water off of your collection surface may be contaminated by dust, pollen, bird plop, or leaves.[3] A simple first flush system will allow these contaminants in the initial rainfall to settle out in a bucket separate from the main storage tank. When it starts to rain, the water that first flows down the roof washes off the dirt and grime and sends it into your first flush bucket. The first flow of "dirty" water will settle out in the bucket. As rain continues to fall, the water flowing into the system is progressively less dirty, and the bucket fills up. This "cleaner" water enters the now full bucket, which overflows into the main storage tank. This maintains a cleaner environment inside the main storage tank, and makes cleaning the system quite a bit easier.
As for sizing your first flush system, opinions vary as to how much water it is necessary to divert. One recommended diversion calculation, and the one used in this particular catchment system, is one or two gallons of rainwater diverted for each 100 square feet of collection area.[4]
So, for example, this roof is almost 150 square feet, so about 1.5 gallons of water is all that needs to be diverted.
Take note, a first flush diverter may not be necessary for collecting water to be used solely to water plants. A simple screen to filter out debris may be adequate. This would simplify the entire system and decrease the number of plumbing connections.
Design and Construction
-
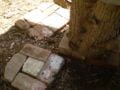
Fig. 0:The system components need a stable and flat surface to sit on. These are miniature brick patios for the barrels. The first flush bucket sits on a large stump on top of a brick patio.
-
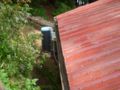
Fig. 1: This is the roof that covers the cob bench.
-
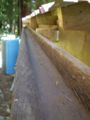
Fig. 2: This is the gutter that the water runs down until it falls into...
-
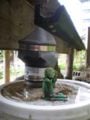
Fig. 3 ...The First flush filter!


First Flush System

The First Flush system is made up of the filter, reducer, bucket, overflow pipe, and a slightly open hose bib.
The Filter is a square of window screen cut and folded to form a cone shape.
-
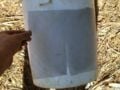
Fig. 4: Cut an 8-inch square of window screen, and cut a 4 inch slit into the middle of one side of the screen.
-

Fig. 5: Pull the inside corner of the cut you just made towards the outer edge of the opposite side of screen to start forming the cone shape.
-

Fig. 6: Now you have a cone shape!
-
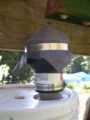
Fig. 7:The cone-shaped filter can be fitted onto the rubber reducer and secured with the included pipe strapping.


This filter and reducer act as a funnel that catches the water running off of the gutter and sends it to the 2 gallon first flush bucket. The smaller end of the reducer is fitted around a short section of 1 1/2 inch PVC pipe. The other end of this pipe conveniently fits into a hole that was already in the lid of the bucket. The pipe is sticking through the underside of the lid just enough to keep the reducer stable and in place.

Now that the lid is all ready, it is time to drill some holes. Use a hole saw or spade bit that is the same size as your overflow pipe. In this case, it is 1 1/2 inches. Drill this hole about 2 inches from the top of the bucket. Insert a section of pipe into the hole and seal it with some good waterproof silicone sealant. This pipe is the connection between the bucket and the barrel. You will insert it into your barrel later.
The next hole is only slightly more tricky. This one will be the location of the automatic reset system. It sounds complicated, but it is actually quite easy. Size your hole depending on the size of the bulkhead fitting you will use to attach the hose bib. This hole is located about 1 1/2 inches from the bottom of the bucket. After drilling the hole, attach the bulkhead fitting, then screw the hose bib into the fitting (Fig. 8). I applied a little Teflon tape to the threads for a more secure fit. Next, attach a length of hose to this fitting. Keep the hose bib slightly open so that the water in the first flush bucket will slowly drip out. (This is the idea of the automatic reset. The water will drip out slow enough so that the bucket will fill during a rainstorm, but afterwards, it will drip out and be empty before the next rain.) It should flow through the attached hose to an area that won't get too swampy. In this system, the water slowly drips out of an old hose with holes drilled into it, that waters several blueberry bushes.
-

Fig. 8: Bulkhead fitting and hose bib
-
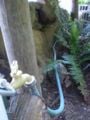
Fig. 9: The hose sits behind the bench and heads toward the blueberry bushes
-
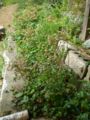
Fig. 10:The Blueberry bushes with the hose running behind them. The hose was laid down, then holes were strategically drilled in it so that water would drip out only at the base of the berry bushes.
-
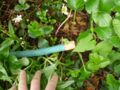
Fig. 11: I closed off the end of the hose by jamming a cork into it.


Barrel

The first flush bucket overflows into the 55 gallon main storage barrel through a section of 1 1/2 inch pipe. The barrel I used was already fitted with a split hose spigot and bulkhead fitting. Otherwise, you would follow the same steps to install the hose bib as was demonstrated with the bucket. The spigot on the barrel was placed about 3 inches from the base of the barrel (Fig. 12). Also, to keep mosquitoes out of the barrel, a section of window screen was secured over the opening.
The water in the barrel can be accessed in two ways. A hose can be attached to one of the spigots, or one can fill a watering can by placing it in the recessed hole beneath the spigots. It is important to have an overflow hole and/or hose near the top of the barrel to redistribute any excess water. This hose can be lead to a place designated as an overflow site, or it can be connected to another barrel, which would have an overflow hose as well.

!!!NOTE!!! When acquiring a barrel, make sure it is a FOOD-GRADE barrel. Often acids, solvents, oils, or other caustic liquids come in this type of barrel. You probably don't want these residues on your plants. You can find food-grade barrels at local food manufacturers, soda bottlers, recycling centers, or on your local Freecycle Network http://www.freecycle.org or Freegle. In fact, get acquainted with Freegle and Freecycle. You can find tons of useful project materials for free (such as, a gutter or an old hose) through this amazing resource.
!!!ANOTHER NOTE!!!The water collected in this type of system is NOT POTABLE, that means, don't drink it! Your garden will be happy to consume this water, but your stomach will not! To get an idea of what it takes to make your collected water consumable, check out Ersson rainwater harvest and purification (original).
Troubleshooting
- During heavy downpours, some of the flow off of the roof overshoots the gutter and lands on the ground. This is in part due to the slightly varying lengths of the corrugated metal used as the main roofing material, as well as higher velocity due to an increased flow of water.
- Again, during heavy flows, some of the water flowing from the gutter into the first flow bucket tends to overshoot the primary filter. This was somewhat remedied by positioning the first flow bucket in such a way that the greatest amount of water is captured during both heavy and lighter flows.
- Teflon tape makes plumbing connections less drippy!
- When using found or used materials, make sure to check the rubber gaskets and washers of plumbing fittings to decrease water loss.
- To keep the heavy rain overflow from damaging the cob bench, several ferns were strategically planted to shield the bench.
Maintenance
In order for this system to function well, it needs some occasional attention.
- While the first filter is meant to be self-cleaning, sometimes enough pine needles get stuck in it to cause a traffic jam. Check to see if those need to be cleared out whenever you go to use the water collected in the barrel.
- The First flush bucket will accumulate a fine layer of crud at the bottom of it. It will have to be monitored in order to know when to clean it out. You know it is time when the crud layer approaches the hose-bib outlet. You don't want alot of fine silt to go through your slow-drip reset contraption, so clean it before that happens! This task is made easier in that the pipe going form the small first flush bucket into the main storage barrel is not sealed where it meets the barrel. The whole bucket and pipe can be removed, cleaned, then replaced.
Thanks
Thanks to Charlie V. for helping me with hanging the gutter and installing the flux capacitor.
Ok, so there isn't really a flux capacitor, but hanging the gutter would have been really difficult with only two hands. Thanks dude.
Also, thanks to CCAT for letting me rummage through their trash pile to find totally usable stuff to use in building this system.