
The Campus Center for Appropriate Technology (CCAT) at Cal Poly Humboldt in Arcata, California has an outdoor area that has potential to be utilized and protected better if there was proper rain cover. The team Under One Roof was originally planned to construct the entirety of the roof but due to the COVID-19 Pandemic of early 2020 their plan had to be altered. Under One roof developed two prototypes and a guide book on the best way to move forward with the roof project. Through this page there is a tentative timeline, budget, literature source, construction steps and suggested next steps. These prototypes are meant to be a launching pad to move this exciting new project forward.
In addition to this project page, the team created a written construction guide to help the future creators of this roof. Find the PDF here: Media:ENGR305 CCAT room construction guide.pdf
Background
This project will be taking place at Cal Poly Humboldt's Campus Center for Appropriate Technology (CCAT) as part of the Appropriate Technology (ENGR 305) class in Spring 2020. The team, Under One Roof, will be working with the center's three co-directors to retrofit the roof over the CCAT Earth Oven and the CCAT rocket mass cobb bench heater in their outdoor kitchen. As you can see in Fig. 1 and Fig. 2, the existing roof is made up of two parts. One is the living roof, which seems to have been made in 2006. Learn more about that project here. The other part of the roof does not seem to have an Appropedia page, but looks like it is made up of a wooden frame with corrugated metal sheeting. The team has about 12 weeks to design, prototype, and complete this project, starting the first week of February 2020. Due to the geographical location, in the small town of Arcata on the coast of Northern California, there is a significant amount of rainfall and consistently high humidity. This has to be taken into account in the design of any project built here, outdoors or indoors. This is one of the reasons why the protection of existing projects is so important. Overall, the roof should be sturdy, functional, and aesthetically pleasing.
-
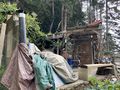
Fig. 1. Before, taken 02/06/2020
-
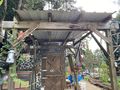
Fig. 2. Before, taken 02/06/2020
-
388x388px


Problem statement
The roof currently in place is not successfully protecting the existing project in the outdoor kitchen. The objective of this project is to make a long-lasting and well-designed roof to protect the cobb oven and bench, as well as to provide a demonstration of green building and the potential of appropriate technology to teach future students and community members. The goal is to create incentive to make the outdoor kitchen at CCAT usable and enjoyable regardless of weather, to prevent weathering of the current projects in the outdoor kitchen, and to ensure that they last as long as possible in order to continue making an impact on future generations, and inspire the people that visit CCAT.
Project Evaluation Criteria
The following Criteria will be used to determine the success of this project. These criteria were determined by the students working on this project in collaboration with the clients. The scale (1-10) represents the importance level of meeting the constraint of each listed criteria.
| Criteria | Constraints | Weight (1-10) |
|---|---|---|
| Durability | Must last ≥ 20 years.
Must have structural integrity ≥ existing shed. Structure must support human weight. |
10 |
| Safety | Must not be a hazard to users during or after its construction.
Roof must provide adequate ventilation. |
10 |
| Aesthetics |  |
7 |
| AT Components/AT Potential | Project must demonstrate appropriate technology components.
Project must be built to accommodate for potential future appropriate technology projects (solar panels, rainwater catchment) |
6 |
| Practicality | Must not interfere with accessibility to CCAT outdoor kitchen.
The project should be easy to maintain for the duration of its lifespan. |
7 |
| Cost | Must be within budget. | 3 |
Research
See CCAT Outdoor Kitchen Roof/literature review to read the research we did for this project.
Prototyping
The prototyping process was simple in the beginning. The team's mindset was 'no idea is a bad idea' as long as they had cardboard and tape. The first prototype was the team collectively adding our ideas into one prototype. This was a time in which they allowed themselves to think out of the box and incorporate different ideas. The second prototype was the vision that came after gathering more information on the space, what the client would like to see, and a more realistic version of what the roof will look like in the future. With this prototype the team tried to scale it to size by using a 1 inch to 1 foot method. By doing so, they were able to make the prototype as realistic as possible. During the prototyping phase, they were able to learn the process of bringing an idea to life. As it was all of their first time creating a prototype, it also gave them the skills to work with each other by keeping an open mind to all the different ideas everyone brought to the table. This phase allowed the team to be creative which was enjoyed by everyone.
Check out the construction section for a more in depth description of how the final prototype was created.
-
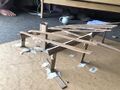
Fig. 4: First Prototype
-
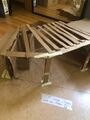
Fig. 5: Beginnings of Final prototype
-
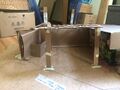
Fig. 6: Beginnings of Final prototype
-
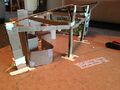
Fig. 7: finished Final prototype


Construction
The construction of the team's final prototype was made out of cardboard boxes from home and white scotch tape built on top of a wood board from who knows where. That's the thing, be creative with what you already have.
Compared to their first prototype, they measured each beam, each post, etc. to create it to scale as much as possible. On the board, a layout of the space with each side measured is drawn on to recreate the site (including the existing green shed). The existing wall was built with cardboard and added the bench and chimney (also made out of cardboard) to make the prototype look more realistic. From there, 4 posts, 4 beams, 10 rafters, and blocking were individually cut to their required height by using 1-inch to 1-foot scale. Since there are two alternatives (see materials budget), for alternative 2, a detachable (just rolled up tape) piece of cardboard was made to recreate the stem wall that has to be put on the existing wall. The metal roof was imitated out of cardboard as well. Every piece is held up together with scotch tape. It was made detachable so that the board could be used for both alternatives instead of making two separate prototypes. It's one prototype but with two alternatives.
Sketch some alternatives


Prototype, Prototype, Prototype


Proposed timeline
Below is the timeline pre-pandemic. It has currently shifted entirely. It is important to note that the time span allotted for this project in the timeline below should be an appropriate estimate of how long the actual construction process would take (assuming a team of four knowledgeable people and many volunteer helpers). It is also under the assumption that each work day to be approximately 8 hours, if not more.
Instead of creating a new timeline for what the work schedule actually ended up looking like, rather it is summarized what the team did. In essence the team met virtually once to three times a week for a few hours, discussing options, designing further, and prototyping individually. AutoCAD was attempted along with Google Sketchup to no avail, and decided to make the to-scale physical model especially detailed, with two design options (see the Prototype subheading).The team each individually went back to the site to take measurements, contacted lumber yards for quotes, researched pricing on the internet, and gathered other important information through research.
| Dates | Objective | Actual Completion |
|---|---|---|
| Thursday 3/5/2020 | Roof designs and alternatives done. Share with client. | done |
| Thursday 3/12/2020 | Make physical model. Prototype life-size at CCAT grounds. Set deconstruction plan for living roof. Rough numbers on budget. This is where the team's work completely shifted due to COVID-19 | done |
| Wednesday 3/25/2020 | Soil out of living roof. | n/a |
| Thursday 3/26/2020 | Materials list finalized. Construction plan & details finalized. Have budget finalized. | n/a |
| Friday 3/27/2020 | Work day / Break down living roof | n/a |
| Sunday 3/29/2020 | Living roof 100% GONE. | n/a |
| Thursday 4/2/2020 | BREAK GROUND. Have materials gathered. | n/a |
| Friday 4/3/2020 | Work day / Foundation work. Get concrete put in. | n/a |
| Friday 4/10/2020 | Work day / frame is up | n/a |
| Thursday 4/16/2020 | Get remaining materials if needed. Make sure all materials are gathered. Rainwater catchment sizing calculations. | n/a |
| Friday 4/17/2020 | Work day / button up frame. | n/a |
| Thursday 4/23/2020 | How hard does the team need to press? Check in. | n/a |
| Friday 4/24/2020 | Work day / Get roof on. | n/a |
| Sunday 4/26/2020 | WORK / Roof better be on. Troubleshoot. | n/a |
| Thursday 4/30/2020 | Dressed and ready for Mayday. | n/a |
| Friday 5/1/2020 | DONE. | n/a |
Budget Proposal
Below is the team's budget proposal for Alternative 1 and Alternative 2. Alternative 1 budget is designed to partially build behind the concrete wall that is currently in place. Alternative 2 budget is designed to be built on the concrete wall by adding a stem wall. Budget may vary due to constraints and donations.
Alternative 1 Budget
| Quantity | Material | Source | Cost ($) | Total ($) |
|---|---|---|---|---|
| 3 | 6x6x12 Post | Local | $45.00 | $135.00 |
| 1 | 6x6x12 Post | Local | $45.00 | $45.00 |
| 10 | 2x6x14 Rafters | Local | $12.00 | $120.00 |
| 2 | 2x6x10 Blocking | Local | $15.00 | $30.00 |
| 3 | 6x6x10 Beam | Local | $36.00 | $108.00 |
| 1 | 6x6x16 Beam | Local | $62.00 | $62.00 |
| 1 | 1/2 x 8 Carriage Bolts & Nuts 25 pack | Local | $67.00 | $67.00 |
| 1 | 10 x 4 in. screw thousand pack | Local | $115.00 | $115.00 |
| 2 | 6x6 Simpson ties | Local | $15.00 | $30.00 |
| 1 | Standing Seam Metal Roof | Local | $500.00-$1,000.00 | $500.00-$1,000.00 |
| Total Cost | $1,212-$1,712 | |||
Alternative 2 Budget
| Quantity | Material | Source | Cost ($) | Total ($) |
|---|---|---|---|---|
| 3 | 6x6x12 Post | Local | $45.00 | $135.00 |
| 10 | 2x6x14 Rafters | Local | $12.00 | $120.00 |
| 2 | 2x6x10 Blocking | Local | $15.00 | $30.00 |
| 3 | 6x6x10 Beam | Local | $36.00 | $108.00 |
| 1 | 6x6x16 Beam | Local | $62.00 | $62.00 |
| 1 | 1/2 x 8 Carriage Bolts & Nuts 25 pack | Local | $67.00 | $67.00 |
| 1 | 10 x 4 in. screw thousand pack | Local | $115.00 | $115.00 |
| 2 | 6x6 Simpson ties | Local | $15.00 | $30.00 |
| 10 | 8x8x16 Cement Blocks | Local | $1.50 | $15.00 |
| 3 | 3/8"x 20' Rebar | Local | $4.00 | $12.00 |
| 14 | Cement Bag | Local | $6.00 | $84.00 |
| 1 | Standing Seam Metal Roof | Local | $500.00-$1,000.00 | $500.00-$1,000.00 |
| Total Cost | $1,331-$1,830.00 | |||
Operations
Due to the COVID-19 pandemic, the team was not able to build this roof. Thus, they are unable to provide final photos of the structure, and only have their prototypes to show. The maintenance and schedule are based on what the roof should look like once it is built. All of the content below is up to variations dependent on the final outcome of the project once it is built.
Maintenance
Although the roof is not yet built, the team present their anticipations for the maintenance that will be needed to keep the structure in good condition. They are basing this list on the first building option that they offer in which the roof is using the back cement wall as support. This section will explain what type of maintenance the structure will need and how to maintain it in order to assure its longest possible life. Due to the roofing material being a standing seam metal roof, the maintenance for it should be significantly lighter than for any kind of shingle roofing. The metal roofing should also ensure its durability. This section may change depending on what version of the roof ends up being built and what the final product ends up looking like. Below is a list of routine things to check for with any metal roof, as well as a few more specific components. Although the team did not design the roof with a gutter system, they anticipate that one may eventually be built and attached to a rainwater catchment tank.
Schedule
Biyearly (twice a year)
- Scan surfaces
- Check for leaks
- Check any sealants that may have been used
- Check wood for rotting/splitting
- Check for water pooling
- Check cement for chipping
- Check for coating failures, rust, or corrosion
- Clear out gutters (especially after a large storm)
- Fix fasteners (tighten or replace loose or dislodged screws
Instructions
- Scan surfaces
- Walk around the perimeter of the roof. Walk up to the outdoor sink and check the roof from above. Look for any corrosion where the metal may be rusting, leaks where the metal roofing is connected to the wood frame, check the roof to see if water is pooling anywhere and if sealants were used for any aspect of the roof, check the status of those as well. Walk back down below the roof and look for any leaks from below. Check the beams, rafters, posts, and blockings for splitting or rotting. Check the cement on the back wall for large chips, make sure to get around to the back of the cob oven.
- Clear out gutters
- Using a long-handle brush or broom (or anything else that is available) clear out any and all debris from the gutter system. Make sure to check the entirety of the system, especially at the entrance of the downspout.
- Fix fasteners
- Examine the structure and, with a screwdriver or drill, tighten any loose screws. Don't forget to check the simpson ties at the bottom of the posts as well.
Conclusion
Testing results
Determining clear results for the roof itself is difficult due to the barrier of not being able to build the structure. Through roof design, research and prototypes the results show the best plan for the roof. The findings are that the roof either set on the top of the back wall or in a separate structure will be structurally sound approach.
The team never got a chance to test the roof because they lost access to the site. One team member was able to test the supports when they built some bunkbeds. The team was able to implement the same lateral bracing that they planned to on the bed. Once it was built they tested it by loading it with 6 people and even had them shake and the bed still stood. This was with scaled down lumber, thought the ratios of the structures were not built to scale. They used a 3.5 inch deck screw to hold it together the same screws that would be used on the roof, out of 60 screws not one of them broke even with the 6 people on it.
Discussion
The team's results were not exactly what they had wanted to come out of this project with. Due to the COVID-19 Pandemic the approach to the roof project needed to be modified. Rather than taking the project on as a hands on construction project it had to be approached from a focused prototype and instruction view. This was done to be able to provide CCAT with the next steps they need to move forward on this project. There is a large confidence behind these plans and a large amount of anticipation on the future of this design and construction.
Lessons Learned
During this project, the team has experienced a serious rollercoaster of certainties and uncertainties. Given the COVID-19 pandemic and their inability to physically construct the project, various attempts were made at designing the roof. AutoCAD and Google SketchUp were tried, but both were a failure. Sometimes going back to reliable materials (such as cardboard and beer boxes is the best approach). The team strongly suggests doing your research and attempting either program with either prior experience/knowledge, or some serious determination. Future designers are urged to always take all possible variables into account, and be ready for ones you never expected. Being extensive and diligent on your design and approach is key. The team has also learned that telecommunication is quite difficult, and that team morale is extremely important. Finally, in Buddy Mitchell's wise words: "wood is strong and work is hard".
Next Steps
Vital next steps for this project involve actually building the physical structure. First, the current living roof over the cobb oven will have to be demolished. After all of the team's hard work, they truly hope to continue to be a huge part of the construction of this project as soon as they are able to commence it. The team hopes that this appropedia page continues to be developed as the roof is constructed and issues arise.
Troubleshooting
| Problem | Suggestion |
|---|---|
| Uncertain about the code standards for the chimney? | Contact Michael Fisher (Facilities Management) |
| Figuring out how to build on the cement wall? | Contact Michael Fisher (Facilities Management). Take a look at the CCAT Green Shed appropedia page. |
| Trouble taking down living roof? | Make a game plan prior to demolition. Have a space to store all materials for repurposing. |
| Clogged gutters? | Install gutter screens (also called gutter guards) |
The Team
SPRING 2020
Under One Roof: Emily Read, Valentina Acosta, Nick Brandi, Buddy Mitchell

The team made a short video about their design process and experiences during the span of this project. Watch it here.