

ABSTRACT
Introduction

Background
The frame for the shed has already been built by previous CCAT workers. The wood frame is set up in a rectangular form with a sloping roof (for possible later water catchment system). The majority of the weight of the roof and possible later water catchment will be held by the frame thus the walls do not have to be extremely weight bearing except in consideration of shelves for tools. The wind coming up the hill will try to lift up the roof once it is built, this will stress the joints of our wall thus we need to put a cross bar 2*6*12 to relieve stress on the joints.
The frequently wet, cold, and humid nature of our climate is an opportunity to work with breathable and non-watersoluble materials. Some methods using organic matter present the issue of rotting. The tendency of organic matter to rot in our wet climate will require the walls to "breathe" well so as to not trap moisture inside.
So far we are thinking light straw clay or woodchip-clay with a lime plaster would be a good application, since there is an overhanging roof, a raised foundation, and the ability to have lime plaster that prevent mold growth. These applications were chosen in comparison to cob, which seems a more popular and appropriate choice in our North Coast weather, because CCAT is an educational site with two demonstrations of cob all ready and CCAT wants to demonstrate other natural building applications.
Since our wall is 6 by 7 ft CCAT suggested we use 2 * 6 * 8's every 1.5 ft width wise, with 1 by 2 blocks every other foot vertically in order to give the light straw clay something to grip onto, to relieve the stress of the four joints during windy times, and to give us more room to experiment with different material compartments.

We've been asked to make this a sculptural and artistic wall, since it is the most visible wall of the tool shed. The shed door will slide to cover our wall so our wall can not extend past the wooden frame more then 1". We will hopefully use papercrete made of a newspaper lime mix rather then cement to make sculptural bricks that we can insert between the 2 * 6 * 8's. The light straw clay or wood chip clay can then be stuffed into a temporary plywood frame around the papercrete blocks.
In addition, the west walls concrete foundation was poured to make a standard 6 inch wide wall. Extending the foundation outward will be an impediment to the shed's sliding door. Extending the foundation toward the inside will also be an impediment to people walking in the side door. 6" is not wide enough for most earth building methods to be of much insulation value, but straw clay, papercrete, and wood chip clay can all work within the 6 " constraint.
Project Requirements
Criteria
| Criteria | Weight | Constraints |
| durable in climate | 10 | longevity under seasonal weather patterns |
| educational ability | 9 | at least demonstrate appropriate technology |
| structural integrity | 10 | meets safety standards by CCAT |
| level of material locality | 7 | @ least within Humboldt |
| maintainability | 5 | less than 1 weeks worth of one persons work a year |
| hrs required for building structure | 6 | maximum 1 semester without maintenance |
| cost | 5 | $500 max |
| labor intensity | 7 | 3 people's manpower |
| level of embeded energy of materials | 8 | uses the least amount of energy |
| aesthetics | 8 | meets CCATs demand |
Delphi Decision Matrix
| Criteria | Weight | Straw + Clay | Planar Shavings + Clay | Mix Shavings + Straw |
| durable in climate | 10 | 37 | 20 | 25 |
| educational ability | 9 | 30 | 40 | 35 |
| structural integrity | 10 | 40 | 20 | 23 |
| level of material locality | 7 | 40 | 35 | 35 |
| maintainability | 5 | 42 | 42 | 42 |
| hrs required for building structure | 6 | 30 | 38 | 35 |
| cost | 5 | 43 | 50 | 47 |
| labor intensity | 7 | 40 | 45 | 44 |
| level of embeded energy of materials | 8 | Straw + Clay | wood chips | Mix Chip + Straw |
| aesthetics | 8 | 45 | 45 | 45 |
Calculating the Embeded Energy
“Embodied energy is the energy consumed by all of the processes associated with the production of a building, from the acquisition of natural resources to product delivery.” [3] The embodied energy calculations used below do not include transportation costs. If transportation were factored in wood chips and straw would be close, straw comes from Humboldt ..... and the woodchips come from ....As a coastal community with a lot of forest there is an abundance of woodchips, but these are in high demand by the biodigesters in Eureka thus more and more of the woodchip scraps have come out of the waste stream.
Papercrete Embedded Energy: cement uses 1,574,000 BTU's/cubic yard of energy in production and use, and sand takes 29,000 BTU's/cubic yard,[4] while the recycled paper would not be using more energy for its use, but instead getting more use back from a product that all ready had energy invested into it for other applications. Given : a 3:2:1 paper to cement to sand mix Our wall is 7ft * 9 ft *6 inches = 31.5 cubic ft 31.5 cubic ft * 3(1 yard/3ft) = 1.67 cubic yards 1.67 cubic yards for the whole wall * 2/5ths cement = .668 cubic yards of cement for the whole wall .668 cubic yards * 1,574,000 BTU's/cubic yard= 1,051,432 BTU's for the cement in our wall if we were to use papercrete 1.67 cubic yards * 1/5ths sand = .334 cubic yards of sand .334 cubic yards of sand * 29,000 BTU's/ cubic yard = 9,686 BTU's for the sand if our wall were to be made of papercrete Papercrete total= 1,051,432 BTU's for the cement + 9,686 BTU's for the sand = 1,061,118 BTU's for a papercrete wall
Straw Clay-Slip Embedded Energy: a straw bale uses .24 MJ/kg and the water and clay dug from on site took the earth thousands of years to break down and create, but this energy is not spent in the form of fossil fuels or coal or any other toxic pollutant. Given : 1.67 cubic yards for the whole wall 4:1 straw to clay mix .24 MJ/kg * 4/5 = .192 MJ/kg of straw for the wall convert MJ/kg (mass) into BTU's/ cubic yard (volume) thus need to know density average density of straw bale is 7lbs /cubic ft [5] .24 MJ/ 1 kg * 1kg/ 2.2046 lbs * 7 lbs / 1 cubic ft * 27 cubic ft/ 1 cubic yard= 20.58 MJ/cubic yards 20.58 MJ/cubic yards * 1,000,000J/ 1 MJ * "9.488* 10-4" Btu/ 1 J = 19,526 BTU's for a straw clay-slip wall
Woodchip Clay Slip Embedded Energy:
Project Timeline
| Date | Activity | Results |
|---|---|---|
| 3/5/2010 | Meet with Drea, Submit Project Proposal and Budget | |
| 3/6/2010 | build test frames, gather materials | |
| 3/7/2010 | make test mixes, testing | |
| 3/8/2010 | weekly group meeting 4-5:00 | |
| Week of 3/22/2010 | check test batches, check plaster | |
| 4/9/2010 | begin wall construction (1st lift) | |
| 4/11/2010 | complete 1st lift | |
| 4/25/2010 | complete construction | |
| Week of 5/1/2010 | Begin plastering |
Design
-
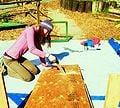
Fig 4a: cutting scrap plywood
-
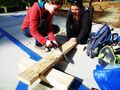
Fig 4b: cutting test frame
-
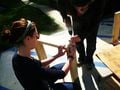
Fig 4c: Screwing together frames
-
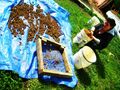
Fig 4d: Stir clay
-
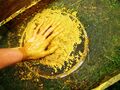
Fig 4e: Strain
-
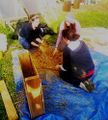
Fig 4f: Mixing clay slurry & straw
-
Fig 4g: Tamp it in
-
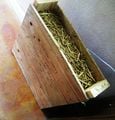
Fig 4h: Finished test frames


Wall Structure: Our wall will be infill for an existing 7x.5x9 ft. stick frame with a .5 ft concrete foundation. We will be adding 2x6 vertical studs every 18 in. and a 2x6 built in stud brace running diagonally through our wall.
Process:
- Obtaining the clay and making the clay slurry was the most labor intensive part of the project. The clay was dug from the south slope of the CCAT grounds. Special care must be taken to exclude any topsoil or decomposing organic matter from the clay. Any organic matter that finds itself into the wall can rot and cause problems.
- At first we tried to sift the clay then mix it with the water, but it took too much time and wasn't as effective. So we decided to shovel our clay into a 5 gallon bucket with water and stir it with an electric power drill that we added paddle attachments too. After stirring then we sifted, which worked better at excluding rocks and grass since the clay was suspended in the water.
(We learned that its not good to leave out the unsifted clay suspended in water, since any grass or organic materials will start to decompose in your slurry and make a funky funky smell. So sift before you take a break from your project or mix it as you go.)


- The final liquified clay slurry is poured over the straw or planar shavings mix and mixed by hand on a tarp or in a 20 gallon bucket. The mix is then stuffed between our frame and some temporary plywood to support it as it dries. We can only build two feet at a time to get the optimum amount of drying and stabalization before adding another layer, these successive layers are called lifts.
- After stuffing it we lightly tamp, or pack down, the straw clay so that it is tight together. We don't want to tamp so hard that the clay and sand particles bond break or are dislodged from each other, nor do we tamp so hard that there is no remaining air pockets in the straw (we want these air pockets for insulation). After it is tamped and dried for about a day we remove the plywood form on either side of the frame. Removing it as soon as possible helps prevent mold growth, since you will expose your wall to the wind and sun. [6]
Wall Testing:
evaluated for adhesion, durability in environment, length of drying time, and ability to resist compression
Test Bricks We made 7 test bricks of different ratio's of clay and fiber and sand. Those without sand did the best indicating that our soil has enough sand in it all ready. The bricks with straw as the main fiber upheld the best to the elements and upheld the best when pressure was applied. Test Frames We built several 2x6x2 ft. test frames in which we will test various mixes of natural building materials. Testing our materials in small 2 sq. ft. batches will not only give us an idea of how well the material holds up to the elements or which of the different ratios is needed for each mix,it should also tell us how much of each material will be needed for the entire wall, and familiarize us with the process involved in making the mix and tamping it into its form. We tested mixes of straw coated with a clay slurry, wood chips coated in a clay slurry and a mix of straw, wood chips and clay.
Temporary plywood forms were used to contain the mixture within the frame and hold the form of our materials as we tamp them down. In the framing of the actual wall, we attached two 1x1 strips vertically along the inside of the studs. This wood will act as keying, locking the straw- clay infill into place, making the wall less vulnerable to forces pushing on it. Once the forms have been packed and dry enough to hold their form, the plywood will be removed from both sides of the frame and the mixes allowed to dry fully. Once the test mixes have completely dried, they will be evaluated based on their strength and length of drying time.
We are testing three different materials, clay+ straw, clay + planar shavings (a wood carving waste material), and clay + straw + planar shavings.
(We have considered developing some kind of mixer to enable us to coat large batches of straw with the slurry at once.)
- For Straw-Clay, no ratio of clay to straw was needed, we just covered it in clay until it was completly coated, but not to the point where it dripped clay slurry. (
- For the Planar shavings -Clay, we mixed 5 shavings to 1 clay using a coffee can that measures out 3/4ths gallon. We also used a clay slurry with a ratio of 1 clay to 3 water. 7 of the 5:1, or 26.25 gallons of shavings and 5.25 gallons of clay, were used to fill the 2X6X2 ft test frame. (This was the easiest job to mix.)
- For the Planar Shavings-Straw-Clay, we mixed 5 coffee cans of shavings to 5 gallon buckets of straw to 2 coffee cans of clay slurry. 3 of of the 5:5:2 were used to fill the 2X6X2 test frames. (This was the hardest to mix since we were mixing to get the two materials to adhere together, which doesn't really happen until it dries.)
Wall Test Outcomes
- Straw-Clay, BEST PERFORMANCE. This started to sprout a few green hay babies from seeds stuck in the hay and it started to mold after 12 days in a warm room, so we are hoping to use a bit of lime or borax in another test batch. The mold died when exposed to the outside elements of wind, sun, and cold, and it has the strongest hold up.
- Planar shavings-Clay, WORST PERFORMANCE for our mix. It didn't bind sufficiently, we tried thicker and thicker clay slurry batches from 2:1 clay to water up to 5:1 clay to water, as well as just using more clay. If we had another binder like flour paste, lime, or rice hull ash this might have worked better.
- Planar shavings-Straw-Clay, NOT GOOD PERFORMANCE. Again it wasn't binding sufficiently, suggesting not that the material of Planar shavings was problematic, but that we needed more clay or another binder.
The planar shavings mixes seemed to need a lot more clay then the straw mix. Though our Humboldt region has clay rich soils the types of clay change quickly over a fifteen foot span and if we use different sources of clay we will have to redo our tests for each new clay type before building. We are also sharing clay sources on the CCAT grounds with another group doing cob, so using less clay in our project will help prevent tapping the communal resource. Also since we are on a short time line of one semester's worth of work it seems using the method that requires the least clay is the most appropriate, since we wont run out of clay as often and have to redo tests as often.
Plaster
Why Lime plaster for the outer wall:
- Earth plasters made of clay (or silica "platelets") have an attraction to water, evaporation of water is what causes severe cracking, and lime helps prevent this. Lime prevents cracking by changing the bonds clay has for water, making it hydrophobic, so swelling and shrinking are greatly reduced. [7]
- Lime bonds with clay to form a "pozzolan," a natural cement. The longer clay and lime are together the stronger the cement bond between them.
- Lime plasters dry slowly gaining strength over time, bonding with clay to form a pozzolan, or natural cement. The longer the clay and lime are together the stronger the bond.
- The average drying time between plaster coats is two weeks. This is an advantage if you want to continue to work with the plaster. Any mistakes or cracks can be fixed, since it can be reworked for days after it's put on wall, unlike cement which sets-up in hours and cannot be altered once its mixed.
- Lime also has the ability to preserve houses for thousands of years. It's finish is hard, weather resistant, inhibits mold growth and repels insects. This is an essential element for our outer wall.[8]
- Extra materials from lime building can be recycled for future use or put back in the earth without releasing poison's into your environment.
- Lime also allows the wall to breathe, preventing liquid penetration, but allowing vapor permeability. This breath ability prevents moisture from being trapped in the wall and thus prevents the inside from rotting.
- After the slacked lime is mixed and applied to a building the chemical reaction that occurs produces crystals of calcite (calcium carbonate). These crystals are have a dual refractive index so that light entering each crystal is reflected back in duplicate giving a glowy shiny look not found in other finishes. [9]
Essentially after you've applied the plaster it turns back into its original form as a dense rock, it's application is forgiving, it is less likely to crack, has a beautiful glowy finish, and has preserved houses for thousands of years.
Using lime:
- Lime (or calcium hydroxide) when mixed with water, is called slacking (or hydrating) your lime. Slacking can be done a month before building and this time helps turn the calcium oxide into calcium hydroxide, which sets slowly by absorbing calcium dioxide from the air. In slacking, as the water to lime ratio is decreased it's generally thought that your product increases, we tried a water to lime ratio of 1.0 lbs of lime with 0.32 lbs of water, 1 lime : 2.5 water, and 1: lime :6.0 water . [10]
- Mixing the lime Plaster for earthen walls (like cob): 2 coats= 1 lime : 3 sand for finish coat and base coat of clay slip, mixed to the consistency of heavy cream.
- Mixing the lime Plaster for strawbale walls: 4 coats= base coat clay slip consistency of heavy cream, Scratch Coat, consistency of brownie batter with 10parts clay dirt: 10 parts sand: 1 part straw, an Infill Coat that lets you build out of 10 parts clay dirt: 15 parts sand: 3 parts straw, and a Finish coat of 1 lime :3 sand.
Make sure the prior coat is dry before adding the next layer,then wet surface, then apply with a trowel.
- Though lime is a product of nature when working with lime its important to not inhale or ingest it. Inhalation can lead to respiratory tract irritation, Coughing, shortness of breath, and chemical bronchitis, while ingestion can lead to internal bleeding, possible perforation of esophagus, severe pain, vomiting, diarrhea, and collapse, among other problems. To take precautions we will wear goggles, gloves, and bandannas for covering our nose and mouth.
- Lime plaster tends to crack around corners so we will apply our plaster only up to the edges of the wall were the 2 by 6 is our stopper and corner.[11]
Earth plaster for the internal wall:
Since lime does require an energy intensive process including temperatures up to 2000 degrees Fahrenheit to break it down, we don't want to use it unless we need to. The outside wall which will have to holdup against the rains could definitely use the help, but the internal wall will not be exposed to much weathering processes.
Earthen plasters have three essential components: sand, clay, and fiber [12]
Plaster Testing
Scratch Test- If the mix has too much sand or too much fiber the plaster will scratch or flake off.
Check for Cracks- If the mix has too much clay content the plaster will crack when its dry, wait around two weeks for it to fully dry.
Challenges of Earthen Plaster on Wood
We have 2 by 4 by 6 studs along our wall and wood likes to soak up the water and dry the plaster out faster then other plastered areas, which can lead to cracking. [13] Since earth plasters do not like to stick well to exposed wood or other smooth surfaces, we tried using burlap soaked in clay slip and stapled to the wood beams.
Using Glass Bottles
For our wall, we decided to incorporate recycled glass bottles. They will serve as a way to let light into the shed and as an aesthetic element of our design.
Collect: First the glass bottles need to be collected. Due to availability, we will be using mostly green, brown and white bottles. For our purposes, both wine bottles and smaller beer bottles are acceptable.
- keep in mind: you will need twice the amount of bottles as places for them in your wall. This is because, with our method at least, you put the cut edges together within the wall so that the parts that show outside are both the bottom of the bottle.
De-label: To remove the labels from the bottles, we got them wet and rubbed the labels off with wire brushes. You can also use steel wool, or soak the bottles for easier removal.
Cut: We used a tile saw to cut bottles in two. Our wall is six inches thick, and it is advisable to leave at least half an inch on either side to allow for plastering. This means the bottle pieces should be 7 inches long. Therefore, we set the saw to cut our bottles 3½ inches from the bottom.
- Be sure to read all instructions for the tile saw.
Prepare bottles: Bottles of the same size and color are put together at their recently cut edges. They are then wrapped together with aluminum flashing and duct taped around the outside. The flashing allows more light to enter the inside of the structure by refraction.
Set bottles: With a material like ours, it would have been problematic to set bottles during construction (using plywood framing wouldn’t have allowed us to leave a half inch on either side). Instead we decided to build the solid wall and bore out holes where we intend to place the bottles. The holes should be just slightly smaller than the bottles themselves in order to hold them tightly.
Plaster: When the wall is completely dry and the bottles are in place the plastering process can begin.
-
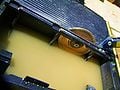
Fig 9a:
-
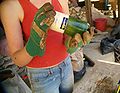
Fig 9b:
-
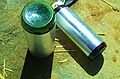
Fig 9c:
-

Fig 9d:
-
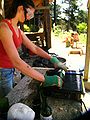
Fig 9e:


Glass Bottle Tests
glass bottles

Costs
| Quantity | Material Needed | source | cost | total cost |
|---|---|---|---|---|
| 3 | straw bale | Eureka Farm Store | 7.00 | 21.00 |
| lots | high content clay soil | From the Earth around us | 0 | 0 |
| 1 | tarp | CCAT | 0 | 0 |
| 1 bag | lime | Do it Best, Eureka | $8.00 | 8.00 |
| 4 5 gallon buckets | sand | From Wes Green | 0 | 0 |
| 1 | big bucket for mixing plaster | CCAT | 0 | 0 |
| 3 | bandannas for mixing plaster | my own | 0 | 0 |
| 3 | gloves | CCAT | 0 | 0 |
| 2 | shovels | CCAT | 0 | 0 |
| 1 | hammer | I have one | 0 | 0 |
| 40 | nails | CCAT | 0 | 0 |
| 1 | power drill | CCAT | 0 | 0 |
| 60 | screws | CCAT | 0 | 0 |
| 1 | metal paddle for stirring clay | CCAT | 0 | 0 |
| 1 | sifter for sifting clay slury | CCAT | 0 | 0 |
| 2 | saws | I have one and CCAT | 0 | 0 |
| 3 | yogurt container tops for applying plaster | Recycling center | 0 | 0 |
| some | recycled glass bottles to let in light | Recycling Center | 0 | 0 |
| 9 | 2" * 6" scrap wood for 4 2' by 2' test frames | Do It Best | ||
| some | plywood | construction sight next to CCAT | 0 | 0 |
| 1 | 2 * 6 * 12 wood crossbeam | Do it Best, Arcata | ||
| 10 | 1 * 1 wood blocks for grip | Do it Best, Arcata | ||
| 4 | 5 gallon buckets | CCAT | 0 | 0 |
| 1 | trash can for storing straw | CCAT | 0 | 0 |
| 4 yards | aluminum sheathing for glass bottle bricks | CCAT | 0 | 0 |
| some | Spanish Red Iron | recycling center | 0 | 0 |
See Help:Tables for more.
Conclusions
Does this meet the criteria?
Next Steps
Contact details
[Carrie Schaden], [Phoebe Sager], [Juliana Willsen]
References Annotated
- Chiras, Dan. "Building with Earth" Mother Earth News, 191(April/May 2002): 28-35.
The advantages and disadvantages of adobe, cob, rammed earth, tire homes, and earthbags.
- Guelberth, Cedar, and Chiras, Dan. The Natural Plaster Book: earth, lime, and gypsum plaster for natural homes. Gabriola Island: New Society Publishers, 2003. [[14]]
- Kennedy, Joseph, F. Building Without Borders: Suistainable Construction for the Global Village. Gabriola Island: New Society Publishers, 2004.[[15]]
- Day, Christopher. Places of the Soul: Architecture and Environmental Design as a Healing Art 1993.
- Minge, Jeanine Marie. "Cob Building: Movements and Moments of Survival." Ph.D. diss., University of South Florida, 2008.
This dissertation is not just a how to, but she also disuses how cob is an "arts-based research process, [which] creates movements and moments of survival". She discusses how "there are no monocultures in nature" and instead talks of building with "nature’s fundamental geometries" keeping in mind "nature’s conservation of resources".
- Pullen, Quinn M. "Strength and Composition of Willamette Valley Cob:An Earthen Building Material." Honors Baccalaureate of Science in Civil Engineering thesis, Oregon State University, 2009.
He discusses the larger variation in properties of cob between builders than conventional building materials like concrete within the Pacific NorthWest.
- The Cob Cottage Company; Evans, Ianto; Smith, Micheal; Smiley, Linda. Earth Building and the Cob Revival: a Reader. Cottage Grove: The Cob Cottage Company, 1996. [[16]]
A collection of 11 international essays on how to build cob and different projects areound the world.
- Wojciechowska, Paulina, Building with Earth: A guide to flexible-form Earthbag Construction [17]
She introduces a variety of natural building materials including adobe,cobb,rammed earth, wattle and daub, and Earthbags. She goes into detail about how and why to use earthbags and introduces leaders in the field of earthbag construction. She also discusses the how and why of different architectural designs like arches and domes that are useful for any earth material construction.
ENGR 305 Literature Review
CCAT Green Shed West Wall
Juliana Willsen
Uses of Earth as a Building Material:
• formed into blocks • packed between forms • molded by hand
Wet Climates and Earth Building:
• mud mixes are often placed wet, directly by hand • should be elevated off ground to avoid sitting in moisture
Cob Walls:
• made of aggregate (various sizes of rock and sand) and straw bound together with clay • roughly 3:1 ratio of sand:clay needed • earth mixture strong against compressive forces, straw gives tensile strength • soil must be tested for clay content • small test mixes will be necessary
Pros- • construction simple, using few tools • no framework needed • hygroscopic, can take on and give off water vapor from air (regulates humidity in building and discourages mold growth) • fireproof • shelves can be built in
Cons- • labor intensive/time consuming • can be poor insulator, depending on amount of straw used • needs to dry for a while before being plastered
Rammed Earth:
• compressed soil, compacted into form • soil mix is placed in layers about 1' thick • plaster may be required depending on materials used • • Methods: • Earthbag: bags filled with earth, stacked in layers, tamped down to lock into place. Barbed wire can be laid between layers for tensile strength. • Block Press: used to make bricks • Superadobe • Clay Slip
Cordwood:
• Cords bonded with mortar
Pros- • hygroscopic • no plaster required
Cons- • wood can shrink or expand causing gaps and cracks • wood can mold, rot, be destroyed by insects/animals
Straw Bale: • stacked straw bales, covered with a plaster
Pros- • excellent insulator
Cons- • very vulnerable to water, must be lifted off ground in moist climates • plastering can be difficult due to texture/non-uniformity of bales
Plastering:
• applied when wet using hawk and trowel • can be made of earth, lime, cement • clay used must be broken down and sifted finely • lime gets soaked in water to become calcium hydroxide • plaster must be tested • the thicker the coat is applied, the more likely it is to crack while drying • 3 coats is typical • 1st coat makes uniform surface and is scratched so that the 2nd coat will adhere • 2nd coat covers any cracks and smoothes rough spots • 3rd coat is thinnest
Works Cited:
King, Bruce (1996). "Buildings of Earth and Straw", Ecological Design Press, Sausalito, CA
Snell, Clarke & Callahan, Tim (2009). "Building Green: A Complete How -To Guide to Alternative Building", Larke Books, New York, NY
Chiras, Daniel (2004). "The New Ecological Home: A Complete Guide to Green Building Options", Chelsea Green Publishing Company, White River Junction, VT
Bee, Becky (1997) "The Cob Builders Handbook: You Can Hand-Sculpt Your Own Home", Groundworks, Murphy, OR
Goodhew S., Griffiths R.(2005). "Sustainable earth walls to meet the building regulations", Energy and Buildings, 37(5), p. 451-459.