(→Design) |
m (Lonny moved page CCAT rainwater catchment to CCAT greenshed rainwater catchment/2011 without leaving a redirect) |
||
| (36 intermediate revisions by 6 users not shown) | |||
| Line 1: | Line 1: | ||
{{305inprogress|May 15, 2011}} | {{305inprogress|May 15, 2011}} | ||
{{TOCleft}} | |||
== Abstract == | == Abstract == | ||
In a space of less than 5 feet from gutter to the waters primary use, | [[File:CCAT_Rainwater_Sink_Final.jpg|thumb|right]] | ||
In a space of less than 5 feet from the gutter to the waters primary use, a system has been implemented that will filter litter and debris, including a first flush filter, and collect it in an unique storage container. With the remaining space and insufficient water pressure to use a faucet, a temporary pump priming system and pump faucet, that can be converted in the future to a pump hose and gravity fed sink, supplies the increase in water pressure to get sufficient flow from a sink that drains to a greywater marsh system whose outlet currently feeds the soils surrounding the garden, but may be connected to the property drainage in the future. | |||
== Background == | == Background == | ||
[[CCAT]] volunteers are always busy and in need of a | [[CCAT]] volunteers are always busy and in need of a wash station for their new [[CCAT_greenshed|green shed]]. There is an existing [[CCAT_rainwater_catchment_system|rainwater system]] with storage which is in good condition and used for summer watering, although this storage tank at the present time is reported to be exhausted before the end of summer. A second water supply and storage system will need to be designed for the green shed. The water at present time drains behind the green shed and runs into property drainage. | ||
This could best be served using [[Rainwater_Harvesting_(Practical_Action_Technical_Brief)|rainwater]] and the | This could best be served using [[Rainwater_Harvesting_(Practical_Action_Technical_Brief)|rainwater]] and the green shed roof, which is a viable source for a [[rainwater|rainwater catchment system]]. | ||
[[Basic_rainwater_collection_calculations|Calculator]] | Rainwater collection estimates can be made using this [[Basic_rainwater_collection_calculations|Calculator]] or the equation <math> V = R*A*k*e </math> | ||
From the calculator and our measurements, we were able to determine that we would be able to obtain: | |||
<math> (3.5 \tfrac{ft}{yr})(96 ft^2)(.9)(7.48 \tfrac{gal}{ft^3}) = 2262\tfrac{Gallons}{Year}</math> | |||
2250 gallons per year. | 2250 gallons per year. | ||
== Objective == | == Objective == | ||
The objective is to redirect the 2250 gallons of water currently draining off the [[CCAT Greenshed south wall|CCAT’s green shed]] | The objective is to redirect the estimated 2250 gallons of water currently draining off the roof of [[CCAT Greenshed south wall|CCAT’s green shed]] to a [[Rainwater|catchment system]]. This water will be used in an easy to use wash station for tools. The reason to use this water is to prevent the water from soaking the soil behind the green shed retaining wall every year. After the water is collected and used it should then be used for a secondary purpose in a greywater marsh. The water and the system should fulfill as many needs as possible. | ||
== Cost Estimate | == Cost Estimate == | ||
{| class="wikitable sortable" | {| class="wikitable sortable" | ||
! Item !! Description !! Price !! Quantity !! Total | ! Item !! Description !! Price !! Quantity !! Total | ||
|- | |- | ||
| Filter || Prevent large particulate matter || $ | | Filter || Prevent large particulate matter || $50 || 1 || $50 | ||
|- | |- | ||
| Tank || Water Bladder: holds 1057.53 gallons || $200 || 1 || $200 | | Tank || Water Bladder: holds 1057.53 gallons || $200 || 1 || $200 | ||
|- | |- | ||
| Sink || Two basin kitchen sink || | | Sink || Two basin kitchen sink || found in garbage || 1 || $0 | ||
|- | |- | ||
| | | Pump || drum pump and 2 PVC connections || online || 1 || $50 | ||
|- | |- | ||
| Marsh || | | Piping || PVC and 2 T's, 2 reducers, 2 90* elbows, 2 globe v., hose conn. || 4.86 || 10 || $48.60 | ||
|- | |||
| Marsh || 2nd H2O use for waste water || donated || 1 || $0 | |||
|-class="sortbottom" | |-class="sortbottom" | ||
|colspan="4" align="right" | '''Total Cost''' | |colspan="4" align="right" | '''Total Cost''' | ||
|align="right"| '''$ | |align="right"| '''$318.60''' | ||
|} | |} | ||
== Criteria == | == Criteria == | ||
The basic Criteria of planning our rainwater catchment system is function first, but based around user friendliness, longevity, and | The basic Criteria of planning our rainwater catchment system is function first, but based around user friendliness, longevity, and usefulness. The system has to be easy to use and rugged due the nature of the environment and able to withstand the test of time with minimal maintenance. Other considerations such as how easy the system can be modified and aesthetics are being taken into account as well. The following criteria will be used and with the highest score being considered over the others for the project. | ||
{| class="wikitable sortable" | {| class="wikitable sortable" | ||
| Line 47: | Line 52: | ||
| Storage Uniqueness | | Storage Uniqueness | ||
| 10 | | 10 | ||
| location | | location constraints and no rain barrels | ||
|- | |- | ||
| Materials used | | Materials used | ||
| 6 | | 6 | ||
| Minimize new materials and high | | Minimize new materials and high embedded energy | ||
|- | |- | ||
| Usable sink | | Usable sink | ||
| Line 71: | Line 76: | ||
| Aesthetics | | Aesthetics | ||
| 4 | | 4 | ||
| Is it | | Is it camouflaged with the surroundings | ||
|- | |- | ||
| Lifespan | | Lifespan | ||
| 8 | | 8 | ||
| Quality of materials and resistance to | | Quality of materials and resistance to photo-degradation | ||
|} | |} | ||
==Rough Timeline== | ==Rough Timeline== | ||
{| class="wikitable" | |||
! Objectives | |||
! Relative Week | |||
{| | |||
|- | |- | ||
| Build framing || Week 7 Mar 1st | | Build framing || Week 7 Mar 1st | ||
| Line 113: | Line 116: | ||
== Construction == | == Construction == | ||
Going through the building phase step by step! Starting with getting the water bladder, digging, and finally putting everything together. | Going through the building phase step by step! Starting with getting the water bladder, digging, and finally putting everything together. | ||
<gallery> | <gallery caption="Building phases"> | ||
Image:Ccat bag 0300.JPG| | Image:Ccat bag 0300.JPG|Making sure the bag fits behind the shed | ||
Image:Ccat bag 0297.JPG|Testing the water bag and making sure there are no leaks | Image:Ccat bag 0297.JPG|Testing the water bag and making sure there are no leaks | ||
Image:Ccat bag 0301.JPG| | Image:Ccat bag 0301.JPG| | ||
Image:Ccat bag 0306.JPG|This is after digging out dirt for the bag to fit in and putting in gravel | Image:Ccat bag 0306.JPG|This is after digging out dirt for the bag to fit in and putting in gravel | ||
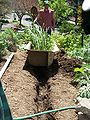
Image:Ccat bag 0311.JPG|The sink | Image:Ccat bag 0311.JPG|The sink | ||
Image:CCAT Rainwater Sink 1.jpg|Output and runoff from sink runs under the urbanite wall | |||
Image:Ccat bag 0312.JPG|Sink with pump that can connect to a hose | Image:Ccat bag 0312.JPG|Sink with pump that can connect to a hose | ||
Image:CCAT Rainwater Pump.jpg|Pump with Instructions for gravity feed and priming | |||
Image:CCAT Rainwater YAY.jpg|Finished the Piping from the sink to the Marsh | |||
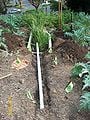
Image:Ccat bag 0313.JPG|Piping connecting from the sink to the marsh | Image:Ccat bag 0313.JPG|Piping connecting from the sink to the marsh | ||
Image:Ccat bag 0314.JPG|Piping continue to the marsh | Image:Ccat bag 0314.JPG|Piping continue to the marsh | ||
Image:Ccat bag 0315.JPG|The final step for the flow of water is into the marsh | Image:Ccat bag 0315.JPG|The final step for the flow of water is into the marsh | ||
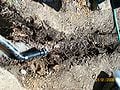
Image:Ccat bag 0316.JPG|Marsh | Image:Ccat bag 0316.JPG|Marsh | ||
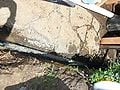
Image:CCAT Rainwater Filter.jpg|First flush and macro particle Filter | |||
Image:CCAT Rainwater Filter2.jpg|Clear Tube used to bleed any stagnation, Opaque Tube is elevated inside the filter to use as first flush | |||
Image:CCAT Rainwater Sink Final.jpg|The final setup of the sink, piping and pump | |||
</gallery> | </gallery> | ||
==Design== | ==Design== | ||
The system consists of: | |||
*A first flush filter | |||
first flush filter | *Water storage | ||
storage | *Transport to wash sink | ||
*Drainage | |||
*Transport to marsh | |||
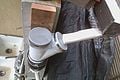
The design of the rainwater catchment system first starts with rain and the capture of it! The rain | The design of the rainwater catchment system first starts with rain and the capture of it! The rain falls onto the green shed roof, which occupies an area of 96 ft<sup>2</sup>, and flows into the gutter. With limited space it was decided to use a downspout in the gutter and channel the water to the green shed wall where the filter is mounted. The filter consists of a screen for macro debris and has the ability to create a small first flush system before it is directed to the storage bag using flexible ribbed hosing. Without enough drop for a self cleaning screen and too little room to have the filter be in a preferential area further from the storage, we decided to attach the filter to the green shed wall using masonry screws. | ||
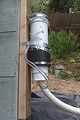
Due to | Due to everyone's overall preference for a unique storage container, we decided to use a water bladder which has the limitation of top entry and exit from the container. While this ensures the maximum water pressure because conventional storage devices often put their outlets at the bottom, we still did not have enough pressure for a gravity fed sink, which is far easier to use than any other type. | ||
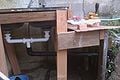
After elevating our storage to the highest point possible that still allows room for a small filter, and lowering our sink or point of use below the standard still making it accessible, and changing our faucet and sink to optimize water pressure, we were still unable to produce enough water pressure to provide the sink with sufficient flow with only gravity. | After elevating our storage to the highest point possible that still allows room for a small filter, and lowering our sink or point of use below the standard still making it accessible, and changing our faucet and sink to optimize water pressure, we were still unable to produce enough water pressure to provide the sink with sufficient flow with only gravity. | ||
To resolve the problem with insufficient flow, we | To resolve the problem with insufficient flow, we revisited a design that incorporated a pump. While this is not optimal because it requires two people to operate the sink, we used threads and hose fittings to allow for removal or alternate use for the pump, should the problems surrounding a gravity fed sink be resolved. | ||
The idea of a pump was also a help, because as previously mentioned the water needed to be siphoned out of storage and should the seal ever be lost a primer would be essential. The pump can provide an alternate function as a system primer. To use the pump as a primer and for water pressure on the sink we used two globe valves to control the direction of flow and by using threaded | The idea of a pump was also a help, because as previously mentioned the water needed to be siphoned out of storage and should the seal ever be lost a primer would be essential. The pump can provide an alternate function as a system primer. To use the pump as a primer and for water pressure on the sink we used two globe valves to control the direction of flow and by using threaded PVC at certain points it allowed the system to be easily altered in future allowing the pump to be used to work a garden hose. | ||
We wanted to limit the amount of | We wanted to limit the amount of PVC and embedded energy used so while we could not avoid using PVC for the sink drainage and pump mechanism we decided to use garden hose as it can be easily attached to PVC fittings and can be customized more easily with regards to the flexible storage container. | ||
After using the pump or gravity fed sink we connected the typical sink drainage to a | After using the pump or gravity fed sink we connected the typical sink drainage to a PVC piping system that flows underground to a greywater marsh that has been sunken in the ground currently increasing water content in the soil surround the garden. | ||
==Testing Results== | ==Testing Results== | ||
*Filter positioning is critical to determine and should be considered during all stages of planning and construction. | |||
*Storage is vulnerable to puncture but easy to repair. | |||
*Not enough water pressure for a gravity fed sink. | |||
*Pump as siphon primer works well. | |||
*Pumping water to sink works but provides too much pressure and the pump must be turned slowly. | |||
*Pump is not ideal but works. | |||
*Drainage is at proper declination for water to drain to marsh without apparent leakage or standing water. | |||
*Marsh drains well and is at proper height. | |||
==Next Steps== | ==Next Steps== | ||
Make sink gravity fed. Would suggest building green shed wall higher to allow water storage to be higher, putting in a viewing window to see storage. With sink being gravity fed, decouple pump output and attach hose for a hose for that side of the property. The pump can also be used in the future to pump the water to a higher point on the property. | |||
Improve on sink basin if desired. | |||
Examine long term viability of unique storage container. | |||
Improve filter system. | |||
==Conclusion== | ==Conclusion== | ||
In the end we discovered, as originally thought, that a gravity fed tool wash station requires more head (change in elevation) than our site allowed. The greywater marsh fit snugly into the earth, with a little encouragement and dislodging of an uncooperative clay deposit. (Word to the wise: When dealing with a several hundred pound cast iron bathtub, make sure the hole you are placing said bathtub in is A) appropriately sized, B) correctly angled to ensure maximum drainage and C) is still in reach of the drainage output connected to the rest of the system.) It is essential that system be planned out in its entirety before major assembly begins, and if plans change mid-construction then hope for the best. | |||
== Lessons Learned == | == Lessons Learned == | ||
[[Category:Engr305 Appropriate Technology]] | [[Category:Engr305 Appropriate Technology]] | ||
1. | 1. Make sure the site is appropriate for the project. | ||
2. If | 2. If scope of project changes then time line should reflect changes accordingly. | ||
3. | 3. Minimize points of contact from the client to prevent communication issues. | ||
4. | 4. Get initials or sign off on all parts of project. | ||
5. Require 24/7 or | 5. Require 24/7 or access to materials and tools. | ||
6. If there is a conflict in direction, | 6. If there is a conflict in direction, do not be in the middle. Open up communication and try to keep communication written to force people to be on their best behavior. | ||
7. Request clear grading criteria for project. | 7. Request clear grading criteria for project. | ||
8. | 8. For a class project consider visibility and social organizations affiliated with the project. | ||
9. Have client define criteria or project prior to accepting. | |||
10. This project would be a better project for fall semester since it doesn't rain as much until the end and allows the system to be used and tested during the spring, but starting the project in spring when it rains in the beginning of the semester and halts work also making difficult testing and use for the summer until the rains come again in excess. | |||
== Literature review == | == Literature review == | ||
| Line 188: | Line 212: | ||
2. Shows how to calculate the efficiency of water from the storage tanks to farms. | 2. Shows how to calculate the efficiency of water from the storage tanks to farms. | ||
Bos,M.G.. On Irrigation Efficiencies. 19 ed. Wageningen,Netherlands: International Institute for Land | Bos,M.G.. On Irrigation Efficiencies. 19 ed. Wageningen,Netherlands: International Institute for Land Reclamation and Improvement, 1974. | ||
3. Case studies from around the world using different types of catchments and also measure sediment build up. | 3. Case studies from around the world using different types of catchments and also measure sediment build up. | ||
Revision as of 23:19, 10 February 2017
Template:305inprogress Template:TOCleft
Abstract

In a space of less than 5 feet from the gutter to the waters primary use, a system has been implemented that will filter litter and debris, including a first flush filter, and collect it in an unique storage container. With the remaining space and insufficient water pressure to use a faucet, a temporary pump priming system and pump faucet, that can be converted in the future to a pump hose and gravity fed sink, supplies the increase in water pressure to get sufficient flow from a sink that drains to a greywater marsh system whose outlet currently feeds the soils surrounding the garden, but may be connected to the property drainage in the future.
Background
CCAT volunteers are always busy and in need of a wash station for their new green shed. There is an existing rainwater system with storage which is in good condition and used for summer watering, although this storage tank at the present time is reported to be exhausted before the end of summer. A second water supply and storage system will need to be designed for the green shed. The water at present time drains behind the green shed and runs into property drainage.
This could best be served using rainwater and the green shed roof, which is a viable source for a rainwater catchment system.
Rainwater collection estimates can be made using this Calculator or the equation

From the calculator and our measurements, we were able to determine that we would be able to obtain:

2250 gallons per year.
Objective
The objective is to redirect the estimated 2250 gallons of water currently draining off the roof of CCAT’s green shed to a catchment system. This water will be used in an easy to use wash station for tools. The reason to use this water is to prevent the water from soaking the soil behind the green shed retaining wall every year. After the water is collected and used it should then be used for a secondary purpose in a greywater marsh. The water and the system should fulfill as many needs as possible.
Cost Estimate
| Item | Description | Price | Quantity | Total |
|---|---|---|---|---|
| Filter | Prevent large particulate matter | $50 | 1 | $50 |
| Tank | Water Bladder: holds 1057.53 gallons | $200 | 1 | $200 |
| Sink | Two basin kitchen sink | found in garbage | 1 | $0 |
| Pump | drum pump and 2 PVC connections | online | 1 | $50 |
| Piping | PVC and 2 T's, 2 reducers, 2 90* elbows, 2 globe v., hose conn. | 4.86 | 10 | $48.60 |
| Marsh | 2nd H2O use for waste water | donated | 1 | $0 |
| Total Cost | $318.60 | |||
Criteria
The basic Criteria of planning our rainwater catchment system is function first, but based around user friendliness, longevity, and usefulness. The system has to be easy to use and rugged due the nature of the environment and able to withstand the test of time with minimal maintenance. Other considerations such as how easy the system can be modified and aesthetics are being taken into account as well. The following criteria will be used and with the highest score being considered over the others for the project.
| Criteria | Weight (scale:1-10) | Constraints |
|---|---|---|
| Storage Uniqueness | 10 | location constraints and no rain barrels |
| Materials used | 6 | Minimize new materials and high embedded energy |
| Usable sink | 7 | |
| Ease of future modifications | 9 | Available location and budget |
| Ease of use | 8 | Is it versatile and simple |
| Self Sustaining | 7 | Is it self cleaning |
| Aesthetics | 4 | Is it camouflaged with the surroundings |
| Lifespan | 8 | Quality of materials and resistance to photo-degradation |
Rough Timeline
| Objectives | Relative Week |
|---|---|
| Build framing | Week 7 Mar 1st |
| Attach and test filter | Week 6 Mar 7th |
| Start collecting testing storage | Week 6 Mar 14th |
| Find overflow elevation/capacity | Week 5 Mar 21st |
| Place and start siphon | Week 5 Mar 28th |
| Connect overflow system | Week 5 Apr 4th |
| Connect sink & Test sink | Week 4 Apr 11th |
| Connect marsh to sink outlet | Week 4 Apr 18nd |
| System complete | Week 3 Apr 25th |
| Working system debugged or noted | Week 2 May 6th |
| Working whitepapers - specs/docs | Week 1 May 2nd |
| Appropedia/report COMPLETE | Week 0 May 9th |
Construction
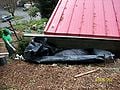
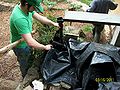
Going through the building phase step by step! Starting with getting the water bladder, digging, and finally putting everything together.
- Building phases
-
Making sure the bag fits behind the shed
-
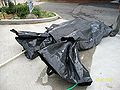
Testing the water bag and making sure there are no leaks
-
-
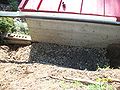
This is after digging out dirt for the bag to fit in and putting in gravel
-
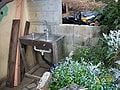
The sink
-
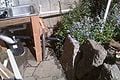
Output and runoff from sink runs under the urbanite wall
-
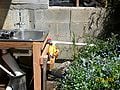
Sink with pump that can connect to a hose
-
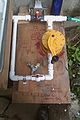
Pump with Instructions for gravity feed and priming
-

Finished the Piping from the sink to the Marsh
-
Piping connecting from the sink to the marsh
-
Piping continue to the marsh
-
The final step for the flow of water is into the marsh
-
Marsh
-
First flush and macro particle Filter
-
Clear Tube used to bleed any stagnation, Opaque Tube is elevated inside the filter to use as first flush
-
The final setup of the sink, piping and pump


Design
The system consists of:
- A first flush filter
- Water storage
- Transport to wash sink
- Drainage
- Transport to marsh
The design of the rainwater catchment system first starts with rain and the capture of it! The rain falls onto the green shed roof, which occupies an area of 96 ft2, and flows into the gutter. With limited space it was decided to use a downspout in the gutter and channel the water to the green shed wall where the filter is mounted. The filter consists of a screen for macro debris and has the ability to create a small first flush system before it is directed to the storage bag using flexible ribbed hosing. Without enough drop for a self cleaning screen and too little room to have the filter be in a preferential area further from the storage, we decided to attach the filter to the green shed wall using masonry screws.
Due to everyone's overall preference for a unique storage container, we decided to use a water bladder which has the limitation of top entry and exit from the container. While this ensures the maximum water pressure because conventional storage devices often put their outlets at the bottom, we still did not have enough pressure for a gravity fed sink, which is far easier to use than any other type.
After elevating our storage to the highest point possible that still allows room for a small filter, and lowering our sink or point of use below the standard still making it accessible, and changing our faucet and sink to optimize water pressure, we were still unable to produce enough water pressure to provide the sink with sufficient flow with only gravity.
To resolve the problem with insufficient flow, we revisited a design that incorporated a pump. While this is not optimal because it requires two people to operate the sink, we used threads and hose fittings to allow for removal or alternate use for the pump, should the problems surrounding a gravity fed sink be resolved.
The idea of a pump was also a help, because as previously mentioned the water needed to be siphoned out of storage and should the seal ever be lost a primer would be essential. The pump can provide an alternate function as a system primer. To use the pump as a primer and for water pressure on the sink we used two globe valves to control the direction of flow and by using threaded PVC at certain points it allowed the system to be easily altered in future allowing the pump to be used to work a garden hose.
We wanted to limit the amount of PVC and embedded energy used so while we could not avoid using PVC for the sink drainage and pump mechanism we decided to use garden hose as it can be easily attached to PVC fittings and can be customized more easily with regards to the flexible storage container.
After using the pump or gravity fed sink we connected the typical sink drainage to a PVC piping system that flows underground to a greywater marsh that has been sunken in the ground currently increasing water content in the soil surround the garden.
Testing Results
- Filter positioning is critical to determine and should be considered during all stages of planning and construction.
- Storage is vulnerable to puncture but easy to repair.
- Not enough water pressure for a gravity fed sink.
- Pump as siphon primer works well.
- Pumping water to sink works but provides too much pressure and the pump must be turned slowly.
- Pump is not ideal but works.
- Drainage is at proper declination for water to drain to marsh without apparent leakage or standing water.
- Marsh drains well and is at proper height.
Next Steps
Make sink gravity fed. Would suggest building green shed wall higher to allow water storage to be higher, putting in a viewing window to see storage. With sink being gravity fed, decouple pump output and attach hose for a hose for that side of the property. The pump can also be used in the future to pump the water to a higher point on the property.
Improve on sink basin if desired.
Examine long term viability of unique storage container.
Improve filter system.
Conclusion
In the end we discovered, as originally thought, that a gravity fed tool wash station requires more head (change in elevation) than our site allowed. The greywater marsh fit snugly into the earth, with a little encouragement and dislodging of an uncooperative clay deposit. (Word to the wise: When dealing with a several hundred pound cast iron bathtub, make sure the hole you are placing said bathtub in is A) appropriately sized, B) correctly angled to ensure maximum drainage and C) is still in reach of the drainage output connected to the rest of the system.) It is essential that system be planned out in its entirety before major assembly begins, and if plans change mid-construction then hope for the best.
Lessons Learned
1. Make sure the site is appropriate for the project.
2. If scope of project changes then time line should reflect changes accordingly.
3. Minimize points of contact from the client to prevent communication issues.
4. Get initials or sign off on all parts of project.
5. Require 24/7 or access to materials and tools.
6. If there is a conflict in direction, do not be in the middle. Open up communication and try to keep communication written to force people to be on their best behavior.
7. Request clear grading criteria for project.
8. For a class project consider visibility and social organizations affiliated with the project.
9. Have client define criteria or project prior to accepting.
10. This project would be a better project for fall semester since it doesn't rain as much until the end and allows the system to be used and tested during the spring, but starting the project in spring when it rains in the beginning of the semester and halts work also making difficult testing and use for the summer until the rains come again in excess.
Literature review
Books
1. This book shows the right and wrong ways to build a catchment system. Also shows the steps on how to build ferrocement water tank and maintenance on tanks. It also talks about the history of rainwater catchment.
Gould,John. Rainwater Catchment Systems For Domestic Supply Design, Construction and Implementation. Southampton Row,London: Intermediate Technology Publications, 1999.
2. Shows how to calculate the efficiency of water from the storage tanks to farms.
Bos,M.G.. On Irrigation Efficiencies. 19 ed. Wageningen,Netherlands: International Institute for Land Reclamation and Improvement, 1974.
3. Case studies from around the world using different types of catchments and also measure sediment build up.
Schick,Asher. Channel Processes: Water, Sediment, Catchment Controls. Catena Supplement 5. West Germany: Catena Verlag, 1984.
4. Ball Redbook 17th edition Vol. 1 Multiple descriptions and ideas of utilizing space for irrigation systems. Beytes, Chris, and Debbie Hamrick. Ball redbook . 17th ed. Batavia, Ill.: Ball Pub., 2003.
5. Greenhouse Operation & Management 6th edition More examples and ideas for transporting small scale amounts of water. Nelson, Paul V.. Greenhouse operation & management . 6th ed. Upper Saddle River, N.J.: Prentice Hall, 1998.
6. The Atmosphere an introduction to Meteorology Detailed information on interpreting weather patterns and atmospheric conditions. Lutgens, Fredrick K., and Edward J. Tarbuck. The Atmosphere an introduction to Meteorology. 10 ed. Upper Saddle River, NJ: Pearson Prentice Hall, 2007.
Peer Reviewed
1. Talks about different types of grey water (light grey water) . The benefits, nutrients that are good for irrigation. Or some effects on plants and what you should do to decrease risks.
"BC Green Building Code Greywater Recycling". (2007), http://www.llbc.leg.bc.ca/public/pubdocs/bcdocs/438927/lighthouse_research_on_greywater_recycling_oct_22_07_2_.pdf. (accessed February 10, 2011).
2. “Harvest the Rain” Article on rainwater catchment systems with multiple diagrams of filtration systems
Mother Earth News; Aug/Sep2003, Issue 199, p42, 7p, 2 Color Photographs, 3 Black and White Photographs, 3 Diagrams
3. Specifics towards maximizing the efficiency of a rain gutter drainage system. Arthur, S. "Recent and future advances in roof drainage design and performance." Building services engineering research & technology 26.4 (2005): 337-348.
Internet sites
1. Talks about where to put a marsh, how to build one and how it helps animals have habitats.
The Old House Web. "Backyard Wetlands: Mini-marshes Can Provide Benefits Of Natural Wetlands." http://www.oldhouseweb.com/gardening/backyard-wetlands-mini-marshes-can-provide-benefits-of-natural-wetlands.shtml (accessed 2/11/11).
2. Shows the process of how to install a sink outdoors
Ames, Daniel. "How to Add an Outdoor Sink." may 6, 2010.http://www.ehow.com/how_6299555_add-outdoor-sink.html (accessed 2/8/11).
3. An idea for Rubbermaid trash cans for a water storage. Seeing if people used them and if they liked them.
"Simply Discuss: Rubbermaid trash can for water storage?." 03/07/2007.http://forum.simplydiscus.com/showthread.php?56309-rubbermaid-trash-can-for-water-storage (accessed 2/8/11).
4. Flexi tube connection and inlet connection. http://www.instructables.com/id/Elevated-Dual-Barrel-Rainwater-Collection-System/
5. Solar Powered system, an idea should we find ourselves with excess time. http://www.instructables.com/id/Green-Solar-Powered-Water-Barrel/
6. Modular Filtration and Storage system http://www.instructables.com/id/Rain-water-collection-filtration-storage-syste/