Project Background

.JPG)
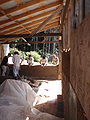
CCAT is in the process of finishing up a green shed/workshop space that utilizes green methods of building. Part of this green design is the walls, that will be made from as many natural or recycled materials as is reasonable. The different methods of natural building used for this shed are cordwood, straw clay slip, and cob. This project offers students the opportunity to get hands-on experience with various wall infill methods and materials. Our wall, the south facing wall, will be constructed of cob and recycled glass. We chose cob as the material to use for the south facing wall because it has a lot of thermal mass and will hopefully act as a heat battery for the workshop space. The concrete foundation of the green shed was poured to make a standard 6-inch wide wall. This is not wide enough for most earth building methods to be of much insulation value. The foundation for the walls have been widened by pieces of concrete found around town and cemented together to accommodate the thickness of a cob wall.
The frequently wet nature of our climate may present other obstacles. The water-soluble nature of many natural materials will be considered in material selection. Some methods using organic matter present the issue of rotting. The tendency of organic matter to rot in out wet climate will require the walls to "breathe" well so as to not trap moisture inside. An existing example of natural wall construction exists at CCAT: http://www.appropedia.org/CCAT_natural_wall_construction. For our south wall, we have decided to use cob and lime plaster.
Project Definition
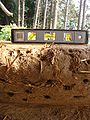
A strong criterion for the south wall is to let light in. Our plan is to mount glass bottles horizontally into the wall, as well as a granite slab to serve as a shelf below a large glass plate donated from Fire & Light, a local glass company that makes glass from recycled glass.
The other two walls will be engineered for insulation. The west wall is built with straw clay slip to take advantage of the sunlight hitting it and provide insulation. The north wall, which will receive little to no sunlight, will be built for maximum insulation, using cordwood. Since this will be a workshop space, shelving will be incorporated into our wall. Our granite slab shelf will provide a small shelf space.
Criteria
| Criteria | Constraints | Weight |
|---|---|---|
| Water Resistance | Must withstand rain and humidity | 9 |
| Aesthetics | Must be pleasing to the eye and creative | 9 |
| Cost | Must be (much) less than $500 | 10 |
| Level of education value | Accessible and includes clear explanations of the project | 5 |
| Thermal mass | Must retain heat | 10 |
| Passive Solar | Cob may not be insulating enough | 5 |
| Light permeability | Must have enough glass bottles/windows for light to shine through | 10 |
| Local materials | Must have low fossil fuel intensity, low embedded energy | 8 |
| Strength/structural safety | Must with stand compressional, tensile and torsion pressures | 8 |
| Maintainability | Must require only 1 Friday workday a month at CCAT for maintenance | 7 |
| Repairability | Must be able to identify problem areas and have easy repair | 9 |
| Time | Groups members can only work 3 hours/week on wall (give or take) | 10 |
Proposed Timeline
| ITEM | PROPOSED DATE | DATE MET? |
|---|---|---|
| Test Soil | 2/20 | Yes |
| Make Test Bricks | 3/7 | Yes |
| Send donation request to Fire and Light and Granite Construction Co. | 3/12 | Yes |
| Assemble sand, clay and straw in semester long storage | 3/14 | Yes |
| Finish final design for bottle layout on wall | 3/14 | Yes |
| Prepare bottles for placing in wall | 3/20 | No, but is now finished |
| Lay down a foot tall run of cob (1/10) 3/20 | 3/20 | No, due to rain |
| Lay down a foot tall run of cob (2/10) | 3/26 | No, due to rain! |
| Lay down a foot tall run of cob (3/10) | 3/27 | No |
| Lay down a foot tall run of cob (4/10) | 4/2 | Yes, thanks to help from the class and finally some clear weather! |
| Lay down a foot tall run of cob (5/10) | 4/3 | Yes |
| Lay down a foot tall run of cob (6/10) | 4/4 | Yes |
| Lay down a foot tall run of cob (7/10) | 4/9 | No |
| Lay down a foot tall run of cob (8/10) | 4/10 | Yes |
| Lay down a foot tall run of cob (9/10) | 4/16 | No |
| Lay down a foot tall run of cob (10/10) | 4/17 | No |
| Test plaster mixes on wall | 4/18 | No, not done with wall! |
| Apply plaster | 4/23-4/30 | No, not done with wall! |
| Put granite shelf into wall | 5/9 | Yes |
| Make instructional video | 5/9 | Yes |
| Finish Appropedia page | 5/9-5/10 | Yes |
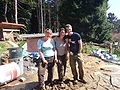
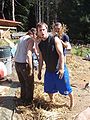
Project Members

Left: Mitra Abidi, Middle: Adam Channel, Right: Adam Shapiro
Elements of Cob
Some concerns of building with cob involve getting the right methods for retrieving soil, so with a few exceptions, earth suitable for construction comes from the subsoil layers. The topsoil layer, because it contains organic matter which will continue to decompose and change, and which sometimes has a negative effect on certain stabilizers, is not normally used for cob construction. Another concern is that cob walls in general, have good strength in compression but they have very weak strength in regards to tension, so consequently they do not have great resistance to bending over time. Also the lack of tensile strength and resistance to bending causes load-bearing earth buildings to have the reputation of being prone to damage and collapse in an earthquake. The lack of tensile strenghth means that when earth is to be used as a load-bearing material, all forces must pass down within the thickness of the structure to the ground. In regards to cob building, the main constraint is the slenderness of the wall, since the lack of resistance to bending has to be compensated for by greater width in the wall to ensure stability. What this means is that load bearing walls not stabilized by wood studs should be thick and massive. More concerns to take into consideration are that cob walls lose much of their compressive strength when exposed to prolonged rain or moisture like what we experience often in Humboldt. Some Benefits of building with cob include climatic comfort, because thick earth structures are good insulators due to earth's low thermal conductivity value. Earth is a building material with the capacity for making buildings of very high quality and great durability and has also been used very successfully for centuries in countries with wet climates(British Isles) as much as it has in dry countries (Niger,Sudan).
Types of Cob Building
There are many different popular styles of earth building including: Adobe (which involves bricks that are molded wet and cast small enough to shrink without cracking), Pise De Terre (originating from France), Tapial (which involves packing soil into wooden framework), Wattle and Daub (which tapial evolved from, is a woven framework of twigs and a mud covering applied to the framework) and finally cob, in which clayey soils are mixed into sticky mud, then laid up directly into a free-standing wall. As far as building with earth materials, human beings have been utilizing limitless structural possibilities for thousands of years.
Designing cob building
Cob is fireproof, so fireplaces, stoves, and chimneys can be shaped with it. Cob beds and benches can be placed near the stoves and frieplaces to be warmed. Usually the walls of a cob home are whitewashed or stuccoed over. This undoubtedly helps to preserve them, protecting against any harsh winds. Both the composition of cob and the positioning of the house/cob structure affect the electricity consumed in the structure. It is more energy efficient to position the house so that it faces the south(in the northern hemisphere)and north(in the southern hemisphere), with big windows in this direction. This way the big south/north facing windows and solar panels, if employed, can capture sunlight. After sunlight has been captured, the thermal mass of the cob can absorb and make use of the solar energy. In similar conditions of this study, stabilization by cement or lime have been found to be inadequate. First, the stabilization does not employ the recycling of the material, which can be detrimental to the environment. In addition, the use of cement or lime may not be economical viable or easily available in some countries or regions. That is why the development of new suitable tests to evaluate the feasibility of rammed earth appropriate for different climatic conditions is very important in deciding which type of stabilization is necessary. A particular method called stereo-photogrammetry, used to measure the erosion of rammed earth walls, may also help to calibrate more pertinent laboratory testing to assess the durability of rammed earth walls.
Cob is made from a combination of water, clay, sand/small stones, and straw. Cob is a very ancient building material and has been used throughout history because its durable, cheap, and easy to apply. Cob, if one were to make it out of pure ingredients, would be 70 percent sand, 20 percent clay, and 10 percent water. One aspect of cob that makes it so unique and special is that it can be made anywhere, as long as the components can be shipped, trucked, or flown into the area. Some cool facts about cob is that it is non-toxic and completely recyclable. This can be a nice relief to the health hazards and carcinogens contained in commonly utilized, 20th century building materials like asbestos and lead paint. Also cob is environmentally sound; it makes no contributions to deforestation, pollution, or mining. Likewise, no power tools or manufactured materials are needed to make a cob structure. The word cob is rooted in Old English, derived from a word meaning "a lump or rounded mass" and is completely built by hand. Since cob structures require no frame, the builder is allowed infinite freedom and creativity to proceed within the design of the structure, much like building with clay.
Building Process

Shake Test
To mix cob correctly, you must first figure out the correct ratio of clay to sand. To see how much clay was in our soil, we did a shake test. We did this by getting a jar and filling it 3/4 of soil, adding water to nearly the top, and shaking furiously. Adding some table salt to the mixture supposedly helps separate the chunks and gives a more accurate reading. This separates the soil into three parts, sand, silt and clay. Sand settles to the bottom the quickest, usually in about 15 seconds. Then, the silt settles on top of that a minute or so later, with clay accumulating at the top, which takes longer. Some sources say to wait a day or an hour to see how much clay accumulates on the top. Our soil was very clay rich, so we were able to see a large amount of clay accumulate quickly within minutes.
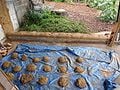
Test Bricks
After you do a shake test, you can start to gauge how much sand to clay you will need in your cob mixture. We made some test bricks using a few different ratios to see which one was the strongest, testing their strength by throwing them on the ground after they dried. We did 1:1 sand:clay, 2:1 sand:clay and so on. The 2:1 ratio worked best for our soil.

Mixing Cob
After we found the best ratio for our soil, in order to mix together cob for the wall we used shovel fulls of sand and clay. We did 30 shovels of sand to 15 shovels of clay, and mixed it all together by stomping on it on a tarp.
To make sure the sand and clay is really mixed together well, we used the "burrito" technique to make sure there were no remaining "veins" of sand in the cob mixture. These "veins", if left that way, will crumble once dried into the wall.
After we thoroughly mixed together the sand and clay, we then add straw. We sprinkle long pieces of straw, evenly covering the mixed sand and clay, and stomp it in. We burrito a few more times, adding more straw each time. When the consistency of the cob is thick and hard to pull apart with your fingers, we knew it was ready to be bundled into loaves and placed on the wall.
-
Some volunteers helping out with the stomping process
-
Loaves of cob before they are placed onto the wall
-
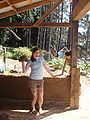
Sarah, a volunteer and employee of CCAT, gets excited about natural building!
-
Stomping on the cob is the best way to mix all the ingredients together!
-
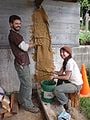
Adam and Mitra prepare the burlap sack and clay idea to help the cob wall stick the the concrete wall
-

Mitra soaks in the sun while preparing bottles
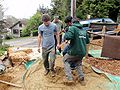
-
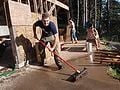
Adam cleaning up after a long day of building
-
Adam stomping away
-
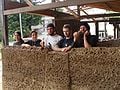
Mitra, Hannah, Steven, Adam, and John. Thanks to our dedicated volunteers!
-
Wonderful volunteers helping on a beautiful sunny day


.JPG)
.JPG)


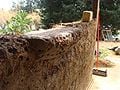
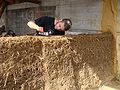
Laying Cob
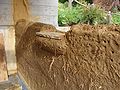
The process of laying the cob is one of the most important parts of building with cob. When you lay a loaf of cob onto the wall, you want to make sure you are really incorporating each loaf with the layer beneath it, massaging it into the wall. It helps to put holes into each layer with a "cobber's thumb", which is usually a pointed stick in our case, to let the lower layers breath as well as mold together the different layers. One issue we ran into was not distributing the cob out enough, and leaving it too dense in some areas where the cob wasn't really being integrated into the rest of wall, instead it was just sitting on top of other layers. This created bulging in those areas when it dried. Incorporating each layer of cob onto the wall take a long time and it is important to really make sure you are keeping with the shape you want, not bulging out too much or tapering in too much.
At the end of each day of laying cob, sources recommended that we leave a spine and rib layer on top. This is so the next time we start building, we are able to incorporate our new layer with two layers form the last building day. This technique also allows for more of the cob to dry, especially with the help of the holes from the "cobber's thumb". We made sure at the end of each work day to put many holes in the cob to allow for drying and easier blending the next time we built.
Bottle Bricks

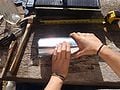
Our idea to put glass bottles in the wall includes incorporating each bottle into a tree design to allow light to shine into the green shed. To allow for maximum light per bottle they will be cut off at a wide cross section and secure them open side to open side, effectively making a glass cylinder. We then wrap the bottles in aluminum flashing and secure it with duct tape. We also needed to scrape each bottle clean of its label to allow for maximum light to go through the bottle into the shed. This was done in the past at CCAT, though the example is no longer in existence, the following appropedia page outlines a project very similar to ours. http://www.appropedia.org/Cob_and_Glass_Bottle_Wall_at_CCAT.
-
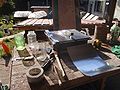
All the necessary components for prepping the glass bottles - A tile saw, flashing, tape measure, duct tape, a sharpie, etc
-
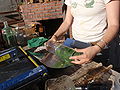
Wrapping the bottles in flashing
-
Wrapping the bottle in flashing, next comes the duct tape to hold it all together
-

Another shot of the bottle prepping process
-
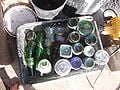
Some finished bottle bricks


Corbelling, Shelves and Glass Plate Window
We used the corbelling process to incorporate the granite slab shelf and glass plate as a window. To install the shelf correctly, we made a few corbels to protrude out of the wall to be the base for the shelf and act as a seat. The first picture in the gallery gives an example of what corbelling looks like. Imagine an upside down stair case. To make corbels with cobb we took a finished loaf, rolled it up in to a cylinder, covered it length-wise with straight straw to give tensile strength in one direction, then we worked the straw in. We laid one layer of corbels jutting out slightly then laid another layer of corbels over that one protruding further. We then covered the corbels with cob mixtrue and smoothed it out. We then smoothed the top and leveled it to place a granite shelf on. The placement of the glass plate will be a few inches above the shelf. Corbelling is also used on arches to connect a keystone and we intend to install our glass plate using corbelling on top. Eventually, there be be a large glass plate serving as a window inside the design of the tree.
-
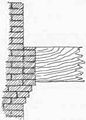
A diagram of corbelling
-
This picture shows the corbels protruding out of the wall, ready for the shelf
-
Adam exacting the science. You can also see the outline of our future tree design here!
-
We had to make sure the shelf would be level
-
The final placement of the granite slab shelf!

.JPG)
.JPG)
.JPG)
.JPG)
Tips to Future Builders
1. It is much easier to mix wet ingredients. If it is sunny then get your clay and sand as wet as you can while mixing it. It will really speed up the process.
2. You can make really wet cobb loaves and leave them outside on a tarp for a day and come back the next day to lay them. Don't go too nuts though. Remember you can always add more water but you can't take it out.
3. When mixing on a tarp make sure you lay the sand down first or the mix will stick.
4. The "burrito" technique is the best way to mix on a tarp. After you stomp your mix up grab two sides of the tarp from the inside and pull all the cob towards you to roll it up into a burrito shape. Make sure you pull from the inside to save your back.
5. Hay is for horses; straw it for cob. Hay still has seeds in it and may sprout in your wall then decompose which you do not want.
6. A long strong straw like wheat does much better than a spindly short one like rice according to our tests.
7. Cob takes a really really long time. In our project we estimated about 5 worker hours/inch of cob. It is a learning process. We went much slower at first then faster as we got better so give your self time to get over the learning curve.
8. Remove any large organic matter you have. Our research told us that any more than 5% organic matter can cause problems.
9. Speaking of proportions, you'll want to make test bricks with your sand and clay to determine what proportion is right for you. We went with 2 parts clay to 3 parts sand.
10. Don't use beach sand. It is too smooth. Use river sand instead. We bought ours from a local landscaping company for $40/yard.
11. You can probably find clay soil for free. Ask at construction sites or look in the phone book for excavation contractors.
12. We wanted our wall to securely attach to our wood frame. To that end we went crazy with nails and screws and left them hanging out in every direction form a surface for our cob to integrate in to the rest of the building.
13. Our building ties in to a large concrete wall on the east side. To form an adhesive surface for our cob we screwed burlap sacks to the concrete and covered them with sloppy wet clay slurry. Every run of cob we laid we resoaked the burlap to re-form our adhesive surface.
Literature Review
Books
Callahan, Tim, and Clarke Snell. Building Green: A Complete How-To Guide to Alternative Building Methods Earth Plaster * Straw Bale * Cordwood * Cob * Living Roofs. New York: Lark Books, 2005.
In this guidebook to natural building, the authors effectively demonstrate building methods of cob, straw bale, earth plaster and many more. Applications, history, and methods are shared by the author’s, who have firsthand experience with building with all of the natural building methods in the book. The book provides a step-by-step process, providing information on foundation, site preparation, walls, doorframes, and essentially any aspect of building. This book does a great job covering natural wall construction in a way that many people can understand.
McHenry Jr., Paul Graham. Adobe and Rammed Earth Buildings: Design and Construction. New York: Wiley, 1984.
This book provides knowledge about using earth materials for natural buildings and has many insights about the use of earthen materials for natural building. It has step-by-step instructions on how to build with adobe and cob materials. IT provides information on soil selection, earth wall finishes, foundations, window and door detailing, and much more. This reference will be valuable during the process of building the greenshed wall.
Southwick, Marica. Build With Adobe. Ohio: Swallow Press, 1994 Anything you need to know about building with adobe is explained in detail in this book. The author goes into great detail about many different aspects of natural building and how you can be successful in doing it. There are many different chapters highlighting these things.
Chiras, Daniel. “The natural house: a complete guide ... - Google Books.” Web. 15 Feb 2010.
Elizabeth, Lynne, and Cassandra Adams. Alternative Construction: Contemporary Natural Building Methods. New York: Wiley, 2000. Print.
Kennedy, Joseph F., Catherine Wanek, and Michael G. Smith. The art of natural building. New Society Publishers, 2002. Print.
Guelberth, Cedar Rose, and Daniel D. Chiras. The natural plaster book. New Society Publishers, 2003. Print.
Field Guide to Appropriate Technology,first edition, Academic Press, Inc. 2003
Norton,John (1997). Building With Earth: A Handbook, Second Edition, Intermediate Technology Publications Limited, London,UK. p.3-8.
Easton,David (1996).The Rammed Earth House, Chelsea Green Publishing Co., White River Junction,VT. p.3-146
Peer reviewed journals
Evans, Ianto. White River Junction, Vt. : Chelsea Green Pub. Co., c2002. http://poetry.lib.calpoly.edu/search~S0?/Xcob+building&SORT=DX/Xcob+building&SORT=DX&extended=0&SUBKEY=cob%20building/1%2C2%2C2%2CB/frameset&FF=Xcob+building&SORT=DX&1%2C1%2C
Goodhew, S, and R Griffiths. “Sustainable earth walls to meet the building regulations.” Energy and Buildings 37.5 (2005): 451-459. Web.
Q.B. Buia, J.C., Morela,B.V. Venkatarama Reddyc and W. Ghayada (May,2009). "Durability of earth rammed walls exposed for 20 years to natural weathering." Building and Environment,Volume 44,Issue 5,p.912-919.
External Links
- Cob Natural Building
- Cob
- Cob Together
- Google Video results for Cob
- I love cob
- Natural Building Photos
- House Alive
- Natural Building 101: Cob
- Cob Works
- Cob: Gettin' Down and Dirty with Natural Building
- Cob cottage in Montford: natural building is a community affair.
- Natural Homes
- House Alive Cob natural building natural design & appropriate technology
- Earthen Hand Natural Building
- Building with earth (.pdf)
- A guide to making a cob bench
- Appropedia guide for 4th and F St. Cob Bench
- CCAT Cob oven
- Bloomfield Cobb Bench: Another guide to making a cob bench
- Garden house cob oven
- Cob and Glass Bottle Wall at CCAT
- CCAT natural wall construction
- Video demonstrations of building with cob
- [1]