JacobWalsh (talk | contribs) (→costs) |
JacobWalsh (talk | contribs) (→costs) |
||
| Line 160: | Line 160: | ||
|File:Crossbeamstumbler.jpeg |attach crossbeams to support poles |4 |attach crossbeams to support poles | |File:Crossbeamstumbler.jpeg |attach crossbeams to support poles |4 |attach crossbeams to support poles | ||
We screwed in the other 2x4's in a criss cross pattern to provide further support for the structure while also providing a stand for the PVC pipe to rest on later in the process | |||
|File:Turningpointtumbler.jpeg |align and drill holes for rotation point |5 | align and drill holes for rotation point | |File:Turningpointtumbler.jpeg |align and drill holes for rotation point |5 | align and drill holes for rotation point | ||
We drilled 2" diameter holes in the two flat sides of the 55 gallon drum for the PVC pipe to fit through providing an axle for the container to rotate on | |||
|File:Attachedlidtumbler.jpeg| attach lid to tumbler to fully enclose (this step is only needed if you don’t have a fitting lid for your container |6 | attach lid to tumbler to fully enclose (this step is only needed if you don’t have a fitting lid for your container) | |File:Attachedlidtumbler.jpeg| attach lid to tumbler to fully enclose (this step is only needed if you don’t have a fitting lid for your container |6 | attach lid to tumbler to fully enclose (this step is only needed if you don’t have a fitting lid for your container) | ||
For our project our 55 gallon drum didn't have a lid so we had to attach a circular wood cap to properly seal the container with caulk | |||
|File:Aerationholes.jpeg |drill aeration holes into tumbling container |7 | drill aeration holes into tumbling container | |File:Aerationholes.jpeg |drill aeration holes into tumbling container |7 | drill aeration holes into tumbling container | ||
We then used a 3" hole saw to punch holes randomly scattered around the walls of the tumbler to provide air flow to the compost that will be housed within | |||
|File:Aerationscreen.jpeg |line the inside with screen to keep materials inside |8 | line the inside with screen to keep materials inside | |File:Aerationscreen.jpeg |line the inside with screen to keep materials inside |8 | line the inside with screen to keep materials inside | ||
We lined the inside of the tumbler with window screen to allow air flow through the holes while keeping the compost on the inside of the tumbler | |||
|File:Insidesupportbeams.jpeg|attach support beams inside tumbler |9 | attach support beams inside tumbler | |File:Insidesupportbeams.jpeg|attach support beams inside tumbler |9 | attach support beams inside tumbler | ||
We screwed 2' 2x4's lining the inside of the tumbler to provide support to the plastic, preventing warping, particularly on the edge of the door that will be cut | |||
|File:Turningpointtumbler.jpeg|drill holes in 4 squares of wood that align with the previous holes in the tumbling container |10 | drill holes in 4 squares of wood that align with the previous holes in the tumbling container | |File:Turningpointtumbler.jpeg|drill holes in 4 squares of wood that align with the previous holes in the tumbling container |10 | drill holes in 4 squares of wood that align with the previous holes in the tumbling container | ||
We measured out for additional squares of wood and drilled 2" holes that would perfectly align with the holes we drilled into the plastic drum | |||
|File:Supportwoodhole.jpeg |attach squares on inside and outside of plastic layer aligning the holes |11 | attach squares on inside and outside of plastic layer aligning the holes | |File:Supportwoodhole.jpeg |attach squares on inside and outside of plastic layer aligning the holes |11 | attach squares on inside and outside of plastic layer aligning the holes | ||
We attached the 4 squarr pieces of wood on the inside and the outside of where the rotational holes were drilled in the plastic to provide additional support and surface area against the friction of the drum spinning on the PVC pipe | |||
|File:Insidesupportbeams.jpeg |cut square in the side of the tumbler to create a door |12 | cut square in the side of the tumbler to create a door | |File:Insidesupportbeams.jpeg |cut square in the side of the tumbler to create a door |12 | cut square in the side of the tumbler to create a door | ||
We cut a 20'x20' square out of the side of the tumbler to create a door to access the inside of the tumbler | |||
|File:Ziptiestumbler.jpeg |drill a line of small holes on the door and the corresponding side to place zipties |13 | drill a line of small holes on the door and the corresponding side to place zipties | |File:Ziptiestumbler.jpeg |drill a line of small holes on the door and the corresponding side to place zipties |13 | drill a line of small holes on the door and the corresponding side to place zipties | ||
We lined one side of the newly cut door with small holes drilled into it and also drilled the same holes on the corresponding side of the drum so that they would align to allow zip ties to hold the door in place | |||
|File:Tumblerlocks.jpeg |attach locks to secure door when closed |14 | attach locks to secure door when closed | |File:Tumblerlocks.jpeg |attach locks to secure door when closed |14 | attach locks to secure door when closed | ||
|File:Pipestrapstumbler.jpeg |Place PVC pipe through the | We then attached locks to the other side of the door flap so you can properly seal the tumbler | ||
|File:Pipestrapstumbler.jpeg |Place PVC pipe through the tumbler and secure with pipe straps |15 | Place PVC pipe through the tumber and secure with pipe straps | |||
We ran the PVC pipe through the aligned holes on the sides of the tumbler, placed the whole set up on and the previously made stand, and then secured the pipe in its position with pipe straps so that the tumbler can rotate on the axis without the PVC pipe moving | |||
}} | }} | ||
Revision as of 03:09, 5 May 2017
Abstract
Background
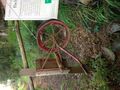
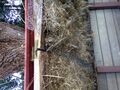
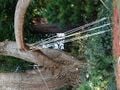
For the Spring 2017 semester, we will be rebuilding the Humboldt State University compost system at CCAT (the Campus Center for Appropriate Technology). CCAT is a model home dedicated to demonstrating renewable and carbon neutral practices you can do in your home. CCAT needs a new compost system because their current one doesn't have enough insulation and is difficult to use. As you can see below, the frame of the system is beginning to break down making it even harder to access the mature compost. A working compost system is essential to the identity of CCAT and needs to be functional as well as educational. The current compost system is a three part compost but the system we hope to implement will be a tumbler compost which will be more compatible with what CCAT needs. More details of different compost systems can be found below. This gallery shows photos of the current compost system in place.
-
Crank to lift lid of compost bin
-

Inside of compost bin
-
Lid insulation
-
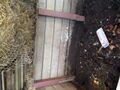
Inside of compost bin
-
Lid pulley system
-
Full compost bin


Problem statement
The objective of this project is to redesign and rebuild the compost system at CCAT in HSU to be more insulated, accessible, and protected.
Literature Review
Composting Basics
"The word compost comes from two Latin roots, one meaning "together," the other meaning "to bring"". [1] This essentially boils down to the practice of combining a bunch of organic material together to create useful and organic fertilizer. Many cultures have re-purposed organic materials for farming, building material and fuel that it is hard to give credit to just one for the origin of composting. [2]
The basics of composting include organic material, a certain level of aeration, and insulation. The idea is that the insulated area creates its own heat which speeds up the decomposing process while the aeration helps to reduce the odor that decomposing material produces. The organic materials that can be composted are fruit/vegetable scraps from the kitchen, yard clippings, and paper materials. The things that should not be composted are meat, eggs (though the shells are compostable), dairy products and any material that has been processed such as metals or plastics. [3]
There is a balance of nitrogen and carbon to be aware of also. Carbon ("browns") is usually found in dried things like straw, dried leaves and wood chips. Nitrogen ("greens") is in most kitchen scraps and yard clippings. The ratio of carbon to nitrogen or browns to greens needs to be close to 25-30:1. [4] If there is too much carbon, the decomposition will slow down and if there is too much nitrogen the pile may begin to smell. The balance helps keep the microorganisms working with enough protein and energy to turn the organic matter into nutrient rich compost.
Methods of Composting
There are many different styles of composting. Determining which one is right for an individual is determined by a few different thing. How much waste is produced, how much maintenance is needed for the system and how quickly the compost matures are just a few elements to consider.
Barrel Compost
The barrel compost system is a relatively new system. It is a system that is easy to operate but there is some thinking to do about placement. This system doesn’t have a large storage space but it creates mature compost in as little as one month. [5] The maintenance of this system is very easy. The barrel should be turned once a week for proper aeration and once the compost is matured it must be removed and the cycle starts again. The mature compost can be used right away or it can be stored elsewhere for later use. One down side to this system is that once the barrel is full the addition of new materials but stop. This halts the constant production of compost but rather it is made in ‘batches’ which may not be compatible for high waste producing households.
3 Part Compost
A three part compost system is very useful. It takes up more room than a barrel compost but material can be continuously added and turned for the constant production of usable compost. The idea is to have a three blocks where one side is the incoming block, the middle block is the “in progress” compost and the last is the ready to use, finished compost. The maintenance is a somewhat involved, since the incoming compost must be moved to the middle compartment and then once again to the finished side. If mixed and proportioned properly, there shouldn’t be much more maintenance than that but it is possible for it to need turning if it begins to produce odor. [6]
Vermiculture
Also called vermicompost, this uses worms to process the organic material. It has the same basic methodology as regular composting but the worms speed up the process and requite a little more attention. They are a little more sensitive to temperature which means they should be located close to a home or in the home itself. There also needs to be some specific things added to the compost in order to make it easier for the worms to breathe. Things that aerate the compost not only makes it easier for the worms to breathe and move around but it also cuts down on odor that is produced naturally by compost. There are many structures to choose from when housing the worms. The most common structure is the stackable unit. There are many square containers that have holes in the bottom of the unit. The basic idea of this unit is the new organic material is added to the top level. When there are no more levels to be added, the very bottom layer is taken out and the worms are removed from the mature compost. The worms are added back into the unit and the compost is used. The now empty level is placed on top and the process starts over. [7] The holes in the unit allow for the worms to move up toward the fresher organic material. Other structures have one level that they harvest more frequently and all at once. The maintenance of vermicultures require a little more work than the non-wormy compost. The worms need to be monitored and kept alive in extreme temperatures and when time comes to harvest the compost, they need to be sorted out of the compost in order to continue on with the cycle.
Construction
Building Materials
Building materials for a compost system can range from anything from wooden pallets to recycled plastic bins you might find lying around. Depending on the size, location, and type of composting system you wish to build the materials may vary. Wire mesh and pallet planks can be used to build simple outdoor square or rectangular compost systems along with cinder blocks, bricks, or even cardboard for a simpler but less sturdy option.[8] If your building a tumbler composter, which is essentially a drum or any cylindrical contain that can be rotated to help move and aerate the compost inside materials such as trash cans, recycled food drums, or old wine barrels can be used. [9] Essentially all that needs to be accomplished is a contained, protected environment that successfully allows for the natural process of breaking down organic materials to occur.
Client Criteria
When speaking to CCAT about their needs and what improvements they are looking for, there were a few elements that stood out as more urgent needs. One of those needs was more insulation to speed up the decomposition time which makes the system more efficient. The current compost bin has little insulation on the bottom of the lid but all the inner walls are bare which allow a lot of heat to be lost. Another was accessibility to the mature compost which currently is only accessible by either lifting the compost over the side through the top or by removing a panel in the wall, both of which can be physically strenuous. There was a mention of pests but this isn't a very urgent problem, just something to keep in mind while designing. [10]
Criteria
| Criteria | Constraints | Weight (1-10) |
|---|---|---|
| Accessibility | Mature compost must be easily accessible and unit must be easy to open | |
| Aesthetics | Compost bin should look professional and pleasing to look at | |
| Cost | Must not exceed budget (max $200) | |
| Dimensions | Should have dimensions close to 12ft long X 3ft tall X 4ft deep | |
| Insulation | Must have enough insulation for proper composting to occur | |
| Materials Used | Materials should coincide with appropriate technology techniques |
Proposed timeline
| Activity | Due Date |
|---|---|
| Visit local examples of composting systems | February 17-19 |
| Finalize budget | February 25 |
| Prototype/design new system | March 1 |
| Acquire building materials | March 3-5 |
| Build new compost | March 9-11 |
| Test new compost | March 12- April 12 |
| Redesign/ make changes if needed | April 12-16 |
| Create signage | April 21-23 |
| Present final project | May 1 |
Proposed Budget
Our funding will be coming from CCAT and will simply be used on buying the building materials to upgrade the compost system.
| Quantity | Material | Source | Cost ($) | Total ($) |
|---|---|---|---|---|
| 4 | 4x4x8 Pressure Treated Wood | The Mill Yard | $10.99 | $43.96 |
| 2 | 2x4x18 Douglas Fir Wood | The Mill Yard | $7.19 | $14.38 |
| 2 | Sturdy Door Hinges | The Mill Yard | $9.99 | $19.98 |
| 3 | Rust Proof Handles (for rotating) | Ace Hardware | $6.00 | $18.00 |
| Total Cost | $96.32 | |||
costs
operation
This is how to operate. It should have a brief introduction and very useful images with labels. Also it may work best for your project to use the step by step how to template {{How to}}. See #Troubleshooting for an example.
Maintenance
Introduce this maintenance section.
Schedule
This is when to maintain what.
- Daily
- A daily task
- A daily task
- Weekly
- a weekly task
- a weekly task
- Monthly
- a monthly task
- a monthly task
- Yearly
- a yearly task
- a yearly task
- Every __ years
- task
- task
Instructions
This is how to maintain. The step by step how to template {{How to}} is most likely best for this part.
Conclusion
Testing results
Describe the testing results.
Discussion
Discuss the testing results.
Lessons learned
Discuss lessons were learned during this project and what you would do different next time.
Next steps
Discuss any next steps for the project as it goes on into the future.
Troubleshooting
This is only how to troubleshoot basic operation. For complex issues, the solution might just say contact ________. It should be a table in this format:
| Problem | Suggestion |
|---|---|
| Example issue | Example solution or suggestion |
| Does not turn on | Make sure it is plugged in |
| Another issue | Et cetera |
Team
Introduce team and semester in the following format:
- Jacob Walsh
- for each team member.
References
- ↑ Campbell, Stu. "Let it rot!". Storey Publishing. 1993. Pg. 3
- ↑ Smith, Martha, and Duane Friend. "History of Composting." History of Composting - Composting for the Homeowner - University of Illinois Extension. Accessed January 26, 2017. https://web.extension.illinois.edu/homecompost/history.cfm.
- ↑ Elmore, Dave. "Composting Basics & Getting Started." Green Action Centre. September 9, 2010. Accessed January 26, 2017. http://greenactioncentre.ca/reduce-your-waste/composting-basics-and-getting-started/.
- ↑ Adekalu, K.O., Ogunjimi, L.A.O., Ogunwande, G.A., Osunade, J.A. (2008, November). Nitrogen loss in chicken litter compost as affected by carbon to nitrogen ratio and turning frequency. Bioresource Technology. Volume 99 (Issue 16), pp. Pages 7495–7503.
- ↑ "How to Compost in a Rotating Barrel." Home Guides | SF Gate. Accessed January 26, 2017. http://homeguides.sfgate.com/compost-rotating-barrel-78337.html.
- ↑ Martin, Deborah L., Grace Gershuny and Jerry Minnich. The Rodale Book of Composting. Emmaus, PA: Rodale Press, 1992.
- ↑ Appelhof, Mary. Worms Eat My Garbage. Kalamazoo, MI, USA: Flower Press, 1997.
- ↑ Admin. 18 Cool DIY Compost Bin Designs. Compost Guide: tips for home composting. 2013 Online article. http://compostguide.com/18-cool-diy-compost-bin-designs/
- ↑ G6957. How to build a compost bin. Uinversity of Missouri Extension. Online article. 1993 http://extension.missouri.edu/p/G6957
- ↑ Anderson, Austin. "CCAT Compost." Interview by author. January 27, 2017.