(→Need More Instructions?: sharper cat: Category:Toilet designs) |
Sophivorus (talk | contribs) m (Rename "affiliations" parameter to "organizations", to unify terminology throughout Appropedia) |
||
| (63 intermediate revisions by 15 users not shown) | |||
| Line 1: | Line 1: | ||
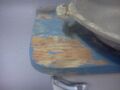
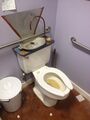
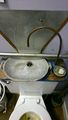
[[File:Final final.jpg|thumb|The CCAT Wash n' Flush]] | |||
== | {{Project data | ||
The Wash n' Flush is a [[Humboldt | | uses = development, water | ||
| authors = User:Annie, Jeffrey Steuben, Tim Dower | |||
| status = Deployed | |||
| made = Yes | |||
| replicated = No | |||
| location = Arcata, California | |||
}} | |||
{{Device data | |||
| hardware-license = CC-BY-SA-4.0 | |||
}} | |||
{{CCAT notice}} | |||
The Wash n' Flush is a [[Cal Poly Humboldt]] environmental science 410 senior project implemented by Jeffrey Steuben, Annie Welbes and Tim Dower which is located in the downstairs bathroom at [[CCAT]]. This is a toilet modification that allows users to save water by utilizing the [[wastewater]] from handwashing to flush the [[Toilet designs|Toilet]]. | |||
If you think of this project as a way of doing a DIY version of | If you think of this project as a way of doing a DIY version of [https://web.archive.org/web/20140424124858/http://www.watersavertech.com:80/AQUS-Diagram.html an Aqus Toilet], you'd be mostly right. | ||
These are also commercially popular in Japan. | These are also commercially popular in Japan. | ||
The goals of our project were: | The goals of our project were: | ||
* conserve drinkable water by eliminating the use of clean, potable water to flush toilets. | * conserve drinkable water by eliminating the use of clean, potable water to flush toilets. | ||
* break down social stigma around toilet water pre-use. | * break down social stigma around toilet water pre-use. | ||
| Line 17: | Line 30: | ||
* conserve water at CCAT. | * conserve water at CCAT. | ||
We thought about the fact that clean, drinkable water is being used to flush human waste down the toilet. | We thought about the fact that clean, drinkable water is being used to flush human waste down the toilet. We consider this to be environmentally and socially irresponsible. Therefore, we took action. | ||
== Materials & Tools == | == Materials & Tools == | ||
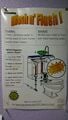
[[File:Diagram.jpg|thumb|Painstakingly photoshopped diagram of the Wash n' Flush (1) Clean water flows in (2) Water is diverted towards the faucet (3) It flows out into the basin--Wash your hands! (4) Then drains through toilet's overflow tube to fill the bowl]] | |||
The following materials and tools were used for this specific project. If replicating, you may not need the same equipment or materials. Feel free to get creative! | The following materials and tools were used for this specific project. If replicating, you may not need the same equipment or materials. Feel free to get creative! | ||
===Materials=== | |||
=== Materials === | |||
* 3/4 inch plywood lid | * 3/4 inch plywood lid | ||
* 3 feet quarter-inch vinyl tubing | * 3 feet quarter-inch vinyl tubing | ||
| Line 32: | Line 45: | ||
* funnel | * funnel | ||
* 2 feet of 1/2 inch copper pipe | * 2 feet of 1/2 inch copper pipe | ||
* Aluminum basin | * Aluminum basin | ||
* 4 one-inch L brackets | * 4 one-inch L brackets | ||
* Paint (blue) | * Paint (blue) | ||
* Butcher paper | * Butcher paper | ||
===Tools=== | === Tools === | ||
* Jigsaw - for cutting lid | * Jigsaw - for cutting lid | ||
* Power drill | * Power drill | ||
* 3 inch hole saw | |||
* 1/2 inch spade bit | |||
* 3/16 molybdenum bit (for drilling aluminum) | |||
* Measuring tape | * Measuring tape | ||
* Hand crank flashlight | * Hand crank flashlight | ||
== The Steps to Success! == | == The Steps to Success! == | ||
<center> | |||
<gallery> | |||
File:Lid Stencil.JPG|Fig 1:We are tracing the outline of the tank and the location of the overflow pipe | |||
File:Flow Location.JPG|Fig 2: This is the template we used to locate the overflow pipe, the faucet location, and where to place the brackets to secure the lid in place | |||
File:Hole Saw.JPG|Fig 3: Using the hole saw to make a channel for the funnel to sit flush with lid surface, and a hole for the funnel drain through | |||
File:Holy Hole.JPG|Fig 4: Wow, look at that fine hole! | |||
File:Brackets.JPG|Fig 5: These brackets, attached to the underside of the lid, sit inside of the tank, holding the lid in place. | |||
File:Painted lid.JPG|Fig 6: Don't forget to seal the lid with some sweet and low VOC paint! yeah! | |||
File:Basin Holes.JPG|Fig 7: The basin was placed on the lid to locate where the drain would be located. We drew a circle on the bottom of the basin through the previously cut hole in the lid, then used the drill with a molybdenum bit to remove the portion of the basin that would be the drain. | |||
File:Bender.JPG|Fig 8: Here's Tim bending the copper tube over his knee to create a faucet-like effect. This technique is not recommended, as the pipe may kink during the process. Instead, use a pipe bending spring to keep the pipe open and bent. | |||
File:Bended.JPG|Fig 9: Hey, look at that bent pipe! Now slide it into the hole in the lid and secure it in place. | |||
File:Upside yo head.jpg|Fig 10: Attach the small vinyl tube to the water inflow tube, then feed it through the copper pipe. This is where the water will come out of your homemade faucet. Note the two 32 ounce bottles in the toilet tank to decrease the amount of water used to flush. | |||
File:Bowels.jpg|Fig 11: Here you can see the larger vinyl tube attached to the bottom of the funnel. It runs directly into the overflow tube in the toilet. | |||
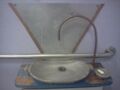
File:final_final.jpg|Fig 12: We added this Star Trek-like panel to guide the water that was splashing onto the wall, back into the basin. This addition may not be necessary depending on your particular basin and water pressure. | |||
</gallery></center> | |||
== Unforeseen Issues == | == Unforeseen Issues == | ||
*Since CCAT is a | |||
*The faucet creates a high-velocity flow of water. | * Since CCAT is a public facility, it is required to have a restroom that meets the standards of the Americans with Disabilities Act. As such, there is a bar on the wall behind the toilet. We had to work around this by using a shallow basin. This shallow basin, and the high velocity of water coming from the faucet created quite a bit of splashing. In an effort to mitigate this, we installed the Star Trek-like splash guard to redirect the splashed water into the basin. Even after installing this back splash, the problem of water splashing onto the toilet seat was not completely solved. If we had a toilet-bowl lid, this would be less of a problem. | ||
* The faucet creates a high-velocity flow of water. Because of this, handwashing style must be slightly altered to avoid splashing. Social acceptance of this system may be more difficult to achieve because it requires that people change their bathroom behavior. | |||
*Drilling through the half-inch of aluminum basin required the special molybdenum drill bit. | * This was fixed by turning down the supply spigot behind the toilet. | ||
*It was difficult to track the actual water savings without a water bill or some sort of water-use data logger. Our water savings might not be as great as we thought. | * Drilling through the half-inch of aluminum basin required the special molybdenum drill bit. A different basin might not require a special tool. | ||
*Seeing as this is a demonstration project at CCAT, the toilet is flushed unnecessarily | * It was difficult to track the actual water savings without a water bill or some sort of water-use data logger. Our water savings might not be as great as we thought. | ||
* Seeing as this is a demonstration project at CCAT, the toilet is flushed unnecessarily by overzealous tour guides. Therefore, water is being used more at this toilet. | |||
== Need More Instructions? == | == Need More Instructions? == | ||
{{ | Yes, you do. Find an awesome step-by-step process to create this system [http://www.instructables.com/id/Hack-a-Toilet-for-free-water./] | ||
== Update October 2013 == | |||
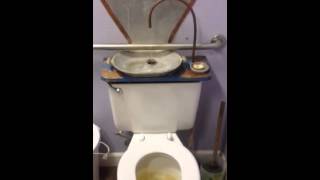
As of October 2013, the CCAT's water-saving-designed Wash n Flush is still fully operational. Here you can see it in proper working action! | |||
<center> | |||
{{Video|b6bwBTc6VI}} | |||
</center> | |||
According to a kind CCAT guide, the Wash n Flush provides "a lot" of water with which to wash hands! Indeed, the water from the Wash n Flush sink pipe flowed forth approximately another 20 seconds after the video ends--quite an ample amount. Though the fundamental functionality of the system has remained intact, time and usage has left its mark on the Wash n Flush. Below are the observable changes since its creation. | |||
<center> | |||
<gallery> | |||
File:Wnf1.jpg|The Wash n Flush as of October 2013. It is well-used and complete with a bar of soap! | |||
File:Wnf5.jpg|The paint has chipped quite thoroughly, and needs to be re-done. | |||
File:Wnf3.jpg|A small part of the siding to the StarTrek-like splash board has begun to warp on the base of both sides. | |||
File:Wnf2.jpg|Underneath the main sink of the Wash n Flush (not usually visible). There has been some mildew development due to water getting underneath. The main drain has also become dirty. | |||
</gallery></center> | |||
== Update October 2014 == | |||
As of October 2014, the CCAT Wash n Flush toilet is still fully operational. The video below was taken on October 15th, 2014. | |||
<center> | |||
{{Video|jQkvAHpz3YM}} | |||
</center> | |||
Although there are visible signs of wear and tear on the parts of the Wash n Flush toilet, the system is still functioning properly. According to an on-site source, the toilet gets used an upwards of 20 times a day, 7 days a week. Of the two people I interviewed at CCAT, neither of them reported any problems occurring with the system in the last 2 months since they had been present at the building. Not even a backup or broken flusher! | |||
<center> | |||
<gallery> | |||
File:WashNFlush1.jpg|There is minor wear and tear visible with the aging of materials and water corrosion. | |||
File:WashNFlush2.jpg|Despite the aging and constant usage this system is still operational. | |||
File:WashNFlush3.jpg| | |||
File:WashNFlush4.jpg|Polishing the metal and applying certain chemicals would help improve the appearance. | |||
File:WashNFlush5.jpg| | |||
File:WashNFlush6.jpg| | |||
</gallery></center> | |||
== Conclusion == | |||
The Wash n Flush is a reliable water-saving system, but this model does require some basic upkeep. End of analysis. | |||
{{Page data | |||
| keywords = grey water flush, toilet modification, sustainable design, Aluminum, Copper Pipe, Funnel, Paint, Vinyl Tubing, Wood | |||
| published = 2008 | |||
| organizations = Category:Cal Poly Humboldt, Category:Campus Center for Appropriate Technology (CCAT) | |||
| sdg = SDG11 Sustainable cities and communities, SDG12 Responsible consumption and production | |||
}} | |||
[[Category:CCAT greywater]] | [[Category:CCAT greywater]] | ||
| Line 81: | Line 148: | ||
[[Category:Toilet designs]] | [[Category:Toilet designs]] | ||
[[Category:CCAT|Wash n Flush]] | [[Category:CCAT|Wash n Flush]] | ||
[[Category:CCAT active project|W]] | |||
[[Category:Sustainable design]] | |||
[[Category:Paint]] | |||
[[Category:Wood]] | |||
Latest revision as of 15:49, 29 January 2024

The Wash n' Flush is a Cal Poly Humboldt environmental science 410 senior project implemented by Jeffrey Steuben, Annie Welbes and Tim Dower which is located in the downstairs bathroom at CCAT. This is a toilet modification that allows users to save water by utilizing the wastewater from handwashing to flush the Toilet.
If you think of this project as a way of doing a DIY version of an Aqus Toilet, you'd be mostly right.
These are also commercially popular in Japan.
The goals of our project were:
- conserve drinkable water by eliminating the use of clean, potable water to flush toilets.
- break down social stigma around toilet water pre-use.
- build awareness of creative water conservation.
- make toilet modification replicable, accessible, and affordable to low income households.
- conserve water at CCAT.
We thought about the fact that clean, drinkable water is being used to flush human waste down the toilet. We consider this to be environmentally and socially irresponsible. Therefore, we took action.
Materials & Tools[edit | edit source]

The following materials and tools were used for this specific project. If replicating, you may not need the same equipment or materials. Feel free to get creative!
Materials[edit | edit source]
- 3/4 inch plywood lid
- 3 feet quarter-inch vinyl tubing
- 6 inches of three-quarter inch vinyl tubing
- funnel
- 2 feet of 1/2 inch copper pipe
- Aluminum basin
- 4 one-inch L brackets
- Paint (blue)
- Butcher paper
Tools[edit | edit source]
- Jigsaw - for cutting lid
- Power drill
- 3 inch hole saw
- 1/2 inch spade bit
- 3/16 molybdenum bit (for drilling aluminum)
- Measuring tape
- Hand crank flashlight
The Steps to Success![edit | edit source]
-
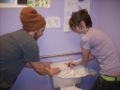
Fig 1:We are tracing the outline of the tank and the location of the overflow pipe
-
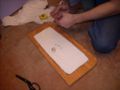
Fig 2: This is the template we used to locate the overflow pipe, the faucet location, and where to place the brackets to secure the lid in place
-
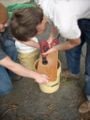
Fig 3: Using the hole saw to make a channel for the funnel to sit flush with lid surface, and a hole for the funnel drain through
-
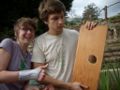
Fig 4: Wow, look at that fine hole!
-
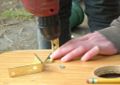
Fig 5: These brackets, attached to the underside of the lid, sit inside of the tank, holding the lid in place.
-
Fig 6: Don't forget to seal the lid with some sweet and low VOC paint! yeah!
-
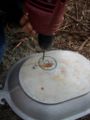
Fig 7: The basin was placed on the lid to locate where the drain would be located. We drew a circle on the bottom of the basin through the previously cut hole in the lid, then used the drill with a molybdenum bit to remove the portion of the basin that would be the drain.
-
Fig 8: Here's Tim bending the copper tube over his knee to create a faucet-like effect. This technique is not recommended, as the pipe may kink during the process. Instead, use a pipe bending spring to keep the pipe open and bent.
-

Fig 9: Hey, look at that bent pipe! Now slide it into the hole in the lid and secure it in place.
-
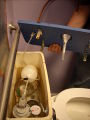
Fig 10: Attach the small vinyl tube to the water inflow tube, then feed it through the copper pipe. This is where the water will come out of your homemade faucet. Note the two 32 ounce bottles in the toilet tank to decrease the amount of water used to flush.
-
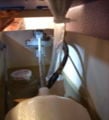
Fig 11: Here you can see the larger vinyl tube attached to the bottom of the funnel. It runs directly into the overflow tube in the toilet.
-
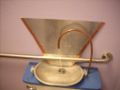
Fig 12: We added this Star Trek-like panel to guide the water that was splashing onto the wall, back into the basin. This addition may not be necessary depending on your particular basin and water pressure.


Unforeseen Issues[edit | edit source]
- Since CCAT is a public facility, it is required to have a restroom that meets the standards of the Americans with Disabilities Act. As such, there is a bar on the wall behind the toilet. We had to work around this by using a shallow basin. This shallow basin, and the high velocity of water coming from the faucet created quite a bit of splashing. In an effort to mitigate this, we installed the Star Trek-like splash guard to redirect the splashed water into the basin. Even after installing this back splash, the problem of water splashing onto the toilet seat was not completely solved. If we had a toilet-bowl lid, this would be less of a problem.
- The faucet creates a high-velocity flow of water. Because of this, handwashing style must be slightly altered to avoid splashing. Social acceptance of this system may be more difficult to achieve because it requires that people change their bathroom behavior.
- This was fixed by turning down the supply spigot behind the toilet.
- Drilling through the half-inch of aluminum basin required the special molybdenum drill bit. A different basin might not require a special tool.
- It was difficult to track the actual water savings without a water bill or some sort of water-use data logger. Our water savings might not be as great as we thought.
- Seeing as this is a demonstration project at CCAT, the toilet is flushed unnecessarily by overzealous tour guides. Therefore, water is being used more at this toilet.
Need More Instructions?[edit | edit source]
Yes, you do. Find an awesome step-by-step process to create this system [1]
Update October 2013[edit | edit source]
As of October 2013, the CCAT's water-saving-designed Wash n Flush is still fully operational. Here you can see it in proper working action!

According to a kind CCAT guide, the Wash n Flush provides "a lot" of water with which to wash hands! Indeed, the water from the Wash n Flush sink pipe flowed forth approximately another 20 seconds after the video ends--quite an ample amount. Though the fundamental functionality of the system has remained intact, time and usage has left its mark on the Wash n Flush. Below are the observable changes since its creation.
-
The Wash n Flush as of October 2013. It is well-used and complete with a bar of soap!
-
The paint has chipped quite thoroughly, and needs to be re-done.
-
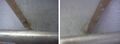
A small part of the siding to the StarTrek-like splash board has begun to warp on the base of both sides.
-
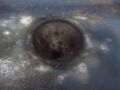
Underneath the main sink of the Wash n Flush (not usually visible). There has been some mildew development due to water getting underneath. The main drain has also become dirty.


Update October 2014[edit | edit source]
As of October 2014, the CCAT Wash n Flush toilet is still fully operational. The video below was taken on October 15th, 2014.
Although there are visible signs of wear and tear on the parts of the Wash n Flush toilet, the system is still functioning properly. According to an on-site source, the toilet gets used an upwards of 20 times a day, 7 days a week. Of the two people I interviewed at CCAT, neither of them reported any problems occurring with the system in the last 2 months since they had been present at the building. Not even a backup or broken flusher!
-
There is minor wear and tear visible with the aging of materials and water corrosion.
-
Despite the aging and constant usage this system is still operational.
-
-
Polishing the metal and applying certain chemicals would help improve the appearance.
-
-


Conclusion[edit | edit source]
The Wash n Flush is a reliable water-saving system, but this model does require some basic upkeep. End of analysis.