Sophivorus (talk | contribs) m (Rename "affiliations" parameter to "organizations", to unify terminology throughout Appropedia) |
|||
| (68 intermediate revisions by 13 users not shown) | |||
| Line 1: | Line 1: | ||
{{Solar menu}} | |||
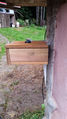
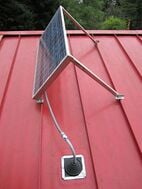
[[File:ChargingStation3.jpg|thumb | [[File:ChargingStation3.jpg|thumb]] | ||
{{Device data | |||
| making_instructions = https://www.appropedia.org/File:Final_Document.pdf | |||
}} | |||
{{Project data | |||
| authors = User:Akr57, User:APenny6 | |||
| status = Deployed | |||
| completed = 2014 | |||
| made = Yes | |||
| replicated = No | |||
| cost = USD 268.5 | |||
| instance-of = Photovoltaic system | |||
}} | |||
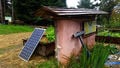
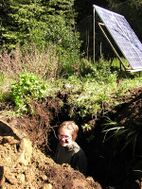
The Campus Center of Appropriate Technology is a demonstration house located on the Cal Poly Humboldt campus, Arcata, California that is a resource for students and faculty. CCAT has many different technologies on display such as: solar panels, rainwater catchment, organic gardens, a greywater marsh, and an experimental composting toilet, among other things. These projects are on display as educational tools to the community and information is provided through CCAT/Appropedia on how to recreate these technologies on your own. The Solar Charging Station at CCAT will align with the mission of CCAT to provide education and resources to the community, by clearly expressing how off-grid solar works, while being functional for cell phone/laptop charging. | |||
== Understanding the market == | == Understanding the market == | ||
'''What we have:''' | '''What we have:''' | ||
[[ | |||
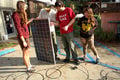
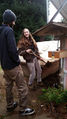
[[File:TheSunSpotters.jpg|thumb|The Sun Spotters]] | |||
* 10 functioning solar panels donated to CCAT | * 10 functioning solar panels donated to CCAT | ||
* A kiosk in the center of CCAT as a space to set up our system | * A kiosk in the center of CCAT as a space to set up our system | ||
| Line 16: | Line 32: | ||
* Materials for making a guest book | * Materials for making a guest book | ||
* Some materials for charge controller housing | * Some materials for charge controller housing | ||
'''What we need:''' | '''What we need:''' | ||
| Line 35: | Line 50: | ||
* 8 gauge wire from battery to charge controller | * 8 gauge wire from battery to charge controller | ||
* Fuse block, 10 - 15 Amps near battery | * Fuse block, 10 - 15 Amps near battery | ||
<gallery> | <gallery> | ||
File:SunSpottersPanel.jpg|Sun Spotters with a panel | |||
File:SunSpotters.jpg|Sun Spotters scouting at the Wildlife Care Center | |||
File:SolarPathfinderbyBLC.jpg|Testing sun exposure near the Bicycle Learning Center | |||
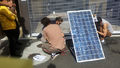
File:KevinSolarChargeStation.jpg|Kevin checking out the panels on the CCAT kiosk | |||
File:KevinJohnCableCutting.jpg|Cutting the cables to the appropriate size for installation | |||
File:PVCables.jpg|PV Cable challenges | |||
File:PVCablesStripping.jpg|Stripping the cables for installation | |||
File:SpottersWiringPanel.jpg|Attempting to attach the wiring to the panels | |||
</gallery> | </gallery> | ||
| Line 52: | Line 66: | ||
By the end of the project we want to have accomplished the '''following goals:''' | By the end of the project we want to have accomplished the '''following goals:''' | ||
# Have a functioning solar charging station at [CCAT][ | # Have a functioning solar charging station at [CCAT][https://www.appropedia.org/Campus_Center_for_Appropriate_Technology] | ||
# Provide an effective demonstration of off-grid solar | # Provide an effective demonstration of off-grid solar | ||
# Complete a step by step guide to construction here on Appropedia for those who want to build it themselves | # Complete a step by step guide to construction here on Appropedia for those who want to build it themselves | ||
| Line 64: | Line 78: | ||
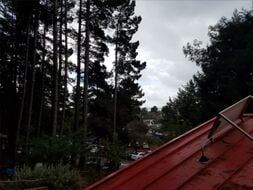
The project location will be the roof of the CCAT demonstration wall kiosk. We measured solar insolation at this location with a Solar Pathfinder and assessed other sites at CCAT as well. We chose the kiosk for having the most solar insolation on an already constructed, available rooftop, and because it is in a centralized location at CCAT. | The project location will be the roof of the CCAT demonstration wall kiosk. We measured solar insolation at this location with a Solar Pathfinder and assessed other sites at CCAT as well. We chose the kiosk for having the most solar insolation on an already constructed, available rooftop, and because it is in a centralized location at CCAT. | ||
Full sun hours at location: 2.05 hrs/day | * Full sun hours at location: 2.05 hrs/day | ||
Panel power: 100 Watts | * Panel power: 100 Watts | ||
Balance of system efficiency assumed at: 0.8 | * Balance of system efficiency assumed at: 0.8 | ||
Number of panels: 2 | * Number of panels: 2 | ||
Edaily = full sun hours * panel power * efficiency | |||
Edaily = 2.05 hrs/day * 100 Watts * 0.8 | |||
equals 164 Wh/day / 1000 | |||
equals.164 kWh/day * 2 panels | |||
'''.328 kWh/day''' | |||
'''.328 kWh/day * 365 days/year = 119.72 kWh/year''' | |||
<gallery> | <gallery> | ||
File:PV Voltage Test.jpg|Testing the IV Curve of the PV Panels | |||
File:RESUTestingIVCurve.jpg|Testing IV Curves with the RESU | |||
File:JohnRoof.jpg|Sun exposure test at the Wildlife Care Center (same test done on Kiosk) | |||
</gallery> | </gallery> | ||
== Construction == | == Construction == | ||
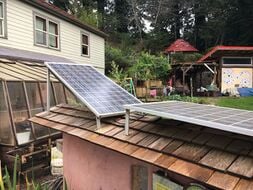
The panels will be positioned vertically and staggered on the kiosk rooftop, facing south, at a 30 degree angle for maximum sun exposure. | The panels will be positioned vertically and staggered on the kiosk rooftop, facing south, at a 30 degree angle for maximum sun exposure. | ||
'''Stabilizing the Kiosk Roof, Building the Panel Racks, Mounting the Panels, and Installing the Fuse''' | '''Stabilizing the Kiosk Roof, Building the Panel Racks, Mounting the Panels, and Installing the Fuse''' | ||
| Line 93: | Line 105: | ||
<gallery> | <gallery> | ||
File:KioskPreConstruction.jpg|Kiosk Pre Construction | |||
File:KioskUnderside.jpg|Underside view of the Kiosk prior to reinforcements | |||
File:KioskReinforcements2.jpg|Reinforcements being made to the underside | |||
File:KioskReinforcements.jpg|Reinforcements to the Kiosk | |||
</gallery> | </gallery> | ||
First, we noticed the kiosk roof has a wobble to it due the the rooftop having a centralized beam and no side support. In an attempt to stabilize the roof, we added additional screws from the main support beam to the support beams from the main wall. | First, we noticed the kiosk roof has a wobble to it due the the rooftop having a centralized beam and no side support. In an attempt to stabilize the roof, we added additional screws from the main support beam to the support beams from the main wall. | ||
'''Building the Panel Racks:''' | '''Building the Panel Racks:''' | ||
<gallery> | <gallery> | ||
File:KevinSolarChargeStation.jpg|Testing out PV Placement! | |||
File:KioskPlacementTest.jpg|Testing PV Placement from another angle! | |||
File:DesignSketch.jpg|Design Sketch Up | |||
</gallery> | </gallery> | ||
Second, we began constructing our own panel racks. We chose building our own over buying racks to attempt to keep within budget and recycle materials at CCAT. We built our racks out of scrap metal found at CCAT. The panels are attached to the rack with 90 degree brackets | Second, we began constructing our own panel racks. We chose building our own over buying racks to attempt to keep within budget and recycle materials at CCAT. We built our racks out of scrap metal found at CCAT. The panels are attached to the rack with 90 degree brackets and the tools used were available at CCAT. Our priorities for the racking were that they be: | ||
# Stable, attached firmly to the panels | # Stable, attached firmly to the panels | ||
# Supporting the panels at desirable angles | # Supporting the panels at desirable angles | ||
# Reusing materials at CCAT | # Reusing materials at CCAT | ||
'''Rack/Panel #1:''' | '''Rack/Panel #1:''' | ||
We addressed rack stability by experimenting with different heights of the first rack while still maintaining a close to 30 degree angle. The back legs of the panel ended up being around 2.5 feet long. We preferred the back legs being shorter versus longer to prevent the panel from picking up wind during storm events. We also included a crossbeam between the back two legs to prevent the panel from swaying. The front of the panel will rest upon two short metal supports that will attach to the roof through angled brackets. The panel front will be as low to the roof as possible to prevent swaying in the wind. | We addressed rack stability by experimenting with different heights of the first rack while still maintaining a close to 30 degree angle. The back legs of the panel ended up being around 2.5 feet long. We preferred the back legs being shorter versus longer to prevent the panel from picking up wind during storm events. We also included a crossbeam between the back two legs to prevent the panel from swaying. The front of the panel will rest upon two short metal supports that will attach to the roof through angled brackets. The panel front will be as low to the roof as possible to prevent swaying in the wind. | ||
To find the appropriate lengths of the racking to maintain a 30 degree angle we used simple geometry: | To find the appropriate lengths of the racking to maintain a 30 degree angle we used simple geometry: | ||
| Line 124: | Line 136: | ||
We decided to have the second angle lay almost flat on the rooftop instead of having a 30 degree angle. This decision was made to prevent shading of the first panel on the second and also to more effectively catch summer sun. We figured since the panels will not be moved, we wanted our system to be built with one panel focused on catching winter sun and one that can catch the higher in the sky, summer sun. | We decided to have the second angle lay almost flat on the rooftop instead of having a 30 degree angle. This decision was made to prevent shading of the first panel on the second and also to more effectively catch summer sun. We figured since the panels will not be moved, we wanted our system to be built with one panel focused on catching winter sun and one that can catch the higher in the sky, summer sun. | ||
'''Mounting the Panels:''' | '''Mounting the Panels:''' | ||
<gallery> | <gallery> | ||
File:AnnettebyMonique1.jpg|Measuring Panel Placement | |||
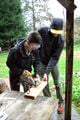
File:KevinPanelScrewing.jpg|Mounting a panel in the front and back | |||
File:JohnAnnikaScrewing.jpg|Screwing the panels in place | |||
File:JohnDrillingPanels.jpg|Screwing in another panel | |||
File:AnnikaSolarKiosk.jpg|Panel mounting is almost complete | |||
File:FinalScrews.jpg|Mounting Teamwork | |||
File:SelfieAnnetteRachaelAnnika.jpg|Being proud of our installation | |||
</gallery> | </gallery> | ||
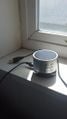
'''Building and Mounting the Charge Controller Box and Battery installation:''' | '''Building and Mounting the Charge Controller Box and Battery installation:''' | ||
<gallery> | <gallery> | ||
File:AnnetteHandSaw.jpg|Cutting the Charge Controller Box mount | |||
File:Tupperware.jpg|The tupperware housing for the charge controller box | |||
File:AnnikaJohnAdjustingWires.jpg|Attaching the wires from the charge controller to the battery and the panels! | |||
File:ChargeControllerBox.jpg|Completed Charge Controller Box! Blue light means go! | |||
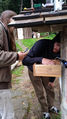
File:JohnAnnikaBuryingBattery.jpg|Burying the battery to deter theft | |||
</gallery> | </gallery> | ||
'''Installing the Fuse''' | '''Installing the Fuse''' | ||
Since our system has a current of 8.33 Amps, we chose a 10 Amp fuse for safety. We were advised to choose a fuse between 10 - 15 Amps, but we chose the lowest number as an extra precaution. The point of a fuse is to "pop" should there be a surge of current in the circuit. The fuse popping prevents the current surge from damaging something else in the system and disconnects the circuit, turning the system off. | Since our system has a current of 8.33 Amps, we chose a 10 Amp fuse for safety. We were advised to choose a fuse between 10 - 15 Amps, but we chose the lowest number as an extra precaution. The point of a fuse is to "pop" should there be a surge of current in the circuit. The fuse popping prevents the current surge from damaging something else in the system and disconnects the circuit, turning the system off. | ||
We put our fuse on the positive battery line. The battery is the most important place to have a fuse, due to the amount of energy batteries have stored up. If the battery were to explode, it could cause significant damage or even start a fire. Furthermore, since batteries are typically expensive, you don't want any damage to come to it. For these reasons you should always have a fuse by the battery. | We put our fuse on the positive battery line. The battery is the most important place to have a fuse, due to the amount of energy batteries have stored up. If the battery were to explode, it could cause significant damage or even start a fire. Furthermore, since batteries are typically expensive, you don't want any damage to come to it. For these reasons you should always have a fuse by the battery. | ||
We bought an in-line fuse holder at Ace and the corresponding 10 Amp fuse that it will hold. We have back up fuses stored in the CCAT Greenshed, should the fuse need to be replaced. It is also recommended to have a fuse on one of the panel lines as well, but it is more necessary for larger systems that are capable of causing more damage. | We bought an in-line fuse holder at Ace and the corresponding 10 Amp fuse that it will hold. We have back up fuses stored in the CCAT Greenshed, should the fuse need to be replaced. It is also recommended to have a fuse on one of the panel lines as well, but it is more necessary for larger systems that are capable of causing more damage. | ||
| Line 159: | Line 171: | ||
We had a $400 budget from CCAT for this project. For a chart of supplies, their prices, and where they were from, reference our final document linked at the bottom of this page. | We had a $400 budget from CCAT for this project. For a chart of supplies, their prices, and where they were from, reference our final document linked at the bottom of this page. | ||
'''Buyback:''' | '''Buyback:''' | ||
The system will save the campus around $20 each year in electricity costs and will therefore buy itself back in about 21 years. ($400/$19.12/year = 20.88 years). | The system will save the campus around $20 each year in electricity costs and will therefore buy itself back in about 21 years. ($400/$19.12/year = 20.88 years). | ||
| Line 169: | Line 181: | ||
http://www.phocos.com/sites/default/files/document/181802613%20CML%20final%20manual.pdf | http://www.phocos.com/sites/default/files/document/181802613%20CML%20final%20manual.pdf | ||
If you scroll through, there is a manual in English. The manual offers some handy troubleshooting knowledge and explains which each light/series of lights on the charge controller mean. | If you scroll through, there is a manual in English. The manual offers some handy troubleshooting knowledge and explains which each light/series of lights on the charge controller mean. | ||
=== Possible Issue #1 === | === Possible Issue #1 === | ||
The charge controller has a red light on it in the bottom center. This means that the battery has been disconnected, because it has run low. This could mean that the battery simply needs time to recharge, or somewhere the wiring has become disconnected. If the red light is on while another light is still on, or the red light is flashing, reference the user manual. | The charge controller has a red light on it in the bottom center. This means that the battery has been disconnected, because it has run low. This could mean that the battery simply needs time to recharge, or somewhere the wiring has become disconnected. If the red light is on while another light is still on, or the red light is flashing, reference the user manual. | ||
If investigating the cause of a problem always disconnect and reconnect wires in the correct order and with caution. | If investigating the cause of a problem always disconnect and reconnect wires in the correct order and with caution. | ||
'''DISCONNECTING:''' | '''DISCONNECTING:''' | ||
# Disconnect load (USB) | |||
# Disconnect panels | |||
# Disconnect battery | |||
NEVER cross wires or touch a live wire. Use extreme caution. Always connect positive to positive and negative to negative. The wrong polarity will cause the charging station to stop working or the charge controller may make an error noise. | NEVER cross wires or touch a live wire. Use extreme caution. Always connect positive to positive and negative to negative. The wrong polarity will cause the charging station to stop working or the charge controller may make an error noise. | ||
| Line 187: | Line 199: | ||
'''RECONNECTING''' | '''RECONNECTING''' | ||
# Connect battery | |||
# Connect panels | |||
# Connect load | |||
NEVER cross wires or touch a live wire. Use extreme caution. Maintain polarity. | NEVER cross wires or touch a live wire. Use extreme caution. Maintain polarity. | ||
''' Possible Issue #2 ''' | |||
There is NOT a green LED light on above the battery symbol on the charge controller during the day. This light should be on during the day, it indicates that the panels are generating voltage. If this light is not on, there could be a loss of connectivity to the panels or the panels are being shaded. | There is NOT a green LED light on above the battery symbol on the charge controller during the day. This light should be on during the day, it indicates that the panels are generating voltage. If this light is not on, there could be a loss of connectivity to the panels or the panels are being shaded. | ||
| Line 205: | Line 217: | ||
We foresee that chargers being stolen could be a continuous issue. To save CCAT money and to save resources, we have decided to try and obtain used chargers for the station. After getting in touch with the student Help Desk, I (Annika) found out that they normally have chargers that were lost and students never came back for. After two weeks of the chargers sitting in the lost and found, they are recycled at the nearby electronic waste station. Getting these used chargers from the Help Desk or other locations on campus would prevent them from entering the waste stream just yet and get more use out of them in their lifetime. The Sun Spotters encourage collaboration with other organizations on campus to ensure that the charging station will always have chargers and that we won't have to continuously buy new ones. | We foresee that chargers being stolen could be a continuous issue. To save CCAT money and to save resources, we have decided to try and obtain used chargers for the station. After getting in touch with the student Help Desk, I (Annika) found out that they normally have chargers that were lost and students never came back for. After two weeks of the chargers sitting in the lost and found, they are recycled at the nearby electronic waste station. Getting these used chargers from the Help Desk or other locations on campus would prevent them from entering the waste stream just yet and get more use out of them in their lifetime. The Sun Spotters encourage collaboration with other organizations on campus to ensure that the charging station will always have chargers and that we won't have to continuously buy new ones. | ||
== Cisco Speaker == | == Cisco Innovator (Speaker) == | ||
CCAT will be receiving a mini speaker donated by Cisco for the Solar Charging Station. The speaker can be connected to via Bluetooth and uses a USB charger. Therefore, we can charge the speaker from our station and use the charging smart phones to play music through it. This will be an excellent resource for CCAT volunteer days so that we can play music off of renewable energy. | CCAT will be receiving a mini speaker donated by Cisco for the Solar Charging Station. The speaker can be connected to via Bluetooth and uses a USB charger. Therefore, we can charge the speaker from our station and use the charging smart phones to play music through it. This will be an excellent resource for CCAT volunteer days so that we can play music off of renewable energy. | ||
The speaker should be kept INSIDE in a safe location when not in use. Preferably somewhere upstairs where it can be locked up at night, but still accessible for Volunteer Fridays or other work days. | The speaker should be kept INSIDE in a safe location when not in use. Preferably somewhere upstairs where it can be locked up at night, but still accessible for Volunteer Fridays or other work days. | ||
<gallery> | |||
File:CiscoInnovator.jpg|The mini speaker with USB charger attached. | |||
File:CiscoInnovator2.jpg|The mini speaker and protective case. | |||
</gallery> | |||
== Documents == | == Documents == | ||
| Line 215: | Line 232: | ||
Here is the final document for our project: | Here is the final document for our project: | ||
[[File:Final Document.pdf]] | [[File:Final Document.pdf|600px]] | ||
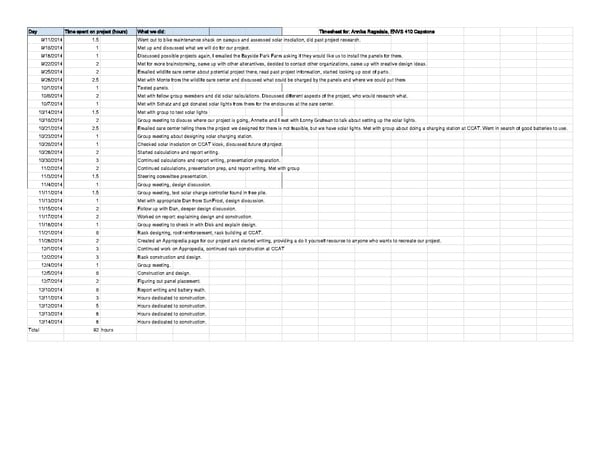
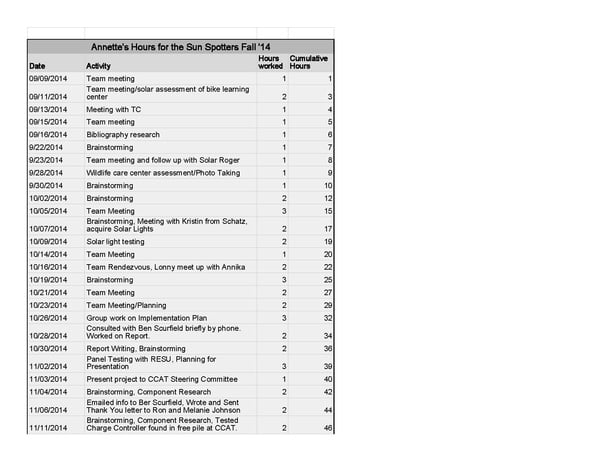
Here are the hours spent on the project for each team member: | Here are the hours spent on the project for each team member: | ||
[[File:Annika' | [[File:Annika's Hours.pdf|600px]] | ||
[[File:Annette' | |||
[[File:Annette's Hours.pdf|600px]] | |||
Here is the solar math breakdown for the project: | Here is the solar math breakdown for the project: | ||
[[File:Energy Calculations.pdf]] | [[File:Energy Calculations.pdf|600px]] | ||
[[File: | [[File:Energy Cost Buyback.pdf|600px]] | ||
[[File:Carbon Intensity.pdf]] | [[File:Carbon Intensity.pdf|600px]] | ||
== Contact == | == Contact == | ||
Annika can be contacted about this project at akr57@humboldt.edu | Annika Ragsdale can be contacted about this project at akr57@humboldt.edu | ||
== Related projects == | |||
{{Gallery | |||
| instance-of = Photovoltaic system | |||
}} | |||
== References == | |||
We would like to acknowledge and express our gratitude to members of our community who served as references for us: | |||
Kristin Radesky at Schatz Energy Resource Center, Humboldt | * Campus Center for Appropriate Technology, Cal Poly Humboldt, Arcata | ||
* Lonny Grafman, Engineering Professor, Cal Poly Humboldt, Arcata | |||
* Dr. Richard Hansis, Cal Poly Humboldt, Arcata | |||
* Monte Merrick at the Humboldt Wildlife Care Center, Bayside | |||
* Dan Moyer at Appropriate Solar, Sun Frost Refrigeration, Arcata | |||
* Bryan Norkunas at PV Cables, Redway | |||
* Kristin Radesky at Schatz Energy Resource Center, Cal Poly Humboldt, Arcata | |||
* Renewable Energy Student Union (RESU), Cal Poly Humboldt, Arcata | |||
<references /> | |||
{{Page data | |||
| keywords = Solar, renewable, energy, Cal Poly Humboldt, demonstration, photovoltaic, solar array, solar panels, charging station, appropriate technology, design, battery, USB, current, voltage, cellphone, laptop, tablet, Campus Center for Appropriate Technology, off-grid, stand alone, CCAT, Wood, Metal, Charge Controller, Battery | |||
| sdg = SDG07 Affordable and clean energy, SDG04 Quality education, SDG09 Industry innovation and infrastructure, SDG11 Sustainable cities and communities, SDG12 Responsible consumption and production, SDG13 Climate action | |||
| published = 2014 | |||
| organizations = Category:Campus Center for Appropriate Technology (CCAT), Cal Poly Humboldt | |||
| license = CC-BY-SA-3.0 | |||
| language = en | |||
}} | |||
[[Category:CCAT|S]] | |||
[[Category:Solar]] | |||
[[Category:Energy]] | |||
[[Category:Cal Poly Humboldt]] | |||
[[Category:Appropriate technology]] | |||
[[Category:Design]] | |||
[[Category:Wood]] | |||
Latest revision as of 18:34, 29 January 2024

The Campus Center of Appropriate Technology is a demonstration house located on the Cal Poly Humboldt campus, Arcata, California that is a resource for students and faculty. CCAT has many different technologies on display such as: solar panels, rainwater catchment, organic gardens, a greywater marsh, and an experimental composting toilet, among other things. These projects are on display as educational tools to the community and information is provided through CCAT/Appropedia on how to recreate these technologies on your own. The Solar Charging Station at CCAT will align with the mission of CCAT to provide education and resources to the community, by clearly expressing how off-grid solar works, while being functional for cell phone/laptop charging.
Understanding the market[edit | edit source]
What we have:

- 10 functioning solar panels donated to CCAT
- A kiosk in the center of CCAT as a space to set up our system
- Scrap metal and wood
- High quality 2 x 4s
- CCAT tools/hardware
- Materials for making a guest book
- Some materials for charge controller housing
What we need:
- A sealed battery
- Charge controller
- Waytek USB plug for load
- USB split plug for multiple chargers
- Copper wire #8 bare, 20 feet
- Ground rod, 8 feet
- Acorn nut
- Panel wire, 8 feet
- MC 4 branch 10 gauge PV wire
- MC 4 wire 60 inches cut in half
- Conduit
- Battery box
- Lock for battery box
- 8 gauge wire from battery to charge controller
- Fuse block, 10 - 15 Amps near battery
-
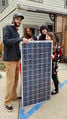
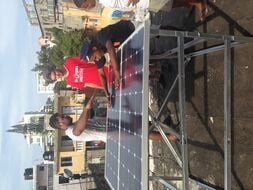
Sun Spotters with a panel
-
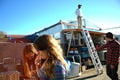
Sun Spotters scouting at the Wildlife Care Center
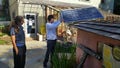
-
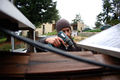
Testing sun exposure near the Bicycle Learning Center
-
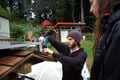
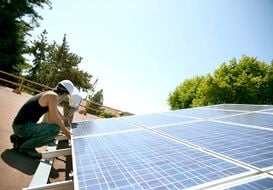
Kevin checking out the panels on the CCAT kiosk
-
Cutting the cables to the appropriate size for installation
-
PV Cable challenges
-

Stripping the cables for installation
-
Attempting to attach the wiring to the panels


Project goals[edit | edit source]
By the end of the project we want to have accomplished the following goals:
- Have a functioning solar charging station at [CCAT][1]
- Provide an effective demonstration of off-grid solar
- Complete a step by step guide to construction here on Appropedia for those who want to build it themselves
- Complete a project report with a cost, buyback time, and energy return on investment analysis
- Create a prototype and precedent for future such stations on the HSU campus
Design[edit | edit source]
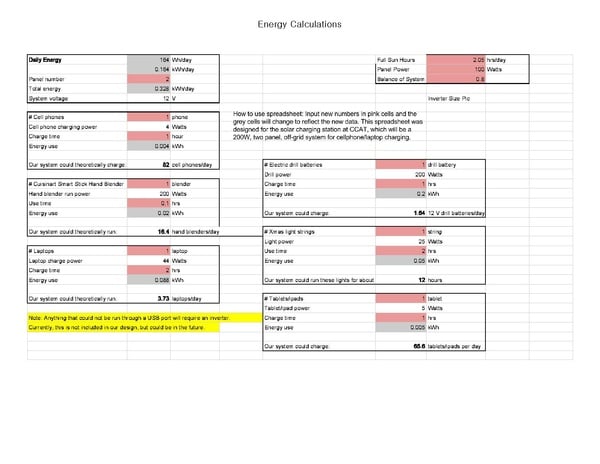
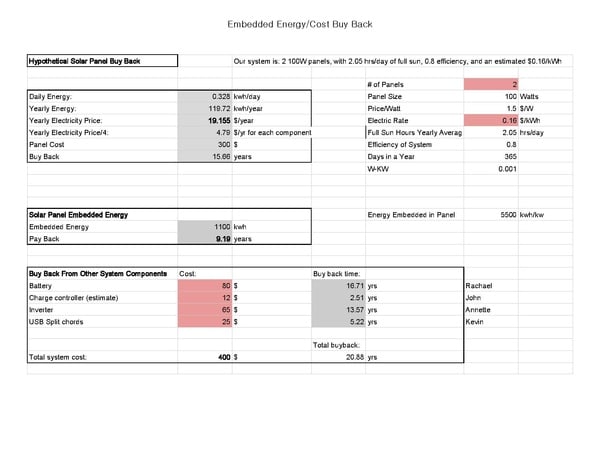
Energy calculations:
The project location will be the roof of the CCAT demonstration wall kiosk. We measured solar insolation at this location with a Solar Pathfinder and assessed other sites at CCAT as well. We chose the kiosk for having the most solar insolation on an already constructed, available rooftop, and because it is in a centralized location at CCAT.
- Full sun hours at location: 2.05 hrs/day
- Panel power: 100 Watts
- Balance of system efficiency assumed at: 0.8
- Number of panels: 2
Edaily = full sun hours * panel power * efficiency
Edaily = 2.05 hrs/day * 100 Watts * 0.8
equals 164 Wh/day / 1000
equals.164 kWh/day * 2 panels
.328 kWh/day
.328 kWh/day * 365 days/year = 119.72 kWh/year
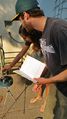
-
Testing the IV Curve of the PV Panels
-
Testing IV Curves with the RESU
-

Sun exposure test at the Wildlife Care Center (same test done on Kiosk)


Construction[edit | edit source]
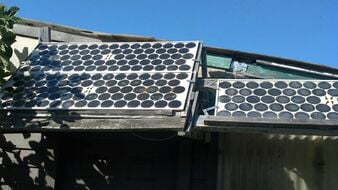
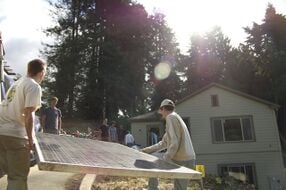
The panels will be positioned vertically and staggered on the kiosk rooftop, facing south, at a 30 degree angle for maximum sun exposure.
Stabilizing the Kiosk Roof, Building the Panel Racks, Mounting the Panels, and Installing the Fuse
Stabilizing the Kiosk Roof:
-
Kiosk Pre Construction
-
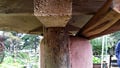
Underside view of the Kiosk prior to reinforcements
-
Reinforcements being made to the underside
-
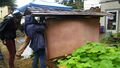
Reinforcements to the Kiosk


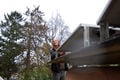
First, we noticed the kiosk roof has a wobble to it due the the rooftop having a centralized beam and no side support. In an attempt to stabilize the roof, we added additional screws from the main support beam to the support beams from the main wall.
Building the Panel Racks:
-
Testing out PV Placement!
-

Testing PV Placement from another angle!
-
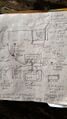
Design Sketch Up


Second, we began constructing our own panel racks. We chose building our own over buying racks to attempt to keep within budget and recycle materials at CCAT. We built our racks out of scrap metal found at CCAT. The panels are attached to the rack with 90 degree brackets and the tools used were available at CCAT. Our priorities for the racking were that they be:
- Stable, attached firmly to the panels
- Supporting the panels at desirable angles
- Reusing materials at CCAT
Rack/Panel #1:
We addressed rack stability by experimenting with different heights of the first rack while still maintaining a close to 30 degree angle. The back legs of the panel ended up being around 2.5 feet long. We preferred the back legs being shorter versus longer to prevent the panel from picking up wind during storm events. We also included a crossbeam between the back two legs to prevent the panel from swaying. The front of the panel will rest upon two short metal supports that will attach to the roof through angled brackets. The panel front will be as low to the roof as possible to prevent swaying in the wind.
To find the appropriate lengths of the racking to maintain a 30 degree angle we used simple geometry:
Rack/Panel #2:
We decided to have the second angle lay almost flat on the rooftop instead of having a 30 degree angle. This decision was made to prevent shading of the first panel on the second and also to more effectively catch summer sun. We figured since the panels will not be moved, we wanted our system to be built with one panel focused on catching winter sun and one that can catch the higher in the sky, summer sun.
Mounting the Panels:
-
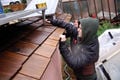
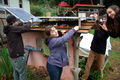
Measuring Panel Placement
-
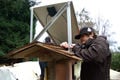
Mounting a panel in the front and back
-
Screwing the panels in place
-
Screwing in another panel
-
Panel mounting is almost complete
-
Mounting Teamwork
-
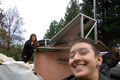
Being proud of our installation


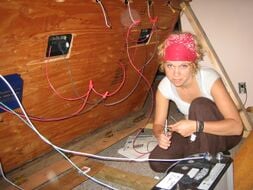
Building and Mounting the Charge Controller Box and Battery installation:
-
Cutting the Charge Controller Box mount
-
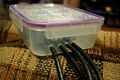
The tupperware housing for the charge controller box
-
Attaching the wires from the charge controller to the battery and the panels!
-
Completed Charge Controller Box! Blue light means go!
-
Burying the battery to deter theft


Installing the Fuse
Since our system has a current of 8.33 Amps, we chose a 10 Amp fuse for safety. We were advised to choose a fuse between 10 - 15 Amps, but we chose the lowest number as an extra precaution. The point of a fuse is to "pop" should there be a surge of current in the circuit. The fuse popping prevents the current surge from damaging something else in the system and disconnects the circuit, turning the system off.
We put our fuse on the positive battery line. The battery is the most important place to have a fuse, due to the amount of energy batteries have stored up. If the battery were to explode, it could cause significant damage or even start a fire. Furthermore, since batteries are typically expensive, you don't want any damage to come to it. For these reasons you should always have a fuse by the battery.
We bought an in-line fuse holder at Ace and the corresponding 10 Amp fuse that it will hold. We have back up fuses stored in the CCAT Greenshed, should the fuse need to be replaced. It is also recommended to have a fuse on one of the panel lines as well, but it is more necessary for larger systems that are capable of causing more damage.
Costs[edit | edit source]
We had a $400 budget from CCAT for this project. For a chart of supplies, their prices, and where they were from, reference our final document linked at the bottom of this page.
Buyback:
The system will save the campus around $20 each year in electricity costs and will therefore buy itself back in about 21 years. ($400/$19.12/year = 20.88 years).
Troubleshooting for Future CCATers[edit | edit source]
Here is a link to the user's manual for our Phocos charge controller:
http://www.phocos.com/sites/default/files/document/181802613%20CML%20final%20manual.pdf
If you scroll through, there is a manual in English. The manual offers some handy troubleshooting knowledge and explains which each light/series of lights on the charge controller mean.
Possible Issue #1[edit | edit source]
The charge controller has a red light on it in the bottom center. This means that the battery has been disconnected, because it has run low. This could mean that the battery simply needs time to recharge, or somewhere the wiring has become disconnected. If the red light is on while another light is still on, or the red light is flashing, reference the user manual.
If investigating the cause of a problem always disconnect and reconnect wires in the correct order and with caution.
DISCONNECTING:
- Disconnect load (USB)
- Disconnect panels
- Disconnect battery
NEVER cross wires or touch a live wire. Use extreme caution. Always connect positive to positive and negative to negative. The wrong polarity will cause the charging station to stop working or the charge controller may make an error noise.
RECONNECTING
- Connect battery
- Connect panels
- Connect load
NEVER cross wires or touch a live wire. Use extreme caution. Maintain polarity.
Possible Issue #2
There is NOT a green LED light on above the battery symbol on the charge controller during the day. This light should be on during the day, it indicates that the panels are generating voltage. If this light is not on, there could be a loss of connectivity to the panels or the panels are being shaded.
If taking apart the system, refer to the instructions above and the charge controller manual.
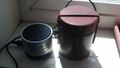
Chargers[edit | edit source]
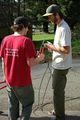
A mini USB to USB charger and ipod to USB charger were purchased at the HSU campus marketplace for the Solar Charging Station. They are stored in a Tupperware for waterproofing at the station and are readily accessible for all students to use. After about 3 months of use, the mini USB charger disappeared from the station.
We foresee that chargers being stolen could be a continuous issue. To save CCAT money and to save resources, we have decided to try and obtain used chargers for the station. After getting in touch with the student Help Desk, I (Annika) found out that they normally have chargers that were lost and students never came back for. After two weeks of the chargers sitting in the lost and found, they are recycled at the nearby electronic waste station. Getting these used chargers from the Help Desk or other locations on campus would prevent them from entering the waste stream just yet and get more use out of them in their lifetime. The Sun Spotters encourage collaboration with other organizations on campus to ensure that the charging station will always have chargers and that we won't have to continuously buy new ones.
Cisco Innovator (Speaker)[edit | edit source]
CCAT will be receiving a mini speaker donated by Cisco for the Solar Charging Station. The speaker can be connected to via Bluetooth and uses a USB charger. Therefore, we can charge the speaker from our station and use the charging smart phones to play music through it. This will be an excellent resource for CCAT volunteer days so that we can play music off of renewable energy.
The speaker should be kept INSIDE in a safe location when not in use. Preferably somewhere upstairs where it can be locked up at night, but still accessible for Volunteer Fridays or other work days.
-
The mini speaker with USB charger attached.
-
The mini speaker and protective case.


Documents[edit | edit source]
Here is the final document for our project:
Here are the hours spent on the project for each team member:
Here is the solar math breakdown for the project:
Contact[edit | edit source]
Annika Ragsdale can be contacted about this project at akr57@humboldt.edu
Related projects[edit | edit source]


References[edit | edit source]
We would like to acknowledge and express our gratitude to members of our community who served as references for us:
- Campus Center for Appropriate Technology, Cal Poly Humboldt, Arcata
- Lonny Grafman, Engineering Professor, Cal Poly Humboldt, Arcata
- Dr. Richard Hansis, Cal Poly Humboldt, Arcata
- Monte Merrick at the Humboldt Wildlife Care Center, Bayside
- Dan Moyer at Appropriate Solar, Sun Frost Refrigeration, Arcata
- Bryan Norkunas at PV Cables, Redway
- Kristin Radesky at Schatz Energy Resource Center, Cal Poly Humboldt, Arcata
- Renewable Energy Student Union (RESU), Cal Poly Humboldt, Arcata