No edit summary |
(→Things You will Need: image size) |
||
| (4 intermediate revisions by 4 users not shown) | |||
| Line 1: | Line 1: | ||
== Steps == | == Steps == | ||
[[Image:IMG 3551. | [[Image:IMG 3551.JPG|thumb|left|Fig 1: Full view of system]]Welcome to the quick and dirty gravity fed drip irrigation system tutorial. This particular model (version 1.0) was built for CCAT to supply their seasoned vegetable beds with an appropriate, efficient water supply and a little love. | ||
A gravity fed drip irrigation system is a way to redirect water to plants in a much more efficient manner than just spraying them with a hose. Due to it using much less water because of how small the tubing is, it allows the water to be able to reach the root system much more effectively. That being said, you are also saving more water. | A gravity fed drip irrigation system is a way to redirect water to plants in a much more efficient manner than just spraying them with a hose. Due to it using much less water because of how small the tubing is, it allows the water to be able to reach the root system much more effectively. That being said, you are also saving more water. | ||
| Line 14: | Line 14: | ||
Our group had a bit of a problem getting the water pressure right, but we found a solution. When filling the bucket up, plug up the hole till it reaches the top (in our case, however much water you would like to use may differ), then allow it to drain. We have not installed a shut off valve yet, which would be allowed in future builds. Another idea for future alterations would be several shut off valves to redirect the water more effectively. | Our group had a bit of a problem getting the water pressure right, but we found a solution. When filling the bucket up, plug up the hole till it reaches the top (in our case, however much water you would like to use may differ), then allow it to drain. We have not installed a shut off valve yet, which would be allowed in future builds. Another idea for future alterations would be several shut off valves to redirect the water more effectively. | ||
<gallery> | <gallery> | ||
Image:IMG 3554. | Image:IMG 3554.JPG|Fig 1: Profile of bucket stand | ||
Image:IMG 3555. | Image:IMG 3555.JPG|Fig 1a: Brandon laying tubing to correct bed length | ||
Image:DSCF4221.JPG|Fig 1b: Brandon Welding bucket stand | Image:DSCF4221.JPG|Fig 1b: Brandon Welding bucket stand | ||
Image:DSCF4223.JPG|Fig 1c: Finished | Image:DSCF4223.JPG|Fig 1c: Finished stand | ||
Image:IMG 3553.JPG|Fig 1d: Hooks on back of bucket stand | Image:IMG 3553.JPG|Fig 1d: Hooks on back of bucket stand to hang off of curb | ||
Image:IMG 3556.JPG|Fig 1e: More tubing being | Image:IMG 3556.JPG|Fig 1e: More tubing being laid | ||
Image:IMG 3557.JPG|Fig 1f: | Image:IMG 3557.JPG|Fig 1f: Crimping the end of the line | ||
Image:IMG 3558.JPG|Fig 1g: Holes being punched into tubing | Image:IMG 3558.JPG|Fig 1g: Holes being punched into tubing for the emitters | ||
Image:IMG 3560.JPG|Fig 1h: Barbs into | Image:IMG 3560.JPG|Fig 1h: Barbs into micro tubing | ||
Image:IMG 3561.JPG|Fig 1i: Microtubing connected to main line | Image:IMG 3561.JPG|Fig 1i: Microtubing connected to main line | ||
Image:IMG 3563.JPG|Fig 1j: Mainline | Image:IMG 3563.JPG|Fig 1j: Mainline | ||
| Line 29: | Line 29: | ||
Image:IMG 3568.JPG|Fig 1m: Microtubing next to plant | Image:IMG 3568.JPG|Fig 1m: Microtubing next to plant | ||
Image:IMG 3569.JPG|Fig 1n: Mainline staked down | Image:IMG 3569.JPG|Fig 1n: Mainline staked down | ||
Image:IMG 3570.JPG|Fig 1o: Hooking up mainline to bucket | Image:IMG 3570.JPG|Fig 1o: Hooking up mainline to the bucket | ||
Image:IMG 3571.JPG|Fig 1p: Overview of whole system | Image:IMG 3571.JPG|Fig 1p: Overview of whole system | ||
| Line 37: | Line 37: | ||
'''All parts are for this project in particular. Your needs may differ.''' | '''All parts are for this project in particular. Your needs may differ.''' | ||
[[Image:IMG 3574.JPG]] | [[Image:IMG 3574.JPG|600px]] | ||
*1/4" Barb connectors | *1/4" Barb connectors | ||
| Line 58: | Line 58: | ||
== Sources and Citations == | == Sources and Citations == | ||
[[Category:Agriculture]] | [[Category:Agriculture]] | ||
[[Category:Engr114 Whole Earth Engineering]] | [[Category:Engr114 Whole Earth Engineering]] | ||
[[Category:Irrigation]] | [[Category:Irrigation]] | ||
[[Category:CCAT|G]] | |||
Revision as of 01:15, 1 January 2012
Steps

Welcome to the quick and dirty gravity fed drip irrigation system tutorial. This particular model (version 1.0) was built for CCAT to supply their seasoned vegetable beds with an appropriate, efficient water supply and a little love.
A gravity fed drip irrigation system is a way to redirect water to plants in a much more efficient manner than just spraying them with a hose. Due to it using much less water because of how small the tubing is, it allows the water to be able to reach the root system much more effectively. That being said, you are also saving more water.
- First things first, get out your trusty measuring tool and find out how long the beds you want watered are. This will allow you to know how much tubing you will need. We used 1/2" tubing for redirecting the water.
- The water source. We took our five gallon bucket and drilled a 1/2" hole into it to allow the water to get out. Afterwards, we took the two male threaded hose pieces and put them through the hole, filling any gaps in with sealant. We used a tee joint on the end of hose piece because we had multiple beds to get to, your case may differ. One of our team members had access to welding materials, so he created a shelf from scrap metal for the bucket to sit on for the necessary amount of head for the water to travel.
- Lay down all your tubing and mark along it where your holes would be to let the water flow. It is possible to bury the tubing if you want, we chose not to for ease of access and repair reasons.
- Start punching! At this point, we put either drippers or the 1/4" microtubing depending on the plant's size and water needs.
- Make sure all hoses are hooked up and staked down, then fill bucket to test.
- Make appropriate adjustments.
Tips
Our group had a bit of a problem getting the water pressure right, but we found a solution. When filling the bucket up, plug up the hole till it reaches the top (in our case, however much water you would like to use may differ), then allow it to drain. We have not installed a shut off valve yet, which would be allowed in future builds. Another idea for future alterations would be several shut off valves to redirect the water more effectively.
-
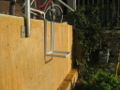
Fig 1: Profile of bucket stand
-

Fig 1a: Brandon laying tubing to correct bed length
-
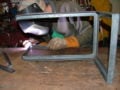
Fig 1b: Brandon Welding bucket stand
-
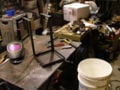
Fig 1c: Finished stand
-

Fig 1d: Hooks on back of bucket stand to hang off of curb
-

Fig 1e: More tubing being laid
-

Fig 1f: Crimping the end of the line
-

Fig 1g: Holes being punched into tubing for the emitters
-
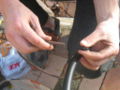
Fig 1h: Barbs into micro tubing
-
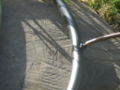
Fig 1i: Microtubing connected to main line
-
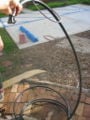
Fig 1j: Mainline
-

Fig 1k: Matt and Jessica laying more tubing
-

Fig 1l: Microtubing next to plants
-
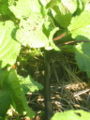
Fig 1m: Microtubing next to plant
-

Fig 1n: Mainline staked down
-

Fig 1o: Hooking up mainline to the bucket
-

Fig 1p: Overview of whole system


Things You will Need
All parts are for this project in particular. Your needs may differ.

- 1/4" Barb connectors
- 1/4" Vinyl microtubing
- 1/2" Vinyl tubing
- 2 1/2" Tee joint
- 1 1/2" Elbow joint
- Drippers
- Professional hole puncher
- Figure 8 hose end
- 5 Gallon bucket
- Hand made hook for cement wall
- 2 Male threaded hose ends
- Stakes
- Scissors or knife
- Drill
- Measuring tool