| (27 intermediate revisions by 7 users not shown) | |||
| Line 1: | Line 1: | ||
The earth oven is located at Humboldt State's [[Campus Center for Appropriate Technology]], or CCAT. It was built as an ENGR 305 project by John and Liz. For more information, look at their original project write up here: http://www.pequals.com/at/earthenoven/01_Project_Selection.html Some pictures and text were copied from the original page to this one. | [[File:Earthoven6.jpg|thumb]] | ||
The earth oven is located at Humboldt State's [[Campus Center for Appropriate Technology]], or CCAT. It was built as an ENGR 305 project by John and Liz. For more information, look at their original project write up here:<ref>http://www.pequals.com/at/earthenoven/01_Project_Selection.html</ref> Some pictures and text were copied from the original page to this one. | |||
== What is an Earth Oven? == | == What is an Earth Oven? == | ||
| Line 12: | Line 14: | ||
== Structure of an Earth Oven == | == Structure of an Earth Oven == | ||
# The first layer: | |||
#* The thermal layer is made mostly of clay and sand. It is best when created in a dome shape providing heat for the oven by retaining heat from a fire that is first lit inside. | |||
# The second layer: | |||
#* The insulation layer is made mostly of fiber and clay. It covers the thermal layer helping prevent heat loss. | |||
# The third layer: | |||
#* This layer is optional. The outer layer is made of clay, sand and fiber. It protects the first two layers from the elements and can be used to sculpt the oven into almost any shape. | |||
<gallery> | |||
File:Earthoven1.jpg | |||
File:Earthoven2.jpg | |||
</gallery> | |||
== Materials Gathering == | |||
During materials gathering, it is best to try and find what you need locally so long as it is still affordable for you to do so. Finding local materials supports your neighboring community, while reducing the embedded energy of your project. "Embedded energy" comes from the energy required to harvest, produce, package, and transport your materials. Getting things locally cuts out the transportation portion of embedded energy by reducing its miles traveled. This helps to reduce your ecological footprint by being responsible for less gasoline burned and thus less greenhouse gases emitted. | |||
'''Urbanite''' (concrete chunks): construction sites, calling local construction companies, looking for piles around town (ask before you take). Not much preparation is needed after you've harvested your urbanite. You may want to get a small sledge hammer to shape the chunks just the way you want. More about Urbanite in the Foundation Section. | '''Urbanite''' (concrete chunks): construction sites, calling local construction companies, looking for piles around town (ask before you take). Not much preparation is needed after you've harvested your urbanite. You may want to get a small sledge hammer to shape the chunks just the way you want. More about Urbanite in the Foundation Section. | ||
'''Clay''': It is best to dig on site. | '''Clay''': It is best to dig on site. You can dig up some clayish soil from below the topsoil in your yard and give it the "E-Z soil analysis test" here. Grate the clay on a heavy duty screen (1/2") to help break it up before it is mixed in with your sand or straw. Raw clay is easily mixed with a paint mixer after it has been soaked in a bit of water for a while (though our mixing attachment did break after a while). | ||
'''Sand''': It is very important that you use river sand for construction with cob, beach sand is too smooth. You can get sand directly from the river, however try to minimize your impact to the river bank. You can also buy sand from construction companies that sell gravel. You want about 1/4 inch or smaller. We used varying sized screens (as seen below) to filter the sand to different sizes we wanted. Larger pieces of sand and gravel are welcome in the foundation to be used as fill. Medium pieces are good to mix with your clay. The finest sand is used for laying the fire brick and for a fine plaster coating. | '''Sand''': It is very important that you use river sand for construction with cob, beach sand is too smooth. You can get sand directly from the river, however try to minimize your impact to the river bank. You can also buy sand from construction companies that sell gravel. You want about 1/4 inch or smaller. We used varying sized screens (as seen below) to filter the sand to different sizes we wanted. Larger pieces of sand and gravel are welcome in the foundation to be used as fill. Medium pieces are good to mix with your clay. The finest sand is used for laying the fire brick and for a fine plaster coating. | ||
'''Straw''': | '''Straw''': Usually you buy it unless you know someone in the bailing business. We bought organic rice straw for $5.00 a bale and needed about 2 bales. | ||
'''Manure''': A good ingredient in the plaster. Get from fields with permission. Call local stables for horse manure or dairy/meat farms for cow manure. Do not trespass on fields! Manure works great as a fiber because it has already been digested into very small particles which can form long chains of tensile strength in cob mixtures. Grate the manure to break it up from its post-digested form. Consider using rubber gloves or washing your hands afterward. | '''Manure''': A good ingredient in the plaster. Get from fields with permission. Call local stables for horse manure or dairy/meat farms for cow manure. Do not trespass on fields! Manure works great as a fiber because it has already been digested into very small particles which can form long chains of tensile strength in cob mixtures. Grate the manure to break it up from its post-digested form. Consider using rubber gloves or washing your hands afterward. | ||
| Line 36: | Line 44: | ||
{| class="wikitable" | {| class="wikitable" | ||
! Qty | |||
!Qty | ! Material Needed | ||
!Material Needed | ! Source | ||
!Source | ! Cost | ||
!Cost | ! Total cost | ||
!Total cost | |||
|- | |- | ||
| 1 | | 1 | ||
| Line 49: | Line 56: | ||
| $0 | | $0 | ||
|- | |- | ||
|As needed | | As needed | ||
|Paper, pens, pencils | | Paper, pens, pencils | ||
|CCAT | | CCAT | ||
|$0 | | $0 | ||
|$0 | | $0 | ||
|- | |- | ||
|1 | | 1 | ||
|Digital Camera for documentation | | Digital Camera for documentation | ||
|Liz | | Liz | ||
|$0 | | $0 | ||
|$0 | | $0 | ||
|- | |- | ||
|2 | | 2 | ||
|Measuring tape | | Measuring tape | ||
|CCAT Toolshed | | CCAT Toolshed | ||
|$0 | | $0 | ||
|$0 | | $0 | ||
|- | |- | ||
|lots | | lots | ||
|Running water | | Running water | ||
|CCAT | | CCAT | ||
|$0 | | $0 | ||
|$0 | | $0 | ||
|- | |- | ||
|2 | | 2 | ||
|Large clay sifters 1/2" | | Large clay sifters 1/2" | ||
|Kiva | | Kiva | ||
|Donated | | Donated | ||
|$0 | | $0 | ||
|- | |- | ||
|2 | | 2 | ||
|Medium sand sifters 1/4" | | Medium sand sifters 1/4" | ||
|CCAT Toolshed | | CCAT Toolshed | ||
|$0 | | $0 | ||
|$0 | | $0 | ||
|- | |- | ||
|2 | | 2 | ||
|Small sand sifter 1/8" | | Small sand sifter 1/8" | ||
|CCAT Toolshed | | CCAT Toolshed | ||
|$0 | | $0 | ||
|$0 | | $0 | ||
|- | |- | ||
|1 | | 1 | ||
|Fine sand sifter 1/16" | | Fine sand sifter 1/16" | ||
|CCAT | | CCAT | ||
|$0 | | $0 | ||
|$0 | | $0 | ||
|- | |- | ||
|3 | | 3 | ||
|Wheel barrows | | Wheel barrows | ||
|CCAT | | CCAT | ||
|$0 | | $0 | ||
|$0 | | $0 | ||
|- | |- | ||
|2 | | 2 | ||
|Shovels | | Shovels | ||
|CCAT | | CCAT | ||
|$0 | | $0 | ||
|$0 | | $0 | ||
|- | |- | ||
|10 | | 10 | ||
|Five gallon buckets | | Five gallon buckets | ||
|CCAT | | CCAT | ||
|$0 | | $0 | ||
|$0 | | $0 | ||
|- | |- | ||
|As needed | | As needed | ||
|Scrap wood | | Scrap wood | ||
|CCAT | | CCAT | ||
|$0 | | $0 | ||
|$0 | | $0 | ||
|- | |- | ||
|40 | | 40 | ||
|Screws | | Screws | ||
|CCAT | | CCAT | ||
|$0 | | $0 | ||
|$0 | | $0 | ||
|- | |- | ||
|1 | | 1 | ||
|Power drill | | Power drill | ||
|CCAT | | CCAT | ||
|$0 | | $0 | ||
|$0 | | $0 | ||
|- | |- | ||
|1 | | 1 | ||
|Paint mixing attachment for clay mixing | | Paint mixing attachment for clay mixing | ||
|CCAT | | CCAT | ||
|$0 | | $0 | ||
|$0 | | $0 | ||
|- | |- | ||
|300 | | 300 | ||
|Labor hours | | Labor hours | ||
|Project leaders/volunteers | | Project leaders/volunteers | ||
|$0 | | $0 | ||
|$0 | | $0 | ||
|- | |- | ||
|4 | | 4 | ||
|Baking pans | | Baking pans | ||
|CCAT | | CCAT | ||
|$0 | | $0 | ||
|$0 | | $0 | ||
|- | |- | ||
|4 ft^3 | | 4 ft^3 | ||
|"Sticky" sand | | "Sticky" sand | ||
|CCAT | | CCAT | ||
|$0 | | $0 | ||
|$0 | | $0 | ||
|- | |- | ||
|2 tons | | 2 tons | ||
|River sand | | River sand | ||
|Mason donation | | Mason donation | ||
|$0 | | $0 | ||
|$0 | | $0 | ||
|- | |- | ||
|5 ft^3 | | 5 ft^3 | ||
|Clay | | Clay | ||
|CCAT | | CCAT | ||
|$0 | | $0 | ||
|$0 | | $0 | ||
|- | |- | ||
|10 ft^3 | | 10 ft^3 | ||
|Gravel fill | | Gravel fill | ||
|CCAT | | CCAT | ||
|$0 | | $0 | ||
|$0 | | $0 | ||
|- | |- | ||
|40 ft^3 | | 40 ft^3 | ||
|Urbanite | | Urbanite | ||
|CCAT | | CCAT | ||
|$0 | | $0 | ||
|$0 | | $0 | ||
|- | |- | ||
|1 | | 1 | ||
|Sledge hammer for urbanite | | Sledge hammer for urbanite | ||
|CCAT | | CCAT | ||
|$0 | | $0 | ||
|$0 | | $0 | ||
|- | |- | ||
|23 | | 23 | ||
|Fire brick | | Fire brick | ||
|Mason | | Mason | ||
|$1 | | $1 | ||
|$24 | | $24 | ||
|- | |- | ||
|2 bales | | 2 bales | ||
|Straw | | Straw | ||
|The Mill | | The Mill | ||
|$5 | | $5 | ||
|$10 | | $10 | ||
|- | |- | ||
|5 gal | | 5 gal | ||
|Horse manure | | Horse manure | ||
|CCAT | | CCAT | ||
|$0 | | $0 | ||
|$0 | | $0 | ||
|- | |- | ||
|2 | | 2 | ||
|Rubber gloves | | Rubber gloves | ||
|CCAT | | CCAT | ||
|$0 | | $0 | ||
|$0 | | $0 | ||
|- | |- | ||
|1 | | 1 | ||
|Kitchen oven | | Kitchen oven | ||
|CCAT | | CCAT | ||
|$0 | | $0 | ||
|$0 | | $0 | ||
|- | |- | ||
|1 | | 1 | ||
|Newspaper | | Newspaper | ||
|HSU Lumberjack | | HSU Lumberjack | ||
|$0 | | $0 | ||
|$0 | | $0 | ||
|- | |- | ||
|1 ft^3 | | 1 ft^3 | ||
|Pulp/paper | | Pulp/paper | ||
|CCAT | | CCAT | ||
|$0 | | $0 | ||
|$0 | | $0 | ||
|- | |- | ||
|1 | | 1 | ||
|Thermal layer instructions lamination | | Thermal layer instructions lamination | ||
|Kinko's Copies | | Kinko's Copies | ||
|$5 | | $5 | ||
|$5 | | $5 | ||
|- | |- | ||
|As needed | | As needed | ||
|Firewood | | Firewood | ||
|CCAT | | CCAT | ||
|$0 | | $0 | ||
|$0 | | $0 | ||
|- | |- | ||
|1 box | | 1 box | ||
|Matches | | Matches | ||
|CCAT | | CCAT | ||
|$0 | | $0 | ||
|$0 | | $0 | ||
|- | |- | ||
|1 | | 1 | ||
|Skill saw | | Skill saw | ||
|CCAT | | CCAT | ||
|$0 | | $0 | ||
|$0 | | $0 | ||
|- | |- | ||
|1 | | 1 | ||
|Wood saw | | Wood saw | ||
|CCAT | | CCAT | ||
|$0 | | $0 | ||
|$0 | | $0 | ||
|- | |- | ||
|1 | | 1 | ||
|Level | | Level | ||
|CCAT | | CCAT | ||
|$0 | | $0 | ||
|$0 | | $0 | ||
|- | |- | ||
|1 | | 1 | ||
|Chalk | | Chalk | ||
|CCAT | | CCAT | ||
|$0 | | $0 | ||
|$0 | | $0 | ||
|- | |- | ||
|1 | | 1 | ||
|String for drawing circle | | String for drawing circle | ||
|Came with straw | | Came with straw | ||
|$0 | | $0 | ||
|$0 | | $0 | ||
|- | |- | ||
|Total | | colspan="4" align="right" | '''Total Cost''' | ||
| align="right"| '''$39.00''' | |||
|} | |} | ||
== Things to Consider == | == Things to Consider == | ||
Kiko Denzer suggests people to consider: | Kiko Denzer suggests people to consider: | ||
*If they like to work in the elements, or how will they protect their oven from the elements? | |||
*Will they build a roof over it? | * If they like to work in the elements, or how will they protect their oven from the elements? | ||
*Can it be a well-lit area? | * Will they build a roof over it? | ||
*Does it face away from the wind to carry smoke away, or will smoke be blown in an undesirable location? | * Can it be a well-lit area? | ||
*Do they need a permit to build it there? | * Does it face away from the wind to carry smoke away, or will smoke be blown in an undesirable location? | ||
*How will it affect their fire insurance? | * Do they need a permit to build it there? | ||
*Is it near food preparation areas? | * How will it affect their fire insurance? | ||
*Will it be waist level, or will people have to sit on the ground to use it? | * Is it near food preparation areas? | ||
* Will it be waist level, or will people have to sit on the ground to use it?" | |||
== Determining Mixture == | == Determining Mixture == | ||
| Line 300: | Line 309: | ||
Our first tests involved mixing the materials and forming them into bricks and then baking the bricks in a regular oven to speed the drying process. This can add a bit of error as most cob ovens will not be dried by being baked in a regular oven, but is mostly reliable and helps rule out some mixtures. | Our first tests involved mixing the materials and forming them into bricks and then baking the bricks in a regular oven to speed the drying process. This can add a bit of error as most cob ovens will not be dried by being baked in a regular oven, but is mostly reliable and helps rule out some mixtures. | ||
We formed each test brick into a | We formed each test brick into a 2" thick, 10" long, approx 5" wide loaf and placed it in a baking pan. We marked each loaf with a letter and recorded on our data sheet what mix ratio went with that letter. It is important to keep them in order and clearly marked while baking. | ||
To bake them, we placed them in an oven at a low temperature (100º-150º F) and baked them with the door cracked, this took a few hours. | To bake them, we placed them in an oven at a low temperature (100º-150º F) and baked them with the door cracked, this took a few hours. | ||
| Line 307: | Line 316: | ||
{| class="wikitable" | {| class="wikitable" | ||
! Brick | |||
! Parts Clay | |||
! Parts Sand | |||
! Percent Clay | |||
! Percent Sand | |||
! Shrinkage | |||
! Strength | |||
! Cracking | |||
|- | |- | ||
| A | |||
| 1 | |||
| 4 | |||
| 20 | |||
| 80 | |||
| Little | |||
| Brittle | |||
| High | |||
|- | |- | ||
| | | B | ||
|1 | | 1 | ||
| | | 3 | ||
| | | 25 | ||
| | | 75 | ||
|Little | | Little | ||
| | | Hard | ||
| | | Moderate | ||
|- | |- | ||
| | | C | ||
|1 | | 1 | ||
| | | 2 | ||
| | | 33 | ||
| | | 66 | ||
|Little | | Little | ||
|Hard | | Hard | ||
| | | High | ||
|- | |- | ||
| | | D | ||
| | | 2 | ||
| | | 3 | ||
| | | 40 | ||
| | | 60 | ||
| | | Medium | ||
|Hard | | Hard | ||
| | | Low | ||
|- | |- | ||
| E | |||
| 1 | |||
| 1 | |||
| 50 | |||
| 50 | |||
| Medium | |||
| Firm | |||
| Low | |||
|E | |||
|1 | |||
|1 | |||
|50 | |||
|50 | |||
|Medium | |||
|Firm | |||
|Low | |||
|- | |- | ||
|F | | F | ||
|3 | | 3 | ||
|2 | | 2 | ||
|60 | | 60 | ||
|40 | | 40 | ||
|Medium | | Medium | ||
|Soft | | Soft | ||
|Low | | Low | ||
|- | |- | ||
|G | | G | ||
|2 | | 2 | ||
|1 | | 1 | ||
|66 | | 66 | ||
|33 | | 33 | ||
|High | | High | ||
|Soft | | Soft | ||
|Medium | | Medium | ||
|- | |- | ||
|H | | H | ||
|3 | | 3 | ||
|1 | | 1 | ||
|75 | | 75 | ||
|25 | | 25 | ||
| High | |||
| Very Soft | |||
| Medium | |||
|High | |||
|Very Soft | |||
|Medium | |||
|- | |- | ||
| I | |||
| 4 | |||
| 1 | |||
| 80 | |||
| 20 | |||
| High | |||
| Very Soft | |||
| Medium | |||
|} | |} | ||
== Foundation == | == Construction == | ||
=== Foundation === | |||
Our foundation is made out of broken up concrete, or urbanite. The concrete is broken into large chunks usually about a foot square and four to six inches thick, this size is suitable for easy handling. Usually, urbanite has one side that is flat (the surface side) and one side that is rough (the side that was against the ground). We got our urbanite locally. Reusing concrete as urbanite is a great way to reduce embedded energy costs for many projects. | |||
'''Sidenote:''' Cement (a key ingredient to concrete) production is energy intensive and the EIA determined it to be the most energy intensive form of manufacturing in America. The industry only used 0.25% of America's energy requirements in 2010, but it was found that the industry used 10 times the energy use per share of outputs (EIA). Meaning, cement production uses more energy per unit cement than most other energy intensive industries use per unit goods. Since cement production is energy intensive and burns fossil fuels in its production (when cement ingredients are heated to form a rock-like substance), it is also high in embedded carbon. A tonne of traditional Portland cement has emitted 913 kg of CO2 equivalent during production (Sustainable Concrete). For these reasons, reusing old concrete instead of buying new bags of concrete, is best for any project you decide to undertake. | |||
We started with outlining where our foundation would be on the bare patio and on the retaining wall using chalk. Our foundation would start out as a 5'x 5' square and be tapered up on all sides (except the side against the retaining wall). At the top it would end up being about a 4'x4' square, 30" off the ground. We chose 30" as our height because it would put our oven floor at a height comfortable to cook at. | We started with outlining where our foundation would be on the bare patio and on the retaining wall using chalk. Our foundation would start out as a 5'x 5' square and be tapered up on all sides (except the side against the retaining wall). At the top it would end up being about a 4'x4' square, 30" off the ground. We chose 30" as our height because it would put our oven floor at a height comfortable to cook at. | ||
Then we started laying out our urbanite. We took our larger pieces of urbanite and placed them flat side down on the patio, puzzling them into a square. After a tight square was laid out we filled the gaps in with rubble (gravel, sand, and broken glass) left over from other projects. Also, we laid about an inch of rubble over the gaps as a settling layer. We repeated this process with each layer. | Then we started laying out our urbanite. We took our larger pieces of urbanite and placed them flat side down on the patio, puzzling them into a square. After a tight square was laid out we filled the gaps in with rubble (gravel, sand, and broken glass) left over from other projects. Also, we laid about an inch of rubble over the gaps as a settling layer. We repeated this process with each layer. | ||
In the second layer we laid the rough side of the urbanite against the rough side from the first layer, working them in until the flat side of the second layer was again level. We inset every subsequent layer about two inches in from the previous layer, except on the side against the retaining wall. We repeated this process of flat-to-flat and rough-to-rough and tapering in at the edges until we had seven layers of oven. At the top we inserted some longer pieces of urbanite which formed a small lip that overhangs the rest of the foundation. The lip is useful for hanging buckets to collect hot coals or for many other purposes. | In the second layer we laid the rough side of the urbanite against the rough side from the first layer, working them in until the flat side of the second layer was again level. We inset every subsequent layer about two inches in from the previous layer, except on the side against the retaining wall. We repeated this process of flat-to-flat and rough-to-rough and tapering in at the edges until we had seven layers of oven. At the top we inserted some longer pieces of urbanite which formed a small lip that overhangs the rest of the foundation. The lip is useful for hanging buckets to collect hot coals or for many other purposes. | ||
| Line 412: | Line 423: | ||
The very top layer was covered with sand. | The very top layer was covered with sand. | ||
<center> | |||
<gallery> | <gallery> | ||
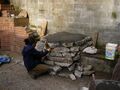
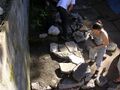
Image:earth oven.jpg|Liz working on the foundation. | Image:earth oven.jpg|Liz working on the foundation. | ||
Image:earth oven2.jpg|Michelle prepares to lay a piece of urbanite. | Image:earth oven2.jpg|Michelle prepares to lay a piece of urbanite. | ||
</gallery> | </gallery></center> | ||
== Oven Floor == | === Oven Floor === | ||
Our oven floor was planned to be 27" in diameter. The floor would be round as it is the base of the dome shaped first layer. | Our oven floor was planned to be 27" in diameter. The floor would be round as it is the base of the dome shaped first layer. | ||
| Line 427: | Line 439: | ||
After the floor was laid out on the patio in the way that it would be most level, the bricks were numbered from the center out. Then we used a string to draw a circle with a 13½" radius (half our 27" floor). This is where the sand form (in the next step) would go. We had to make sure the circle we drew would allow enough room between the retaining wall and the future layers of the oven. Since the main body of our oven floor was rectangular, we had some room to play with. The center of our circle was about 15" in from the back of the brick layout. The retaining wall was about 9" away from the back of the bricks. This ended up being about a perfect distance since the oven walls would be about 10" thick, and start 10½" away from the wall. This would give us about a 1/2" gap between the oven and the wall. | After the floor was laid out on the patio in the way that it would be most level, the bricks were numbered from the center out. Then we used a string to draw a circle with a 13½" radius (half our 27" floor). This is where the sand form (in the next step) would go. We had to make sure the circle we drew would allow enough room between the retaining wall and the future layers of the oven. Since the main body of our oven floor was rectangular, we had some room to play with. The center of our circle was about 15" in from the back of the brick layout. The retaining wall was about 9" away from the back of the bricks. This ended up being about a perfect distance since the oven walls would be about 10" thick, and start 10½" away from the wall. This would give us about a 1/2" gap between the oven and the wall. | ||
<center> | |||
<gallery> | <gallery> | ||
Image:earth oven floor.jpg| | Image:earth oven floor.jpg| | ||
</gallery> | </gallery></center> | ||
== Sand Form == | === Sand Form === | ||
A sand form supports the layers of the oven as it is being built. It also creates the interior shape of the oven. | A sand form supports the layers of the oven as it is being built. It also creates the interior shape of the oven. In almost all ovens, the interior should be dome-shaped. We chose to use sand with a high quality of stickiness to make shaping the sand form easier. After the first layer of the oven is laid over the sand form and is somewhat dry, the sand can be removed and the interior of the oven will be revealed. | ||
As we created the dome, we shaped a short parabolic tunnel leading out toward the extended brick-lip which created a doorway for our oven. | As we created the dome, we shaped a short parabolic tunnel leading out toward the extended brick-lip which created a doorway for our oven. | ||
| Line 439: | Line 452: | ||
After the sand was shaped, wet newspaper was put over the form. This would serve as a barrier between the sand form and the first layer of the oven, showing exactly where the sand form stops and the first oven layer starts. The newspaper also helps the sand form keep it's smooth shape if it's not going to be worked with for a while. | After the sand was shaped, wet newspaper was put over the form. This would serve as a barrier between the sand form and the first layer of the oven, showing exactly where the sand form stops and the first oven layer starts. The newspaper also helps the sand form keep it's smooth shape if it's not going to be worked with for a while. | ||
== Thermal Layer == | === Thermal Layer === | ||
The next step is to add the dense thermal layer to the sand form you have created. This part is normally 1 part clay, 2 parts concrete or sharp sand, and water. This mixture is created by folding it all together in a tarp and stomping it into a good mix. This layer should be sturdy enough to make a strong outer layer and should be about 4 inches thick. Start at the base and push downwards. Then, work your way up slowly to form this layer. | The next step is to add the dense thermal layer to the sand form you have created. This part is normally 1 part clay, 2 parts concrete or sharp sand, and water. This mixture is created by folding it all together in a tarp and stomping it into a good mix. This layer should be sturdy enough to make a strong outer layer and should be about 4 inches thick. Start at the base and push downwards. Then, work your way up slowly to form this layer. | ||
For more information on building your own thermal layer | For more information on building your own thermal layer visit the [[HBCSL cobb oven]] page. | ||
=== Straw Slip Layer === | |||
This portion of the earth oven is a 2 inch thick layer of straw, water, and clay. To apply this layer, start at the base and work up. To make the straw stick, dissolve clay in water and dunk the straw in. Make sure to not compress all the straw down during application. | |||
For detailed instructions on making your own straw slip layer visit the [[HBCSL cobb oven]] page. | |||
=== Plastering === | |||
The last stage is plastering. A lime plaster is a good choice to use for the damp Northern California environment and it will preserve the life of your oven. There are many different recipes to choose from, but it comes down to where you live and what you are looking for in choosing a good one. The natural plaster and paint Appropedia page outlines some lime recipes and testing them. You can also visit the [[CCAT Natural Exterior Wall Plaster and Paint, Appendix]] for more info on plaster varieties. | |||
== Turtle cob oven (2005) == | |||
A group of HSU students completed the Turtle Cob Oven by adding to the earth oven located at CCAT. They gave the turtle feet, fixed cracking, and painted the Turtle's Shell. Since they were adding to the previously built cob oven, they needed to find a way to attach more cob to form the feet. They did this by drilling into the plaster and cob with a one inch drill bit about one and a half inches deep (as far as possible due to the foundation). They cut seven inch pieces of bamboo and placed them snugly inside the holes, and also scraped the surface of the plaster with a screwdriver in order for the cob to stick into the groves. | A group of HSU students completed the Turtle Cob Oven by adding to the earth oven located at CCAT. They gave the turtle feet, fixed cracking, and painted the Turtle's Shell. Since they were adding to the previously built cob oven, they needed to find a way to attach more cob to form the feet. They did this by drilling into the plaster and cob with a one inch drill bit about one and a half inches deep (as far as possible due to the foundation). They cut seven inch pieces of bamboo and placed them snugly inside the holes, and also scraped the surface of the plaster with a screwdriver in order for the cob to stick into the groves. | ||
<center> | |||
<gallery> | <gallery> | ||
Image:Earthoven3.jpg| | Image:Earthoven3.jpg| | ||
Image:Earthoven4.jpg| | Image:Earthoven4.jpg| | ||
</gallery> | </gallery></center> | ||
== Cob protection and beautification (2009) == | == Cob protection and beautification (2009) == | ||
A second group of HSU students took on the job of protecting and beautifying the previously made earth oven (aka cob oven) and cob bench already found at CCAT. Their goal was to find a way to protect and beautify the cob installations. | A second group of HSU students took on the job of protecting and beautifying the previously made earth oven (aka cob oven) and cob bench already found at CCAT. Their goal was to find a way to protect and beautify the cob installations. | ||
"While cob is a very durable material in some climates, like Humboldt County's, it must be sealed. Weather plays a large role in the degrading of cob and without a proper seal, like a plaster, the cob will not last very long. Since being built, signs of weathering were already apparent in the oven" | |||
'''Testing the plaster:''' | '''Testing the plaster:''' | ||
A variety of plaster mixes with a variety of ratios were tested in order to find the best plaster for the project. Each plaster was tested for scratch resistance, the amount of dust given off, compressive strength, and water resistance. Each plaster was also observed for cracking during the drying process. | A variety of plaster mixes with a variety of ratios were tested in order to find the best plaster for the project. Each plaster was tested for scratch resistance, the amount of dust given off, compressive strength, and water resistance. Each plaster was also observed for cracking during the drying process. | ||
'''The final project:''' | '''The final project:''' | ||
"A two layered plaster design was chosen. The first aspect of the design is a base coat made of one part clay and soil, one part sand and one part sawdust. This layer is applied relatively heavily to reshape in minor ways and to fill in holes and cracks from wear and tear. The fill coat also provides a clean smooth surface to apply a finish coat to. | |||
The second coat was applied for both aesthetic purposes and to provide long lasting durability. This plaster mixture uses a ratio of 1 part mixed hydrated lime and water to three parts sand. This mixture is similar to one used by CCAT before, and it is recommended in Green | The second coat was applied for both aesthetic purposes and to provide long lasting durability. This plaster mixture uses a ratio of 1 part mixed hydrated lime and water to three parts sand. This mixture is similar to one used by CCAT before, and it is recommended in Green Building" | ||
<center> | |||
<gallery> | <gallery> | ||
Image:Earthoven5.jpg| | Image:Earthoven5.jpg| | ||
</gallery> | </gallery></center> | ||
== Similar projects to consider == | == Similar projects to consider == | ||
*[[Blue ox earthen oven]] | |||
*[[Garden house cob oven]] | * [[Blue ox earthen oven]] | ||
* [[Garden house cob oven]] | |||
== October 2013 Update == | == October 2013 Update == | ||
[[File:Earthoven6.jpg]] | The cob oven appears to be in great shape. The living roof is still doing a good job of protecting the oven from the elements, which has helped the oven last over the years with little damage from weathering. The main visible damage the oven has experienced is the char in the front of the oven—beginning at the opening in the front and extending towards the top of the oven. This is as a result of firing up the oven during each use, and is a merely aesthetic component of the oven's presentation that does not affect the oven's proper functioning. | ||
[[File:Earthoven6.jpg|thumb|center]] | |||
== Resources == | == Resources == | ||
* http://www.cement.org/cement-concrete-basics/how-cement-is-made | |||
* http://web.archive.org/web/20170505102743/http://www.sustainableconcrete.org.uk:80/PDF/Factsheet_18_FINAL.pdf | |||
* http://www.eia.gov/todayinenergy/detail.cfm?id=11911 | |||
* http://www.pequals.com/at/earthenoven/04_Materials_Gather.html | * http://www.pequals.com/at/earthenoven/04_Materials_Gather.html | ||
* http://en.wikipedia.org/wiki/Cob_(material) | * http://en.wikipedia.org/wiki/Cob_(material) | ||
* | * https://www.appropedia.org/CCAT_cob_protection_and_beautification | ||
* http://www.pequals.com/at/natoven/applying_the_cob.html | * http://www.pequals.com/at/natoven/applying_the_cob.html | ||
[[Category:CCAT]] | {{Page data}} | ||
[[Category:CCAT|E]] | |||
[[Category:Earthen ovens]] | [[Category:Earthen ovens]] | ||
Latest revision as of 13:49, 30 June 2023

The earth oven is located at Humboldt State's Campus Center for Appropriate Technology, or CCAT. It was built as an ENGR 305 project by John and Liz. For more information, look at their original project write up here:[1] Some pictures and text were copied from the original page to this one.
What is an Earth Oven?[edit | edit source]
What's the difference between a Cob Oven and an Earthen Oven?
Cob Ovens (sometimes spelled Cobb to preserve it's Old English origin) are ovens made of a cob mixture containing the three specific elements of clay, sand, and straw. The word cob traced to it's origin meant "lump" or "to lump." (I think of cobble stone streets, perhaps they meant lumpy streets.) Cob is applied in lumps to a certain height, allowed to harden, then the application continues.
Earthen Ovens (sometimes called Earth Ovens for ease of speaking) are ovens made of materials gathered from the earth. This may include clay, sand and straw or other fibrous materials (such as paper or horse manure). Though the earthen mixture may be applied in lumps, it may not contain specifically clay, sand and straw.
So, while all cob ovens are earthen ovens, not all earthen ovens are cob ovens.
Structure of an Earth Oven[edit | edit source]
- The first layer:
- The thermal layer is made mostly of clay and sand. It is best when created in a dome shape providing heat for the oven by retaining heat from a fire that is first lit inside.
- The second layer:
- The insulation layer is made mostly of fiber and clay. It covers the thermal layer helping prevent heat loss.
- The third layer:
- This layer is optional. The outer layer is made of clay, sand and fiber. It protects the first two layers from the elements and can be used to sculpt the oven into almost any shape.


Materials Gathering[edit | edit source]
During materials gathering, it is best to try and find what you need locally so long as it is still affordable for you to do so. Finding local materials supports your neighboring community, while reducing the embedded energy of your project. "Embedded energy" comes from the energy required to harvest, produce, package, and transport your materials. Getting things locally cuts out the transportation portion of embedded energy by reducing its miles traveled. This helps to reduce your ecological footprint by being responsible for less gasoline burned and thus less greenhouse gases emitted.
Urbanite (concrete chunks): construction sites, calling local construction companies, looking for piles around town (ask before you take). Not much preparation is needed after you've harvested your urbanite. You may want to get a small sledge hammer to shape the chunks just the way you want. More about Urbanite in the Foundation Section.
Clay: It is best to dig on site. You can dig up some clayish soil from below the topsoil in your yard and give it the "E-Z soil analysis test" here. Grate the clay on a heavy duty screen (1/2") to help break it up before it is mixed in with your sand or straw. Raw clay is easily mixed with a paint mixer after it has been soaked in a bit of water for a while (though our mixing attachment did break after a while).
Sand: It is very important that you use river sand for construction with cob, beach sand is too smooth. You can get sand directly from the river, however try to minimize your impact to the river bank. You can also buy sand from construction companies that sell gravel. You want about 1/4 inch or smaller. We used varying sized screens (as seen below) to filter the sand to different sizes we wanted. Larger pieces of sand and gravel are welcome in the foundation to be used as fill. Medium pieces are good to mix with your clay. The finest sand is used for laying the fire brick and for a fine plaster coating.
Straw: Usually you buy it unless you know someone in the bailing business. We bought organic rice straw for $5.00 a bale and needed about 2 bales.
Manure: A good ingredient in the plaster. Get from fields with permission. Call local stables for horse manure or dairy/meat farms for cow manure. Do not trespass on fields! Manure works great as a fiber because it has already been digested into very small particles which can form long chains of tensile strength in cob mixtures. Grate the manure to break it up from its post-digested form. Consider using rubber gloves or washing your hands afterward.
Fire Brick: Unless you find it somewhere creative, we suggest buying it from a place that sells brick and building materials. The bricks will assembled into a floor for your oven so it is important that your brick resource has kept the bricks clean and free from things you may not want eat later (such as chemicals).
| Qty | Material Needed | Source | Cost | Total cost |
|---|---|---|---|---|
| 1 | Build Your Own Earth Oven by Kiko Denzer | CCAT Library | Already available $0 | $0 |
| As needed | Paper, pens, pencils | CCAT | $0 | $0 |
| 1 | Digital Camera for documentation | Liz | $0 | $0 |
| 2 | Measuring tape | CCAT Toolshed | $0 | $0 |
| lots | Running water | CCAT | $0 | $0 |
| 2 | Large clay sifters 1/2" | Kiva | Donated | $0 |
| 2 | Medium sand sifters 1/4" | CCAT Toolshed | $0 | $0 |
| 2 | Small sand sifter 1/8" | CCAT Toolshed | $0 | $0 |
| 1 | Fine sand sifter 1/16" | CCAT | $0 | $0 |
| 3 | Wheel barrows | CCAT | $0 | $0 |
| 2 | Shovels | CCAT | $0 | $0 |
| 10 | Five gallon buckets | CCAT | $0 | $0 |
| As needed | Scrap wood | CCAT | $0 | $0 |
| 40 | Screws | CCAT | $0 | $0 |
| 1 | Power drill | CCAT | $0 | $0 |
| 1 | Paint mixing attachment for clay mixing | CCAT | $0 | $0 |
| 300 | Labor hours | Project leaders/volunteers | $0 | $0 |
| 4 | Baking pans | CCAT | $0 | $0 |
| 4 ft^3 | "Sticky" sand | CCAT | $0 | $0 |
| 2 tons | River sand | Mason donation | $0 | $0 |
| 5 ft^3 | Clay | CCAT | $0 | $0 |
| 10 ft^3 | Gravel fill | CCAT | $0 | $0 |
| 40 ft^3 | Urbanite | CCAT | $0 | $0 |
| 1 | Sledge hammer for urbanite | CCAT | $0 | $0 |
| 23 | Fire brick | Mason | $1 | $24 |
| 2 bales | Straw | The Mill | $5 | $10 |
| 5 gal | Horse manure | CCAT | $0 | $0 |
| 2 | Rubber gloves | CCAT | $0 | $0 |
| 1 | Kitchen oven | CCAT | $0 | $0 |
| 1 | Newspaper | HSU Lumberjack | $0 | $0 |
| 1 ft^3 | Pulp/paper | CCAT | $0 | $0 |
| 1 | Thermal layer instructions lamination | Kinko's Copies | $5 | $5 |
| As needed | Firewood | CCAT | $0 | $0 |
| 1 box | Matches | CCAT | $0 | $0 |
| 1 | Skill saw | CCAT | $0 | $0 |
| 1 | Wood saw | CCAT | $0 | $0 |
| 1 | Level | CCAT | $0 | $0 |
| 1 | Chalk | CCAT | $0 | $0 |
| 1 | String for drawing circle | Came with straw | $0 | $0 |
| Total Cost | $39.00 | |||
Things to Consider[edit | edit source]
Kiko Denzer suggests people to consider:
- If they like to work in the elements, or how will they protect their oven from the elements?
- Will they build a roof over it?
- Can it be a well-lit area?
- Does it face away from the wind to carry smoke away, or will smoke be blown in an undesirable location?
- Do they need a permit to build it there?
- How will it affect their fire insurance?
- Is it near food preparation areas?
- Will it be waist level, or will people have to sit on the ground to use it?"
Determining Mixture[edit | edit source]
We ended up testing nine different ratios of sand to clay and selected the best one based on criteria below.
Testing the different possible ratios is important as materials are site specific. This means the clay or sand that we use may not have the same physical properties as clay or sand in other parts of the world (or county for that matter). Thus properties such as water absorbance, shrinkage, durability, and cracking affinity are different for each mixture and each specific type of clay and sand. There is no single formula to the best mixture, though good mixtures do tend to contain about 25% clay.
Our first tests involved mixing the materials and forming them into bricks and then baking the bricks in a regular oven to speed the drying process. This can add a bit of error as most cob ovens will not be dried by being baked in a regular oven, but is mostly reliable and helps rule out some mixtures.
We formed each test brick into a 2" thick, 10" long, approx 5" wide loaf and placed it in a baking pan. We marked each loaf with a letter and recorded on our data sheet what mix ratio went with that letter. It is important to keep them in order and clearly marked while baking.
To bake them, we placed them in an oven at a low temperature (100º-150º F) and baked them with the door cracked, this took a few hours.
Mostly, the bricks high in clay content shrank a little and had few cracks, but were soft to the touch. The bricks high in sand content didn't shrink too much but were full of cracks and brittle. For our tests it looks like brick B was the winner - 3 parts sand, 1 part clay. I thought it seemed a bit brittle in the test, but it worked out great in performance. Perhaps the oven baking added some error.
| Brick | Parts Clay | Parts Sand | Percent Clay | Percent Sand | Shrinkage | Strength | Cracking |
|---|---|---|---|---|---|---|---|
| A | 1 | 4 | 20 | 80 | Little | Brittle | High |
| B | 1 | 3 | 25 | 75 | Little | Hard | Moderate |
| C | 1 | 2 | 33 | 66 | Little | Hard | High |
| D | 2 | 3 | 40 | 60 | Medium | Hard | Low |
| E | 1 | 1 | 50 | 50 | Medium | Firm | Low |
| F | 3 | 2 | 60 | 40 | Medium | Soft | Low |
| G | 2 | 1 | 66 | 33 | High | Soft | Medium |
| H | 3 | 1 | 75 | 25 | High | Very Soft | Medium |
| I | 4 | 1 | 80 | 20 | High | Very Soft | Medium |
Construction[edit | edit source]
Foundation[edit | edit source]
Our foundation is made out of broken up concrete, or urbanite. The concrete is broken into large chunks usually about a foot square and four to six inches thick, this size is suitable for easy handling. Usually, urbanite has one side that is flat (the surface side) and one side that is rough (the side that was against the ground). We got our urbanite locally. Reusing concrete as urbanite is a great way to reduce embedded energy costs for many projects.
Sidenote: Cement (a key ingredient to concrete) production is energy intensive and the EIA determined it to be the most energy intensive form of manufacturing in America. The industry only used 0.25% of America's energy requirements in 2010, but it was found that the industry used 10 times the energy use per share of outputs (EIA). Meaning, cement production uses more energy per unit cement than most other energy intensive industries use per unit goods. Since cement production is energy intensive and burns fossil fuels in its production (when cement ingredients are heated to form a rock-like substance), it is also high in embedded carbon. A tonne of traditional Portland cement has emitted 913 kg of CO2 equivalent during production (Sustainable Concrete). For these reasons, reusing old concrete instead of buying new bags of concrete, is best for any project you decide to undertake.
We started with outlining where our foundation would be on the bare patio and on the retaining wall using chalk. Our foundation would start out as a 5'x 5' square and be tapered up on all sides (except the side against the retaining wall). At the top it would end up being about a 4'x4' square, 30" off the ground. We chose 30" as our height because it would put our oven floor at a height comfortable to cook at.
Then we started laying out our urbanite. We took our larger pieces of urbanite and placed them flat side down on the patio, puzzling them into a square. After a tight square was laid out we filled the gaps in with rubble (gravel, sand, and broken glass) left over from other projects. Also, we laid about an inch of rubble over the gaps as a settling layer. We repeated this process with each layer.
In the second layer we laid the rough side of the urbanite against the rough side from the first layer, working them in until the flat side of the second layer was again level. We inset every subsequent layer about two inches in from the previous layer, except on the side against the retaining wall. We repeated this process of flat-to-flat and rough-to-rough and tapering in at the edges until we had seven layers of oven. At the top we inserted some longer pieces of urbanite which formed a small lip that overhangs the rest of the foundation. The lip is useful for hanging buckets to collect hot coals or for many other purposes.
The very top layer was covered with sand.
-
Liz working on the foundation.
-
Michelle prepares to lay a piece of urbanite.


Oven Floor[edit | edit source]
Our oven floor was planned to be 27" in diameter. The floor would be round as it is the base of the dome shaped first layer.
The floor is made up of 23 fire bricks obtained from our local masonry shop: six bricks wide, four bricks long, with a five brick lip on a side of the long edge that would face away from the retaining wall.
The bricks serve as the cooking surface inside the oven. They use conduction to directly heat the food. Each brick measures approximately 4.5" wide by 9.125" long by 3" deep.
After the floor was laid out on the patio in the way that it would be most level, the bricks were numbered from the center out. Then we used a string to draw a circle with a 13½" radius (half our 27" floor). This is where the sand form (in the next step) would go. We had to make sure the circle we drew would allow enough room between the retaining wall and the future layers of the oven. Since the main body of our oven floor was rectangular, we had some room to play with. The center of our circle was about 15" in from the back of the brick layout. The retaining wall was about 9" away from the back of the bricks. This ended up being about a perfect distance since the oven walls would be about 10" thick, and start 10½" away from the wall. This would give us about a 1/2" gap between the oven and the wall.

Sand Form[edit | edit source]
A sand form supports the layers of the oven as it is being built. It also creates the interior shape of the oven. In almost all ovens, the interior should be dome-shaped. We chose to use sand with a high quality of stickiness to make shaping the sand form easier. After the first layer of the oven is laid over the sand form and is somewhat dry, the sand can be removed and the interior of the oven will be revealed.
As we created the dome, we shaped a short parabolic tunnel leading out toward the extended brick-lip which created a doorway for our oven.
After the sand was shaped, wet newspaper was put over the form. This would serve as a barrier between the sand form and the first layer of the oven, showing exactly where the sand form stops and the first oven layer starts. The newspaper also helps the sand form keep it's smooth shape if it's not going to be worked with for a while.
Thermal Layer[edit | edit source]
The next step is to add the dense thermal layer to the sand form you have created. This part is normally 1 part clay, 2 parts concrete or sharp sand, and water. This mixture is created by folding it all together in a tarp and stomping it into a good mix. This layer should be sturdy enough to make a strong outer layer and should be about 4 inches thick. Start at the base and push downwards. Then, work your way up slowly to form this layer.
For more information on building your own thermal layer visit the HBCSL cobb oven page.
Straw Slip Layer[edit | edit source]
This portion of the earth oven is a 2 inch thick layer of straw, water, and clay. To apply this layer, start at the base and work up. To make the straw stick, dissolve clay in water and dunk the straw in. Make sure to not compress all the straw down during application.
For detailed instructions on making your own straw slip layer visit the HBCSL cobb oven page.
Plastering[edit | edit source]
The last stage is plastering. A lime plaster is a good choice to use for the damp Northern California environment and it will preserve the life of your oven. There are many different recipes to choose from, but it comes down to where you live and what you are looking for in choosing a good one. The natural plaster and paint Appropedia page outlines some lime recipes and testing them. You can also visit the CCAT Natural Exterior Wall Plaster and Paint, Appendix for more info on plaster varieties.
Turtle cob oven (2005)[edit | edit source]
A group of HSU students completed the Turtle Cob Oven by adding to the earth oven located at CCAT. They gave the turtle feet, fixed cracking, and painted the Turtle's Shell. Since they were adding to the previously built cob oven, they needed to find a way to attach more cob to form the feet. They did this by drilling into the plaster and cob with a one inch drill bit about one and a half inches deep (as far as possible due to the foundation). They cut seven inch pieces of bamboo and placed them snugly inside the holes, and also scraped the surface of the plaster with a screwdriver in order for the cob to stick into the groves.


Cob protection and beautification (2009)[edit | edit source]
A second group of HSU students took on the job of protecting and beautifying the previously made earth oven (aka cob oven) and cob bench already found at CCAT. Their goal was to find a way to protect and beautify the cob installations. "While cob is a very durable material in some climates, like Humboldt County's, it must be sealed. Weather plays a large role in the degrading of cob and without a proper seal, like a plaster, the cob will not last very long. Since being built, signs of weathering were already apparent in the oven"
Testing the plaster: A variety of plaster mixes with a variety of ratios were tested in order to find the best plaster for the project. Each plaster was tested for scratch resistance, the amount of dust given off, compressive strength, and water resistance. Each plaster was also observed for cracking during the drying process.
The final project: "A two layered plaster design was chosen. The first aspect of the design is a base coat made of one part clay and soil, one part sand and one part sawdust. This layer is applied relatively heavily to reshape in minor ways and to fill in holes and cracks from wear and tear. The fill coat also provides a clean smooth surface to apply a finish coat to. The second coat was applied for both aesthetic purposes and to provide long lasting durability. This plaster mixture uses a ratio of 1 part mixed hydrated lime and water to three parts sand. This mixture is similar to one used by CCAT before, and it is recommended in Green Building"

Similar projects to consider[edit | edit source]
October 2013 Update[edit | edit source]
The cob oven appears to be in great shape. The living roof is still doing a good job of protecting the oven from the elements, which has helped the oven last over the years with little damage from weathering. The main visible damage the oven has experienced is the char in the front of the oven—beginning at the opening in the front and extending towards the top of the oven. This is as a result of firing up the oven during each use, and is a merely aesthetic component of the oven's presentation that does not affect the oven's proper functioning.
Resources[edit | edit source]
- http://www.cement.org/cement-concrete-basics/how-cement-is-made
- http://web.archive.org/web/20170505102743/http://www.sustainableconcrete.org.uk:80/PDF/Factsheet_18_FINAL.pdf
- http://www.eia.gov/todayinenergy/detail.cfm?id=11911
- http://www.pequals.com/at/earthenoven/04_Materials_Gather.html
- http://en.wikipedia.org/wiki/Cob_(material)
- https://www.appropedia.org/CCAT_cob_protection_and_beautification
- http://www.pequals.com/at/natoven/applying_the_cob.html