| Line 34: | Line 34: | ||
== Technical Specifications and Assembly Instructions== | == Technical Specifications and Assembly Instructions== | ||
[[File:Brakecalliper before assembly.JPG|100px|right|brake calliper before assembly]] | |||
# Provide directions for print/assembly - be detailed enough in your “how to” to ensure that someone could construct the device from your description. Consider the elegance of IKEA like instructions. | # Provide directions for print/assembly - be detailed enough in your “how to” to ensure that someone could construct the device from your description. Consider the elegance of IKEA like instructions. | ||
# Include print time estimate | # Include print time estimate | ||
Revision as of 13:06, 4 December 2014
Brake Calliper of BlackMamba bicycle
Project developed by [Rivu]
Template:Statusboxtop Template:Status-design
You can help Appropedia by contributing to the next step in this OSAT's status. Template:Boxbottom
Abstract
- Indian and Chinese made cruisers, known as Black Mambas in East Africa, are the most common type of bicycle found throughout sub-Saharan Africa - The objective of the project is to 3D print as many parts possible of this bicycle which is very commonly used in the third world countries of Africa and make it much more economically viable for people to use over there for transportation.
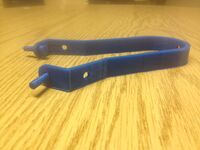
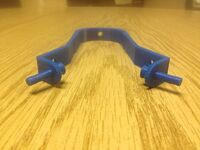
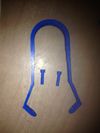
- The below figures shows a 3D printed brakecalliper with the 2cm long bolts to connect to the brake pads and the necessary holes on the calliper to fit on the existing Black Mamba model.


Bill of Materials
- Brake Calliper- 8 gms of PLA, QTY 1, cost $0.18
- 3d printed bolt to connect the brake pads, QTY 2, cost $0.06.
- STLs for part can be found at [[1]]
Tools needed for fabrication of the OSAT
- MOST Delta RepRap.
- OpenScad, Cura & repetier Host software.
- 1.75 mm PLA filament.
Skills and Knowledge Necessary to Make the OSAT
- If you used special skill – link to relevant wikipedia or wikiversity articles/courses
Technical Specifications and Assembly Instructions

- Provide directions for print/assembly - be detailed enough in your “how to” to ensure that someone could construct the device from your description. Consider the elegance of IKEA like instructions.
- Include print time estimate
- Include assembly time estimate
- Including drawings or pictures of the device at stage of assembly at minimum. (http://www.appropedia.org/Special:Upload)
- Consider video if appropriate
| Example video summary of textbook |
|---|
Error in widget YouTube: Unable to load template 'wiki:YouTube' |
Common Problems and Solutions
- Include common mistakes/problems to avoid in building your OSAT and how to overcome them
Cost savings
- If your solution is not a low cost one then it is not really appropriate.
- Estimate your costs
- Find a commercial equivalent
- Calculate $ savings and % savings
References
- The sources of information (e.g. engineering handbooks, journal articles, government documents, webpages, books, magazine articles etc.). References should use the <ref> </ref> and <references/> tags and can be in any format but should include all the information necessary for someone else to find the same information you did. For example: [1]
- ↑ web page: Department of Energy (DOE) Landscaping and Energy Efficiency, DOE/GO-10095 (1995) Available: http://www.eren.doe.gov/erec/factsheets/landscape.html
Based on the developmental needs addressed (e.g. food, heat, electricity, clean water, health care, etc.) be sure to label your device in the proper categories e.g. use [[Category:Water]]. Be sure to categorize your device so that it will be easy to find – for example “Low voltage connection basics” is categorized in [[Category:How tos]] [[Category:Electricity]] [[Category:Electric lighting]].