No edit summary |
No edit summary |
||
| Line 41: | Line 41: | ||
# Once the parts are printed, you should be ready to assemble the part. prepare to begin assembling by getting the pop rives, the spindle and the pop rivet gun | # Once the parts are printed, you should be ready to assemble the part. prepare to begin assembling by getting the pop rives, the spindle and the pop rivet gun | ||
## Please note that if screws are more readily available they can be substituted for the rivets. | ## Please note that if screws are more readily available they can be substituted for the rivets. | ||
# Begin by holding the thin end piece against the grip, Place the pop rivet in the hole and complete the rivet | # Begin by holding the thin end piece against the grip, Place the pop rivet in the hole and complete the rivet. See the first figure at the left. | ||
# Next get the other grip and rivet that in the same fashion to the same end piece as before. | # Next get the other grip and rivet that in the same fashion to the same end piece as before.See figure 2 on the left. | ||
# Next place the spindle into the center hole ensuring that the threaded end of the spindle was inserted into the thinner end piece | # Next place the spindle into the center hole ensuring that the threaded end of the spindle was inserted into the thinner end piece see figure 3 on the left | ||
# With the spindle inserted, place the thick end piece over the spindle and place a rivet in both holes. | # With the spindle inserted, place the thick end piece over the spindle and place a rivet in both holes. See figure 4 on the left. | ||
# The pedal should now be complete. | # The pedal should now be complete. | ||
Revision as of 15:00, 3 December 2014
Black Mamba Bike Pedal
Project developed by Rnmcfarl
Template:Statusboxtop Template:Status-design
You can help Appropedia by contributing to the next step in this OSAT's status. Template:Boxbottom
Abstract
The Black Mamba bicycle is commonly found in Africa. The overall goal of this project is to make open source models of as many bicycle parts as possible. This will hopefully allow someone to set up and print many of the parts of the bike at a lower cost then it would typically be. This page is the design of the black mamba bicycle pedal.
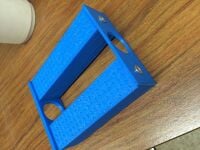
- the following picture shows the completed pedal without the spindle. A pedal with a spindle can be seen below

Bill of Materials
- Bike grips - 60 grams PLA, QTY 2, cost -- Materials needed for fabrication of device and alternative materials if they are not available, prices/sources of non-printable parts
- Pedal ends- 9 grams PLA, QTY 2
- Pop rivets- 1/8", QTY 4, Cost $0.05 each
- spindle -QTY 1, Cost $
- STLs for parts can be found at [[1]]
Tools needed for fabrication of the OSAT
- MOST Delta RepRap or similar RepRap 3-D printer
- Pop Rivet gun
Skills and Knowledge Necessary to Make the OSAT
- If you used special skill – link to relevant wikipedia or wikiversity articles/courses
Technical Specifications and Assembly Instructions


- printing will take approximately 3.5 hours total, 3 hours for the grips and 30 minutes for the end
- assembly should take no more than 5 minutes
- download STL's from given source above
- import the STL into slicing program of your choice
- ensure that the top bottom thickness is 0.6
- fill density is between 35 and 45
- The rest of the settings can be changed at the users preference and the needs of their printer
- Send the g-code to printing controller of your choice and print the parts
- you will need 2 of the pedal pads
- print 1 of each of the end pieces
- Once the parts are printed, you should be ready to assemble the part. prepare to begin assembling by getting the pop rives, the spindle and the pop rivet gun
- Please note that if screws are more readily available they can be substituted for the rivets.
- Begin by holding the thin end piece against the grip, Place the pop rivet in the hole and complete the rivet. See the first figure at the left.
- Next get the other grip and rivet that in the same fashion to the same end piece as before.See figure 2 on the left.
- Next place the spindle into the center hole ensuring that the threaded end of the spindle was inserted into the thinner end piece see figure 3 on the left
- With the spindle inserted, place the thick end piece over the spindle and place a rivet in both holes. See figure 4 on the left.
- The pedal should now be complete.
Common Problems and Solutions
- ensure the the thicker end-piece is away from the threaded end of the spindle
- As stated before, If a Rivet gun in not available a screw could easily replace the rivet in the part.
Cost savings
- The cost of the PLA and the Pop Rivets are $2.02
- The commercial equivalent of the pedal with out the spindle in $3.30
- 61% cost savings or $1.28 dollars
Tests

In order to ensure the fill of the pedal could easily suppor the pop rivets, cubes of different fill were tried with the rivets. The figure to the left shows the rivets after a load was placed on the rivet trying to move it in and out. This was to simulate the load that would be placed on the pedal while the bicyclist was pedaling. This shows that between the 35-45% no cracks had occurred..
</nowiki>