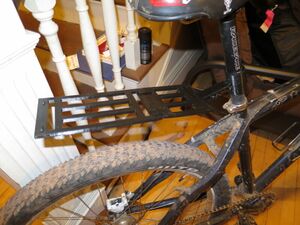
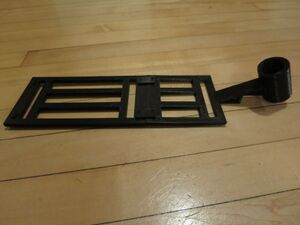
Bicycle cargo rack
Project developed by Erik Bain
Template:Statusboxtop Template:Status-design Template:Status-prototype You can help Appropedia by contributing to the next step in this OSAT's status. Template:Boxbottom
Abstract
A bicycle is a common form of transportation in developing countries. It is relatively cheap, fast, and effective. Since bicycles are used for transportation, a cargo rack is a helpful accessory for hauling goods or personal items. A 3D printable cargo rack was designed to fulfill this purpose in a very economical way. The rack is symmetrical and can be easily adjusted in the script for different bike sizes, seat tube angles, and seat tube diameters. It was designed to be modular to further facilitate customization.

Bill of Materials
- 1 mount File:OSAT Bike Rack mount 1.stl SCAD
- 1 180mm rack plate File:OSAT Bike rack 180mm.stl File:OSAT Bike rack 180mm.scad
- 2 Female snap connectors File:OSAT Bike rack female connector.stl File:OSAT Bike rack female connector.scad
- 1 Male connector File:OSAT Bike rack male connector.stl File:OSAT Bike rack male connector.scad
Tools needed for fabrication of the OSAT
- MOST Delta RepRap or similar RepRap 3-D printer
Skills and Knowledge Necessary to Make the OSAT
- Simple bike assembly/adjustment skills
- The seatpost must be removed in order to install rack
Technical Specifications and Assembly Instructions

- Print times
- Mount: 2.5 hrs.
- 180mm plate and connectors can be printed in one print: 1.5 hrs.
- Assembly time: Approx. 10 minutes
Assembly Instructions
- Print all necessary parts.
- The quantities listed in the BOM are the minimum for a completed assembly.
- Remove support material from the mount print with fingers or a knife.
- Snap the two female connectors into place, connecting the 180mm plate and the mount on the top surface.
- Snap the male connector into place on the bottom surface.
- Install the mount on the bike.
- Remove the seatpost.
- slide the mount onto the seatpost, taking care that the right side is up.
- Re-install the seat post.
Common Problems and Solutions
- Due to the angles of the mount part, sufficient support is necessary for a quality print.
- I used line support for easy removal with a 15% fill. This was sufficient support and easy to remove.
- To ensure a flat rack, the seat tube angle of the bike frame must be known or measured
- On my bike, the angle was 72.5 degrees, so I rotated the cylinder on the mount part 27.5 degrees
- As-is, the rack can only hold a small amount of weight.
- supports can easily be attached to the seat stays to allow the rack to hold more weight
- These supports were not included in the design since it is much cheaper to use a commercial equivalent (items like steel rods, sticks, dowels, or plastic rods can be attached using zip ties, string, or bark.)
Cost savings
- If your solution is not a low cost one then it is not really appropriate.
- The mount is approximately 59 grams while the connectors and plate combine for 37 grams. The total is 96 grams
- 96 grams at $22.98/ kg [1] gives a cost of $2.21
- The closest commercial equivalents are on average $20 [2]
- This gives and average savings of $17.79 or 89%
References
- ↑ http://www.amazon.com/HATCHBOX-1-75mm-3D-Printer-Filament/dp/B00MEZEEJ2/ref=sr_1_4?s=industrial&ie=UTF8&qid=1449554843&sr=1-4&keywords=hatchbox
- ↑ http://www.newegg.com/Product/Product.aspx?Item=9SIA0601R07923&nm_mc=KNC-GoogleMKP-PC&cm_mmc=KNC-GoogleMKP-PC-_-pla-_-Cycle+Parts-_-9SIA0601R07923&gclid=Cj0KEQiA-ZSzBRDp3ITHm5KO_JYBEiQA1JjHHPRCjlFT4CGsuVIwZxEWAz8Qr9JVDWcra2RrNFiWP70aAumC8P8HAQ&gclsrc=aw.ds