Teratornis (talk | contribs) (add to Category:Bamboo, Category:Gardening, Category:How tos) |
(→How To: how to) |
||
| Line 5: | Line 5: | ||
=How To= | =How To= | ||
{{How to | |||
File:Bamboo propped .jpg|Fig 1:Bamboo propped up | |File:Bamboo propped .jpg|Fig 1:Bamboo propped up|1|Find a suitable piece of bamboo and prop it up. | ||
File:Measuring bamboo planter 066.jpg|Fig 2:Measuring from knot | |File:Measuring bamboo planter 066.jpg|Fig 2:Measuring from knot |2|Measure and mark for cutting. Mark an equal distance from each knot (1-2 inches in). | ||
File:Measuring, bamboo planter 068.jpg|Fig 3: Measuring from center mark to create long sides | |File:Measuring, bamboo planter 068.jpg|Fig 3: Measuring from center mark to create long sides|3|Use these marks to form a center line. Draw out an even oval based around the center line, this is what you will cut out. | ||
File:Bamboo Planter drain holes.jpg|Fig 4: Drill holes at the bottom for drainange | |File:Bamboo Planter drain holes.jpg|Fig 4: Drill holes at the bottom for drainange|4|Flip the piece over and drill a few (2-3) holes for drainage. This is easier to do now before the main hole is cut from the top. Flip the piece back again and drill holes where you marked the ends of the center line. This provides a place for the hacksaw to enter. | ||
File:Bambooplanter smile cut.jpg|Fig 5: Cut both rounded sides first | |File:Bambooplanter smile cut.jpg|Fig 5: Cut both rounded sides first|5|Cut the smile cuts out on each end. | ||
File:Bamboo planter cut sides.jpg|Fig 6: Cut straight sides | |File:Bamboo planter cut sides.jpg|Fig 6: Cut straight sides|6|Cut the straight sides. | ||
File:Bamboo planter pry open.jpg|Fig 7: Pry open | |File:Bamboo planter pry open.jpg|Fig 7: Pry open|7|Pry open. | ||
File:A BP shave with machete.jpg|Fig 8: Hack smooth | |File:A BP shave with machete.jpg|Fig 8: Hack smooth|8|Hack the sides smooth with a machete (or sandpaper depending on your style). | ||
|footer=That's all! | |||
}} | |||
[[Category:Bamboo]] | [[Category:Bamboo]] | ||
[[Category:Gardening]] | [[Category:Gardening]] | ||
[[Category:How tos]] | [[Category:How tos]] | ||
Revision as of 20:37, 18 September 2011
About
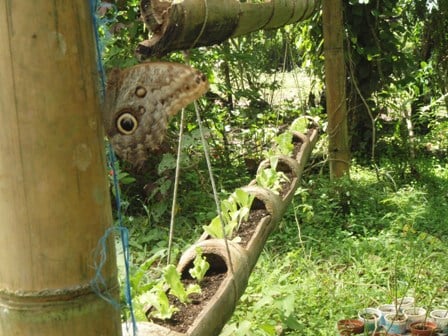
This functional and aesthetically appealing bamboo planter is appropriate for those with ample supplies of large diameter bamboo. The example shown in the photo below was found at Finca Amrta in Costa Rica. It hangs under a roof, which is recommended to extend the life of the bamboo.

How To
File:Bamboo propped .jpg
Fig 1:Bamboo propped up