(Created page with "Constructing the Lower Platform Before You Begin: * Make sure you have the everything to build the lower platform: ** Hardware: *** 3 – ...") |
Sophivorus (talk | contribs) m (Text replacement - "{{MOST BPDelta Nav}}" to "{{MOST Backpack Delta menu}}") |
||
| (10 intermediate revisions by 4 users not shown) | |||
| Line 1: | Line 1: | ||
{{MOST}} | |||
{{MOST-RepRap}} | |||
{{MOST Backpack Delta menu}} | |||
Before You Begin | ==Constructing the Lower Platform== | ||
===Before You Begin=== | |||
* Make sure you have the everything to build the lower platform: | * Make sure you have the everything to build the lower platform: | ||
** Hardware: | ** Hardware: | ||
*** 3 – M3x35mm socket head screws | *** 3 – M3x35mm socket head screws | ||
*** 3 – M3 ny-lock nuts | *** 3 – M3 ny-lock nuts | ||
*** | *** 6 – M3 Flat Washers | ||
** Printed Parts: | ** Printed Parts: | ||
*** 3 – Motor Ends | *** 3 – Motor Ends | ||
| Line 20: | Line 21: | ||
*** 3mm or 1/8” Drill bit | *** 3mm or 1/8” Drill bit | ||
Building the lower platform: | ===Building the lower platform=== | ||
# Take 1 M3 x 35mm and put 1 washer on it. Insert it into one of the two holes opposite the motor mount.[[File:Platform_Spacer_Screw_1.JPG||thumb|Right|Step One]]{{clear}} | |||
# Slide the screw through the hole in the platform spacer. make sure the flat part is down. | |||
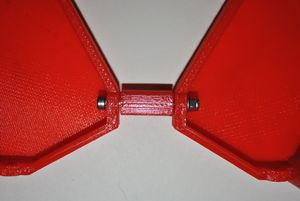
# Place another motor end on the screw after the platform spacer, followed by 1 washer and 1 ny-lock nut. Do not tighten the nut all the way, keep the nut loose, in order to attach the other two platform spacers. Repeat steps 1-3 for the rest of the motor mounts and spacers. Once complete, tighten all the screws and nuts.[[File:Platform_Spacer_Screw_2.JPG||thumb|Right|Steps 2 & 3]][[File:Motor_Platform_With_Platform_Spacers.JPG||thumb|Right|Steps 2 & 3]]{{clear}} | |||
# | |||
{{Page data}} | |||
Latest revision as of 11:47, 24 May 2022


Constructing the Lower Platform[edit | edit source]
Before You Begin[edit | edit source]
- Make sure you have the everything to build the lower platform:
- Hardware:
- 3 – M3x35mm socket head screws
- 3 – M3 ny-lock nuts
- 6 – M3 Flat Washers
- Printed Parts:
- 3 – Motor Ends
- 3 – Platform Spacers
- Required Tools:
- 2.5mm Alan Wrench
- 5.5mm Combination wrench
- Recommended Tools:
- 3mm or 1/8” Drill bit
- Hardware:
Building the lower platform[edit | edit source]
- Take 1 M3 x 35mm and put 1 washer on it. Insert it into one of the two holes opposite the motor mount.
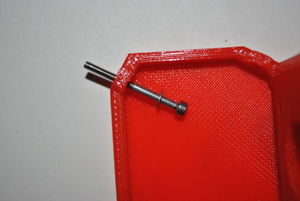
Step One - Slide the screw through the hole in the platform spacer. make sure the flat part is down.
- Place another motor end on the screw after the platform spacer, followed by 1 washer and 1 ny-lock nut. Do not tighten the nut all the way, keep the nut loose, in order to attach the other two platform spacers. Repeat steps 1-3 for the rest of the motor mounts and spacers. Once complete, tighten all the screws and nuts.
Steps 2 & 3 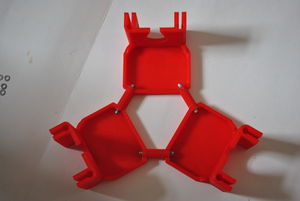
Steps 2 & 3