# Check connection to http://192.168.76.2 in a web browser or using <code>ping 192.168.76.2</code> on a command line.
# Check connection to http://192.168.76.2 in a web browser or using <code>ping 192.168.76.2</code> on a command line.
# Using an ssh client, connect to 192.168.76.2:22 with username <code>debian</code> and password <code>reprap</code>.
# Using an ssh client, connect to 192.168.76.2:22 with username <code>debian</code> and password <code>reprap</code>.
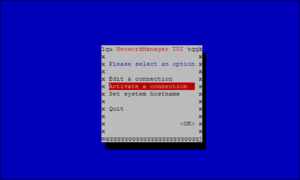
# [[File:athenaIIwireless_nmtui1.png|thumb|right|<code>nmtui</code> interface]] Launch <code>sudo nmtui</code> and select "Activate a connection" using the arrow keys.
# [[File:AthenaIIwireless_nmtui1.png|thumb|right|<code>nmtui</code> interface]] Launch <code>sudo nmtui</code> and select "Activate a connection" using the arrow keys.
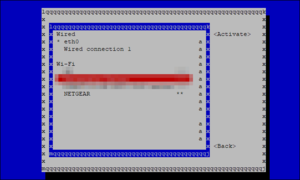
# [[File:athenaIIwireless_nmtui2.png|thumb|right|<code>nmtui</code> network connection]] Select the WiFi network of interest. Enter the network key if necessary. <code>nmtui</code> should indicate success.
# [[File:AthenaIIwireless_nmtui2.png|thumb|right|<code>nmtui</code> network connection]] Select the WiFi network of interest. Enter the network key if necessary. <code>nmtui</code> should indicate success.
# Exit <code>nmtui</code> using the back and quit buttons.
# Exit <code>nmtui</code> using the back and quit buttons.
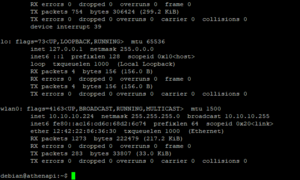
# [[File:athenaIIwireless_ifconfig.png|thumb|right|<code>ifconfig</code> results for connected OrangePi]] At the command line, launch <code>sudo ifconfig</code> and look for the interface <code>wlan0</code>. Identify and note the '''inet''' IP address for this interface (here, <code>10.10.10.224</code>
# [[File:AthenaIIwireless_ifconfig.png|thumb|right|<code>ifconfig</code> results for connected OrangePi]] At the command line, launch <code>sudo ifconfig</code> and look for the interface <code>wlan0</code>. Identify and note the '''inet''' IP address for this interface (here, <code>10.10.10.224</code>
# Disconnect the ssh session using <code>exit</code> or by simply closing the ssh window.
# Disconnect the ssh session using <code>exit</code> or by simply closing the ssh window.
# Remove the ethernet cable from the AthenaII.
# Remove the ethernet cable from the AthenaII.
Revision as of 21:28, 8 September 2019
The AthenaII is based on an OrangePi board, which includes an onboard wireless adapter. This page describes the process of connecting to a wireless network rather than using a physical network interface.
Required Materials
Computer with wired and wireless network connection & Ethernet cable
SSH client program (ssh on Mac or Linux, PuTTy or equivalent on Windows)
AthenaII board (and OrangePi) with pre-installed MSE4777 debian/Franklin image
Initial Wireless Setup
Connect the powered AthenaII board to the computer using an ethernet cable.
Check connection to http://192.168.76.2 in a web browser or using ping 192.168.76.2 on a command line.
Using an ssh client, connect to 192.168.76.2:22 with username debian and password reprap.
nmtui interface Launch sudo nmtui and select "Activate a connection" using the arrow keys.
nmtui network connection Select the WiFi network of interest. Enter the network key if necessary. nmtui should indicate success.
Exit nmtui using the back and quit buttons.
ifconfig results for connected OrangePi At the command line, launch sudo ifconfig and look for the interface wlan0. Identify and note the inet IP address for this interface (here, 10.10.10.224
Disconnect the ssh session using exit or by simply closing the ssh window.
Remove the ethernet cable from the AthenaII.
Test the connection using a device connected to the same wireless network as the AthenaII, again either by pinging or browsing to the inet address identified above. The AthenaII homepage should load.