Alex.weitman (talk | contribs) |
Alex.weitman (talk | contribs) |
||
| Line 66: | Line 66: | ||
==References== | ==References== | ||
* | * For example: <ref> web page: OpenSCAD Cheat Sheet Available: http://www.openscad.org/cheatsheet/</ref> | ||
<references/> | <references/> | ||
| Line 82: | Line 82: | ||
[[category:ENGR242]] | [[category:ENGR242]] | ||
[[category:242-2017 People]] | [[category:242-2017 People]] | ||
[[User Alex.weitman]] | [[User:Alex.weitman]] | ||
Revision as of 05:36, 3 May 2017

This page is for Alex Weitman's Final Open Source Appropriate Technology (OSAT) Project. Her page can be found here: Alex.weitman
Some introduction text and background can go here.
Project Background
The purpose of the OSAT project is for me to improve upon another project that someone else has done.
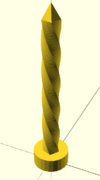
Here are the original project and my improvement project side by side (my project is still in the STL file stage, not printed yet):
- OSAT Projects
-
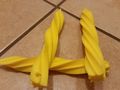
Original Design.
-

My Design.


Title of the device or system
Project developed by [your name linked to your user account]
Add a status meter by copying the following templates (inside double curly brackets) into your page as you reach each step: status-design, status-prototype, status-deployed, status-model and status-verified....
Template:Statusboxtop Template:Status-design Template:Status-prototype You can help Appropedia by contributing to the next step in this OSAT's status. Template:Boxbottom
Abstract
- This project is done to create a better version of a tent stake that I found. My version has a better head to use a hammer on, it is twisty like the original, but it also has a point on the end of it so it can pierce the ground better and is able to twist in after that. This would be appropriate for ground that is firmer and harder to penetrate with a dull end, like the original design. I used OpenSCAD to design this tent stake. This use of open source technology and design helped me to understand OpenSCAD more completely as well as make it easy for anyone to open the OpenSCAD program and improve upon my design to continue to improve designs everywhere.
 Tent Stake Scad file - will update
Bill of Materials
- For this print, I used 0.69 meters of filament OR 1.70 meters of filament. For the 0.69 meter print, it costs $0.07 of filament. For the 1.7 meter print, it costs $0.18 of filament. Materials needed includes: a 3D printer – for example I use a Jelly Box to print my designs, and filament (as well as electricity to power the printer).
- SCAD and STL are not being accepted on appropedia at the moment, so I cannot include my links either one, and libre3D is not working either. But, the pictures are included on this page.
Tools needed for fabrication of the OSAT
- Jellybox or similar RepRap 3-D printer
- Filament - Orange
Skills and Knowledge Necessary to Make the OSAT
- Knowledge of OpenSCAD is required
- Knowledge of Cura (to turn STL files into .gcode files)
Technical Specifications and Assembly Instructions
- Print instructions: Majority of the Feedrate time can be at 100%, but in order to have a point at the tip of the tent stake, slow down to 20-25% for a very good, sharp tip.
- No assembly required.
- Print Time: Approximately 47 minutes (longer)
- Assembly Time: 0 minutes
Common Problems and Solutions
- My first print was too small, and I assumed that it might break off since the body of the stake was too thin. So I printed it again with a wider body, and it is very durable.
- If you print with a raft, and you take the raft off at the end of the print, make sure that all the sharp edges of the ripped raft are taken out to have a more refined look.
Cost savings
- If your solution is not a low cost one then it is not really appropriate.
- Estimate your costs
- Find a commercial equivalent
- Calculate $ savings and % savings
References
- For example: [1]
- ↑ web page: OpenSCAD Cheat Sheet Available: http://www.openscad.org/cheatsheet/
Based on the developmental needs addressed (e.g. food, heat, electricity, clean water, health care, etc.) be sure to label your device in the proper categories e.g. use [[Category:Water]]. Be sure to categorize your device so that it will be easy to find – for example “Low voltage connection basics” is categorized in [[Category:How tos]] [[Category:Camping]] User:Alex.weitman