- tighten adjustments to make possible to use without epoxy permanent
Adjustable Bike Mirror
Project developed by [Nick Lanter Njlanter (talk) 13:32, 22 November 2016 (PST)]
Template:Statusboxtop Template:Status-design Template:Status-prototype You can help Appropedia by contributing to the next step in this OSAT's status. Template:Boxbottom
Abstract
- Every time I ride my bike I find myself wishing for a mirror, and the 3d models I've found require you to shove it into the hole of your handlebar [1]. This OSAT creates makes biking safer by providing a cheap, easy, adjustable way to mount a mirror to the handlebars of a bicycle.
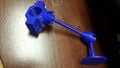
2. Photo

Bill of Materials
- Filament:
- Rod: 10g @ $20.1294 / kg - $0.2
- Base: 7g @ $20.1294 / kg - $0.14
- Top Clamp: 11g @ $20.1294 / kg - $0.22
- Bottom Clamp: 6g @ $20.1294 / kg - $0.12
- Total Filament: 34g @ $20.1294 / kg - $0.68
- One 2" mirror. I used a blind spot mirror for a car that you can pick up for $1 at Walmart such as this one [1] - $1
- Two zip ties
- Adhesive
- Total Cost: ~$1.68
SOURCE AND STL FILES
- All source and stl files can be found here: | Youmagine Link
- File:Bike clamp bottom v5.FCStd
- File:Bike clamp top v7.FCStd
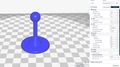
- File:Mirror base v2.FCStd
- File:Rod v5.FCStd
Tools needed for fabrication of the OSAT
- MOST Delta RepRap or similar RepRap 3-D printer
Skills and Knowledge Necessary to Make the OSAT
- No Special Skills or knowledge required
Technical Specifications and Assembly Instructions
- Print Settings
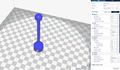
- Rod: 50% infill, 0.2mm layer height, print with the ball up, no supports. If your printer has difficulties with printing this for some reason, use a small raft.
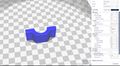
- Base: 15% infill, 0.2mm layer height
- Top Clamp: 50% infill, 0.2mm layer height. Print with supports and the joint on the side as shown in photos below.
- Bottom Clamp: 25% infill, 0.2mm layer height
- Print Times (Varies)
- Rod: 49min
- Base: 30min
- Bottom Clamp: 16min
- Top Clamp: 29min
- Overall Time: 2hr04min
Gallery
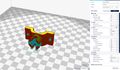
- STL designs and printing orientations
-
-
-
-


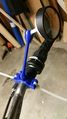
- Assembly
- Assembly Time: time ~5-15min
- Mount the two clamps onto the bike handlebars using two zip ties. Using the adhesive that came on the mirror, or using superglue, attach the mirror to the flat part of the base. Put the balls from the rod and base into the appropriate sockets of the mount and find a position with the rod and base that suit your liking, then remove the balls and apply some super glue to them. Reinsert the balls into the sockets and allow to dry. (I find that gluing the balls in the sockets may or may not be necessary, depending on the tolerances of the printer.
- Assembly
-
-


Common Problems and Solutions
- Pay attention to the orientation of how the parts are printed in the photos below. For the top clamp, make sure to use supports and print it so that the joint is on on the side, this maximizes the strength of the socket. For the rod make sure NOT to use supports and print it ball side UP (socket faces down).
- When designing this I had many issues with the socket for the ball breaking. I found that by printing with the suggested orientations and settings the socket does not break. Also, be sure to check the layers that the infill used is actually filling the socket. Sometimes cura doesn't always give you the best solution
Cost savings
- Total cost: $1.75
- Commercial equivalent: $9.99 + S&H [2]
- Estimated Savings: $8.25
- Total Savings: Priceless.
References
- Used as inspiration: [1]
- ↑ web page: Thingiverse Bicycle Mirror Available: http://www.thingiverse.com/thing:1607714