Sophivorus (talk | contribs) m (Rename "affiliations" parameter to "organizations", to unify terminology throughout Appropedia) |
|||
| (47 intermediate revisions by 14 users not shown) | |||
| Line 1: | Line 1: | ||
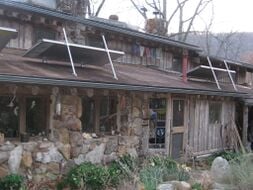
[[File:CurrentWall.JPG|thumb|Our project as of May 10, 2010.]] | |||
[[ | |||
{{AEF menu}} | |||
{{Project data | |||
| authors = User:Ljp34 | |||
| status = Deployed | |||
| made = Yes | |||
| cost = USD 161.55 | |||
| instance-of = Cobb construction | |||
| location = Arcata, California | |||
}} | |||
The [[Arcata Educational Farm]] has been operating as a [[CSA]] (Community-Supported Agriculture establishment) in Arcata, California since 1993. This farm allows students, residents, and local farmers to work side-by-side in their efforts to accomplish goals such as [[sustainable agriculture]] and valuable work experience. The farm also allows fresh organic produce to be sold as shares to stockholders and members of the organization. | The [[Arcata Educational Farm]] has been operating as a [[CSA]] (Community-Supported Agriculture establishment) in Arcata, California since 1993. This farm allows students, residents, and local farmers to work side-by-side in their efforts to accomplish goals such as [[sustainable agriculture]] and valuable work experience. The farm also allows fresh organic produce to be sold as shares to stockholders and members of the organization. | ||
As students enrolled in the [[ENGR305]] class, we decided to build an earthen informational kiosk at the entrance of the farm. The earthen wall will be constructed with a [[cobb]] base, and will then be coated with an [[earthen plaster]] finish. The kiosk will serve not only as an entrance piece to the farm but also as a place to learn about current and past projects constructed at this site. Projects such as the [[AEF solar water heater]], or the [[AEF spiral herb garden]]. | |||
== Opportunity Definition == | |||
==Opportunity Definition== | |||
;Who: [[User:Ljp34|Luke Pedersen]] and [[User:ebolainurcola|Andrew Spickerman]] are working with the Arcata Educational Farm. | <div style="margin-left: 1; margin-right: auto; width: 425px">{{Video|jBd1NRrDowI}}</div> | ||
;Who: [[User:Ljp34|Luke Pedersen]] and [[User:ebolainurcola|Andrew Spickerman]] are working with the Arcata Educational Farm. | |||
;What: The project is to build an earthen kiosk at the entrance of the garden. | ;What: The project is to build an earthen kiosk at the entrance of the garden. | ||
;When: The informational kiosk will take approximately fifteen weeks to complete and will be finished by May 15th, 2010. | ;When: The informational kiosk will take approximately fifteen weeks to complete and will be finished by May 15th, 2010. | ||
;Where:930 Old Arcata Road | ;Where:930 Old Arcata Road | ||
:Arcata, CA 95521 | :Arcata, CA 95521 | ||
==Literature Review== | {{Aefmap}} | ||
;Why: The practical purposes of this wall would be to serve as an entrance piece and as a place to obtain information about the farm. Most importantly it would serve as an educational tool based at the farm. | |||
== Literature Review == | |||
=== Gathering Materials === | |||
It is a good idea to use as many on-site or nearby materials as possible when working with cobb. Cobb requires a vast amount of materials that are very labor and time-intensive to acquire. Here is a list of the materials you will need: | |||
* '''Water''' and a way to transport it to the construction site | |||
* '''Clay''', '''Sand''', and '''Straw''' which are the key building materials used for cobb | |||
* '''Foundation''': Cement, Stone, and Mortar are examples of what can be used | |||
* A reliable '''Vehicle''' to transport materials | |||
* '''Roofing''' to protect the wall from the elements: A variety of different types of roofing can be used | |||
* '''Tarps''' to mix your cob | |||
* '''Multipurpose buckets''': The more the better | |||
* '''Carpentry tools''' such as hammers, nails, screws, levels, measuring tape, etc. | |||
* '''Earth moving tools''' such as shovels and wheel barrels | |||
* '''Plastering tools and materials''': horse or cow manure, clays with pigment, trowels, and smoothing tools such as paintbrushes | |||
* '''Lots of friends''' to help build<ref>Bee, Becky. The Cob Builders Handbook. Grove City, PA: Jenkins Publishing, 1997. 13-14. Print.</ref> | |||
=== | === Testing === | ||
[[File:SoilShakeTest.JPG|thumb|The jar on the left has settled out, and the jar on the right was recently shaken.]] | |||
[[File:TestBricks3.JPG|thumb|We chose the middle brick for 2:3 sand to clay. All the bricks had the same amount of straw.]] | |||
[[File:Cob Closeup.JPG|thumb|A closeup of what our bricks looked like prior to putting them up on the wall.]] | |||
'''''Testing Clay Content''''': | '''''Testing Clay Content''''': | ||
The [[soil shake test]] is used to determine how much clay is in the makeup of the soil. This simple process involves filling a glass jar with water and soil which is | The [[soil shake test]] is used to determine how much clay is in the makeup of the soil. This simple process involves filling a glass jar with water and soil which is then shaken vigorously for up to a minute. The jar should be left undisturbed for roughly 24 hours, or until the contents of the jar have completely settled. The sand will settle first at the bottom, with the silt settling second on top of the sand. The clay will take the longest to settle on top of the silt, and the organic materials will float to the top of the water. | ||
'''''Test Bricks''''': | '''''Test Bricks''''': | ||
Test bricks are constructed to find the best ratio of sand to clay to straw. After the soil shake test has determined the makeup of the soil, the builder will | Test bricks are constructed to find the best ratio of sand to clay to straw. After the soil shake test has determined the makeup of the soil, the builder will then be able to decide whether to add excess sand or clay to the mixture. One effective method is to make test bricks with more and more sand until the brick no longer holds together, which is a clear indicator of too much sand in the mixture. The builder should make at least three different samples of clay/sand mixtures, which will allow for different amounts of straw to be added accordingly to each brick. | ||
'''''Once The Bricks Have Dried''''' | '''''Once The Bricks Have Dried''''' | ||
| Line 57: | Line 66: | ||
There is too much sand in the mixture if sand can easily be rubbed off of the finished bricks. There is too much clay in the mixture if the finished bricks have numerous cracks when dried. The strength of the bricks can also be tested by holding them at various distances to the ground and allowing them to drop. The mixtures that yield the strongest bricks should be considered. | There is too much sand in the mixture if sand can easily be rubbed off of the finished bricks. There is too much clay in the mixture if the finished bricks have numerous cracks when dried. The strength of the bricks can also be tested by holding them at various distances to the ground and allowing them to drop. The mixtures that yield the strongest bricks should be considered. | ||
=== Building a foundation === | |||
The first thing that needs to be considered when laying a foundation is to have a loose aggregate added directly underneath and around the actual cob wall. We laid crushed gravel under are the foundation to serve as a stopgap, which will keep the immediate area free from becoming muddy during the winter season. After we laid our crushed gravel, we decided to go with a poured cement slab as our foundation. We first needed to build and align a form that served as retaining walls for our poured cement. Once we built the form, we evened out the gravel area using a level and hammered numerous 18-inch stakes around the perimeter. We than poured approximately six inches of cement into our securely held form, and allowed it to dry for 72 hours. Once the slab had dried, we removed the form by hammering each board away from the slab which left us with a rectangular slab of cement that was 5 feet long, 15 inches wide, and 6 inches deep.<ref>How To Build Walks, Walls, & Patio Floors. 2nd ed.. Menlo Park, CA: Sunset Books, 1963. 29-31. Print.</ref> | |||
=== Making Cob === | |||
Cob is created by using a combination of compression and mixing. The way we decided to do this was we piled a mixture of two parts sand and one part clay onto a tarp. We than repeatedly stomped the mixture together with our feet, and rolled the tarp upon itself, making cigar shaped piles of clay and sand. Once the mixture was similar to coarse clay, we added straw to the mix and continued to roll and stomp. Once the consistency had changed from a dough like texture to that with much more plasticity, we added the straw and began forming bricks to add to our wall. If the mix is too dry and the straw does not take, this is the builders cue to add more water. If the mix is too wet, than the bricks will begin to sag to one side of the wall after they have been applied. This is the problem we repeatedly faced during this project because we live in such a wet community..<ref>Bee, Becky. The Cob Builders Handbook. Grove City, PA: Jenkins Publishing, 1997. 20-24. Print.</ref> | |||
=== Plastering === | |||
In order to protect the wall from the elements, and to enhance its visual appeal, we decided to use a lime plaster. Lime is used because it allows moisture to transpire across, but does not get soft itself. It is also extremely weather durable and resistant to cracking. Lime plaster is made from a lime morter, sand, and water.<ref>Hagsten, Ellen. Traditional & Sustainable Building. 2007. Print.</ref> In order to give the lime a better color, we mixed in an iron oxide (red) pigment. | |||
== Criteria == | == Criteria == | ||
{| class=" | These are the most heavily weighted criteria. We weighted each criteria on a 1-10 scale, based on importantance, with 10 being the highest. | ||
! class="unsortable" | Criteria | {| class="wikitable" | ||
! Criteria, Constraints, and Weights for the Arcata Educational Farm Earthen Oven | |||
! class="unsortable" | Criteria | |||
! class="unsortable" | Constraint | ! class="unsortable" | Constraint | ||
! Weight | ! Weight | ||
| Line 91: | Line 109: | ||
|- | |- | ||
| Durability | | Durability | ||
| We want this wall to stand for | | We want this wall to stand for at least ten to fifteen years | ||
| 10 | | 10 | ||
|} | |} | ||
===Additional Considerations === | === Additional Considerations === | ||
* Color | * Color | ||
* Glass enclosurement to protect information pamphlets | * Glass enclosurement to protect information pamphlets | ||
| Line 105: | Line 124: | ||
There are a multitude of ways to construct an earthen kiosk. The wall itself will use a cob building technique which is primarily made of earthen materials. Much of this earthen material was acquired at the Arcata Educational Farm instead of purchasing them from a store. Gathering on-site materials will greatly reduce the price of constructing an earthen wall. A large portion of the overall cost will be associated with building the support frame, roof, and foundation. Donated or salvaged goods are a good way to reduce the total overall spending. | There are a multitude of ways to construct an earthen kiosk. The wall itself will use a cob building technique which is primarily made of earthen materials. Much of this earthen material was acquired at the Arcata Educational Farm instead of purchasing them from a store. Gathering on-site materials will greatly reduce the price of constructing an earthen wall. A large portion of the overall cost will be associated with building the support frame, roof, and foundation. Donated or salvaged goods are a good way to reduce the total overall spending. | ||
{| | {| class="wikitable" | ||
! Quantity | ! Quantity | ||
! Material | |||
! Source | |||
! Cost ($) | |||
! Total ($) | |||
|- | |||
| 1 | |||
| 2" C-clamp | |||
| Arcata Lumber | |||
| 2.29 | |||
| 2.29 | |||
|- | |- | ||
| 1 | | 1 | ||
| Rice Straw Bale | |||
| Three G's Hay & Grain | |||
| 6.75 | |||
| 7.34 | |||
|- | |- | ||
| 9 cubic feet | | 9 cubic feet | ||
| Crushed Rock | |||
| Eureka Ready Mix | |||
| Donated | |||
| 0 | |||
|- | |- | ||
| About 6 Gallons | | About 6 Gallons | ||
| Gasoline (transportation) | |||
| Shell Gas | |||
| 3.25 | |||
| 20.00 | |||
|- | |- | ||
| 6 | | 6 | ||
| 80-lb. Concrete Ready Mix Bags | |||
| Arcata Lumber | |||
| 4.99 | |||
| 29.94 | |||
|- | |- | ||
| 1 | | 1 | ||
| 2x4 Fir Post | |||
| Arcata Lumber | |||
| 2.24 | |||
| 2.24 | |||
|- | |- | ||
| Lots | | Lots | ||
| Clay | |||
| On-Site | |||
| 0 | |||
| 0 | |||
|- | |- | ||
| Lots | | Lots | ||
| Sand | |||
| On-Site | |||
| 0 | |||
| 0 | |||
|- | |- | ||
| 1 | | 1 | ||
| 4x8 Plywood Board | |||
| Arcata Lumber | |||
| 11.99 | |||
| 11.99 | |||
|- | |- | ||
| 1 | | 1 | ||
| Claw Hammer | |||
| Ace Hardware | |||
| 8.99 | |||
| 8.99 | |||
|- | |- | ||
| 1 | | 1 | ||
| Measuring Tape | |||
| Ace Hardware | |||
| 5.49 | |||
| 5.49 | |||
|- | |- | ||
| 1 | | 1 | ||
| 9" Level | |||
| Ace Hardware | |||
| 4.29 | |||
| 4.29 | |||
|- | |- | ||
| 6 | | 6 | ||
| 1x6x6 Cedar Panels | |||
| Arcata Lumber | |||
| 1.99 | |||
| 11.94 | |||
|- | |- | ||
| 3 | | 3 | ||
| 4x4 Fir Post | |||
| Arcata Lumber | |||
| 8.32 | |||
| 24.96 | |||
|- | |- | ||
| Lots | | Lots | ||
| Nails | |||
| Arcata Lumber | |||
| Various Prices For Various Sizes | |||
| 11.18 | |||
|- | |- | ||
| .5 lbs | | .5 lbs | ||
| Screws | |||
| Arcata Lumber | |||
| 2.59/pound | |||
| 1.35 | |||
|- | |- | ||
| 2 | | 2 | ||
| Post-Base Attachments | |||
| Arcata Lumber | |||
| 5.29 | |||
| 10.58 | |||
|- | |- | ||
| 3 | | 3 | ||
| 50-lb Fence Post Mix | |||
| Arcata Lumber | |||
| 2.99 | |||
| 8.97 | |||
|- | |- | ||
! colspan="4"|Total Cost | |||
! $161.55 | |||
|} | |||
== Project Timeline == | |||
This timeline was designed during the early stages of this project to keep us on a timeline that would allow us to finish the kiosk on time | This timeline was designed during the early stages of this project to keep us on a timeline that would allow us to finish the kiosk on time | ||
{| class="wikitable" | {| class="wikitable" | ||
! ITEM | |||
! PROPOSED DATE | |||
! DATE MET? | |||
|- | |- | ||
| Obtain all materials | |||
| 4/09/10 | |||
| Completed | |||
|- | |- | ||
| Lay Gravel | |||
| 4/09/10 | |||
| Completed | |||
|- | |- | ||
| Construct foundation | |||
| 4/12/10 | |||
| Completed | |||
|- | |- | ||
| Begin cob construction | |||
| 4/16/10 | |||
| Completed | |||
|- | |- | ||
| Begin roof construction | |||
| 4/16/10 | |||
| Completed | |||
|- | |- | ||
| Finish all construction | |||
| 5/10/10 | |||
| Not Yet | |||
|} | |} | ||
<gallery widths= | <gallery widths=250 heights=200> | ||
File:Making bricks 2.jpg|Forming the cob bricks for the kiosk. | File:Making bricks 2.jpg|Forming the cob bricks for the kiosk. | ||
File:Making Bricks.jpg|Forming the first batch of bricks into the wall. | File:Making Bricks.jpg|Forming the first batch of bricks into the wall. | ||
| Line 225: | Line 284: | ||
</gallery> | </gallery> | ||
==References== | == Update October 2013 == | ||
Myself [Drew[https://www.appropedia.org/User:Dfh95]] and project partner [Annika[https://www.appropedia.org/User:Akr57]] visited the Bayside Park Farm during the second week of October. During this visit, we evaluated the current condition of this project. Unfortunately, the info kiosk described in this project posting no longer exists at the farm. After talking with current Co-Farmers Jayme and Leandra, we were able to gather some information about the unsuccessful project. What we now know is that this project was never fully executed and it is believed that the leaders ran into proposal issues with the city. We are still unsure if the wall was ever finished because Jayme told us that before the wall was removed it had become very moist/soft and began to collapse. This absorption of moisture may suggest that either a) the wall was never finished or b) the lime plaster that is mentioned above may not have been the best protective shell for this wall constructed of natural material. | |||
In short, the natural material info kiosk is gone and has been replaced by a wooden information kiosk. Please refer to the photo below to see the current kiosk. This new kiosk is primarily used to inform the public and farmers about the community garden side of the farm. | |||
<gallery>[[File:Info kiosk.jpg|thumb|Fig 1: Current Wooden Info Kiosk]]</gallery> | |||
== Related projects == | |||
{{Gallery | |||
| instance-of = Cobb construction | |||
}} | |||
== References == | |||
<references /> | <references /> | ||
{{Page data | |||
| part-of = Engr305 Appropriate Technology | |||
| keywords = kiosk, informational, Arcata Educational Farm | |||
| sdg = SDG11 Sustainable cities and communities | |||
| organizations = Cal Poly Humboldt, Arcata Educational Farm | |||
}} | |||
[[Category:Appropriate technology videos]] | |||
[[Category: | |||
Latest revision as of 17:32, 29 January 2024

The Arcata Educational Farm has been operating as a CSA (Community-Supported Agriculture establishment) in Arcata, California since 1993. This farm allows students, residents, and local farmers to work side-by-side in their efforts to accomplish goals such as sustainable agriculture and valuable work experience. The farm also allows fresh organic produce to be sold as shares to stockholders and members of the organization. As students enrolled in the ENGR305 class, we decided to build an earthen informational kiosk at the entrance of the farm. The earthen wall will be constructed with a cobb base, and will then be coated with an earthen plaster finish. The kiosk will serve not only as an entrance piece to the farm but also as a place to learn about current and past projects constructed at this site. Projects such as the AEF solar water heater, or the AEF spiral herb garden.
Opportunity Definition[edit | edit source]

- Who
- Luke Pedersen and Andrew Spickerman are working with the Arcata Educational Farm.
- What
- The project is to build an earthen kiosk at the entrance of the garden.
- When
- The informational kiosk will take approximately fifteen weeks to complete and will be finished by May 15th, 2010.
- Where
- 930 Old Arcata Road
- Arcata, CA 95521
- Why
- The practical purposes of this wall would be to serve as an entrance piece and as a place to obtain information about the farm. Most importantly it would serve as an educational tool based at the farm.
Literature Review[edit | edit source]
Gathering Materials[edit | edit source]
It is a good idea to use as many on-site or nearby materials as possible when working with cobb. Cobb requires a vast amount of materials that are very labor and time-intensive to acquire. Here is a list of the materials you will need:
- Water and a way to transport it to the construction site
- Clay, Sand, and Straw which are the key building materials used for cobb
- Foundation: Cement, Stone, and Mortar are examples of what can be used
- A reliable Vehicle to transport materials
- Roofing to protect the wall from the elements: A variety of different types of roofing can be used
- Tarps to mix your cob
- Multipurpose buckets: The more the better
- Carpentry tools such as hammers, nails, screws, levels, measuring tape, etc.
- Earth moving tools such as shovels and wheel barrels
- Plastering tools and materials: horse or cow manure, clays with pigment, trowels, and smoothing tools such as paintbrushes
- Lots of friends to help build[1]
Testing[edit | edit source]


Testing Clay Content:
The soil shake test is used to determine how much clay is in the makeup of the soil. This simple process involves filling a glass jar with water and soil which is then shaken vigorously for up to a minute. The jar should be left undisturbed for roughly 24 hours, or until the contents of the jar have completely settled. The sand will settle first at the bottom, with the silt settling second on top of the sand. The clay will take the longest to settle on top of the silt, and the organic materials will float to the top of the water.
Test Bricks:
Test bricks are constructed to find the best ratio of sand to clay to straw. After the soil shake test has determined the makeup of the soil, the builder will then be able to decide whether to add excess sand or clay to the mixture. One effective method is to make test bricks with more and more sand until the brick no longer holds together, which is a clear indicator of too much sand in the mixture. The builder should make at least three different samples of clay/sand mixtures, which will allow for different amounts of straw to be added accordingly to each brick.
Once The Bricks Have Dried
There is too much sand in the mixture if sand can easily be rubbed off of the finished bricks. There is too much clay in the mixture if the finished bricks have numerous cracks when dried. The strength of the bricks can also be tested by holding them at various distances to the ground and allowing them to drop. The mixtures that yield the strongest bricks should be considered.
Building a foundation[edit | edit source]
The first thing that needs to be considered when laying a foundation is to have a loose aggregate added directly underneath and around the actual cob wall. We laid crushed gravel under are the foundation to serve as a stopgap, which will keep the immediate area free from becoming muddy during the winter season. After we laid our crushed gravel, we decided to go with a poured cement slab as our foundation. We first needed to build and align a form that served as retaining walls for our poured cement. Once we built the form, we evened out the gravel area using a level and hammered numerous 18-inch stakes around the perimeter. We than poured approximately six inches of cement into our securely held form, and allowed it to dry for 72 hours. Once the slab had dried, we removed the form by hammering each board away from the slab which left us with a rectangular slab of cement that was 5 feet long, 15 inches wide, and 6 inches deep.[2]
Making Cob[edit | edit source]
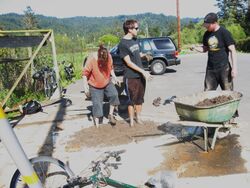
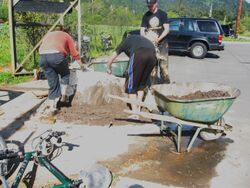
Cob is created by using a combination of compression and mixing. The way we decided to do this was we piled a mixture of two parts sand and one part clay onto a tarp. We than repeatedly stomped the mixture together with our feet, and rolled the tarp upon itself, making cigar shaped piles of clay and sand. Once the mixture was similar to coarse clay, we added straw to the mix and continued to roll and stomp. Once the consistency had changed from a dough like texture to that with much more plasticity, we added the straw and began forming bricks to add to our wall. If the mix is too dry and the straw does not take, this is the builders cue to add more water. If the mix is too wet, than the bricks will begin to sag to one side of the wall after they have been applied. This is the problem we repeatedly faced during this project because we live in such a wet community..[3]
Plastering[edit | edit source]
In order to protect the wall from the elements, and to enhance its visual appeal, we decided to use a lime plaster. Lime is used because it allows moisture to transpire across, but does not get soft itself. It is also extremely weather durable and resistant to cracking. Lime plaster is made from a lime morter, sand, and water.[4] In order to give the lime a better color, we mixed in an iron oxide (red) pigment.
Criteria[edit | edit source]
These are the most heavily weighted criteria. We weighted each criteria on a 1-10 scale, based on importantance, with 10 being the highest.
| Criteria, Constraints, and Weights for the Arcata Educational Farm Earthen Oven | Criteria | Constraint | Weight |
|---|---|---|---|
| Cost | We would like this project to cost no more than $200 dollars | 5 | |
| Aesthetics | We want this to be a symbol of pride for the farm since it is at the immediate entrance | 4 | |
| Educational Value | It must have enough space to post as many informational documents as possible | 10 | |
| Maintainability | The wall must be strong and require very little maintenance (<1 hour) on an yearly basis | 7 | |
| Sustainability | The use of common, local, and low impact materials | 5 | |
| Durability | We want this wall to stand for at least ten to fifteen years | 10 |
Additional Considerations[edit | edit source]
- Color
- Glass enclosurement to protect information pamphlets
- Simple frame and roof design
- Six-foot frame with five feet of earthen wall
Costs[edit | edit source]
There are a multitude of ways to construct an earthen kiosk. The wall itself will use a cob building technique which is primarily made of earthen materials. Much of this earthen material was acquired at the Arcata Educational Farm instead of purchasing them from a store. Gathering on-site materials will greatly reduce the price of constructing an earthen wall. A large portion of the overall cost will be associated with building the support frame, roof, and foundation. Donated or salvaged goods are a good way to reduce the total overall spending.
| Quantity | Material | Source | Cost ($) | Total ($) |
|---|---|---|---|---|
| 1 | 2" C-clamp | Arcata Lumber | 2.29 | 2.29 |
| 1 | Rice Straw Bale | Three G's Hay & Grain | 6.75 | 7.34 |
| 9 cubic feet | Crushed Rock | Eureka Ready Mix | Donated | 0 |
| About 6 Gallons | Gasoline (transportation) | Shell Gas | 3.25 | 20.00 |
| 6 | 80-lb. Concrete Ready Mix Bags | Arcata Lumber | 4.99 | 29.94 |
| 1 | 2x4 Fir Post | Arcata Lumber | 2.24 | 2.24 |
| Lots | Clay | On-Site | 0 | 0 |
| Lots | Sand | On-Site | 0 | 0 |
| 1 | 4x8 Plywood Board | Arcata Lumber | 11.99 | 11.99 |
| 1 | Claw Hammer | Ace Hardware | 8.99 | 8.99 |
| 1 | Measuring Tape | Ace Hardware | 5.49 | 5.49 |
| 1 | 9" Level | Ace Hardware | 4.29 | 4.29 |
| 6 | 1x6x6 Cedar Panels | Arcata Lumber | 1.99 | 11.94 |
| 3 | 4x4 Fir Post | Arcata Lumber | 8.32 | 24.96 |
| Lots | Nails | Arcata Lumber | Various Prices For Various Sizes | 11.18 |
| .5 lbs | Screws | Arcata Lumber | 2.59/pound | 1.35 |
| 2 | Post-Base Attachments | Arcata Lumber | 5.29 | 10.58 |
| 3 | 50-lb Fence Post Mix | Arcata Lumber | 2.99 | 8.97 |
| Total Cost | $161.55 | |||
Project Timeline[edit | edit source]
This timeline was designed during the early stages of this project to keep us on a timeline that would allow us to finish the kiosk on time
| ITEM | PROPOSED DATE | DATE MET? |
|---|---|---|
| Obtain all materials | 4/09/10 | Completed |
| Lay Gravel | 4/09/10 | Completed |
| Construct foundation | 4/12/10 | Completed |
| Begin cob construction | 4/16/10 | Completed |
| Begin roof construction | 4/16/10 | Completed |
| Finish all construction | 5/10/10 | Not Yet |
-
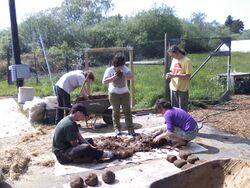
Forming the cob bricks for the kiosk.
-
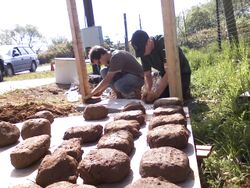
Forming the first batch of bricks into the wall.
-
-


.JPG)
Update October 2013[edit | edit source]
Myself [Drew[1]] and project partner [Annika[2]] visited the Bayside Park Farm during the second week of October. During this visit, we evaluated the current condition of this project. Unfortunately, the info kiosk described in this project posting no longer exists at the farm. After talking with current Co-Farmers Jayme and Leandra, we were able to gather some information about the unsuccessful project. What we now know is that this project was never fully executed and it is believed that the leaders ran into proposal issues with the city. We are still unsure if the wall was ever finished because Jayme told us that before the wall was removed it had become very moist/soft and began to collapse. This absorption of moisture may suggest that either a) the wall was never finished or b) the lime plaster that is mentioned above may not have been the best protective shell for this wall constructed of natural material. In short, the natural material info kiosk is gone and has been replaced by a wooden information kiosk. Please refer to the photo below to see the current kiosk. This new kiosk is primarily used to inform the public and farmers about the community garden side of the farm.
Related projects[edit | edit source]


References[edit | edit source]
- ↑ Bee, Becky. The Cob Builders Handbook. Grove City, PA: Jenkins Publishing, 1997. 13-14. Print.
- ↑ How To Build Walks, Walls, & Patio Floors. 2nd ed.. Menlo Park, CA: Sunset Books, 1963. 29-31. Print.
- ↑ Bee, Becky. The Cob Builders Handbook. Grove City, PA: Jenkins Publishing, 1997. 20-24. Print.
- ↑ Hagsten, Ellen. Traditional & Sustainable Building. 2007. Print.