Jack Hicks (talk | contribs) |
|||
| Line 67: | Line 67: | ||
Image:Grip1.jpg|[http://www.appropedia.org/Handlebar_grips Handlebar Grip] | Image:Grip1.jpg|[http://www.appropedia.org/Handlebar_grips Handlebar Grip] | ||
</gallery> | </gallery> | ||
{{777}} | {{777}} | ||
== | ==Rain Water Bottler== | ||
Project developed by [ | Project developed by [jfhicks] | ||
{{Statusboxtop}} | {{Statusboxtop}} | ||
{{status-prototype}} | {{status-prototype}} | ||
You can help Appropedia by contributing to the next step in this [[OSAT]]'s [[:Category:Status|status]]. | You can help Appropedia by contributing to the next step in this [[OSAT]]'s [[:Category:Status|status]]. | ||
| Line 85: | Line 78: | ||
==Abstract== | ==Abstract== | ||
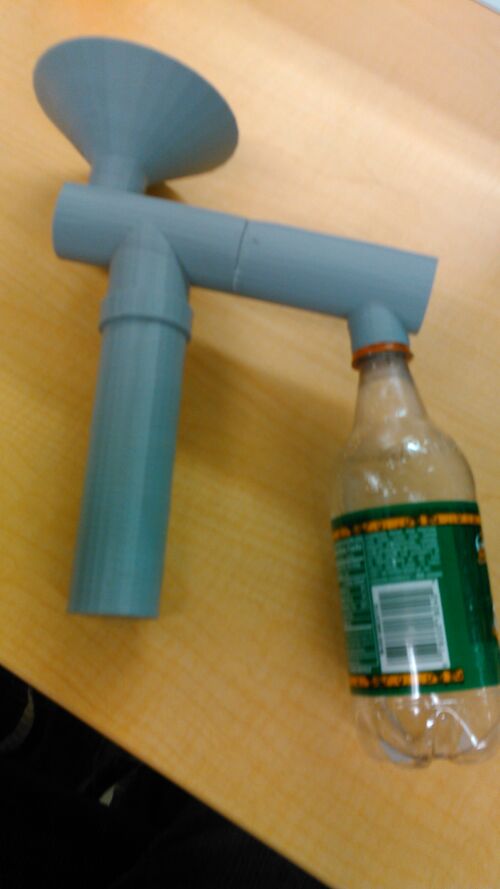
# | # This device collects rain water in a water bottle or any container that has standard bottle threads. It includes a purge container that collects the initial dirty rain water. The reason this water is dirty is due to the sediment that collects on a roof between rain cycles. Once the purge container is filled a ball floats to the top and closes of this container and the clean rain water is diverted into the water bottle. | ||
# Picture of | |||
# Picture of Rain Water Collector[[image:Rain water collector.jpg|500px|right]] | |||
== Bill of Materials== | == Bill of Materials== | ||
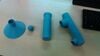
# | # All compents are 3D printable but glue is needed to secure the purge main to the bottle collector and a container with standard bottle thread is need to collect clean water. | ||
## | # The file used for the bottle neck threads and funnel were designed by laird can be found here [http://www.thingiverse.com/thing:157541] | ||
## | ## Image of Parts [[image:Water Bottle Filler parts.jpg|100px|right]] | ||
##Water Collector Purge scad[[Water collector purge.scad]] | |||
##Water Collector Purge stl[[Water Collector Purge .stl]] | |||
## Water Purge Pipe SCAD[[File:Purge pipe.scad]] | |||
## Water Purge Pipe STL [[File:Purge pipe.stl]] | |||
## ScrewBall Desigend by JamieLaing and must be scaled to .55. link to source [http://www.thingiverse.com/thing:61205] | |||
## Water collector filler.scad [[File:Water collector filler.scad]] | |||
##Water collector filler.stl [[File:Water collector filler.stl]] | |||
## Water collector funnel.scad [[File:Water collector funnel.scad]] | |||
## Water collector funnel.stl [[File:Water collector funnel.stl]] | |||
== Tools needed for fabrication of the OSAT== | == Tools needed for fabrication of the OSAT== | ||
# [[Delta_Build_Overview:MOST| MOST Delta RepRap]] or similar RepRap 3-D printer | # [[Delta_Build_Overview:MOST| MOST Delta RepRap]] or similar RepRap 3-D printer | ||
# | # Liquid glue ex: Super Glue or 5 Min Epoxy | ||
== Skills and Knowledge Necessary to Make the OSAT == | == Skills and Knowledge Necessary to Make the OSAT == | ||
* | * Basic 3D printer knowledge | ||
== Technical Specifications and Assembly Instructions== | == Technical Specifications and Assembly Instructions== | ||
# | To construct the rain water collector | ||
## Print out the following parts using supports | |||
# | * Water Collector Purge [[Water Collector Purge .stl]] | ||
# | * Water Purge Pipe [[File:Purge pipe.stl]] | ||
# | * Water collector filler [[File:Water collector filler.stl]] | ||
* Water collector funnel [[File:Water collector funnel.stl]] | |||
## Then you have to scale the ScrewBall by .55 in your slicer ex. Cura | |||
* ScrewBall [[File:Screwball 7.stl]] Source [http://www.thingiverse.com/thing:61205] | |||
## Insert the Water Collector Purge Part into the Water Collector Filler with a bead of liquid glue on the connector | |||
## Screw the ball together | |||
## Optional: Add a bead of glue around ball seam to insure ball is water tight | |||
## Place the ball inside the purge pipe | |||
## Place the purge pipe over the open pipe on the Water Collector Purge part | |||
## Insert the Water Collector Funnel in the open hole on the Water Collector Purge part | |||
## Screw Water bottle into the final pipe on the Water Collector Filler | |||
# 15 Hrs | |||
# Under 5 mins | |||
== Cost savings== | == Cost savings== | ||
| Line 122: | Line 131: | ||
# Calculate $ savings and % savings | # Calculate $ savings and % savings | ||
== | == Components == | ||
##Water Collector Purge scad[[Water collector purge.scad]] | |||
##Water Collector Purge stl[[Water Collector Purge .stl]] | |||
## Water Purge Pipe SCAD[[File:Purge pipe.scad]] | |||
## Water Purge Pipe STL [[File:Purge pipe.stl]] | |||
## ScrewBall Desigend by JamieLaing and must be scaled to .55. link to source [http://www.thingiverse.com/thing:61205] | |||
## Water collector filler.scad [[File:Water collector filler.scad]] | |||
##Water collector filler.stl [[File:Water collector filler.stl]] | |||
## Water collector funnel.scad [[File:Water collector funnel.scad]] | |||
## Water collector funnel.stl [[File:Water collector funnel.stl]] | |||
## Image of Parts [[image:Water Bottle Filler parts.jpg|100px|right]] | |||
[[Category:How tos]] | |||
[[Category:Water]] | |||
</nowiki> | </nowiki> | ||
Revision as of 15:58, 4 December 2014
Assignment
- Identify an OSAT that you would like to design to be a 3D printable technology
- Make sure someone else has not already done it : existing designs here.
- Reserve your OSAT by signature tagging with ~~~~ next to the OSAT on the list generated by the Appropedia community: Requests for 3-D printable open source appropriate technology. You can add your own ideas to the list, more than one of you can tackle the same tech in a different way, you may improve upon existing designs if you do so in a significant way. Do this by 11/18
- Design 3D printable components with ONLY OS CAD packages (e.g. OpenSCAD, FreeCAD, or Blender)
- Create a Appropedia page for your project. (Easiest way to create a page is to search for the name of it and then click on the red link or in the list put double square brackets around it)
- Include the following sections on your page using the template below (copy and paste wiki markup into your page)
- Add picture and link to your project page in gallery below.
- Print component and bring to class - Complete and due by 12/4
Grading
- 20% Print quality
- 30% Documentation
- 25% Design (design for printing, plastic minimization)
- 25% Function - Is it OSAT? Does it work?
Automatic reductions: -50% no source or the use of non-OS software -10% per day for late
Gallery
Add your image and link the gallery below in a single line after the last one in the list


.jpg)


![black mamba bicycle pedal[[1]]](/File:Pedal4r.JPG)


![[Field Dressing Tool]](/File:Tool_Cutting.JPG)


.JPG)


![[2]](/File:DoorHinge.jpg)


![[[3]]](/File:Rain_water_collector.jpg)
![[Seed Drill Punch]](/File:SeedDrillPoke.JPG)
![[Bike Hub Pelton Turbine]](/File:Pelton_wheel_iso.png)


![[Wind Turbine Blade]](/File:Blade.jpg)


Rain Water Bottler
Project developed by [jfhicks]
Template:Status-prototype You can help Appropedia by contributing to the next step in this OSAT's status. Template:Boxbottom
Abstract
- This device collects rain water in a water bottle or any container that has standard bottle threads. It includes a purge container that collects the initial dirty rain water. The reason this water is dirty is due to the sediment that collects on a roof between rain cycles. Once the purge container is filled a ball floats to the top and closes of this container and the clean rain water is diverted into the water bottle.
- Picture of Rain Water Collector
Bill of Materials
- All compents are 3D printable but glue is needed to secure the purge main to the bottle collector and a container with standard bottle thread is need to collect clean water.
- The file used for the bottle neck threads and funnel were designed by laird can be found here [4]
- Image of Parts
- Water Collector Purge scadWater collector purge.scad
- Water Collector Purge stlWater Collector Purge .stl
- Water Purge Pipe SCADFile:Purge pipe.scad
- Water Purge Pipe STL File:Purge pipe.stl
- ScrewBall Desigend by JamieLaing and must be scaled to .55. link to source [5]
- Water collector filler.scad File:Water collector filler.scad
- Water collector filler.stl File:Water collector filler.stl
- Water collector funnel.scad File:Water collector funnel.scad
- Water collector funnel.stl File:Water collector funnel.stl
- Image of Parts

Tools needed for fabrication of the OSAT
- MOST Delta RepRap or similar RepRap 3-D printer
- Liquid glue ex: Super Glue or 5 Min Epoxy
Skills and Knowledge Necessary to Make the OSAT
- Basic 3D printer knowledge
Technical Specifications and Assembly Instructions
To construct the rain water collector
- Print out the following parts using supports
- Water Collector Purge Water Collector Purge .stl
- Water Purge Pipe File:Purge pipe.stl
- Water collector filler File:Water collector filler.stl
- Water collector funnel File:Water collector funnel.stl
- Then you have to scale the ScrewBall by .55 in your slicer ex. Cura
- ScrewBall File:Screwball 7.stl Source [6]
- Insert the Water Collector Purge Part into the Water Collector Filler with a bead of liquid glue on the connector
- Screw the ball together
- Optional: Add a bead of glue around ball seam to insure ball is water tight
- Place the ball inside the purge pipe
- Place the purge pipe over the open pipe on the Water Collector Purge part
- Insert the Water Collector Funnel in the open hole on the Water Collector Purge part
- Screw Water bottle into the final pipe on the Water Collector Filler
- 15 Hrs
- Under 5 mins
Cost savings
- If your solution is not a low cost one then it is not really appropriate.
- Estimate your costs
- Find a commercial equivalent
- Calculate $ savings and % savings
Components
- Water Collector Purge scadWater collector purge.scad
- Water Collector Purge stlWater Collector Purge .stl
- Water Purge Pipe SCADFile:Purge pipe.scad
- Water Purge Pipe STL File:Purge pipe.stl
- ScrewBall Desigend by JamieLaing and must be scaled to .55. link to source [7]
- Water collector filler.scad File:Water collector filler.scad
- Water collector filler.stl File:Water collector filler.stl
- Water collector funnel.scad File:Water collector funnel.scad
- Water collector funnel.stl File:Water collector funnel.stl
- Image of Parts
- Image of Parts
</nowiki>